| [トップ][目次][インデックス][ ? ] |
LilyPond — 記譜法リファレンス
|
このマニュアルは LilyPond バージョン 2.21.0 で提供されるすべての記譜法についての参照を提供します。このマニュアルは、読み手が 学習マニュアル で扱っている題材に慣れ親しんでいることを前提としています。 |
| 1. 音楽記譜法 | ほとんどすべての楽譜作成で使用される記譜法 | |
| 2. 専門的な記譜法 | 特別な目的でのみ使用される記譜法 | |
| 3. 入出力全般 | LilyPond 入力についての一般的な情報 | |
| 4. スペースの問題 | 出力の表示 | |
| 5. デフォルトを変更する | 出力の調整 | |
付録 | ||
|---|---|---|
| A. Notation manual tables | 表と図 | |
| B. カンニング ペーパー | LilyPond 構文についての要約 | |
| C. GNU Free Documentation License | このドキュメントの使用許諾書 | |
| D. LilyPond コマンド インデックス | ||
| E. LilyPond インデックス | ||
|
このマニュアルと他のドキュメントの関係について、あるいは、このマニュアルを他の形式で読む方法についての情報は、 マニュアル を参照してください。 マニュアルのいずれかを見失ってしまった場合、http://lilypond.org/ にマニュアルがすべて揃っています。 |
| [ << Top ] | [トップ][目次][インデックス][ ? ] | [ 専門的な記譜法 >> ] | ||
| [ < Top ] | [ 上へ : Top ] | [ ピッチ > ] | ||
1. 音楽記譜法
この章では音楽表記を作成する方法について説明します。
| 1.1 ピッチ | 音符のピッチを記述、表示する | |
| 1.2 リズム | 音符の演奏時間を記述、表示する | |
| 1.3 発想記号 | 音符に表現を付け加える | |
| 1.4 繰り返し | 音楽の繰り返し | |
| 1.5 同時進行する音符 | 同時に複数の音符を演奏する | |
| 1.6 譜の記譜法 | 譜を表示する | |
| 1.7 編集者の注釈 | 可読性を良くするための特別な表記 | |
| 1.8 テキスト | 楽譜にテキストを追加する |
| [ << 音楽記譜法 ] | [トップ][目次][インデックス][ ? ] | [ 専門的な記譜法 >> ] | ||
| [ < 音楽記譜法 ] | [ 上へ : 音楽記譜法 ] | [ ピッチを記述する > ] | ||
1.1 ピッチ
![[image of music]](67/lily-393eafe4.png)
このセクションでは音符のピッチを指定する方法について議論します。このプロセスには 3 つのステップがあります: 入力、変更、出力です。
| 1.1.1 ピッチを記述する | ||
| 1.1.2 複数のピッチを変更する | ||
| 1.1.3 ピッチを表示する | ||
| 1.1.4 符頭 |
| [ << 音楽記譜法 ] | [トップ][目次][インデックス][ ? ] | [ 専門的な記譜法 >> ] | ||
| [ < ピッチ ] | [ 上へ : ピッチ ] | [ 絶対オクターブ入力 > ] | ||
1.1.1 ピッチを記述する
このセクションではピッチを入力する方法について議論します。音符をオクターブの中に置くには 2 つの方法があります: 絶対モードと相対モードです。たいていの場合、相対モードの方が便利です。
| 絶対オクターブ入力 | ||
| 相対オクターブ入力 | ||
| 臨時記号 | ||
| 他の言語での音符名 |
| [ << 音楽記譜法 ] | [トップ][目次][インデックス][ ? ] | [ 専門的な記譜法 >> ] | ||
| [ < ピッチを記述する ] | [ 上へ : ピッチを記述する ] | [ 相対オクターブ入力 > ] | ||
絶対オクターブ入力
ピッチ名は a から g までの小文字を使って指定されます。c から b までの音符名はミドル C の下のオクターブに譜刻されます。
{
  \clef bass
  c4 d e f
  g4 a b c
  d4 e f g
}
![[image of music]](23/lily-2097557c.png)
他のオクターブはシングル クォート (') またはカンマ (,) 文字で指定されます。各 ' はピッチを 1 オクターブ上げます。一方、各 , はピッチを 1 オクターブ下げます。
{
  \clef treble
  c'4 c'' e' g
  d''4 d' d c
  \clef bass
  c,4 c,, e, g
  d,,4 d, d c
}
![[image of music]](13/lily-a823f452.png)
参照
音楽用語集: Pitch names
コード断片集: ピッチ
| [ << 音楽記譜法 ] | [トップ][目次][インデックス][ ? ] | [ 専門的な記譜法 >> ] | ||
| [ < 絶対オクターブ入力 ] | [ 上へ : ピッチを記述する ] | [ 臨時記号 > ] | ||
相対オクターブ入力
絶対オクターブ入力は、一つ一つの音符のオクターブを指定する必要があります。相対オクターブ入力は、対照的に、すぐ前の音符との関係で各オクターブを指定します。1 つの音符のオクターブを変更すると、続く音符のすべてに影響します。
相対音符モードは \relative コマンドを使って明示的に入力する必要があります。
\relative startpitch musicexpr
相対モードでは、各音符は可能な限り前の音符の近くに配置されます。このことは、musicexp の中にある各ピッチのオクターブが以下のように算出されるということを意味します:
- 音符に対してオクターブ変更記号が使用されていない場合、その音符のオクターブは前の音符との音程が 5 度よりも小さくなるよう算出されます。この音程は臨時記号を考慮せずに決定されます。
-
オクターブ変更記号
'や,を付け加えることによって、オクターブ記号無しの場合のピッチから、ピッチを 1 オクターブ上げ下げすることができます。 -
複数のオクターブ変更記号を使用することができます。例えば、
''と,,はピッチを 2 オクターブ変えます。 -
最初の音符のピッチは
startpitchと相対関係で決定されます。startpitch は絶対オクターブ モードで指定されます。どの選択肢がわかりやすですか?-
cのオクターブ c'でミドル C を指定することは極めて基本的なため、cのオクターブは、どちらかといえば素直です。あなたの音楽がc'''より高いgisで始まる場合、\relative c''' { gis' … }のように書くことができます。- 内部の最初の音符のオクターブ
\relative gis''' { gis … }と書くことで、内部の最初の音符の絶対ピッチを簡単に決めることができます。- 明示的な開始ピッチ無し
\relative { gis''' … }の形式は前の選択肢のコンパクト版として機能します。内部の最初の音符は絶対ピッチで書かれます。(これは基準ピッチとしてfを選択したのと同じです。)
このドキュメントは通常、最後の選択肢を使用します。
-
ここで、実際に相対モードの例を挙げます:
\relative {
  \clef bass
  c d e f
  g a b c
  d e f g
}
![[image of music]](ad/lily-6df743ce.png)
オクターブ変更記号は 4 度よりも大きな音程に対して使用されます:
\relative {
  c'' g c f,
  c' a, e'' c
}
![[image of music]](db/lily-95816f63.png)
音符の連なりはオクターブ変更記号が無い場合であっても大きな音程に広がる可能性があります:
\relative {
  c f b e
  a d g c
}
![[image of music]](3f/lily-fcba650d.png)
\relative ブロックがネストされている場合、最も内側の \relative ブロックが、外側の \relative
とは独立した自身の参照ピッチで開始します。
\relative {
  c' d e f
  \relative {
    c'' d e f
  }
}
![[image of music]](1e/lily-8daea53f.png)
\relative は \chordmode ブロックでは効果を持ちません。
\new Staff {
  \relative c''' {
    \chordmode { c1 }
  }
  \chordmode { c1 }
}
![[image of music]](e8/lily-aba3e855.png)
\relative を \chordmode ブロックの中で使用することは認められません。
\transpose ブロックの中では、\relative を記述しない限り、絶対モードになります。
\relative {
  d' e
  \transpose f g {
    d e
    \relative {
      d' e
    }
  }
}
![[image of music]](67/lily-f9c8f5e4.png)
前の要素が和音である場合、その和音の最初の音符が後に続く音符または和音の参照ポイントとして使用されます。和音の内部では、次の音符は常に 1 つ前の音符との相対関係になります。次の例を、c の音符に気を付けて、注意深く検証してください。
\relative {
  c'
  <c e g>
  <c' e g'>
  <c, e, g''>
}
![[image of music]](a0/lily-d4e04773.png)
上で説明したように、ピッチのオクターブは音符名のみを使って算出され、いかなる変更にも影響を受けません。そのため、B の後の E ダブル シャープは B よりも上に配置され、B の後の F ダブル フラットは B よりも下に配置されます。言い換えると、重増 4 度は重減 5 度よりも小さい – それぞれの音程に含まれる半音の数に関係無く – と見なされます。
\relative {
  c''2 fis
  c2 ges
  b2 eisis
  b2 feses
}
![[image of music]](2e/lily-2830a229.png)
参照
音楽用語集: fifth, interval, Pitch names
記譜法リファレンス: オクターブ チェック
コード断片集: ピッチ
内部リファレンス: RelativeOctaveMusic
| [ << 音楽記譜法 ] | [トップ][目次][インデックス][ ? ] | [ 専門的な記譜法 >> ] | ||
| [ < 相対オクターブ入力 ] | [ 上へ : ピッチを記述する ] | [ 他の言語での音符名 > ] | ||
臨時記号
Note: LilyPond を始めたばかりのユーザはしばしば臨時記号と調号のことで混乱します。LilyPond では、音符名は未加工の入力です
– 調号と音部記号がこの未加工の入力をどのように表示するかを決定します。c のような変更を加えられていない音符は、調号や音部記号とは無関係に、‘C ナチュラル’ を意味します。更なる情報は、
Accidentals and key signatures を参照してください。
シャープのピッチは音符名に is を付け加えることによって作られ、フラットのピッチは es を付け加えることによって作られます。予想しているかもしれませんが、ダブル シャープやダブル フラットは isis または eses を付け加えることによって作られます。この構文はオランダ語の音符命名規約から派生しました。臨時記号に他の名前を使うには、他の言語での音符名 を参照してください。
\relative c'' { ais1 aes aisis aeses }
![[image of music]](41/lily-3c66d4da.png)
ナチュラルは臨時記号や調号の効果をキャンセルします。しかしながら、ナチュラルは接尾辞として音符名構文にエンコードされてはいません。そのため、ナチュラルのピッチは単に音符名で入力されます:
\relative c'' { a4 aes a2 }
![[image of music]](83/lily-1fc18563.png)
4 分音が付け加えられるかもしれません。以下の一連の C は左から順にピッチが増えていっています:
\relative c'' { ceseh1 ces ceh c cih cis cisih }
![[image of music]](b9/lily-ec2a4237.png)
通常、臨時記号は自動的に譜刻されますが、手動で譜刻する場合もあるかもしれません。親切の臨時記号はピッチの後にエクスクラメーション記号 ! を付け加えることによって譜刻することができます。忠告の臨時記号 (つまり、括弧で囲まれた臨時記号) はピッチの後にクエスチョン記号 ? を付け加えることによって譜刻することができます。これら追加の臨時記号を使ってナチュラル記号を作り出すこともできます。
\relative c'' { cis cis cis! cis? c c c! c? }
![[image of music]](61/lily-073b0c10.png)
タイで結ばれた音符に付ける臨時記号は新しいシステム (訳者: 譜 1 行分のこと) の開始点でのみ譜刻されます:
\relative c'' {
  cis1~ 1~
  \break
  cis
}
![[image of music]](cc/lily-86643841.png)
Selected Snippets
Hiding accidentals on tied notes at the start of a new system
This shows how to hide accidentals on tied notes at the start of a new system.
\relative c'' {
  \override Accidental.hide-tied-accidental-after-break = ##t
  cis1~ cis~
  \break
  cis
}
![[image of music]](70/lily-d2e38743.png)
Preventing extra naturals from being automatically added
In accordance with traditional typesetting rules, a natural sign is
printed before a sharp or flat if a previous double sharp or flat on
the same note is canceled. To change this behavior to contemporary
practice, set the extraNatural property to f in the
Staff context.
\relative c'' {
  aeses4 aes ais a
  \set Staff.extraNatural = ##f
  aeses4 aes ais a
}
![[image of music]](4d/lily-2b2fe24e.png)
参照
音楽用語集: sharp, flat, double sharp, double flat, Pitch names, quarter tone
学習マニュアル: Accidentals and key signatures
記譜法リファレンス: 自動臨時記号, Annotational accidentals (musica ficta), 他の言語での音符名
コード断片集: ピッチ.
内部リファレンス: Accidental_engraver, Accidental, AccidentalCautionary, accidental-interface
既知の問題と警告
4 分音臨時記号の表記の仕方で広く認められた標準はないため、LilyPond の記号はいかなる標準にも準拠しません。
| [ << 音楽記譜法 ] | [トップ][目次][インデックス][ ? ] | [ 専門的な記譜法 >> ] | ||
| [ < 臨時記号 ] | [ 上へ : ピッチを記述する ] | [ 複数のピッチを変更する > ] | ||
他の言語での音符名
他のさまざまな言語での音符名と臨時記号名のセットが定義されています。通常、音符名の言語の選択はファイルの先頭で行います。 以下の例はイタリア語の音符名を使用します:
\language "italiano"

\relative {
  do' re mi sib
}
![[image of music]](bd/lily-3c6dac38.png)
利用可能な言語ファイルとそれらが定義している音符名を挙げます:
言語
音符名
nederlandsc d e f g a bes b
catalando re mi fa sol la sib si
deutschc d e f g a b h
englishc d e f g a bf b
espanolまたはespañoldo re mi fa sol la sib si
italianoまたはfrançaisdo re mi fa sol la sib si
norskc d e f g a b h
portuguesdo re mi fa sol la sib si
suomic d e f g a b h
svenskac d e f g a b h
vlaamsdo re mi fa sol la sib si
音符名に加えて、臨時記号の接尾辞も言語によって異なる場合があります:
言語
シャープ
フラット
ダブル シャープ
ダブル フラット
nederlands-is
-es
-isis
-eses
catalan-d/-s
-b
-dd/-ss
-bb
deutsch-is
-es
-isis
-eses
english-s/-sharp
-f/-flat
-ss/-x/-sharpsharp
-ff/-flatflat
espanolまたはespañol-s
-b
-ss/-x
-bb
italianoまたはfrançais-d
-b
-dd
-bb
norsk-iss/-is
-ess/-es
-ississ/-isis
-essess/-eses
portugues-s
-b
-ss
-bb
suomi-is
-es
-isis
-eses
svenska-iss
-ess
-ississ
-essess
vlaams-k
-b
-kk
-bb
オランダ語では、aes は縮めて as となりますが、LilyPond ではどちらの形式も認められます。同様に、es と ees の両方が認められます。これはさらに、aeses / ases と
eeses / eses にも適用されます。他の言語ファイルでは短縮名だけが定義されている場合があります。
\relative c'' { a2 as e es a ases e eses }
![[image of music]](6f/lily-a43dee24.png)
音楽の中には ‘通常の’ シャープやフラットの音の変化をさらに細かく分けた微分音を使用するものがあります。さまざまな言語 (ファイル) での 4 分音 (訳者: シャープやフラットの半分の音の変化。4 分音符ではありません) の音符名を以下の表で挙げます。接頭辞 半- と 1.5- はそれぞれ ‘半分’ と ‘1 つ半’ を意味します。表に無い言語では、まだ微分音の名前は定義されていません。
元号
半-シャープ
半-フラット
1.5-シャープ
1.5-フラット
nederlands-ih
-eh
-isih
-eseh
deutsch-ih
-eh
-isih
-eseh
english-qs
-qf
-tqs
-tqf
espanolまたはespañol-cs
-cb
-tcs
-tcb
italianoまたはfrançais-sd
-sb
-dsd
-bsb
portugues-sqt
-bqt
-stqt
-btqt
ここに示されている大半の言語は西洋クラシック音楽 – Common Practice Period: 西暦1600年から1900年頃のバロック音楽、クラシック音楽、ロマン派音楽とも言えます – に関係があります。しかしながら、他のピッチやチューニング方法もサポートされています: 非西洋音楽の一般的な記譜法 を参照してください。
参照
音楽用語集: Pitch names, Common Practice Period.
記譜法リファレンス: 非西洋音楽の一般的な記譜法
あらかじめイストールされているファイル: ‘scm/define-note-names.scm’
コード断片集: ピッチ
| [ << 音楽記譜法 ] | [トップ][目次][インデックス][ ? ] | [ 専門的な記譜法 >> ] | ||
| [ < 他の言語での音符名 ] | [ 上へ : ピッチ ] | [ オクターブ チェック > ] | ||
1.1.2 複数のピッチを変更する
このセクションではピッチを変更する方法について議論します。
| オクターブ チェック | ||
| 移調 | ||
| 反転 | ||
| 逆行 | ||
| 様式的な変形 |
| [ << 音楽記譜法 ] | [トップ][目次][インデックス][ ? ] | [ 専門的な記譜法 >> ] | ||
| [ < 複数のピッチを変更する ] | [ 上へ : 複数のピッチを変更する ] | [ 移調 > ] | ||
オクターブ チェック
相対モードでは、オクターブ変更記号を付け忘れることが容易に起こり得ます。オクターブ チェックは、予期しないオクターブの音符を見つけた場合に警告を表示してオクターブを修正することによって、そのようなエラーを見つけ出すことをより容易にします。
音符のオクターブをチェックするには、= の後に絶対オクターブを指定します。以下の例は、2 番目の音符の絶対オクターブがオクターブ チェックによって示される d' ではなく d'' であるため、警告を発し (そしてピッチを変更し) ます。
\relative {
  c''2 d='4 d
  e2 f
}
![[image of music]](1d/lily-f91db5b8.png)
音符のオクターブは
\octaveCheck controlpitch コマンドでもチェックすることができます。controlpitch は絶対モードで指定されます。これは前の音符と controlpitch との間の音程が
4 度以内であるかどうかをチェックします
(つまり、通常の相対モードでの算出方法と同じです)。このチェックが失敗した場合、警告が表示されますが、このチェックの前にある音符は変更されません。その後に続く音符は controlpitch から算出されます。
\relative {
  c''2 d
  \octaveCheck c'
  e2 f
}
![[image of music]](ac/lily-c652645a.png)
以下の 2 小節を見てください。1 番目と 3 番目の \octaveCheck は失敗していますが、2 番目のチェックは失敗していません。
\relative {
  c''4 f g f

  c4
  \octaveCheck c'
  f
  \octaveCheck c'
  g
  \octaveCheck c'
  f
}
![[image of music]](fb/lily-d5ecfb27.png)
参照
コード断片集: ピッチ
内部リファレンス: RelativeOctaveCheck.
| [ << 音楽記譜法 ] | [トップ][目次][インデックス][ ? ] | [ 専門的な記譜法 >> ] | ||
| [ < オクターブ チェック ] | [ 上へ : 複数のピッチを変更する ] | [ 反転 > ] | ||
移調
音楽表記は \transpose で移調させることができます。構文は以下の通りです:
\transpose frompitch topitch musicexpr
これは musicexpr が frompitch から
topitch に移調されるということを意味します:
frompitch のピッチの音符はすべて topitch
に変更され、他の音符もすべて同じ音程で移調されます。frompitch と topitch のピッチはどちらも絶対モードで指定されます。
Note: \transpose ブロックの中にある音符は、そのブロックの中に \relative が無い限り、絶対モードになります。
D-メジャーの調で書かれた楽曲を思い浮かべてください。この楽曲を E-メジャーに移調することができます。調号も自動的に移調されることに注意してください。
\transpose d e {
  \relative {
    \key d \major
    d'4 fis a d
  }
}
![[image of music]](f3/lily-9b67e663.png)
C (通常の コンサート ピッチ) で書かれたパートを A のクラリネットで演奏する (そのため、A は C として表記され、演奏は表記されたものよりも 3 度低くなります) 場合、そのパート譜は以下のように作り出されます:
\transpose a c' {
  \relative {
    \key c \major
    c'4 d e g
  }
}
![[image of music]](24/lily-4d79f0e5.png)
\key c \major を明示的に指定しているということに注意してください。調号を指定しなかった場合、音符は移調されますが、調号は譜刻されません。
\transpose は同音異名のピッチを区別します:
\transpose c cis と \transpose c des はどちらも半音上に移調します。1 番目の移調はシャープを譜刻し、音符の五線譜上での位置は変わりません。2 番目の移調はフラットを譜刻し、音符の五線譜上での位置は上に上がります。
music = \relative { c' d e f }
\new Staff {
  \transpose c cis { \music }
  \transpose c des { \music }
}
![[image of music]](96/lily-6f303e05.png)
\transpose は上記とは異なる方法で用いることもでき、それによって移調楽器のために書かれた音符を入力することができます。前の例では C (またはコンサート ピッチ) でピッチを入力して、それらを移調楽器のために譜刻する方法を示しましたが、それとは正反対のことも可能です
– 例えば、移調楽器のパート譜から指揮譜を譜刻することです。例えば、E で始まる B-フラットのトランペットの音楽
(コンサート ピッチでは D で始まる音楽) を入力している場合に、指揮譜を作り出すには以下のように記述します:
musicInBflat = { e4 … }
\transpose c bes, \musicInBflat
この音楽を F で譜刻する (例えば、フレンチ ホルンの楽譜にアレンジし直すために)
には、既存の音楽をもう 1 つの \transpose で包み込みます:
musicInBflat = { e4 … }
\transpose f c' { \transpose c bes, \musicInBflat }
移調楽器についての更なる情報は、楽器の移調 を参照してください。
Selected Snippets
Transposing pitches with minimum accidentals ("Smart" transpose)
This example uses some Scheme code to enforce enharmonic modifications for notes in order to have the minimum number of accidentals. In this case, the following rules apply:
Double accidentals should be removed
B sharp -> C
E sharp -> F
C flat -> B
F flat -> E
In this manner, the most natural enharmonic notes are chosen.
#(define (naturalize-pitch p)
   (let ((o (ly:pitch-octave p))
         (a (* 4 (ly:pitch-alteration p)))
         ;; alteration, a, in quarter tone steps,
         ;; for historical reasons
         (n (ly:pitch-notename p)))
     (cond
      ((and (> a 1) (or (eqv? n 6) (eqv? n 2)))
       (set! a (- a 2))
       (set! n (+ n 1)))
      ((and (< a -1) (or (eqv? n 0) (eqv? n 3)))
       (set! a (+ a 2))
       (set! n (- n 1))))
     (cond
      ((> a 2) (set! a (- a 4)) (set! n (+ n 1)))
      ((< a -2) (set! a (+ a 4)) (set! n (- n 1))))
     (if (< n 0) (begin (set! o (- o 1)) (set! n (+ n 7))))
     (if (> n 6) (begin (set! o (+ o 1)) (set! n (- n 7))))
     (ly:make-pitch o n (/ a 4))))

#(define (naturalize music)
   (let ((es (ly:music-property music 'elements))
         (e (ly:music-property music 'element))
         (p (ly:music-property music 'pitch)))
     (if (pair? es)
         (ly:music-set-property!
          music 'elements
          (map naturalize es)))
     (if (ly:music? e)
         (ly:music-set-property!
          music 'element
          (naturalize e)))
     (if (ly:pitch? p)
         (begin
           (set! p (naturalize-pitch p))
           (ly:music-set-property! music 'pitch p)))
     music))

naturalizeMusic =
#(define-music-function (m)
   (ly:music?)
   (naturalize m))

music = \relative c' { c4 d e g }

\score {
  \new Staff {
    \transpose c ais { \music }
    \naturalizeMusic \transpose c ais { \music }
    \transpose c deses { \music }
    \naturalizeMusic \transpose c deses { \music }
  }
  \layout { }
}
![[image of music]](d0/lily-1253424f.png)
参照
記譜法リファレンス: 楽器の移調, 反転, 様式的な変形, 相対オクターブ入力, 逆行
コード断片集: ピッチ
内部リファレンス: TransposedMusic
既知の問題と警告
相対変換コマンドはその引数の中にある \transpose, \chordmode,
あるいは \relative セクションには影響を及ぼしません。移調された音楽の中で相対モードを使用するには、\transpose の中に \relative を置く必要があります。
\transpose を使用している場合、3 重の臨時記号は表示されません。代わりに ‘異名等価の’ ピッチが表示されます
(例えば e の 3 重フラットの代わりに d フラットが表示されます)。
| [ << 音楽記譜法 ] | [トップ][目次][インデックス][ ? ] | [ 専門的な記譜法 >> ] | ||
| [ < 移調 ] | [ 上へ : 複数のピッチを変更する ] | [ 逆行 > ] | ||
反転
単一の操作で音楽表記を反転して、移調することができます:
\inversion around-pitch to-pitch musicexpr
The musicexpr の音程は around-pitch を中心に反転され、さらに around-pitch が to-pitch にマッピングされるように移調されます。
music = \relative { c' d e f }
\new Staff {
  \music
  \inversion d' d' \music
  \inversion d' ees' \music
}
![[image of music]](3d/lily-d870f452.png)
Note: 反転されるモチーフは絶対オクターブ形式で記述するか、最初に絶対オクターブ形式に変換されるよう relative ブロックで囲む必要があります。
参照
| [ << 音楽記譜法 ] | [トップ][目次][インデックス][ ? ] | [ 専門的な記譜法 >> ] | ||
| [ < 反転 ] | [ 上へ : 複数のピッチを変更する ] | [ 様式的な変形 > ] | ||
逆行
音楽表記を後ろから前に演奏する逆行を作り出すことができます:
music = \relative { c'8. ees16( fis8. a16 b8.) gis16 f8. d16 }

\new Staff {
  \music
  \retrograde \music
}
![[image of music]](ff/lily-cbc816b4.png)
既知の問題と警告
\retrograde の中にある手動のタイは壊れて警告を発します。自動音符分割 を有効にすることによって自動的に生成させられるタイもあります。
参照
| [ << 音楽記譜法 ] | [トップ][目次][インデックス][ ? ] | [ 専門的な記譜法 >> ] | ||
| [ < 逆行 ] | [ 上へ : 複数のピッチを変更する ] | [ ピッチを表示する > ] | ||
様式的な変形
音階に基づく作曲では、モチーフはさまざまなやり方で頻繁に移調されます。これは、モチーフの開始の音程を変えるために 移調 する場合や、旋回点で 反転 する場合があります。 逆行 するために後戻りする場合もあります– 逆行 を参照してください。
Note: 与えられた音階の中に無い音符は、移調されません。
様式的な移調
以下により、与えられた音階でモチーフを移調させることができます:
\modalTranspose from-pitch to-pitch scale motif
motif の音符は scale 内を to-pitch と from-pitch 間の音程の度数の分だけシフトされます:
diatonicScale = \relative { c' d e f g a b }
motif = \relative { c'8 d e f g a b c }

\new Staff {
  \motif
  \modalTranspose c f \diatonicScale \motif
  \modalTranspose c b, \diatonicScale \motif
}
![[image of music]](8f/lily-c1504a88.png)
上昇する音階の長さは任意であり、指定する音程も任意です:
pentatonicScale = \relative { ges aes bes des ees }
motif = \relative { ees'8 des ges,4 <ges' bes,> <ges bes,> }

\new Staff {
  \motif
  \modalTranspose ges ees' \pentatonicScale \motif
}
![[image of music]](e0/lily-4ed4d821.png)
半音階の音階を持つ \modalTranspose を使った時の効果は
\transpose と同じですが、使われる音符の名前を特定することが
できます:
chromaticScale = \relative { c' cis d dis e f fis g gis a ais b }
motif = \relative { c'8 d e f g a b c }

\new Staff {
  \motif
  \transpose c f \motif
  \modalTranspose c f \chromaticScale \motif
}
![[image of music]](60/lily-f5badaeb.png)
様式的な反転
モチーフを与えられた音階に従って与えられた旋回点 (音符) で反転させて、 移調させることを 1 つの操作でできます:
\modalInversion around-pitch to-pitch scale motif
motif の音符は scale 内を to-pitch と from-pitch 間の音程の度数の分だけシフトされます:
motif の音符は scale 内を around-pitch から元の音符までと同じ度数の分だけ逆向きに進んだ位置に配置され、それからその結果は scale 内を to-pitch と around-pitch 間の音程の度数分だけシフトされます。
そのため、単純に音階をある音符で反転させる場合は、around-pitch と to-pitch で同じ値を使用します:
octatonicScale = \relative { ees' f fis gis a b c d }
motif = \relative { c'8. ees16 fis8. a16 b8. gis16 f8. d16 }

\new Staff {
  \motif
  \modalInversion fis' fis' \octatonicScale \motif
}
![[image of music]](3e/lily-de5e5edc.png)
音階の中にある 2 つの音符の中間にある旋回点で反転させるには、2 つの音符の 1 つを旋回点として反転させて、音階の 1 度数分だけ移調させます。指定された 2 つの音符が旋回点を囲んでいると解釈することができます:
scale = \relative { c' g' }
motive = \relative { c' c g' c, }

\new Staff {
  \motive
  \modalInversion c' g' \scale \motive
}
![[image of music]](bc/lily-56dda385.png)
反転と逆行の操作を組み合わせると逆行-反転になります:
octatonicScale = \relative { ees' f fis gis a b c d }
motif = \relative { c'8. ees16 fis8. a16 b8. gis16 f8. d16 }

\new Staff {
  \motif
  \retrograde \modalInversion c' c' \octatonicScale \motif
}
![[image of music]](19/lily-aed6137a.png)
参照
| [ << 音楽記譜法 ] | [トップ][目次][インデックス][ ? ] | [ 専門的な記譜法 >> ] | ||
| [ < 様式的な変形 ] | [ 上へ : ピッチ ] | [ 音部記号 > ] | ||
1.1.3 ピッチを表示する
このセクションではピッチの出力を変更する方法について議論します。
| 音部記号 | ||
| 調号 | ||
| オッターバ囲み | ||
| 楽器の移調 | ||
| 自動臨時記号 | ||
| 音域 |
| [ << 音楽記譜法 ] | [トップ][目次][インデックス][ ? ] | [ 専門的な記譜法 >> ] | ||
| [ < ピッチを表示する ] | [ 上へ : ピッチを表示する ] | [ 調号 > ] | ||
音部記号
音部記号を変えることができます。以下のそれぞれの例の中にある音符はすべてミドル C です。例の中にある音部名をダブル クォートで囲むことができます (必須ではありません)。
\clef treble
c'2 c'
\clef alto
c'2 c'
\clef tenor
c'2 c'
\clef bass
c'2 c'
![[image of music]](8c/lily-094a99cf.png)
他の音部記号もあります:
\clef french
c'2 c'
\clef soprano
c'2 c'
\clef mezzosoprano
c'2 c'
\clef baritone
c'2 c'

\break

\clef varbaritone
c'2 c'
\clef subbass
c'2 c'
\clef percussion
c'2 c'

\break

\clef G   % treble と同義です
c'2 c'
\clef F   % bass と同義です
c'2 c'
\clef C   % alto と同義です
c'2 c'
![[image of music]](67/lily-d706f7af.png)
音部名に _8 または ^8 を付け加えることによって、音部はそれぞれ 1 オクターブ下/上に移調され、_15 または ^15 によって 2 オクターブ移調されます。音部名にアルファベット以外の文字が含まれる場合、音部名をダブル クォートで囲む必要があります。
\clef treble
c'2 c'
\clef "treble_8"
c'2 c'
\clef "bass^15"
c'2 c'
\clef "alto_2"
c'2 c'
\clef "G_8"
c'2 c'
\clef "F^5"
c'2 c'
![[image of music]](70/lily-8079425f.png)
数字の引数を括弧や角括弧で囲むことで、オプションのオクターブを表示させることができます:
\clef "treble_(8)"
c'2 c'
\clef "bass^[15]"
c'2 c'
![[image of music]](b5/lily-54828113.png)
ピッチは数字の引数が括弧で囲まれていない場合と同じです。
特殊な音部記号については Mensural clefs,
Gregorian clefs, デフォルトのタブ譜, それに
カスタム タブ譜 で説明します。楽譜の中で合図音符を使用するときに音部記号を変更する場合は、合図音符をフォーマットする の \cueClef 関数と
\cueDuringWithClef 関数を参照してください。
Selected Snippets
Tweaking clef properties
Changing the Clef glyph, its position, or the ottavation does not
change the position of subsequent notes on the staff. To get key
signatures on their correct staff lines middleCClefPosition must
also be specified, with positive or negative values moving middle
C up or down respectively, relative to the staff’s center line.
For example, \clef "treble_8" is equivalent to setting the
clefGlyph, clefPosition (the vertical position of the
clef itself on the staff), middleCPosition and
clefTransposition. Note that when any of these properties
(except middleCPosition) are changed a new clef symbol is
printed.
The following examples show the possibilities when setting these properties manually. On the first line, the manual changes preserve the standard relative positioning of clefs and notes, whereas on the second line, they do not.
{
  % The default treble clef
  \key f \major
  c'1
  % The standard bass clef
  \set Staff.clefGlyph = #"clefs.F"
  \set Staff.clefPosition = #2
  \set Staff.middleCPosition = #6
  \set Staff.middleCClefPosition = #6
  \key g \major
  c'1
  % The baritone clef
  \set Staff.clefGlyph = #"clefs.C"
  \set Staff.clefPosition = #4
  \set Staff.middleCPosition = #4
  \set Staff.middleCClefPosition = #4
  \key f \major
  c'1
  % The standard choral tenor clef
  \set Staff.clefGlyph = #"clefs.G"
  \set Staff.clefPosition = #-2
  \set Staff.clefTransposition = #-7
  \set Staff.middleCPosition = #1
  \set Staff.middleCClefPosition = #1
  \key f \major
  c'1
  % A non-standard clef
  \set Staff.clefPosition = #0
  \set Staff.clefTransposition = #0
  \set Staff.middleCPosition = #-4
  \set Staff.middleCClefPosition = #-4
  \key g \major
  c'1 \break

  % The following clef changes do not preserve
  % the normal relationship between notes, key signatures
  % and clefs:

  \set Staff.clefGlyph = #"clefs.F"
  \set Staff.clefPosition = #2
  c'1
  \set Staff.clefGlyph = #"clefs.G"
  c'1
  \set Staff.clefGlyph = #"clefs.C"
  c'1
  \set Staff.clefTransposition = #7
  c'1
  \set Staff.clefTransposition = #0
  \set Staff.clefPosition = #0
  c'1

  % Return to the normal clef:

  \set Staff.middleCPosition = #0
  c'1
}
![[image of music]](f2/lily-8a6b8f5b.png)
参照
記譜法リファレンス: Mensural clefs, Gregorian clefs, デフォルトのタブ譜, カスタム タブ譜, 合図音符をフォーマットする
コード断片集: ピッチ
内部リファレンス: Clef_engraver, Clef, ClefModifier, clef-interface
既知の問題と警告
音部記号に付けるオクターブ移動の数字は、個別のグラフィカル オブジェクトとして扱われます。このため、Clef に適用される \override は、別の \override で ClefModifier グラフィカル オブジェクトに適用する必要があります。
\new Staff \with {
  \override ClefModifier.color = #red
  \override Clef.color = #blue
}

\clef "treble_8" c'4
![[image of music]](66/lily-3f2bfcb1.png)
| [ << 音楽記譜法 ] | [トップ][目次][インデックス][ ? ] | [ 専門的な記譜法 >> ] | ||
| [ < 音部記号 ] | [ 上へ : ピッチを表示する ] | [ オッターバ囲み > ] | ||
調号
Note: LilyPond を始めたばかりのユーザはしばしば臨時記号と調号のことで混乱します。LilyPond では、音符名は未加工の入力です。調号と音部記号がこの未加工の入力をどのように表示するかを決定します。c のような変更を加えられていない音符は、調号や音部記号とは無関係に、‘C ナチュラル’ を意味します。更なる情報は、
Accidentals and key signatures を参照してください。
調号は楽曲を演奏すべき調性を示します。調号は譜の先頭で変更記号 (フラットやシャープ) のセットによって示されます。調号は変更されることがあります:
\key pitch mode
調号を pitch-メジャーや pitch-マイナーにするには、mode をそれぞれ \major または \minor にします。さらに標準のモード名
– チャーチ モード とも呼ばれます –
を使うこともできます:
\ionian, \dorian, \phrygian, \lydian,
\mixolydian, \aeolian それに \locrian です。
\relative {
  \key g \major
  fis''1
  f
  fis
}
![[image of music]](7d/lily-1162eb41.png)
新たにモードを定義することができます – モードが C で始まる場合、C で始まる音階の各ステップに対する変更記号をリスト アップします。
freygish = #`((0 . ,NATURAL) (1 . ,FLAT) (2 . ,NATURAL)
    (3 . ,NATURAL) (4 . ,NATURAL) (5 . ,FLAT) (6 . ,FLAT))

\relative {
  \key c\freygish c'4 des e f
  \bar "||" \key d\freygish d es fis g
}
![[image of music]](0d/lily-ec32de01.png)
KeySignature のプロパティ flat-positions と
sharp-positions を用いて、調号の臨時記号を通常とは異なるオクターブに表示させたり、複数のオクターブに表示させることができます。これらのプロパティに渡される値は、臨時記号を表示させる譜ポジションの範囲を指定します。1 つの値だけを渡した場合、その譜ポジションで終了するオクターブの範囲に臨時記号が配置されます。
\override Staff.KeySignature.flat-positions = #'((-5 . 5))
\override Staff.KeyCancellation.flat-positions = #'((-5 . 5))
\clef bass \key es \major es g bes d'
\clef treble \bar "||" \key es \major es' g' bes' d''

\override Staff.KeySignature.sharp-positions = #'(2)
\bar "||" \key b \major b' fis' b'2
![[image of music]](d9/lily-a55fdff9.png)
Selected Snippets
Preventing natural signs from being printed when the key signature changes
When the key signature changes, natural signs are automatically printed
to cancel any accidentals from previous key signatures. This may be
prevented by setting to f the printKeyCancellation
property in the Staff context.
\relative c' {
  \key d \major
  a4 b cis d
  \key g \minor
  a4 bes c d
  \set Staff.printKeyCancellation = ##f
  \key d \major
  a4 b cis d
  \key g \minor
  a4 bes c d
}
![[image of music]](df/lily-557c1796.png)
Non-traditional key signatures
The commonly used \key command sets the keyAlterations
property, in the Staff context.
To create non-standard key signatures, set this property directly. The format of this command is a list:
 \set Staff.keyAlterations = #`(((octave . step) . alter) ((octave
. step) . alter) ...)
where, for each element in the list,
octave specifies the octave (0 being the octave from middle C to
the B above), step specifies the note within the octave (0 means
C and 6 means B), and alter is ,SHARP ,FLAT ,DOUBLE-SHARP
etc. (Note the leading comma.)
Alternatively, for each item in the list, using the more concise format
(step . alter) specifies that the same alteration should hold in
all octaves.
For microtonal scales where a “sharp” is not 100 cents, alter
refers to the alteration as a proportion of a 200-cent whole tone.
Here is an example of a possible key signature for generating a whole-tone scale:
\relative {
  \set Staff.keyAlterations = #`((6 . ,FLAT)
                                 (5 . ,FLAT)
                                 (3 . ,SHARP))
  c'4 d e fis
  aes4 bes c2
}
![[image of music]](ce/lily-07c3e0db.png)
参照
音楽用語集: church mode, scordatura
学習マニュアル: Accidentals and key signatures
コード断片集: ピッチ
内部リファレンス: KeyChangeEvent, Key_engraver, Key_performer, KeyCancellation, KeySignature, key-signature-interface
| [ << 音楽記譜法 ] | [トップ][目次][インデックス][ ? ] | [ 専門的な記譜法 >> ] | ||
| [ < 調号 ] | [ 上へ : ピッチを表示する ] | [ 楽器の移調 > ] | ||
オッターバ囲み
オッターバ囲み は譜をオクターブ単位で移調します:
\relative a' {
  a2 b
  \ottava #-2
  a2 b
  \ottava #-1
  a2 b
  \ottava #0
  a2 b
  \ottava #1
  a2 b
  \ottava #2
  a2 b
}
![[image of music]](1d/lily-79a59437.png)
Selected Snippets
Ottava text
Internally, \ottava sets the properties ottavation (for
example, to 8va or 8vb) and middleCPosition. To
override the text of the bracket, set ottavation after invoking
\ottava.
{
  \ottava #1
  \set Staff.ottavation = #"8"
  c''1
  \ottava #0
  c'1
  \ottava #1
  \set Staff.ottavation = #"Text"
  c''1
}
![[image of music]](a4/lily-e1bfe8f6.png)
参照
音楽用語集: octavation
コード断片集: ピッチ
内部リファレンス: Ottava_spanner_engraver, OttavaBracket, ottava-bracket-interface
| [ << 音楽記譜法 ] | [トップ][目次][インデックス][ ? ] | [ 専門的な記譜法 >> ] | ||
| [ < オッターバ囲み ] | [ 上へ : ピッチを表示する ] | [ 自動臨時記号 > ] | ||
楽器の移調
楽器の移調を含む楽器を譜刻するとき、いくつかのパートはコンサート ピッチ とは異なるピッチで譜刻される可能性があります。このような場合、移調楽器 の調を指定すべきです。指定しなければ MIDI 出力や他のパートの出だしのピッチは誤ったものになります。引用についての更なる情報は 他のボイスを引用する を参照してください。
\transposition pitch
\transposition で使用するピッチは、譜に書かれた c' をその移調楽器で演奏したときに聴こえる実際の音に対応したものであるべきです。このピッチは絶対モードで入力します。ですから、楽譜よりも 1 度高い音を出す楽器は
\transposition d' を使うべきです。\transposition は、ピッチがコンサート ピッチでは ない ピッチで入力されている場合に のみ 使用すべきです。
バイオリンと B-フラットのクラリネットのための音符をいくつか挙げます。それぞれのパートは、それぞれが指揮譜に刻譜されるときに使用される音符と調を使って入力されています。2 つの楽器は斉奏で演奏しています。
\new GrandStaff <<
  \new Staff = "violin" {
    \relative c'' {
      \set Staff.instrumentName = #"Vln"
      \set Staff.midiInstrument = #"violin"
      % not strictly necessary, but a good reminder
      \transposition c'

      \key c \major
      g4( c8) r c r c4
    }
  }
  \new Staff = "clarinet" {
    \relative c'' {
      \set Staff.instrumentName = \markup { Cl (B\flat) }
      \set Staff.midiInstrument = #"clarinet"
      \transposition bes

      \key d \major
      a4( d8) r d r d4
    }
  }
>>
![[image of music]](ad/lily-00c437c4.png)
\transposition は楽曲の途中で変更されることもあります。例えば、クラリネット奏者は A のクラリネットから B-フラットのクラリネットに持ち替えることがあります。
\set Staff.instrumentName = #"Cl (A)"
\key a \major
\transposition a
c d e f
\textLengthOn
<>^\markup { Switch to B\flat clarinet }
R1

\key bes \major
\transposition bes
c2 g
![[image of music]](81/lily-bc238a9d.png)
参照
音楽用語集: concert pitch, transposing instrument
記譜法リファレンス: 他のボイスを引用する, 移調
コード断片集: ピッチ
| [ << 音楽記譜法 ] | [トップ][目次][インデックス][ ? ] | [ 専門的な記譜法 >> ] | ||
| [ < 楽器の移調 ] | [ 上へ : ピッチを表示する ] | [ 音域 > ] | ||
自動臨時記号
臨時記号の譜刻の仕方には多くの異なる規約があります。LilyPond はどの臨時記号スタイルを使用するのかを指定するための関数を提供します。この関数は以下のように呼び出されます:
\new Staff <<
  \accidentalStyle voice
  { … }
>>
指定された臨時記号スタイルは、デフォルトでは、カレントの Staff に適用されます
(スタイル piano と piano-cautionary は例外です。これらは以下で説明します)。オプションとして、この関数は 2 つ目の引数をとることができ、それによってスタイルを変更すべき範囲 (スコープ) を指定できます。例えば、カレントの StaffGroup のすべての譜で同じスタイルを使うには、以下のようにします:
\accidentalStyle StaffGroup.voice
サポートされる臨時記号スタイルを以下で示します。それぞれのスタイルを実際に示すために、以下の例を使用します:
musicA = {
  <<
    \relative {
      cis''8 fis, bes4 <a cis>8 f bis4 |
      cis2. <c, g'>4 |
    }
    \\
    \relative {
      ais'2 cis, |
      fis8 b a4 cis2 |
    }
  >>
}

musicB = {
  \clef bass
  \new Voice {
    \voiceTwo \relative {
      <fis a cis>8[ <fis a cis>
      \change Staff = up
      cis' cis
      \change Staff = down
      <fis, a> <fis a>]
      \showStaffSwitch
      \change Staff = up
      dis'4 |
      \change Staff = down
      <fis, a cis>4 gis <f a d>2 |
    }
  }
}

\new PianoStaff {
  <<
    \context Staff = "up" {
      \accidentalStyle default
      \musicA
    }
    \context Staff = "down" {
      \accidentalStyle default
      \musicB
    }
  >>
}
![[image of music]](56/lily-0c662f99.png)
両方の譜で同じ臨時記号スタイルを使うのなら、この例の最後のブロックを以下で置き換えられます:
\new PianoStaff {
  <<
    \context Staff = "up" {
      %%% 次の行を変更したいスタイルに合わせて変更してください:
      \accidentalStyle Score.default
      \musicA
    }
    \context Staff = "down" {
      \musicB
    }
  >>
}
-
default -
これはデフォルトの譜刻の仕方です。これは 18 世紀の一般的な習慣と一致します: 臨時記号が有効なのは、その臨時記号が発生した小節の終わりまでで、かつ、その臨時記号が発生したオクターブの中だけです。そのため以下の例の中では、第 2 小節の
bや最後のcの前にはナチュラル記号は譜刻されていません:
-
voice -
通常の臨時記号の付け方では、臨時記号は
Staffレベルで保持されます。しかしながらこのスタイルでは、臨時記号はそれぞれのボイスで別々に譜刻されます。それを除けば、このスタイルの規則はdefaultと同じです。結果として、あるボイスからの臨時記号は他のボイスでキャンセルされず、これはしばしば望まない結果となります: 以下の例では、2 番目の
aをナチュラルで演奏するか、シャープで演奏するかを決定するのは困難です。そのため、voiceオプションは、それぞれのボイスが別々の演奏者によって個々に読まれる場合にのみ使用すべきです。譜が 1 人の演奏者によって使用される場合 (例えば、指揮者やピアノ譜の場合)、このスタイルの代わりにmodernやmodern-cautionaryを使用すべきです。![[image of music]](1b/lily-82ee9f53.png)
-
modern -
この規則は 20 世紀の一般的な臨時記号の付け方と一致します: この規則はいくつかの余分なナチュラル記号を省略します – 伝統的にダブル シャープの後のシャープに前置されるナチュラル記号と、ダブル フラットの後のフラットに前置されるナチュラル記号を省略します。
modern規則の臨時記号の付け方はdefaultとほぼ同じですが、あいまいさを避けるための 2 つの規則が追加されます – 一時的な臨時記号が使われると、 その後の小節で (同じオクターブにある音符に対して) キャンセル記号が譜刻され、臨時記号が使われた小節では他のオクターブにある音符にもキャンセル記号が譜刻されます。そのため、上部譜の第 2 小節の中にあるbとcの前にはナチュラルが付けられています:![[image of music]](a5/lily-048ce4c0.png)
-
modern-cautionary -
この規則は
modernと似ていますが、忠告的臨時記号として ‘追加の’ 臨時記号が譜刻されます (これはdefaultでは譜刻されません)。デフォルトでは、この臨時記号は括弧で囲まれて譜刻されますが、AccidentalSuggestionのcautionary-styleプロパティを定義することによって小さなサイズで譜刻されることもあり得ます。![[image of music]](c6/lily-14c65bb8.png)
-
modern-voice -
この規則はマルチボイス臨時記号として使用されます。演奏家が複数のボイスの中の 1 つのボイスを演奏する場合にも、すべてのボイスを演奏する場合にも使用されます。臨時記号はそれぞれのボイスに対して譜刻されますが、同じ
Staffの中であってもボイスをまたいでキャンセルされます。そのため、最後の小節でaがキャンセルされています – なぜなら、前のキャンセルは異なるボイスで行われたからです。さらに下部譜ではdがキャンセルされています – その臨時記号は前の小節の異なるボイスで付けられたものだからです:![[image of music]](37/lily-083aab34.png)
-
modern-voice-cautionary -
この規則は
modern-voiceと同じですが、追加の臨時記号 (これはvoiceでは譜刻されません) は忠告として譜刻されます。たとえdefaultで譜刻されるすべての臨時記号がこの規則でも譜刻されたとしても、それらの臨時記号のいくつかは忠告として譜刻されます。![[image of music]](78/lily-79185513.png)
-
piano -
この規則は 20 世紀のピアノ譜の臨時記号のつけ方を反映しています。このスタイルは
modernスタイルと非常によく似ています。しかしながらこのスタイルでは、同じGrandStaffまたはPianoStaffの中にある譜をまたがって臨時記号はキャンセルされます。そのため、最後の和音ではすべての音符でキャンセルが行われています。この臨時記号スタイルは、デフォルトで、
GrandStaffやPianoStaffに適用されます。![[image of music]](fe/lily-1dc90642.png)
-
piano-cautionary -
この規則は
pianoと同じですが、追加の臨時記号は忠告として譜刻されます。![[image of music]](7f/lily-9b0cd6dc.png)
-
neo-modern -
この規則は現代音楽での一般的な臨時記号の付け方を再現します: 臨時記号は
modernと同じように譜刻されますが、同じ小節の中で臨時記号を付けられた音符と同じ音符が再び現れた場合、その音符にも臨時記号が譜刻されます – ただし、臨時記号を付けられた音符の直後に同じ音符が現れる場合は除きます (訳者: 第 1 小節の下部譜にある 2 つのfには両方とも臨時記号が譜刻されていますが、第 1 小節の上部譜にある 2 つのミドル C は連続しているため、後のミドル C には臨時記号が譜刻されません)。![[image of music]](d6/lily-9123aa24.png)
-
neo-modern-cautionary -
この規則は
neo-modernと似ていますが、追加の臨時記号は忠告の臨時記号として譜刻されます。![[image of music]](32/lily-3820cc37.png)
-
neo-modern-voice -
この規則は、1 つのボイスを演奏する音楽家とすべてのボイスを演奏する音楽家両方のための複数ボイスの臨時記号に使用されます。
neo-modernと同様に、臨時記号は各ボイスに譜刻されますが、同じStaffにあるボイスをまたがるとキャンセルされます。![[image of music]](87/lily-e193066b.png)
-
neo-modern-voice-cautionary -
この規則は
neo-modern-voiceと似ていますが、追加の臨時記号が忠告の臨時記号として譜刻されます。![[image of music]](ed/lily-eb5a7c53.png)
-
dodecaphonic -
この規則は 20 世紀初頭の作曲家たちによって導入された臨時記号の付け方を反映しています – ナチュラルの音符と非ナチュラルの音符 (訳者: ピアノの白鍵に対応する音符と黒鍵に対応する音符) 間にある上下関係を無効にしようとする試みです。このスタイルでは、すべて の音符にナチュラル記号を含む臨時記号が付けられます。
![[image of music]](df/lily-7a1e3e54.png)
-
teaching -
この規則は学生向けを意図したものであり、自動的に譜刻される忠告の臨時記号によって容易にスケール譜を作ることを容易にします。臨時記号は
modernと同じように譜刻されます。しかしながら、調号によって指定されたすべてのシャープ音、フラット音に対して忠告の臨時記号が譜刻されます – ただし、前の音符の直後にある同じピッチの音符は例外です。![[image of music]](a9/lily-ce498e41.png)
-
no-reset -
この規則は
defaultと同じですが、臨時記号の保持は小節内に限定されず、‘最後まで’ 保持されます:![[image of music]](44/lily-922c79bc.png)
-
forget -
この規則は
no-resetと正反対です: 臨時記号はまったく保持されません – そのため、調号に対応しながら、前にある音楽とは無関係にすべての臨時記号が譜刻されます。![[image of music]](61/lily-476ec55c.png)
参照
コード断片集: ピッチ
内部リファレンス: Accidental, Accidental_engraver, GrandStaff and PianoStaff, Staff, AccidentalSuggestion, AccidentalPlacement, accidental-suggestion-interface
既知の問題と警告
同時発生する音符はシーケンシャル モードで入力されたものと見なされます。このことが意味するのは、和音の各音符は入力ファイルの中で記述された順に
1 つずつ発生するものとして、和音の臨時記号は譜刻されるということです。これは和音の中の臨時記号が互いに依存関係にある場合に問題となります
– この問題はデフォルトの臨時記号スタイルでは発生しません。この問題は、問題となる音符に ! や ? を手動で付け加えることによって解決できます。
臨時記号の忠告的なキャンセルは 1 つ前の小節を見て行われます。しかしながら、\repeat volta N セクションの後にくる
\alternative ブロックでは、キャンセルの算出はその前に 譜刻された 小節ではなく、その前に 演奏された 小節を見て行われると演奏者は予想します。以下の例では、2 番目の差し替え小節の中にあるナチュラル c
にナチュラル記号は必要ありません。
![[image of music]](e1/lily-9b66810f.png)
以下の方法で解決できます:
局部的に臨時記号スタイルを forget に変更する関数を定義します:
forget = #(define-music-function (music) (ly:music?) #{
  \accidentalStyle forget
  #music
  \accidentalStyle modern
#})
{
  \accidentalStyle modern
  \time 2/4
  \repeat volta 2 {
    c'2
  }
  \alternative {
     cis'
     \forget c'
  }
}
![[image of music]](85/lily-b9014625.png)
| [ << 音楽記譜法 ] | [トップ][目次][インデックス][ ? ] | [ 専門的な記譜法 >> ] | ||
| [ < 自動臨時記号 ] | [ 上へ : ピッチを表示する ] | [ 符頭 > ] | ||
音域
用語 音域 (ambitus) は、音楽のある部分の中にあるボイスがとるピッチの範囲を示します。さらに、ある楽器が演奏することができるピッチ範囲を示すこともあるかもしれません。音域をボーカル パートに譜刻することによって、歌い手はそのパートの音域が歌い手の能力と一致するかどうかを容易に見極めることができます。
音域は、楽曲の開始点で、最初の音部記号の近くに記されます。範囲は最低ピッチと最高ピッチを表す 2 つの音符によってグラフィカルに示されます。臨時記号は、その臨時記号が調号の一部でない場合にのみ譜刻されます。
\layout {
  \context {
    \Voice
    \consists "Ambitus_engraver"
  }
}

\relative {
  aes' c e2
  cis,1
}
![[image of music]](68/lily-f0950882.png)
Selected Snippets
Adding ambitus per voice
Ambitus can be added per voice. In this case, the ambitus must be moved manually to prevent collisions.
\new Staff <<
  \new Voice \with {
    \consists "Ambitus_engraver"
  } \relative c'' {
    \override Ambitus.X-offset = #2.0
    \voiceOne
    c4 a d e
    f1
  }
  \new Voice \with {
    \consists "Ambitus_engraver"
  } \relative c' {
    \voiceTwo
    es4 f g as
    b1
  }
>>
![[image of music]](ea/lily-388b97ec.png)
Ambitus with multiple voices
Adding the Ambitus_engraver to the Staff context creates
a single ambitus per staff, even in the case of staves with multiple
voices.
\new Staff \with {
  \consists "Ambitus_engraver"
  }
<<
  \new Voice \relative c'' {
    \voiceOne
    c4 a d e
    f1
  }
  \new Voice \relative c' {
    \voiceTwo
    es4 f g as
    b1
  }
>>
![[image of music]](38/lily-447a52e9.png)
Changing the ambitus gap
It is possible to change the default gap between the ambitus noteheads and the line joining them.
\layout {
  \context {
    \Voice
    \consists "Ambitus_engraver"
  }
}

\new Staff {
  \time 2/4
  % Default setting
  c'4 g''
}

\new Staff {
  \time 2/4
  \override AmbitusLine.gap = #0
  c'4 g''
}

\new Staff {
  \time 2/4
  \override AmbitusLine.gap = #1
  c'4 g''
}

\new Staff {
  \time 2/4
  \override AmbitusLine.gap = #1.5
  c'4 g''
}
![[image of music]](f4/lily-265fe61c.png)
参照
音楽用語集: ambitus
コード断片集: ピッチ
内部リファレンス: Ambitus_engraver, Voice, Staff, Ambitus, AmbitusAccidental, AmbitusLine, AmbitusNoteHead, ambitus-interface
既知の問題と警告
複数のボイスがある場合にボイスごとに音域をとることによって生じる音域の衝突を処理するシステムはありません。
| [ << 音楽記譜法 ] | [トップ][目次][インデックス][ ? ] | [ 専門的な記譜法 >> ] | ||
| [ < 音域 ] | [ 上へ : ピッチ ] | [ 特殊な符頭 > ] | ||
1.1.4 符頭
このセクションでは符頭を変更する方法について説明します。
| 特殊な符頭 | ||
| 演奏を容易にする記譜法の符頭 | ||
| シェイプ符頭 | ||
| 即興 |
| [ << 音楽記譜法 ] | [トップ][目次][インデックス][ ? ] | [ 専門的な記譜法 >> ] | ||
| [ < 符頭 ] | [ 上へ : 符頭 ] | [ 演奏を容易にする記譜法の符頭 > ] | ||
特殊な符頭
符頭を変更することができます:
\relative c'' {
  c4 b
  \override NoteHead.style = #'cross
  c4 b
  \revert NoteHead.style
  a b
  \override NoteHead.style = #'harmonic
  a b
  \revert NoteHead.style
  c4 d e f
}
![[image of music]](06/lily-c7886195.png)
すべての符頭スタイルを調べるには、Note head styles を参照してください。
cross スタイルはさまざまな音楽的意図を表すために使用されます。以下の定義済みコマンドは符頭を譜コンテキストとタブ譜コンテキストで変更し、何らかの音楽的意味を表すために使用することができます:
\relative {
  c''4 b
  \xNotesOn
   a b c4 b
  \xNotesOff
  c4 d
}
![[image of music]](ef/lily-3f541fd3.png)
この定義済みコマンドの音楽関数は、譜コンテキストやタブ譜コンテキストの和音の内外で使用して、符頭を×の形にすることができます:
\relative {
  c''4 b
  \xNote { e f }
  c b < g \xNote c f > b
}
![[image of music]](e6/lily-5679a976.png)
\xNote, \xNotesOn それに \xNotesOff の同義語として
\deadNote, \deadNotesOn それに \deadNotesOff を使用することができます。dead note という用語はギタリストが一般的に使用します。
また、和音の中でのみ使用できるダイアモンド形のための短縮記法があります:
\relative c'' {
  <c f\harmonic>2 <d a'\harmonic>4 <c g'\harmonic> f\harmonic
}
![[image of music]](99/lily-21488db9.png)
定義済みコマンド
\harmonic,
\xNotesOn,
\xNotesOff,
\xNote.
参照
コード断片集: ピッチ
記譜法リファレンス: Note head styles, 和音の音符, ハーモニクスとデッド ノートの指示
内部リファレンス: note-event, Note_heads_engraver, Ledger_line_engraver, NoteHead, LedgerLineSpanner, note-head-interface, ledger-line-spanner-interface
| [ << 音楽記譜法 ] | [トップ][目次][インデックス][ ? ] | [ 専門的な記譜法 >> ] | ||
| [ < 特殊な符頭 ] | [ 上へ : 符頭 ] | [ シェイプ符頭 > ] | ||
演奏を容易にする記譜法の符頭
‘演奏を容易にする’ 符頭は、符頭の中に音符名を含みます。これは、初心者のための楽譜で使用されます。文字を読みやすくするために、大きなフォント サイズで譜刻すべきです。大きなフォントで譜刻する方法は、譜サイズを設定する を参照してください。
#(set-global-staff-size 26)
\relative c' {
  \easyHeadsOn
  c2 e4 f
  g1
  \easyHeadsOff
  c,1
}
![[image of music]](70/lily-9ae29520.png)
定義済みコマンド
\easyHeadsOn,
\easyHeadsOff
Selected Snippets
Numbers as easy note heads
Easy notation note heads use the note-names property of the
NoteHead object to determine what appears inside the note head.
By overriding this property, it is possible to print numbers
representing the scale-degree.
A simple engraver can be created to do this for every note head object it sees.
#(define Ez_numbers_engraver
   (make-engraver
    (acknowledgers
     ((note-head-interface engraver grob source-engraver)
      (let* ((context (ly:translator-context engraver))
	     (tonic-pitch (ly:context-property context 'tonic))
	     (tonic-name (ly:pitch-notename tonic-pitch))
	     (grob-pitch
	      (ly:event-property (event-cause grob) 'pitch))
	     (grob-name (ly:pitch-notename grob-pitch))
	     (delta (modulo (- grob-name tonic-name) 7))
	     (note-names
	      (make-vector 7 (number->string (1+ delta)))))
	(ly:grob-set-property! grob 'note-names note-names))))))

#(set-global-staff-size 26)

\layout {
  ragged-right = ##t
  \context {
    \Voice
    \consists \Ez_numbers_engraver
  }
}

\relative c' {
  \easyHeadsOn
  c4 d e f
  g4 a b c \break

  \key a \major
  a,4 b cis d
  e4 fis gis a \break

  \key d \dorian
  d,4 e f g
  a4 b c d
}
![[image of music]](68/lily-f0be8920.png)
参照
記譜法リファレンス: 譜サイズを設定する
コード断片集: ピッチ
内部リファレンス: note-event, Note_heads_engraver, NoteHead, note-head-interface
| [ << 音楽記譜法 ] | [トップ][目次][インデックス][ ? ] | [ 専門的な記譜法 >> ] | ||
| [ < 演奏を容易にする記譜法の符頭 ] | [ 上へ : 符頭 ] | [ 即興 > ] | ||
シェイプ符頭
シェイプ ノート記譜法では、符頭の形状は音階の中での音符の位置付けに対応します。この表記は 19 世紀のアメリカの歌集で一般的なものです。シェイプ符頭はセイクリッド ハープ、Southern Harmony、Funk (Harmonia Sacra)、Walker、それに Aiken (Christian Harmony) スタイルで使用されます:
\relative c'' {
  \aikenHeads
  c, d e f g2 a b1 c \break
  \sacredHarpHeads
  c,4 d e f g2 a b1 c \break
  \southernHarmonyHeads
  c,4 d e f g2 a b1 c \break
  \funkHeads
  c,4 d e f g2 a b1 c \break
  \walkerHeads
  c,4 d e f g2 a b1 c \break
}
![[image of music]](0c/lily-e94a7177.png)
符頭の形状は音階の中での位置に対応し、音階のベースは \key コマンドによって決まります。マイナーで記述している場合、符頭の形状を決定する音階ステップはメジャーの場合との相対関係になります:
\relative c'' {
  \key a \minor
  \aikenHeads
  a b c d e2 f g1 a \break
  \aikenHeadsMinor
  a,4 b c d e2 f g1 a \break
  \sacredHarpHeadsMinor
  a,2 b c d \break
  \southernHarmonyHeadsMinor
  a2 b c d \break
  \funkHeadsMinor
  a2 b c d \break
  \walkerHeadsMinor
  a2 b c d \break
}
![[image of music]](13/lily-3ac4afc8.png)
定義済みコマンド
\aikenHeads,
\aikenHeadsMinor,
\funkHeads,
\funkHeadsMinor,
\sacredHarpHeads,
\sacredHarpHeadsMinor,
\southernHarmonyHeads,
\southernHarmonyHeadsMinor,
\walkerHeads,
\walkerHeadsMinor
Selected Snippets
Applying note head styles depending on the step of the scale
The shapeNoteStyles property can be used to define various note
head styles for each step of the scale (as set by the key signature or
the tonic property). This property requires a set of symbols,
which can be purely arbitrary (geometrical expressions such as
triangle, cross, and xcircle are allowed) or based
on old American engraving tradition (some latin note names are also
allowed).
That said, to imitate old American song books, there are several
predefined note head styles available through shortcut commands such as
\aikenHeads or \sacredHarpHeads.
This example shows different ways to obtain shape note heads, and demonstrates the ability to transpose a melody without losing the correspondence between harmonic functions and note head styles.
fragment = {
  \key c \major
  c2 d
  e2 f
  g2 a
  b2 c
}

\new Staff {
  \transpose c d
  \relative c' {
    \set shapeNoteStyles = ##(do re mi fa
                               #f la ti)
    \fragment
  }

  \break

  \relative c' {
    \set shapeNoteStyles = ##(cross triangle fa #f
                               mensural xcircle diamond)
    \fragment
  }
}
![[image of music]](0d/lily-374eb465.png)
すべての符頭スタイルを調べるには、Note head styles を参照してください。
参照
コード断片集: ピッチ
記譜法リファレンス: Note head styles
内部リファレンス: note-event, Note_heads_engraver, NoteHead, note-head-interface
| [ << 音楽記譜法 ] | [トップ][目次][インデックス][ ? ] | [ 専門的な記譜法 >> ] | ||
| [ < シェイプ符頭 ] | [ 上へ : 符頭 ] | [ リズム > ] | ||
即興
即興はしばしばスラッシュ形の符頭で記されます。そのような表記では、演奏者は好みのピッチを選ぶことができますが、指定されたリズムに従って演奏する必要があります。このような符頭は以下のようにして作成することができます:
\new Voice \with {
  \consists "Pitch_squash_engraver"
} \relative {
  e''8 e g a a16( bes) a8 g
  \improvisationOn
  e8 ~
  2 ~ 8 f4 f8 ~
  2
  \improvisationOff
  a16( bes) a8 g e
}
![[image of music]](3b/lily-25cb0b78.png)
定義済みコマンド
\improvisationOn,
\improvisationOff
参照
コード断片集: ピッチ
内部リファレンス: Pitch_squash_engraver, Voice, RhythmicStaff
| [ << 音楽記譜法 ] | [トップ][目次][インデックス][ ? ] | [ 専門的な記譜法 >> ] | ||
| [ < 即興 ] | [ 上へ : 音楽記譜法 ] | [ リズムを記述する > ] | ||
1.2 リズム
![[image of music]](33/lily-3aa02c9a.png)
このセクションではリズム、休符、演奏時間、連桁、小節について議論します。
| 1.2.1 リズムを記述する | ||
| 1.2.2 休符を記述する | ||
| 1.2.3 リズムを表示する | ||
| 1.2.4 連桁 | ||
| 1.2.5 小節 | ||
| 1.2.6 特殊なリズム関連事項 |
| [ << 音楽記譜法 ] | [トップ][目次][インデックス][ ? ] | [ 専門的な記譜法 >> ] | ||
| [ < リズム ] | [ 上へ : リズム ] | [ 演奏時間 > ] | ||
1.2.1 リズムを記述する
| 演奏時間 | ||
| 連符 | ||
| 演奏時間を変更する | ||
| タイ |
| [ << 音楽記譜法 ] | [トップ][目次][インデックス][ ? ] | [ 専門的な記譜法 >> ] | ||
| [ < リズムを記述する ] | [ 上へ : リズムを記述する ] | [ 連符 > ] | ||
演奏時間
演奏時間は数とドットで指定されます。演奏時間はその演奏時間の逆数で入力されます。例えば、4 分音符は 4 で入力され (1/4 の音符だから)、半音符は 2
で入力されます (1/2 の音符だから)。全音符よりも長い音符を入力するには、\longa コマンド (全音符の 4 倍)
と \breve コマンド (全音符の 2 倍) を使う必要があります。128 分音符のような短い音符を指定することもできます。それよりも短い音価を指定することも可能ですが、必ず連桁付きの音符となります。
\relative {
  \time 8/1
  c''\longa c\breve c1 c2
  c4 c8 c16 c32 c64 c128 c128
}
![[image of music]](24/lily-1b588bc0.png)
同じ例で自動連桁を off にしてみます。
\relative {
  \time 8/1
  \autoBeamOff
  c''\longa c\breve c1 c2
  c4 c8 c16 c32 c64 c128 c128
}
![[image of music]](41/lily-2c8b3dd2.png)
全音符の 8 倍の演奏時間を持つ音符は
\maxima を使って入力することができます。しかしながら、これは古代音楽表記でのみサポートされます。詳細は Ancient notation を参照してください。
演奏時間を省略した場合、前に入力された演奏時間にセットされます。最初の音符のデフォルト値は 4 分音符です。
\relative { a' a a2 a a4 a a1 a }
![[image of music]](6d/lily-93423490.png)
付点音符の演奏時間を得るには、演奏時間の後にドット (.) を置きます。2 重付点音符は 2 つのドットを置き、3 重付点音符は 3 つのドットなどとなります。
\relative { a'4 b c4. b8 a4. b4.. c8. }
![[image of music]](1e/lily-9d75bef8.png)
演奏時間の中には 2の倍数の演奏時間とドットだけでは表せないものもあります。それらを表すには 2 つかそれ以上の音符をタイでつなげるしかありません。詳細は タイ を参照してください。
歌詞の音節に対して演奏時間を指定する方法、歌詞を音符に揃える方法については 声楽 を参照してください。
オプションとして、音符を音符の演奏時間に厳密に比例させた間隔で配置することができます。このオプションとプロポーショナル表記を制御するその他の設定についての詳細は プロポーショナル ノーテーション を参照してください。
通常、多声でない限り、ドットは譜線を避けるために上に移動させられます。ある特定のドットの移動方向を手動で指定するための定義済みコマンドがあります – 詳細は 向きと配置 を参照してください。
定義済みコマンド
\autoBeamOn,
\autoBeamOff,
\dotsUp,
\dotsDown,
\dotsNeutral
Selected Snippets
Alternative breve notes
Breve notes are also available with two vertical lines on each side of the notehead instead of one line and in baroque style.
\relative c'' {
  \time 4/2
  c\breve |
  \override Staff.NoteHead.style = #'altdefault
  b\breve
  \override Staff.NoteHead.style = #'baroque
  b\breve
  \revert Staff.NoteHead.style
  a\breve
}
![[image of music]](8a/lily-a7281910.png)
Changing the number of augmentation dots per note
The number of augmentation dots on a single note can be changed indepently of the dots placed after the note.
\relative c' {
  c4.. a16 r2 |
  \override Dots.dot-count = #4
  c4.. a16 r2 |
  \override Dots.dot-count = #0
  c4.. a16 r2 |
  \revert Dots.dot-count
  c4.. a16 r2 |
}
![[image of music]](7f/lily-3c6c4583.png)
参照
音楽用語集: breve, longa, maxima, note value, Duration names notes and rests
記譜法リファレンス: 自動連桁, タイ, 符幹, リズムを記述する, 休符を記述する, 声楽, Ancient notation, プロポーショナル ノーテーション
コード断片集: リズム
既知の問題と警告
休符の演奏時間には基本的に限界がありません (最大値としても、最小値としても)。しかしながら、図柄の数には限界があります: 128 分から全音符の 8 倍までの休符を譜刻することができます。
| [ << 音楽記譜法 ] | [トップ][目次][インデックス][ ? ] | [ 専門的な記譜法 >> ] | ||
| [ < 演奏時間 ] | [ 上へ : リズムを記述する ] | [ 演奏時間を変更する > ] | ||
連符
連符は \tuplet を使った音楽表記から作られ、音楽表記の速度に分数を掛け合わせます。
\tuplet fraction { music }
分数 (fraction) の分子が音符の上または下に譜刻され、オプションで囲みが付きます。最も一般的な連符は 3 連符です。( 3 つの音符が音符 2 つ分の演奏時間を持ちます。)
\relative {
  a'2 \tuplet 3/2 { b4 4 4 }
  c4 c \tuplet 3/2 { b4 a g }
}
![[image of music]](84/lily-c93606c9.png)
連符の長いパッセージを入力するとき、各グループに別々の \tuplet コマンドを記述することは不便です。音楽の前に一つの連符グループの長さを直接指定することで、連符を自動的にグループ化することができます:
\relative {
  g'2 r8 \tuplet 3/2 8 { cis16 d e e f g g f e }
}
![[image of music]](14/lily-cb2ac048.png)
連符囲みは手動で譜の上または下に配置することができます:
\relative {
  \tupletUp \tuplet 3/2 { c''8 d e }
  \tupletNeutral \tuplet 3/2 { c8 d e }
  \tupletDown \tuplet 3/2 { f,8 g a }
  \tupletNeutral \tuplet 3/2 { f8 g a }
}
![[image of music]](c2/lily-bc45afbf.png)
連符はネストすることができます:
\relative {
  \autoBeamOff
  c''4 \tuplet 5/4 { f8 e f \tuplet 3/2 { e[ f g] } } f4
}
![[image of music]](a7/lily-ee350816.png)
ネストされた連符の演奏開始点が同時である場合に、それらの連符を変更するには
\tweak を使う必要があります。
連符囲みを譜刻せずに音符の演奏時間を変更する方法は 演奏時間を変更する を参照してください。
定義済みコマンド
\tupletUp,
\tupletDown,
\tupletNeutral.
Selected Snippets
Entering several tuplets using only one \tuplet command
The property tupletSpannerDuration sets how long each of the
tuplets contained within the brackets after \tuplet should
last. Many consecutive tuplets can then be placed within a single
\tuplet expression, thus saving typing.
There are several ways to set tupletSpannerDuration. The
command \tupletSpan sets it to a given duration, and clears it
when instead of a duration \default is specified. Another way
is to use an optional argument with \tuplet.
\relative c' {
  \time 2/4
  \tupletSpan 4
  \tuplet 3/2 { c8^"\\tupletSpan 4" c c c c c }
  \tupletSpan \default
  \tuplet 3/2 { c8^"\\tupletSpan \\default" c c c c c }
  \tuplet 3/2 4 { c8^"\\tuplet 3/2 4 {...}" c c c c c }
}
![[image of music]](f1/lily-e4c43430.png)
Changing the tuplet number
By default, only the numerator of the tuplet number is printed over the
tuplet bracket, i.e., the numerator of the argument to the
\tuplet command.
Alternatively, num:den of the tuplet number may be printed, or the tuplet number may be suppressed altogether.
\relative c'' {
  \tuplet 3/2 { c8 c c }
  \tuplet 3/2 { c8 c c }
  \override TupletNumber.text = #tuplet-number::calc-fraction-text
  \tuplet 3/2 { c8 c c }
  \omit TupletNumber
  \tuplet 3/2 { c8 c c }
}
![[image of music]](ea/lily-368c47b4.png)
Non-default tuplet numbers
LilyPond also provides formatting functions to print tuplet numbers different than the actual fraction, as well as to append a note value to the tuplet number or tuplet fraction.
\relative c'' {
  \once \override TupletNumber.text =
    #(tuplet-number::non-default-tuplet-denominator-text 7)
  \tuplet 3/2  { c4. c4. c4. c4. }
  \once \override TupletNumber.text =
    #(tuplet-number::non-default-tuplet-fraction-text 12 7)
  \tuplet 3/2  { c4. c4. c4. c4. }
  \once \override TupletNumber.text =
    #(tuplet-number::append-note-wrapper
      (tuplet-number::non-default-tuplet-fraction-text 12 7) (ly:make-duration 3 0))
  \tuplet 3/2  { c4. c4. c4. c4. }
  \once \override TupletNumber.text =
    #(tuplet-number::append-note-wrapper
      tuplet-number::calc-denominator-text (ly:make-duration 2 0))
  \tuplet 3/2  { c8 c8 c8 c8 c8 c8 }
  \once \override TupletNumber.text =
    #(tuplet-number::append-note-wrapper
      tuplet-number::calc-fraction-text (ly:make-duration 2 0))
  \tuplet 3/2  { c8 c8 c8 c8 c8 c8 }
  \once \override TupletNumber.text =
    #(tuplet-number::fraction-with-notes (ly:make-duration 2 1) (ly:make-duration 3 0))
  \tuplet 3/2  { c4. c4. c4. c4. }
  \once \override TupletNumber.text =
    #(tuplet-number::non-default-fraction-with-notes 12 (ly:make-duration 3 0) 4 (ly:make-duration 2 0))
  \tuplet 3/2  { c4. c4. c4. c4. }
}
![[image of music]](23/lily-c22b0a58.png)
Controlling tuplet bracket visibility
The default behavior of tuplet-bracket visibility is to print a bracket
unless there is a beam of the same length as the tuplet. To control the
visibility of tuplet brackets, set the property
'bracket-visibility to either #t (always print a
bracket), #f (never print a bracket) or #'if-no-beam
(only print a bracket if there is no beam).
music = \relative c'' {
  \tuplet 3/2 { c16[ d e } f8]
  \tuplet 3/2 { c8 d e }
  \tuplet 3/2 { c4 d e }
}

\new Voice {
  \relative c' {
    << \music s4^"default" >>
    \override TupletBracket.bracket-visibility = #'if-no-beam
    << \music s4^"'if-no-beam" >>
    \override TupletBracket.bracket-visibility = ##t
    << \music s4^"#t" >>
    \override TupletBracket.bracket-visibility = ##f
    << \music s4^"#f" >>
    %% v2.18 :
    \omit TupletBracket
    << \music s4^"omit" >>
  }
}
![[image of music]](98/lily-87a9eefc.png)
Permitting line breaks within beamed tuplets
This artificial example shows how both manual and automatic line breaks may be permitted to within a beamed tuplet. Note that such off-beat tuplets have to be beamed manually.
\layout {
  \context {
    \Voice
    % Permit line breaks within tuplets
    \remove "Forbid_line_break_engraver"
    % Allow beams to be broken at line breaks
    \override Beam.breakable = ##t
  }
}
\relative c'' {
  a8
  \repeat unfold 5 { \tuplet 3/2 { c[ b a] } }
  % Insert a manual line break within a tuplet
  \tuplet 3/2 { c[ b \bar "" \break a] }
  \repeat unfold 5 { \tuplet 3/2 { c[ b a] } }
  c8
}
![[image of music]](bb/lily-1ef450d4.png)
参照
音楽用語集: triplet, tuplet, polymetric
学習マニュアル: Tweaking methods
記譜法リファレンス:
向きと配置,
時間管理,
演奏時間を変更する,
\tweak コマンド,
多拍子記譜法
コード断片集: Rhythms
内部リファレンス: TupletBracket, TupletNumber, TimeScaledMusic.
| [ << 音楽記譜法 ] | [トップ][目次][インデックス][ ? ] | [ 専門的な記譜法 >> ] | ||
| [ < 連符 ] | [ 上へ : リズムを記述する ] | [ タイ > ] | ||
演奏時間を変更する
*N/M (または、M が 1 の場合は *N) を演奏時間の後に付け加えることによって、単一の音符、休符、和音の演奏時間を分数 N/M
倍することができます。これは作り出される音符や休符の見た目には影響を与えませんが、変更された演奏時間は小節の中での位置を算出するためと、MIDI 出力での演奏時間を決定するために使用されます。掛け合わせる要素は *L*M/N のように組み合わせることができます。掛け合わせる要素は演奏時間の一部です: 音符の演奏時間が指定されていない場合、前の音符から取ったデフォルトの演奏時間に要素が掛け合わされます。
以下の例では、最初の 3 つの音符で 2 拍ですが、連符囲みは譜刻されていません。
\time 2/4
% 演奏時間を変更して 3 連符にします
a4*2/3 gis a
% 通常の演奏時間
a4 a
% 和音の演奏時間を 2 倍にします
<a d>4*2
% 演奏時間は 4 分音符ですが、見た目は 16 分音符です
b16*4 c4
![[image of music]](46/lily-2f5b2d2c.png)
空白休符の演奏時間も掛け算によって変更できます。これは s1*23 のように多くの小節をスキップする場合に役に立ちます。
同様の方法で分数を使うことで、長く伸びた音楽を圧縮することができます。それによりそれぞれの音符、和音、休符には分数が掛け合わせられたかのようになります。これは楽譜要素の見た目をそのままにして、要素の内部演奏時間に分子/分母を掛け合わせます。ここで、音楽がどのように圧縮され、伸張されるかを示す例を挙げます:
\time 2/4
% 通常の演奏時間
<c a>4 c8 a
% 2/3 を掛けます
\scaleDurations 2/3 {
  <c a f>4. c8 a f
}
% 2 を掛けます
\scaleDurations 2/1 {
  <c' a>4 c8 b
}
![[image of music]](3f/lily-29db6350.png)
このコマンドの応用例の 1 つは多拍子記譜法での使用です。多拍子記譜法 を参照してください。
参照
コード断片集: Rhythms
| [ << 音楽記譜法 ] | [トップ][目次][インデックス][ ? ] | [ 専門的な記譜法 >> ] | ||
| [ < 演奏時間を変更する ] | [ 上へ : リズムを記述する ] | [ 休符を記述する > ] | ||
タイ
タイは同じピッチの隣り合う符頭を結び付けます。タイは音符の演奏時間を伸張する効果があります。
Note: タイを音楽的なフレーズを表す スラー や フレージング スラー と混同しないでください。タイは音符の演奏時間を伸ばす働きを持ち、音価を増やすドットに似ています。
タイはチルド記号 ~ を使って入力します:
a2 ~ 2
![[image of music]](81/lily-5922308e.png)
タイは、音符が小節線をまたがる場合か、リズムを表すためにドットを使うことができない場合に使用されます。さらに、以下の例のように音価が小節の区画をまたがる場合にも使用されます (訳者補足: 4/4 拍子では 1 小節は 1/4, 1/4, 1/4, 1/4 の区画に分けられます。下の例の第 2 小節では半音符が区画をまたがっているので良くない書き方であり、第 1 小節のように書くべきです。):
\relative {
  r8 c'8 ~ 2 r4 |
  r8^"こうすべきではありません" c2 ~ 8 r4
}
![[image of music]](4e/lily-e08d6218.png)
小節線をまたいで多くの音符をタイで結び付ける必要がある場合、自動音符分割を使用したほうが簡単かもしれません – 自動音符分割 を参照してください。これは長い音符を自動的に分割して、小節線をまたがる音符をタイで結び付けます。
タイを和音に適用する場合、ピッチが一致する符頭すべてが結ばれます。一致する符頭が無い場合、タイは作成されません。和音の内部にタイを置くことによって、和音の一部だけをタイで結ぶことができます。
<c e g> ~ <c e g>
<c~ e g~ b> <c e g b>
![[image of music]](b9/lily-a0854f2e.png)
繰り返しの 2 回目の差し替え部分はタイで結ばれた音符で始まっています。そのような繰り返し部分でのタイは以下のように指定する必要があります:
\repeat volta 2 { c g <c e>2 ~ }
\alternative {
  % 1 番目の差し替え部分: 後に続く音符は通常通りタイで結ばれます
  { <c e>2. r4 }
  % 2 番目の差し替え部分: 後に続く音符にはリピート用のタイを付けます
  { <c e>2\repeatTie d4 c } }
![[image of music]](a4/lily-7d96cd97.png)
L.v. タイ (レセ ヴィブレ: laissez vibrer) は音符を終端で途切れさせないということを示します。ピアノ、ハープ、他の弦楽器、それに打楽器のための楽譜で使用されます。L.v. タイは以下のように入力します:
<c' f' g'>1\laissezVibrer
![[image of music]](ba/lily-e495fa8c.png)
タイを手動で譜の上または下に配置することができます。 向きと配置 を参照してください。
タイを破線、点線、実線と破線の組み合わせにすることができます。
\tieDotted
c2 ~ 2
\tieDashed
c2 ~ 2
\tieHalfDashed
c2 ~ 2
\tieHalfSolid
c2 ~ 2
\tieSolid
c2 ~ 2
![[image of music]](63/lily-8f361d9a.png)
破線パターンのカスタマイズを指定することができます:
\tieDashPattern #0.3 #0.75
c2 ~ 2
\tieDashPattern #0.7 #1.5
c2 ~ 2
\tieSolid
c2 ~ 2
![[image of music]](28/lily-d89a844a.png)
タイの破線パターン定義の構造は、スラーの破線パターン定義と同じです。複雑な破線パターンについての更なる情報は スラー を参照してください。
譜の中で他のオブジェクトと衝突するタイに対しては、whiteout レイアウト プロパティと layer レイアウト プロパティをオーバライドしてください。
\relative {
  \override Tie.layer = #-2
  \override Staff.TimeSignature.layer = #-1
  \override Staff.KeySignature.layer = #-1
  \override Staff.TimeSignature.whiteout = ##t
  \override Staff.KeySignature.whiteout = ##t
  b'2 b~
  \time 3/4
  \key a \major
  b r4
}
![[image of music]](e4/lily-635910fa.png)
定義済みコマンド
\tieUp,
\tieDown,
\tieNeutral,
\tieDotted,
\tieDashed,
\tieDashPattern,
\tieHalfDashed,
\tieHalfSolid,
\tieSolid
Selected Snippets
Using ties with arpeggios
Ties are sometimes used to write out arpeggios. In this case, two tied
notes need not be consecutive. This can be achieved by setting the
tieWaitForNote property to #t. The same feature is also
useful, for example, to tie a tremolo to a chord, but in principle, it
can also be used for ordinary consecutive notes.
\relative c' {
  \set tieWaitForNote = ##t
  \grace { c16[ ~ e ~ g] ~ } <c, e g>2
  \repeat tremolo 8 { c32 ~ c' ~ } <c c,>1
  e8 ~ c ~ a ~ f ~ <e' c a f>2
  \tieUp
  c8 ~ a
  \tieDown
  \tieDotted
  g8 ~ c g2
}
![[image of music]](52/lily-95ab9d1c.png)
Engraving ties manually
Ties may be engraved manually by changing the tie-configuration
property of the TieColumn object. The first number indicates the
distance from the center of the staff in half staff-spaces, and the
second number indicates the direction (1 = up, -1 = down).
\relative c' {
  <c e g>2~ <c e g>
  \override TieColumn.tie-configuration =
    #'((0.0 . 1) (-2.0 . 1) (-4.0 . 1))
  <c e g>2~ <c e g>
}
![[image of music]](30/lily-a0a10dff.png)
参照
音楽用語集: tie, laissez vibrer
コード断片集: Expressive marks, Rhythms
内部リファレンス: LaissezVibrerTie, LaissezVibrerTieColumn, TieColumn, Tie
既知の問題と警告
タイがアクティブなときに譜を切り換えても斜めのタイは作られません。
タイの最中に音部記号やオクターブを変更することはきちんと定義されていません。そのような場合には、スラーを用いる方が好ましいです。
| [ << 音楽記譜法 ] | [トップ][目次][インデックス][ ? ] | [ 専門的な記譜法 >> ] | ||
| [ < タイ ] | [ 上へ : リズム ] | [ 休符 > ] | ||
1.2.2 休符を記述する
休符は音楽表記の中の音楽の一部として入力されます。
| 休符 | ||
| 不可視の休符 | ||
| 小節単位の休符 |
| [ << 音楽記譜法 ] | [トップ][目次][インデックス][ ? ] | [ 専門的な記譜法 >> ] | ||
| [ < 休符を記述する ] | [ 上へ : 休符を記述する ] | [ 不可視の休符 > ] | ||
休符
休符は音符名 r を持つ音符として入力されます。全休符よりも長い演奏時間を持つ休符には以下に示す定義済みコマンドを使用します:
\new Staff {
  % この 2 本線には意味はありません
  \time 16/1
  \omit Staff.TimeSignature
  % 八全休符を譜刻します。二全休符 4 つと等価です
  r\maxima
  % 四全休符を譜刻します。二全休符 2 つと等価です
  r\longa
  % 二全休符を譜刻します。
  r\breve
  r1 r2 r4 r8 r16 r32 r64 r128
}
![[image of music]](57/lily-aafcc8bd.png)
全休符 – 小節の中心に置かれます – は複数小節の休符として入力する必要があります。複数小節の休符は多くの小節に対してと同様に単一の小節に対しても使用することができます。詳細は 小節単位の休符 を参照してください。
休符の垂直方向の位置を明示的に指定するには、音符の後に続けて \rest
を記述します。その音符が譜上で占める位置に、その音符の演奏時間を持つ休符が配置されます。これは多声部音楽を手動で精密にフォーマットすることを考慮したものです。なぜなら、自動休符フォーマットでは多声部音楽の休符の衝突を回避できないからです。
\relative { a'4\rest d4\rest }
![[image of music]](c8/lily-b44976ba.png)
Selected Snippets
Rest styles
Rests may be used in various styles.
\new Staff \relative c {
  \omit Score.TimeSignature
  \cadenzaOn

  \override Staff.Rest.style = #'mensural
  r\maxima^\markup \typewriter { mensural }
  r\longa r\breve r1 r2 r4 r8 r16 s32 s64 s128 s128
  \bar ""
  \break

  \override Staff.Rest.style = #'neomensural
  r\maxima^\markup \typewriter { neomensural }
  r\longa r\breve r1 r2 r4 r8 r16 s32 s64 s128 s128
  \bar ""
  \break

  \override Staff.Rest.style = #'classical
  r\maxima^\markup \typewriter { classical }
  r\longa r\breve r1 r2 r4 r8 r16 r32 r64 r128 s128
  \bar ""
  \break

  \override Staff.Rest.style = #'z
  r\maxima^\markup \typewriter { z-style }
  r\longa r\breve r1 r2 r4 r8 r16 r32 r64 r128 s128
  \bar ""
  \break

  \override Staff.Rest.style = #'default
  r\maxima^\markup \typewriter { default }
  r\longa r\breve r1 r2 r4 r8 r16 r32 r64 r128 s128
}
![[image of music]](12/lily-d1f55117.png)
参照
記譜法リファレンス: 小節単位の休符
コード断片集: Rhythms
内部リファレンス: Rest
既知の問題と警告
休符の演奏時間には基本的に限界がありません (最大値としても、最小値としても)。しかしながら、図柄の数には限界があります: 128 分から全音符の 8 倍までの休符を譜刻することができます。
| [ << 音楽記譜法 ] | [トップ][目次][インデックス][ ? ] | [ 専門的な記譜法 >> ] | ||
| [ < 休符 ] | [ 上へ : 休符を記述する ] | [ 小節単位の休符 > ] | ||
不可視の休符
不可視の休符 (‘空白休符’ とも呼ばれます) は音符名 s を持つ音符として入力することができます:
\relative c'' {
  c4 c s c |
  s2 c |
}
![[image of music]](0d/lily-00a98e6f.png)
空白休符は音符モードと和音モードでのみ利用可能です。他のモードでは、例えば歌詞を入力している場合、音楽モーメントをスキップするには
\skip を使用します。\skip は明示的な演奏時間を必要としますが、\addlyrics や \lyricsto を使っていて、歌詞が関係するメロディーの音符から演奏時間を得ている場合は無視されます。
<<
  {
    a'2 \skip2 a'2 a'2
  }
  \new Lyrics {
    \lyricmode {
      foo2 \skip 1 bla2
    }
  }
>>
![[image of music]](aa/lily-e529d1c1.png)
\skip はコマンドであるため、s とは異なり後に続く音符のデフォルト演奏時間には影響を与えません。
<<
  {
    \repeat unfold 8 { a'4 }
  }
  {
    a'4 \skip 2 a' |
    s2 a'
  }
>>
![[image of music]](a9/lily-2d8d0a28.png)
空白休符は、音符や休符と同様に、Staff や Voice が存在しない場合に、それらを暗黙的に作成します:
s1 s s
![[image of music]](a7/lily-99c6b74b.png)
\skip はただ音楽的な時間をスキップするだけです。これはいかなる種類の出力も作成しません。
% これは有効な入力ですが、何もしません
\skip 1 \skip1 \skip 1
![[image of music]](99/lily-3f9eb183.png)
参照
学習マニュアル: Visibility and color of objects
記譜法リファレンス: 隠された音符, オブジェクトの可視性
コード断片集: Rhythms
内部リファレンス: SkipMusic
| [ << 音楽記譜法 ] | [トップ][目次][インデックス][ ? ] | [ 専門的な記譜法 >> ] | ||
| [ < 不可視の休符 ] | [ 上へ : 休符を記述する ] | [ リズムを表示する > ] | ||
小節単位の休符
1 つまたは複数の小節に対する休符は音符名として大文字の R を持つ音符として入力します:
% 休みの小節は 1 つの小節にまとめられます
\compressFullBarRests
R1*4
R1*24
R1*4
b2^"Tutti" b4 a4
![[image of music]](0e/lily-38c57e87.png)
小節単位の休符の演奏時間は、音符に対する演奏時間と同じ表記を使います。複数小節にまたがる休符の演奏時間は常に小節の長さの整数倍になります。そのため、しばしばドットや分数を使う必要があります:
\compressFullBarRests
\time 2/4
R1 | R2 |
\time 3/4
R2. | R2.*2 |
\time 13/8
R1*13/8 | R1*13/8*12 |
\time 10/8
R4*5*4 |
![[image of music]](74/lily-18878663.png)
1 小節分の休符は、拍子次第で全休符または二全休符のどちらかとして、小節の中央に譜刻されます。
\time 4/4
R1 |
\time 6/4
R1*3/2 |
\time 8/4
R1*2 |
![[image of music]](79/lily-2e3da84c.png)
デフォルトでは、複数小節にまたがる休符は休みの小節すべてを明示的に示すように譜刻される楽譜に展開されます。そうする代わりに、複数小節にまたがる休符を複数小節の休符記号を持つ単一の小節として譜刻することもできます – 休みの小節数がその小節の上に譜刻されます。
% デフォルトの振る舞い
\time 3/4 r2. | R2.*2 |
\time 2/4 R2 |
\time 4/4
% 休みの小節を 1 つの小節にまとめます
\compressFullBarRests
r1 | R1*17 | R1*4 |
% 休みの小節を展開します
\expandFullBarRests
\time 3/4
R2.*2 |
![[image of music]](b0/lily-382dd8c8.png)
マークアップを複数小節にまたがる休符に付け加えることができます。フェルマータを付け加えるための定義済みコマンドとして
\fermataMarkup が提供されています。
\compressFullBarRests
\time 3/4
R2.*10^\markup { \italic "ad lib." }
R2.^\fermataMarkup
![[image of music]](48/lily-03cb55d4.png)
Note: 複数小節にまたがる休符に付け加えられるマークアップはタイプ
MultiMeasureRestText のオブジェクトであり、TextScript ではありません。オーバライドは正しいオブジェクトに対して行わなければなりません。さもないと無視されます。以下の例を見てください。
% この例は誤ったオブジェクト名を指定しているため失敗します
\override TextScript.padding = #5
R1^"wrong"
% この例は正しいオブジェクト名が指定されています
\override MultiMeasureRestText.padding = #5
R1^"right"
![[image of music]](2c/lily-2537b14e.png)
複数小節にまたがる休符が \partial 設定の直後にある場合、小節チェックの警告が表示されないかもしれません。
定義済みコマンド
\textLengthOn,
\textLengthOff,
\fermataMarkup,
\compressFullBarRests,
\expandFullBarRests
Selected Snippets
Changing form of multi-measure rests
If there are ten or fewer measures of rests, a series of longa and
breve rests (called in German “Kirchenpausen” - church rests) is
printed within the staff; otherwise a simple line is shown. This
default number of ten may be changed by overriding the
expand-limit property.
\relative c'' {
  \compressMMRests {
    R1*2 | R1*5 | R1*9
    \override MultiMeasureRest.expand-limit = #3
    R1*2 | R1*5 | R1*9
  }
}
![[image of music]](d3/lily-32e7bb42.png)
Positioning multi-measure rests
Unlike ordinary rests, there is no predefined command to change the staff position of a multi-measure rest symbol of either form by attaching it to a note. However, in polyphonic music multi-measure rests in odd-numbered and even-numbered voices are vertically separated. The positioning of multi-measure rests can be controlled as follows:
\relative c'' {
  % Multi-measure rests by default are set under the fourth line
  R1
  % They can be moved using an override
  \override MultiMeasureRest.staff-position = #-2
  R1
  \override MultiMeasureRest.staff-position = #0
  R1
  \override MultiMeasureRest.staff-position = #2
  R1
  \override MultiMeasureRest.staff-position = #3
  R1
  \override MultiMeasureRest.staff-position = #6
  R1
  \revert MultiMeasureRest.staff-position
  \break

  % In two Voices, odd-numbered voices are under the top line
  << { R1 } \\ { a1 } >>
  % Even-numbered voices are under the bottom line
  << { a1 } \\ { R1 } >>
  % Multi-measure rests in both voices remain separate
  << { R1 } \\ { R1 } >>

  % Separating multi-measure rests in more than two voices
  % requires an override
  << { R1 } \\ { R1 } \\
     \once \override MultiMeasureRest.staff-position = #0
     { R1 }
  >>

  % Using compressed bars in multiple voices requires another override
  % in all voices to avoid multiple instances being printed
  \compressMMRests
  <<
   \revert MultiMeasureRest.direction
    { R1*3 }
    \\
   \revert MultiMeasureRest.direction
    { R1*3 }
  >>
}
![[image of music]](ab/lily-c414c8ca.png)
Multi-measure rest markup
Markups attached to a multi-measure rest will be centered above or below it. Long markups attached to multi-measure rests do not cause the measure to expand. To expand a multi-measure rest to fit the markup, use an empty chord with an attached markup before the multi-measure rest.
Text attached to a spacer rest in this way is left-aligned to the position where the note would be placed in the measure, but if the measure length is determined by the length of the text, the text will appear to be centered.
\relative c' {
  \compressMMRests {
    \textLengthOn
    <>^\markup { [MAJOR GENERAL] }
    R1*19
    <>_\markup { \italic { Cue: ... it is yours } }
    <>^\markup { A }
    R1*30^\markup { [MABEL] }
    \textLengthOff
    c4^\markup { CHORUS } d f c
  }
}
![[image of music]](1c/lily-56e2a6af.png)
参照
音楽用語集: multi-measure rest
記譜法リファレンス: 演奏時間, テキスト, テキストをフォーマットする, テキスト スクリプト
コード断片集: Rhythms
内部リファレンス: MultiMeasureRest, MultiMeasureRestNumber, MultiMeasureRestText
既知の問題と警告
複数小節にまたがる休符の上に運指記号を配置すると (例えば、R1*10-4)、運指の数字が休みの小節数と衝突する可能性があります。
複数の通常の休符を自動的に単一の複数小節休符にまとめる方法はありません。
複数小節にまたがる休符が休符の衝突を引き起こすことはありません。
| [ << 音楽記譜法 ] | [トップ][目次][インデックス][ ? ] | [ 専門的な記譜法 >> ] | ||
| [ < 小節単位の休符 ] | [ 上へ : リズム ] | [ 拍子 > ] | ||
1.2.3 リズムを表示する
| 拍子 | ||
| メトロノーム記号 | ||
| 上拍 | ||
| 無韻律の音楽 | ||
| 多拍子記譜法 | ||
| 自動音符分割 | ||
| 旋律のリズムを示す |
| [ << 音楽記譜法 ] | [トップ][目次][インデックス][ ? ] | [ 専門的な記譜法 >> ] | ||
| [ < リズムを表示する ] | [ 上へ : リズムを表示する ] | [ メトロノーム記号 > ] | ||
拍子
拍子は以下のようにセットします:
\time 2/4 c''2
\time 3/4 c''2.
![[image of music]](ab/lily-b1f341f5.png)
拍子は楽曲の始まりと拍子が変更されたときに譜刻されます。行の終わりで変更が起こる場合、警告の拍子が行の終わりに譜刻されます。デフォルトの振る舞いを変更することができます。オブジェクトの可視性 を参照してください。
\relative c'' {
  \time 2/4
  c2 c
  \break
  c c
  \break
  \time 4/4
  c c c c
}
![[image of music]](66/lily-9a070c70.png)
2/2 や 4/4 で使用される拍子は数字を使用するスタイルに変更することができます:
% デフォルトのスタイル
\time 4/4 c1
\time 2/2 c1
% 数字を使うスタイルに変更します
\numericTimeSignature
\time 4/4 c1
\time 2/2 c1
% デフォルトのスタイルに戻します
\defaultTimeSignature
\time 4/4 c1
\time 2/2 c1
![[image of music]](8a/lily-5a5b5d77.png)
定量拍子については Mensural time signatures でカバーされています。
定義済みコマンド
\numericTimeSignature,
\defaultTimeSignature
譜刻される拍子を設定することに加えて、\time コマンドは拍子に基づくプロパティ
baseMoment, beatStructure, それに beamExceptions
のデフォルト値も設定します。これらのプロパティにあらかじめ定義されているデフォルト値は
‘scm/time-signature-settings.scm’ で見つかります。既存のデフォルト値を変更したり、新しいデフォルト値を変更したりすることができます:
\score {
  \new Staff {
    \relative c' {
      \overrideTimeSignatureSettings
        4/4        % timeSignatureFraction
        1/4        % baseMomentFraction
        3,1        % beatStructure
        #'()       % beamExceptions
      \time 4/4
      \repeat unfold 8 { c8 } |
    }
  }
}
![[image of music]](b9/lily-36534620.png)
\overrideTimeSignatureSettings は 4 つの引数をとります:
-
timeSignatureFraction, 拍子を示す分数。 -
baseMomentFraction, 拍子の基本タイミングの単位となる分子と分母を保持する分数。 -
beatStructure, 小節の拍構造を示す Scheme リスト。基本タイミングを単位とします。 -
beamExceptions, 指定された拍子でそれぞれの拍で終了しない連桁の規則を保持する配列リスト。自動連桁の振る舞いを設定する に説明があります。
\overrideTimeSignatureSettings を保持するコンテキストは、その \overrideTimeSignatureSettings 呼び出しが実行される前にインスタンス化されている必要があります。このことは、そのようなコンテキストは明示的にインスタンス化するか、そのコンテキスト内で \overrideTimeSignatureSettings の前に音楽を置いておく必要があるということを意味します:
\score {
  \relative c' {
    % コンテキストがまだインスタンス化されていないため、この呼び出しは失敗します
    \overrideTimeSignatureSettings
      4/4        % timeSignatureFraction
      1/4        % baseMomentFraction
      3,1        % beatStructure
      #'()       % beamExceptions
    \time 4/4
    c8^\markup {"Beamed (2 2)"}
    \repeat unfold 7 { c8 } |
    % この呼び出しは成功します
    \overrideTimeSignatureSettings
      4/4        % timeSignatureFraction
      1/4        % baseMomentFraction
      3,1        % beatStructure
      #'()       % beamExceptions
    \time 4/4
    c8^\markup {"Beamed (3 1)"}
    \repeat unfold 7 { c8 } |
  }
}
![[image of music]](f3/lily-ff177cb3.png)
デフォルトの拍子プロパティ値の変更を元の値に戻すことができます:
\score{
  \relative {
    \repeat unfold 8 { c'8 } |
    \overrideTimeSignatureSettings
      4/4        % timeSignatureFraction
      1/4        % baseMomentFraction
      3,1        % beatStructure
      #'()       % beamExceptions
    \time 4/4
    \repeat unfold 8 { c8 } |
    \revertTimeSignatureSettings 4/4
    \time 4/4
    \repeat unfold 8 { c8 } |
  }
}
![[image of music]](c1/lily-4c4f3c44.png)
Timing_translator と Default_bar_line_engraver をScore コンテキストから Staff コンテキストに移動させることにより、異なる譜に対して異なる値のデフォルト拍子プロパティを割り当てることができます。
\score {
  \new StaffGroup <<
     \new Staff {
        \overrideTimeSignatureSettings
          4/4        % timeSignatureFraction
          1/4        % baseMomentFraction
          3,1        % beatStructure
          #'()       % beamExceptions
        \time 4/4
        \repeat unfold 8 {c''8}
     }
     \new Staff {
        \overrideTimeSignatureSettings
          4/4        % timeSignatureFraction
          1/4        % baseMomentFraction
          1,3        % beatStructure
          #'()       % beamExceptions
        \time 4/4
        \repeat unfold 8 {c''8}
     }
  >>
  \layout {
    \context {
      \Score
      \remove "Timing_translator"
      \remove "Default_bar_line_engraver"
    }
    \context {
      \Staff
      \consists "Timing_translator"
      \consists "Default_bar_line_engraver"
    }
  }
}
![[image of music]](ab/lily-16d503d1.png)
定義済みコマンド
\numericTimeSignature,
\defaultTimeSignature
Selected Snippets
Time signature printing only the numerator as a number (instead of the fraction)
Sometimes, a time signature should not print the whole fraction (e.g.
7/4), but only the numerator (7 in this case). This can be easily done
by using \override Staff.TimeSignature.style = #'single-digit
to change the style permanently. By using \revert
Staff.TimeSignature.style, this setting can be reversed. To apply the
single-digit style to only one time signature, use the
\override command and prefix it with a \once.
\relative c'' {
  \time 3/4
  c4 c c
  % Change the style permanently
  \override Staff.TimeSignature.style = #'single-digit
  \time 2/4
  c4 c
  \time 3/4
  c4 c c
  % Revert to default style:
  \revert Staff.TimeSignature.style
  \time 2/4
  c4 c
  % single-digit style only for the next time signature
  \once \override Staff.TimeSignature.style = #'single-digit
  \time 5/4
  c4 c c c c
  \time 2/4
  c4 c
}
![[image of music]](d0/lily-5a6cebe0.png)
参照
音楽用語集: time signature
記譜法リファレンス: Mensural time signatures, 時間管理
コード断片集: Rhythms
内部リファレンス: TimeSignature, Timing_translator
| [ << 音楽記譜法 ] | [トップ][目次][インデックス][ ? ] | [ 専門的な記譜法 >> ] | ||
| [ < 拍子 ] | [ 上へ : リズムを表示する ] | [ 上拍 > ] | ||
メトロノーム記号
基本的なメトロノーム記号は単純に以下のように記述します:
\relative {
  \tempo 4 = 120
  c'2 d
  e4. d8 c2
}
![[image of music]](39/lily-94f5ff20.png)
メトロノーム記号を 2 つの数の範囲として譜刻することもできます:
\relative {
  \tempo 4 = 40 - 46
  c'4. e8 a4 g
  b,2 d4 r
}
![[image of music]](ee/lily-ccc67549.png)
テキストを持つテンポ指示にすこともできます:
\relative {
  \tempo "Allegretto"
    c''4 e d c
    b4. a16 b c4 r4
}
![[image of music]](01/lily-fd6ec5e8.png)
メトロノーム記号とテキストを組み合わせると、メトロノーム記号は自動的に括弧で囲まれます:
\relative {
  \tempo "Allegro" 4 = 160
  g'4 c d e
  d4 b g2
}
![[image of music]](0e/lily-0b3afb0a.png)
一般に、テキストを任意のマークアップ オブジェクトにすることができます:
\relative {
  \tempo \markup { \italic Faster } 4 = 132
  a'8-. r8 b-. r gis-. r a-. r
}
![[image of music]](8b/lily-b29bff01.png)
テキストを伴わないメトロノーム記号を括弧で囲むには、空の文字列を含めて記述します:
\relative {
  \tempo "" 8 = 96
  d''4 g e c
}
![[image of music]](48/lily-b9aa1a53.png)
Selected Snippets
Printing metronome and rehearsal marks below the staff
By default, metronome and rehearsal marks are printed above the staff.
To place them below the staff simply set the direction property
of MetronomeMark or RehearsalMark appropriately.
\layout {
  indent = 0
  ragged-right = ##f
}

{
  % Metronome marks below the staff
  \override Score.MetronomeMark.direction = #DOWN
  \tempo 8. = 120
  c''1

  % Rehearsal marks below the staff
  \override Score.RehearsalMark.direction = #DOWN
  \mark \default
  c''1
}
![[image of music]](fa/lily-cae71fb7.png)
Changing the tempo without a metronome mark
To change the tempo in MIDI output without printing anything, make the metronome mark invisible.
\score {
  \new Staff \relative c' {
    \tempo 4 = 160
    c4 e g b
    c4 b d c
    \set Score.tempoHideNote = ##t
    \tempo 4 = 96
    d,4 fis a cis
    d4 cis e d
  }
  \layout { }
  \midi { }
}
![[image of music]](23/lily-aa4ac659.png)
Creating metronome marks in markup mode
New metronome marks can be created in markup mode, but they will not change the tempo in MIDI output.
\relative c' {
  \tempo \markup {
    \concat {
      (
      \smaller \general-align #Y #DOWN \note {16.} #1
      " = "
      \smaller \general-align #Y #DOWN \note {8} #1
      )
    }
  }
  c1
  c4 c' c,2
}
![[image of music]](8d/lily-073da3c1.png)
詳細は テキストをフォーマットする を参照してください。
参照
音楽用語集: metronome, metronomic indication, tempo indication, metronome mark
記譜法リファレンス: テキストをフォーマットする, MIDI 出力
コード断片集: Staff notation
内部リファレンス: MetronomeMark
| [ << 音楽記譜法 ] | [トップ][目次][インデックス][ ? ] | [ 専門的な記譜法 >> ] | ||
| [ < メトロノーム記号 ] | [ 上へ : リズムを表示する ] | [ 無韻律の音楽 > ] | ||
上拍
弱拍 や 上拍 などのような部分小節またはピックアップ小節は、\partial コマンドを使って入力します:
\partial duration
duration は、最初の完全な長さを持つ小節の前に置かれる小節の長さです:
\time 3/4
\partial 8
e8 | a4 c8 b c4 |
![[image of music]](1f/lily-332eb01d.png)
duration は、完全な長さを持つ小節より短い演奏時間であれば、任意の値を取ることができます:
\relative {
  \time 3/4
  \partial 4.
  r4 e'8 | a4 c8 b c4 |
}
![[image of music]](4f/lily-5ce015ac.png)
\partial duration を以下のように記述することもできます:
\set Timing.measurePosition -duration
この場合、\partial 8 は以下のようになります:
\time 3/4
\set Timing.measurePosition = #(ly:make-moment -1/8)
e8 | a4 c8 b c4 |
![[image of music]](af/lily-6c66c555.png)
プロパティ measurePosition は、ある時点でその小節はどれくらい演奏済みになっているかを示す有理数を保持します。このプロパティは \partial によって負の数にセットされるということに注意してください:
すなわち、\partial 4 は内部的に -4 に翻訳され、“その小節には 4 分音符が残っている” という意味になります。
参照
音楽用語集: anacrusis
記譜法リファレンス: 装飾小音符
コード断片集: Rhythms
内部リファレンス: Timing_translator
既知の問題と警告
\partial コマンドは楽曲の開始時でのみ使用すべきです。楽曲の途中でこのコマンドを使用した場合、警告や問題が発生する可能性があります。曲の途中では \partial の代わりに
\set Timing.measurePosition を使用してください。
\time 6/8
\partial 8
e8 | a4 c8 b[ c b] |
\set Timing.measurePosition = #(ly:make-moment -1/4)
r8 e,8 | a4 c8 b[ c b] |
![[image of music]](74/lily-94dcf58a.png)
| [ << 音楽記譜法 ] | [トップ][目次][インデックス][ ? ] | [ 専門的な記譜法 >> ] | ||
| [ < 上拍 ] | [ 上へ : リズムを表示する ] | [ 多拍子記譜法 > ] | ||
無韻律の音楽
韻律のある音楽では、自動的に小節線が挿入され、小節番号が算出されます。無韻律の音楽 (例えばカデンツァ) では、これは望ましくなく、コマンド
\cadenzaOn を用いて ‘スイッチ off’ することができます。‘スイッチ on’ に戻すには、適切な場所で \cadenzaOff を用います。
\relative c'' {
  c4 d e d
  \cadenzaOn
  c4 c d8[ d d] f4 g4.
  \cadenzaOff
  \bar "|"
  d4 e d c
}
![[image of music]](16/lily-47f774eb.png)
カデンツァが終わると、小節番号が再開されます。
% すべての小節番号を表示します
\override Score.BarNumber.break-visibility = #all-visible
c4 d e d
\cadenzaOn
c4 c d8[ d d] f4 g4.
\cadenzaOff
\bar "|"
d4 e d c
![[image of music]](33/lily-39624e7a.png)
カデンツァの中に \bar コマンドを挿入したとしても、新しい小節が始まることはありません。そのため、注意喚起のための臨時記号は手動で挿入する必要があります。臨時記号 を参照してください。
自動連桁は \cadenzaOn で off になり、\cadenzaOff で on になります。このため、カデンツァ内の連桁はすべて手動で入力する必要があります
(手動連桁)。
c4 d e d
\cadenzaOn
cis4 d cis d
\bar "|"
cis4 d cis! d
\cadenzaOff
\bar "|"
![[image of music]](d6/lily-8a9db55d.png)
自動連桁は \cadenzaOn によって off になります。そのため、カデンツァの中に連桁を挿入するには手動で行う必要があります。手動連桁 を参照してください。
\relative {
  \repeat unfold 8 { c''8 }
  \cadenzaOn
  cis8 c c c c
  \bar"|"
  c8 c c
  \cadenzaOff
  \repeat unfold 8 { c8 }
}
![[image of music]](fb/lily-c46ff666.png)
+These predefined commands affect all staves in the score, even when
+placed in just one Voice context. To change this, move the
+Timing_translator from the Score context to the
+Staff context. See 多拍子記譜法.
これらの定義済みコマンドは、たとえ Voice コンテキストの 1 つの中に配置したとしても、楽譜の中にあるすべての譜に影響を与えます。これを変更するには、Timing_translator を Score コンテキストから Staff コンテキストに移動させます。多拍子記譜法 を参照してください。
定義済みコマンド
\cadenzaOn,
\cadenzaOff
参照
音楽用語集: cadenza
記譜法リファレンス: オブジェクトの可視性, 多拍子記譜法, 手動連桁, 臨時記号
コード断片集: Rhythms
既知の問題と警告
自動の改行と改ページが挿入されるのは小節線のある場所だけです。そのため、長い無韻律の音楽で改行や改ページを行うには手動で ‘不可視の’ 小節線を挿入する必要があります:
\bar ""
\cadenzaOn で楽曲を始める場合、Voice コンテキストを明示的に作成すべきです。さもないと、予期しないエラーが発生する可能性があります。
\new Voice {
  \relative c' {
    \cadenzaOn
    c16[^"Solo Free Time" d e f] g2.
    \bar "||"
    \cadenzaOff
  }
}
| [ << 音楽記譜法 ] | [トップ][目次][インデックス][ ? ] | [ 専門的な記譜法 >> ] | ||
| [ < 無韻律の音楽 ] | [ 上へ : リズムを表示する ] | [ 自動音符分割 > ] | ||
多拍子記譜法
多拍子記譜法がサポートされます。 複合拍子記譜法がサポートされます。明示的な複合拍子と、拍子指定を変更して音符の演奏時間を伸縮することによる複合拍子のどちらもです。
それぞれの譜は異なる拍子を持ち、小節の長さは等価である場合
各譜共通の拍子記号をセットして、timeSignatureFraction にお望みの分数をセットします。それから、\scaleDurations 関数を用いて共通の拍子記号に対する
各譜の音符の演奏時間を伸縮させます。
以下の例では、拍子記号 3/4, 9/8, それに 10/8 の音楽が並列しています。2 番目の譜では示された演奏時間に 2/3 が掛けられ (なぜなら、2/3 * 9/8 = 3/4 だからです)、3 番目の譜では示された演奏時間に 3/5 が掛けられます (なぜなら、3/5 * 10/8 = 3/4 だからです)。演奏時間の伸縮は自動連桁の規則に影響を与えるため、手動で連桁を付ける必要があるかもしれません。
\relative <<
  \new Staff {
    \time 3/4
    c'4 c c |
    c4 c c |
  }
  \new Staff {
    \time 3/4
    \set Staff.timeSignatureFraction = 9/8
    \scaleDurations 2/3
      \repeat unfold 6 { c8[ c c] }
  }
  \new Staff {
    \time 3/4
    \set Staff.timeSignatureFraction = 10/8
    \scaleDurations 3/5 {
      \repeat unfold 2 { c8[ c c] }
      \repeat unfold 2 { c8[ c] } |
      c4. c \tuplet 3/2 { c8[ c c] } c4
    }
  }
>>
![[image of music]](36/lily-edfa20c1.png)
それぞれの譜は異なる拍子を持ち、小節の長さは等価ではない場合
Timing_translator と Default_bar_line_engraver を
Staff コンテキストに移すことによって、それぞれの譜に独立した拍子を与えることができます。
\layout {
  \context {
    \Score
    \remove "Timing_translator"
    \remove "Default_bar_line_engraver"
  }
  \context {
    \Staff
    \consists "Timing_translator"
    \consists "Default_bar_line_engraver"
  }
}

% 以上で、各譜はそれぞれに拍子を持つようになります

\relative <<
  \new Staff {
    \time 3/4
    c'4 c c |
    c4 c c |
  }
  \new Staff {
    \time 2/4
    c4 c |
    c4 c |
    c4 c |
  }
  \new Staff {
    \time 3/8
    c4. |
    c8 c c |
    c4. |
    c8 c c |
  }
>>
![[image of music]](54/lily-e8be535f.png)
複合拍子記号
複合拍子記号は \compoundMeter を用いて作成します。構文は以下の通りです:
\compoundMeter #'(list of lists)
最も簡単な構成は単一のリストであり、リストの 最後の 数字が拍子記号の分母になります。
\relative {
  \compoundMeter #'((2 2 2 8))
  \repeat unfold 6 c'8 \repeat unfold 12 c16
}
![[image of music]](df/lily-d5ab0ead.png)
リストを追加することでより複雑な拍子を構築することができます。また、この関数で指定された値に基づいて自動連桁の設定は調節されます。
\relative {
  \compoundMeter #'((1 4) (3 8))
  \repeat unfold 5 c'8 \repeat unfold 10 c16
}

\relative {
  \compoundMeter #'((1 2 3 8) (3 4))
  \repeat unfold 12 c'8
}
![[image of music]](5a/lily-df3af9da.png)
参照
音楽用語集: polymetric, polymetric time signature, meter
記譜法リファレンス: 自動連桁, 手動連桁, 拍子, 演奏時間を変更する
コード断片集: Rhythms
内部リファレンス: TimeSignature, Timing_translator, Default_bar_line_engraver, Staff
既知の問題と警告
異なる拍子を持つ譜が並列に並べられている場合、同時に起こる音符の水平方向の位置は同じになります。しかしながら、それぞれの譜の小節線により、音符の間隔は通常の異なる拍子が無い場合よりも不規則になります。
| [ << 音楽記譜法 ] | [トップ][目次][インデックス][ ? ] | [ 専門的な記譜法 >> ] | ||
| [ < 多拍子記譜法 ] | [ 上へ : リズムを表示する ] | [ 旋律のリズムを示す > ] | ||
自動音符分割
小節線をまたがる長い音符を自動的にタイで結ばれた音符に変換することができます。これを行うには、Note_heads_engraver を Completion_heads_engraver
で置き換えます。同様に、小節線をまたがる長い休符を自動的に分割することができます。
これを行うには、Rest_engraver を Completion_rest_engraver
で置き換えます。以下の例では、小節線をまたがる音符と休符は分割され、音符はされにタイで結ばれています。
\new Voice \with {
  \remove "Note_heads_engraver"
  \consists "Completion_heads_engraver"
  \remove "Rest_engraver"
  \consists "Completion_rest_engraver"
}
\relative {
  c'2. c8 d4 e f g a b c8 c2 b4 a g16 f4 e d c8. c2 r1*2
}
![[image of music]](07/lily-cec347f6.png)
これらのエングラーバは進行中の音符と休符をすべて小節線のところで分割して、音符に対してはタイを挿入します。これらのエングラーバの用途の 1 つに複雑な楽譜のデバッグがあります: 何小節かで音符がきちんと満たされていない場合、このエングラーバで挿入されたタイが、それぞれの小節の狂いを示します。
参照
音楽用語集: tie
学習マニュアル: Engravers explained, Adding and removing engravers
コード断片集: Rhythms
内部リファレンス: Note_heads_engraver, Completion_heads_engraver, Rest_engraver, Completion_rest_engraver, Forbid_line_break_engraver
既知の問題と警告
すべての演奏時間を通常の音符と付点で正確に表すことはできません
(特に、連符を含んでいる場合) が、Completion_heads_engraver が連符を挿入することはありません。
Completion_heads_engraver は音符にだけ作用します。休符を分割することはありません。
| [ << 音楽記譜法 ] | [トップ][目次][インデックス][ ? ] | [ 専門的な記譜法 >> ] | ||
| [ < 自動音符分割 ] | [ 上へ : リズムを表示する ] | [ 連桁 > ] | ||
旋律のリズムを示す
しばしば旋律のリズムだけを示したいことがあります。これはリズム譜を使うことで達成できます。そのような譜上にある音符のピッチはすべて破棄され、その譜自体は 1 本の線を持ちます:
<<
  \new RhythmicStaff {
    \new Voice = "myRhythm" \relative {
      \time 4/4
      c'4 e8 f g2
      r4 g g f
      g1
    }
  }
  \new Lyrics {
    \lyricsto "myRhythm" {
      This is my song
      I like to sing
    }
  }
>>
![[image of music]](d6/lily-a762d8ca.png)
ギター コード表はしばしばつま弾き (ストラム) のリズムを示します。これは Pitch_squash_engraver と \improvisationOn を使うことで達成できます。
<<
  \new ChordNames {
    \chordmode {
      c1 f g c
    }
  }
  \new Voice \with {
    \consists "Pitch_squash_engraver"
  } \relative c'' {
    \improvisationOn
    c4 c8 c c4 c8 c
    f4 f8 f f4 f8 f
    g4 g8 g g4 g8 g
    c4 c8 c c4 c8 c
  }
>>
![[image of music]](e7/lily-c86893e6.png)
定義済みコマンド
\improvisationOn,
\improvisationOff
Selected Snippets
Guitar strum rhythms
For guitar music, it is possible to show strum rhythms, along with melody notes, chord names and fret diagrams.
\include "predefined-guitar-fretboards.ly"
<<
  \new ChordNames {
    \chordmode {
      c1 | f | g | c
    }
  }
  \new FretBoards {
    \chordmode {
      c1 | f | g | c
    }
  }
  \new Voice \with {
    \consists "Pitch_squash_engraver"
  } {
    \relative c'' {
      \improvisationOn
      c4 c8 c c4 c8 c
      f4 f8 f f4 f8 f
      g4 g8 g g4 g8 g
      c4 c8 c c4 c8 c
    }
  }
  \new Voice = "melody" {
    \relative c'' {
      c2 e4 e4
      f2. r4
      g2. a4
      e4 c2.
    }
  }
  \new Lyrics {
    \lyricsto "melody" {
      This is my song.
      I like to sing.
    }
  }
>>
![[image of music]](85/lily-112cef89.png)
参照
コード断片集: Rhythms
内部リファレンス: RhythmicStaff, Pitch_squash_engraver
| [ << 音楽記譜法 ] | [トップ][目次][インデックス][ ? ] | [ 専門的な記譜法 >> ] | ||
| [ < 旋律のリズムを示す ] | [ 上へ : リズム ] | [ 自動連桁 > ] | ||
1.2.4 連桁
| 自動連桁 | ||
| 自動連桁の振る舞いを設定する | ||
| 手動連桁 | ||
| 羽状の連桁 |
| [ << 音楽記譜法 ] | [トップ][目次][インデックス][ ? ] | [ 専門的な記譜法 >> ] | ||
| [ < 連桁 ] | [ 上へ : 連桁 ] | [ 自動連桁の振る舞いを設定する > ] | ||
自動連桁
デフォルトでは、連桁は自動的に挿入されます:
\relative c'' {
  \time 2/4 c8 c c c
  \time 6/8 c8 c c c8. c16 c8
}
![[image of music]](3a/lily-2a5aadc4.png)
自動的に決定される連桁が満足いかないものである場合、明示的に連桁を挿入することが可能です – 手動連桁 を参照してください。連桁を休符の上まで伸ばそうと意図しているのなら、連桁を手動で挿入する 必要があります。
自動連桁を必要としない場合、\autoBeamOff で off にすることができ、\autoBeamOn で on にすることができます:
\relative c' {
  c4 c8 c8. c16 c8. c16 c8
  \autoBeamOff
  c4 c8 c8. c16 c8.
  \autoBeamOn
  c16 c8
}
![[image of music]](bc/lily-ec57601e.png)
Note: 歌曲の中でメリスマを表すために連桁を使用する場合、autoBeamOff で自動連桁を off にして、手動で連桁を示すべきです。\partcombine を \autoBeamOff と一緒に用いると予期しない結果になる可能性があります。詳細はコード断片集を参照してください。
自動的に挿入されるデフォルトの連桁とは異なるパターンの連桁を作成することができます – 自動連桁の振る舞いを設定する を参照してください。
定義済みコマンド
\autoBeamOff,
\autoBeamOn
Selected Snippets
Beams across line breaks
Line breaks are normally forbidden when beams cross bar lines. This behavior can be changed as shown:
\relative c'' {
  \override Beam.breakable = ##t
  c8 c[ c] c[ c] c[ c] c[ \break
  c8] c[ c] c[ c] c[ c] c
}
![[image of music]](b3/lily-4c62e333.png)
Changing beam knee gap
Kneed beams are inserted automatically when a large gap is detected
between the note heads. This behavior can be tuned through the
auto-knee-gap property. A kneed beam is drawn if the gap is
larger than the value of auto-knee-gap plus the width of the
beam object (which depends on the duration of the notes and the slope
of the beam). By default auto-knee-gap is set to 5.5 staff
spaces.
{
  f8 f''8 f8 f''8
  \override Beam.auto-knee-gap = #6
  f8 f''8 f8 f''8
}
![[image of music]](3e/lily-c353cd54.png)
Partcombine and autoBeamOff
The function of \autoBeamOff when used with
\partcombine can be difficult to understand.
It may be preferable to use
\set Staff.autoBeaming = ##f
instead, to ensure that autobeaming will be turned off for the entire staff.
\partcombine apparently works with 3 voices – stem up single,
stem down single, stem up combined.
An \autoBeamOff call in the first argument to partcombine will
apply to the voice that is active at the time the call is processed,
either stem up single or stem up combined. An \autoBeamOff call
in the second argument will apply to the voice that is stem down single.
In order to use \autoBeamOff to stop all autobeaming when used
with \partcombine, it will be necessary to use three calls to
\autoBeamOff.
{
  %\set Staff.autoBeaming = ##f % turns off all autobeaming
  \partcombine
  {
    \autoBeamOff % applies to split up stems
    \repeat unfold 4 a'16
    %\autoBeamOff % applies to combined up stems
    \repeat unfold 4 a'8
    \repeat unfold 4 a'16
  }
  {
    \autoBeamOff % applies to down stems
    \repeat unfold 4 f'8
    \repeat unfold 8 f'16 |
  }
}
![[image of music]](bc/lily-6826cd0d.png)
参照
記譜法リファレンス: 手動連桁, 自動連桁の振る舞いを設定する.
インストールされているファイル: ‘scm/auto-beam.scm’
コード断片集: Rhythms
内部リファレンス: Auto_beam_engraver, Beam_engraver, Beam, BeamEvent, BeamForbidEvent, beam-interface, unbreakable-spanner-interface
既知の問題と警告
連桁のプロパティは連桁構築の開始時に決定され、その後から連桁の完了までの間に追加された連桁プロパティの変更は 次の 連桁から影響を与えます。
| [ << 音楽記譜法 ] | [トップ][目次][インデックス][ ? ] | [ 専門的な記譜法 >> ] | ||
| [ < 自動連桁 ] | [ 上へ : 連桁 ] | [ 手動連桁 > ] | ||
自動連桁の振る舞いを設定する
たいていの場合、自動連桁は拍の終わりで終了します。拍の終了点はコンテキスト プロパティ baseMoment と
beatStructure によって決定されます。beatStructure は baseMoment を単位とする小節の各拍の長さを定義する Scheme リストです。デフォルトでは、baseMoment は ‘1/拍子の分母’ です。デフォルトでは、各拍の長さは baseMoment です。
\time 5/16
c16^"default" c c c c |
\set Timing.beatStructure = 2,3
c16^"(2+3)" c c c c |
\set Timing.beatStructure = 3,2
c16^"(3+2)" c c c c |
![[image of music]](c0/lily-60ff15e1.png)
連桁の設定変更をある特定のテキストに限定することができます。下位コンテキストに連桁の設定が含まれない場合、そのコンテキストを囲んでいる上位コンテキストの設定が適用されます。
\new Staff {
  \time 7/8
  \set Staff.beatStructure = 2,3,2
  <<
    \new Voice = one {
      \relative {
        a'8 a a a a a a
      }
    }
    \new Voice = two {
      \relative {
        \voiceTwo
        \set Voice.beatStructure = 1,3,3
        f'8 f f f f f f
      }
    }
  >>
}
![[image of music]](3e/lily-25212260.png)
譜で複数のボイスが使用されている場合に連桁設定を譜のすべてのボイスに適用するには、Staff コンテキストで設定を行う必要があります:
\time 7/8
% リズム 3-1-1-2
% デフォルトで連桁設定の変更は Voice に適用され、うまくいきません
% なぜなら、自動生成されるボイスで、すべての拍は baseMoment (1 . 8) だからです
\set beatStructure = 3,1,1,2
<< {a8 a a a16 a a a a8 a} \\ {f4. f8 f f f} >>

% コンテキスト Staff を指定するとうまくいきます
\set Staff.beatStructure = 3,1,1,2
<< {a8 a a a16 a a a a8 a} \\ {f4. f8 f f f} >>
![[image of music]](62/lily-6ab2fc60.png)
baseMoment の値を調整することで、連桁の振る舞いを変更することができます。baseMoment の値を変更した場合、beatStructure に新しい baseMoment と矛盾しない値を設定する必要があります。
\time 5/8
\set Timing.baseMoment = #(ly:make-moment 1/16)
\set Timing.beatStructure = 7,3
\repeat unfold 10 { a16 }
![[image of music]](38/lily-996a6f81.png)
beatLength は moment – 演奏時間の単位 – です。タイプ momento の量は
Scheme 関数 ly:make-moment によって作り出されます。この関数についての更なる情報は 時間管理 を参照してください。
デフォルトでは、baseMoment には「1/拍子の分母」がセットされています。このデフォルトの例外は ‘scm/time-signature-settings.scm’ で見つかります。
特殊な自動連桁規則 (連桁の終わりが拍に従わないもの) はプロパティ
beamExceptions に定義します。
\time 3/16
\set Timing.beatStructure = 2,1
\set Timing.beamExceptions =
  #'(                         ;start of alist
     (end .                   ;entry for end of beams
      (                       ;start of alist of end points
       ((1 . 32) . (2 2 2))   ;rule for 1/32 beams -- end each 1/16
      )))                     %close all entries
c16 c c |
\repeat unfold 6 { c32 } |
![[image of music]](7b/lily-05a52a12.png)
beamExceptions は規則タイプのキーと連桁規則の値を持つ配列リストです。
現時点で、利用可能な唯一の規則タイプの値は、連桁の終わりのための 'end です。
連桁規則は、連桁タイプとその連桁タイプの最短演奏時間の音符を保持する連桁に適用されるグループ化の仕方を示す Scheme 配列リスト (あるいはペアのリスト) です。
#'((beam-type1 . grouping-1)
   (beam-type2 . grouping-2)
   (beam-type3 . grouping-3))
連桁タイプは、その連桁の演奏時間を示す Scheme ペアであり、例えば (1 . 16) です。
Note: beamExceptions の値は 完全な 例外リストである必要があります。つまり、その設定には適用されるべき例外がすべて含まれている必要があります。例外の 1 つだけを追加、削除、変更することはできません。このことは扱い難いように思えるかもしれませんが、新しい連桁パターンを指定する際に現在の連桁設定を知る必要がないということを意味します。
拍子が変更されると、Timing.baseMoment, Timing.beatStructure,
それに Timing.beamExceptions のデフォルト値が設定されます。拍子を設定すると、その Timing コンテキストの自動連桁設定はデフォルトの振る舞いにリセットされます。
\time 6/8
\repeat unfold 6 { a8 }
% (4 + 2) にグループ化します
\set Timing.beatStructure = 4,2
\repeat unfold 6 { a8 }
% デフォルトの振る舞いに戻ります
\time 6/8
\repeat unfold 6 { a8 }
![[image of music]](28/lily-a35b8a5d.png)
ある拍子に対するデフォルトの自動連桁設定は ‘scm/beam-settings.scm’ の中で決定されます。ある拍子に対する自動連桁のデフォルト設定を変更する方法は 拍子 で説明しています。
ある拍子に対する自動連桁設定の多くには
beamExceptions が登録されています。例えば、4/4 拍子は 16 分音符しかない小節を 2 つの連桁で囲もうとします。beamExceptions がリセットされていなければ、beamExceptions 規則は beatStructure 設定をオーバライドすることができます。
\time 4/4
\set Timing.baseMoment = #(ly:make-moment 1/8)
\set Timing.beatStructure = 3,3,2
% 以下は beamExceptions のため、(3 3 2) の連桁にはなりません
\repeat unfold 8 {c8} |
% 以下は beamExceptions をクリアするため、(3 3 2) の連桁になります
\set Timing.beamExceptions = #'()
\repeat unfold 8 {c8}
![[image of music]](7e/lily-f1d6aa81.png)
同様に、3/4 拍子はデフォルトで 8 分音符しかない小節を 1 つの連桁で囲みます。3/4 拍子の 8 分音符に拍毎の連桁を付けるには、beamExceptions をリセットします。
\time 3/4
% beamExceptions により、デフォルトで (6) の連桁を付けます
\repeat unfold 6 {a8} |
% beatLength により、これは (1 1 1) の連桁を付けます
\set Timing.beamExceptions = #'()
\repeat unfold 6 {a8}
![[image of music]](b1/lily-42c76e8e.png)
ロマン派や古典派時代の譜刻では、3/4 拍子の小節の途中から連桁が始まることがありますが、誤った 6/8 拍子の印象を与えるため現代の習慣では用いません (Gould の 153 ページを参照してください)。3/8 拍子でも同様の状況が発生します。この振る舞いはコンテキスト プロパティ beamHalfMeasure によって制御されます – これは分子が 3 の拍子記号の場合にのみ効果を持ちます:
\relative a' {
  \time 3/4
  r4. a8 a a |
  \set Timing.beamHalfMeasure = ##f
  r4. a8 a a |
}
![[image of music]](db/lily-5b0e58bb.png)
自動連桁はどのように機能するのか
自動連桁が有効である場合、自動連桁の配置はコンテキスト プロパティ
baseMoment, beatStructure, それに beamExceptions
によって決定されます。
連桁の配置を決定する際、以下の規則が並び順の優先度で適用されます:
-
[..]で手動連桁が指定されている場合、連桁は指定どおりに設定されます。手動連桁が指定されていない場合、 -
その連桁タイプに対する
beamExceptionsに連桁終了規則が定義されている場合、その規則を用いて連桁を終了させる位置を決定します。連桁終了規則が定義されていない場合、 -
もっと長い連桁タイプに対する
beamExceptionsに連桁終了規則が定義されている場合、その規則を用いて連桁を終了させる位置を決定します。連桁終了規則が定義されていない場合、 -
baseMomentとbeatStructureの値を用いてその小節での拍の終わりを決定し、拍の終わりで連桁を終了させます。
上記の規則で、連桁タイプ は連桁でグループ化された音符の最短演奏時間です。
デフォルトの連桁規則は ‘scm/time-signature-settings.scm’ の中にあります。
Selected Snippets
Subdividing beams
The beams of consecutive 16th (or shorter) notes are, by default, not
subdivided. That is, the three (or more) beams stretch unbroken over
entire groups of notes. This behavior can be modified to subdivide the
beams into sub-groups by setting the property subdivideBeams.
When set, multiple beams will be subdivided at intervals defined by the
current value of baseMoment by reducing the multiple beams to
the number of beams that indicates the metric value of the subdivision.
If the group following the division is shorter than the current metric
value (usually because the beam is incomplete) the number of beams
reflects the longest possible subdivision group. However, if there is
only one note left after the division this restriction isn’t applied.
Note that baseMoment defaults to one over the denominator of the
current time signature if not set explicitly. It must be set to a
fraction giving the duration of the beam sub-group using the
ly:make-moment function, as shown in this snippet. Also, when
baseMoment is changed, beatStructure should also be
changed to match the new baseMoment:
\relative c'' {
  c32[ c c c c c c c]
  \set subdivideBeams = ##t
  c32[ c c c c c c c]

  % Set beam sub-group length to an eighth note
  \set baseMoment = #(ly:make-moment 1/8)
  \set beatStructure = 2,2,2,2
  c32[ c c c c c c c]

  % Set beam sub-group length to a sixteenth note
  \set baseMoment = #(ly:make-moment 1/16)
  \set beatStructure = 4,4,4,4
  c32[ c c c c c c c]

  % Shorten beam by 1/32
  \set baseMoment = #(ly:make-moment 1/8)
  \set beatStructure = 2,2,2,2
  c32[ c c c c c c] r32

  % Shorten beam by 3/32
  \set baseMoment = #(ly:make-moment 1/8)
  \set beatStructure = 2,2,2,2
  c32[ c c c c] r16.
  r2
}
![[image of music]](c2/lily-faa7e958.png)
Strict beat beaming
Beamlets can be set to point in the direction of the beat to which they belong. The first beam avoids sticking out flags (the default); the second beam strictly follows the beat.
\relative c'' {
  \time 6/8
  a8. a16 a a
  \set strictBeatBeaming = ##t
  a8. a16 a a
}
![[image of music]](fa/lily-7e29ba47.png)
Conducting signs measure grouping signs
Beat grouping within a measure is controlled by the context property
beatStructure. Values of beatStructure are established
for many time signatures in scm/time-signature-settings.scm.
Values of beatStructure can be changed or set with \set.
Alternatively, \time can be used to both set the time signature
and establish the beat structure. For this, you specify the internal
grouping of beats in a measure as a list of numbers (in Scheme syntax)
before the time signature.
\time applies to the Timing context, so it will not
reset values of beatStructure or baseMoment that are set
in other lower-level contexts, such as Voice.
If the Measure_grouping_engraver is included in one of the
display contexts, measure grouping signs will be created. Such signs
ease reading rhythmically complex modern music. In the example, the 9/8
measure is grouped in two different patterns using the two different
methods, while the 5/8 measure is grouped according to the default
setting in scm/time-signature-settings.scm:
\score {
  \new Voice \relative c'' {
    \time 9/8
    g8 g d d g g a( bes g) |
    \set Timing.beatStructure = 2,2,2,3
    g8 g d d g g a( bes g) |
    \time 4,5 9/8
    g8 g d d g g a( bes g) |
    \time 5/8
    a4. g4 |
  }
  \layout {
    \context {
      \Staff
      \consists "Measure_grouping_engraver"
    }
  }
}
![[image of music]](0c/lily-6525bade.png)
Beam endings in Score context
Beam-ending rules specified in the Score context apply to all
staves, but can be modified at both Staff and Voice
levels:
\relative c'' {
  \time 5/4
  % Set default beaming for all staves
  \set Score.baseMoment = #(ly:make-moment 1/8)
  \set Score.beatStructure = 3,4,3
  <<
    \new Staff {
      c8 c c c c c c c c c
    }
    \new Staff {
      % Modify beaming for just this staff
      \set Staff.beatStructure = 6,4
      c8 c c c c c c c c c
    }
    \new Staff {
      % Inherit beaming from Score context
      <<
        {
          \voiceOne
          c8 c c c c c c c c c
        }
        % Modify beaming for this voice only
        \new Voice {
          \voiceTwo
          \set Voice.beatStructure = 6,4
          a8 a a a a a a a a a
        }
      >>
    }
  >>
}
![[image of music]](1e/lily-b1efc0a8.png)
参照
インストールされているファイル: ‘scm/beam-settings.scm’
コード断片集: Rhythms
内部リファレンス: Auto_beam_engraver, Beam, BeamForbidEvent, beam-interface
既知の問題と警告
自動連桁が終了しておらず、まだ音符を受け付けている最中に楽譜が終了する場合、その最後の連桁はまったく譜刻されません。<< … \\ … >> で入力される多声ボイスでも同様です。自動連桁がまだ音符を受け付けている最中に多声ボイスが終了する場合、その最後の連桁はまったく譜刻されません。ボイスや楽譜の最後の連桁には手動で連桁を付けることにより、これらの問題を回避できます。
デフォルトでは、Timing コンテキストは Score コンテキストにエイリアスされています。このことは、ある譜で拍子の設定を行うと、他の譜での連桁の付け方にも影響を与えると言うことを意味します。このため、後で出てくる譜で拍子の設定を行うと、前にある譜でセットしたカスタム連桁はリセットされます。この問題を回避する方法の 1 つは、拍子の設定は 1 つの譜でしか行わないことです。
<<
  \new Staff {
    \time 3/4
    \set Timing.baseMoment = #(ly:make-moment 1/8)
    \set Timing.beatStructure = 1,5
    \repeat unfold 6 { a8 }
  }
  \new Staff {
    \repeat unfold 6 { a8 }
  }
>>
![[image of music]](b8/lily-e7c452a4.png)
拍子に対するデフォルトの連桁設定を変更することで、常にお望みの連桁を使うこともできます。ある拍子に対する自動連桁設定を変更する方法は 拍子 で説明しています。
<<
  \new Staff {
    \overrideTimeSignatureSettings
      3/4               % timeSignatureFraction
      1/8               % baseMomentFraction
      1,5               % beatStructure
      #'()		% beamExceptions
    \time 3/4
    \repeat unfold 6 { a'8 }
  }
  \new Staff {
    \time 3/4
    \repeat unfold 6 { a'8 }
  }
>>
![[image of music]](5c/lily-872c89fc.png)
| [ << 音楽記譜法 ] | [トップ][目次][インデックス][ ? ] | [ 専門的な記譜法 >> ] | ||
| [ < 自動連桁の振る舞いを設定する ] | [ 上へ : 連桁 ] | [ 羽状の連桁 > ] | ||
手動連桁
自動連桁アルゴリズムをオーバライドする必要がある場合もあります。例えば、自動連桁は休符や小節線を越えて連桁を配置することはなく、合唱譜では連桁はしばしば音符ではなく歌詞の韻律に従って配置されます。そのような連桁は [ と ] で開始点と終了点を記すことによって手動で指定することができます:
\relative { r4 r8[ g' a r] r g[ | a] r }
![[image of music]](6b/lily-7c8f1f72.png)
方向指示子を用いることで、連桁の向きを手動で設定することができます:
\relative { c''8^[ d e] c,_[ d e f g] }
![[image of music]](f5/lily-421f32d7.png)
連桁でつながれないようにするために、個々の音符には
\noBeam が記されるかもしれません:
\relative {
  \time 2/4
  c''8 c\noBeam c c
}
![[image of music]](c9/lily-b437a5ee.png)
装飾小音符の連桁と通常の音符の連桁は同時進行で発生します。通常の音符の連桁の途中に、連桁でつながれない装飾小音符は配置されません。
\relative {
  c''4 d8[
  \grace { e32 d c d }
  e8] e[ e
  \grace { f16 }
  e8 e]
}
![[image of music]](88/lily-4e8ac515.png)
プロパティ stemLeftBeamCount と stemRightBeamCount をセットすることによって連桁をさらに厳密に手動制御することが可能です。これらの値はそれぞれ、次の音符の左側と右側に描く連桁の本数を指定します。どちらかのプロパティがセットされている場合、その値は 1 度だけ使用され、それから消去されます。以下の例では、最後の f は左側に連桁を 1 本だけ持って
– すなわち、グループ全体をつなげている 8 分音符の連桁を持って –
譜刻されています。
\relative a' {
  a8[ r16 f g a]
  a8[ r16
  \set stemLeftBeamCount = #2
  \set stemRightBeamCount = #1
  f16
  \set stemLeftBeamCount = #1
  g16 a]
}
![[image of music]](97/lily-4a2a8d53.png)
定義済みコマンド
\noBeam
Selected Snippets
Flat flags and beam nibs
Flat flags on lone notes and beam nibs at the ends of beamed figures
are both possible with a combination of stemLeftBeamCount,
stemRightBeamCount and paired [] beam indicators.
For right-pointing flat flags on lone notes, use paired [] beam
indicators and set stemLeftBeamCount to zero (see Example 1).
For left-pointing flat flags, set stemRightBeamCount instead
(Example 2).
For right-pointing nibs at the end of a run of beamed notes, set
stemRightBeamCount to a positive value. And for left-pointing
nibs at the start of a run of beamed notes, set
stemLeftBeamCount instead (Example 3).
Sometimes it may make sense for a lone note surrounded by rests to
carry both a left- and right-pointing flat flag. Do this with paired
[] beam indicators alone (Example 4).
(Note that \set stemLeftBeamCount is always equivalent to
\once \set. In other words, the beam count settings are not
“sticky”, so the pair of flat flags attached to the lone
16[] in the last example have nothing to do with the
\set two notes prior.)
\score {
  <<
    % Example 1
    \new RhythmicStaff {
      \set stemLeftBeamCount = #0
      c16[]
      r8.
    }
    % Example 2
    \new RhythmicStaff {
      r8.
      \set stemRightBeamCount = #0
      16[]
    }
    % Example 3
    \new RhythmicStaff {
      16 16
      \set stemRightBeamCount = #2
      16 r r
      \set stemLeftBeamCount = #2
      16 16 16
    }
    % Example 4
    \new RhythmicStaff {
      16 16
      \set stemRightBeamCount = #2
      16 r16
      16[]
      r16
      \set stemLeftBeamCount = #2
      16 16
    }
  >>
}
![[image of music]](9a/lily-90512306.png)
参照
コード断片集: Rhythms
内部リファレンス: Beam, BeamEvent, Beam_engraver, beam-interface, Stem_engraver
| [ << 音楽記譜法 ] | [トップ][目次][インデックス][ ? ] | [ 専門的な記譜法 >> ] | ||
| [ < 手動連桁 ] | [ 上へ : 連桁 ] | [ 小節 > ] | ||
羽状の連桁
羽状の連桁は、楽曲全体のテンポを変えることなく、音符の小さなグループをテンポを上げながら (あるいは下げながら) 演奏すべきであることを示すために使用されます。羽状連桁の範囲は [ と ] を使って手動で指定する必要があり、連桁の羽は Beam のプロパティ grow-direction に向きを指定することによって調整することができます。
音符の配置と MIDI 出力での音が羽状連桁によって指示された
ritardando (徐々に緩やかに) や accelerando (次第に速く) を反映すべきであるのなら、音符は波括弧で区切られた音楽表記としてグループ化される必要があり、さらに、そのグループの最初の音符と最後の音符の演奏時間の比率を指定する
featheredDurations コマンドを前に置く必要があります。
角括弧は連桁の範囲を示し、波括弧は演奏時間を変更される音符はどれなのかを示します。通常これら 2 つは同じ音符のグループを囲みますが、同じであることは必須ではありません: 2 つのコマンドは独立しています。
以下の例では、8 つの 16 分音符は 2 分音符とまったく同じ時間を占めますが、最初の音符の長さは最後の音符の長さの半分であり、中間の音符は徐々に長くなります。最初の 4 つの 32 分音符は徐々にスピード アップしますが、最後の 4 つの 32 分音符は一定のテンポです。
\relative c' {
  \override Beam.grow-direction = #LEFT
  \featherDurations #(ly:make-moment 2/1)
  { c16[ c c c c c c c] }
  \override Beam.grow-direction = #RIGHT
  \featherDurations #(ly:make-moment 2/3)
  { c32[ d e f] }
  % revert to non-feathered beams
  \override Beam.grow-direction = #'()
  { g32[ a b c] }
}
![[image of music]](fb/lily-46cb6738.png)
譜刻される音符の間隔は音符の演奏時間を近似的に表しているだけですが、MIDI 出力での演奏時間は正確です。
定義済みコマンド
\featherDurations
参照
コード断片集: Rhythms
既知の問題と警告
\featherDurations は非常に短い音楽コード断片に対してだけ、そして分数の数が小さいときにだけ機能します。
| [ << 音楽記譜法 ] | [トップ][目次][インデックス][ ? ] | [ 専門的な記譜法 >> ] | ||
| [ < 羽状の連桁 ] | [ 上へ : リズム ] | [ 小節線 > ] | ||
1.2.5 小節
| 小節線 | ||
| 小節番号 | ||
| 小節と小節番号のチェック | ||
| リハーサル記号 |
| [ << 音楽記譜法 ] | [トップ][目次][インデックス][ ? ] | [ 専門的な記譜法 >> ] | ||
| [ < 小節 ] | [ 上へ : 小節 ] | [ 小節番号 > ] | ||
小節線
小節線は小節を区切り、繰り返しを示すためにも使用されます。通常、単線の小節線が拍子に基づいて出力に自動的に挿入されます。
自動的に挿入される単線の小節線は
\bar コマンドで他のタイプに変更することができます。例えば、通常、2 重線の閉じの小節線が楽曲の最後に配置されます:
\relative { e'4 d c2 \bar "|." }
![[image of music]](33/lily-78aa98d7.png)
ある小節の最後の音符が、自動的に挿入される小節線の所で終わっていなくても無効ではありません: その音符は次の小節に持ち越されるものと見なされます。しかしながら、そのような持ち越しのある小節がいくつも続く場合、その音楽は圧縮されて表示される可能性があり、ページからはみ出す可能性さえあります。これは、自動改行は完全な小節 – つまり、小節の終端ですべての音符が終わっている小節 – の終わりでのみ発生するからです。
Note: 誤った演奏時間の指定は改行を抑制し、結果として非常に圧縮された楽譜やページからはみ出す楽譜の原因となります。
手動で挿入された小節線のところでも – たとえ、その小節が不完全であっても – 改行することができます。小節線を譜刻せずに改行を可能にするには、以下を使用します:
\bar ""
これは不可視の小節線を挿入し、そこで改行が発生することを可能にします (強制はしません)。小節番号カウンタは増加しません。強制的に改行を行うには、改行 を参照してください。
不可視の小節線と他の特殊な小節線は任意の位置に手動で挿入することができます。それらの小節線の位置がある小節の終わりと一致する場合、それらの小節線はそこに自動で挿入されるはずだった単線の小節線に取って代わります。小節の終わりと一致しない場合、指定された小節線がその位置に挿入されます。
手動の小節線は純粋に視覚的なものです。それらは通常の小節線が影響を与えるプロパティ – 小節番号、臨時記号、改行など – には何の影響も与えません。手動の小節線はその後に続く自動小節線の算出や配置に影響を与えません。自動小節線がすでに存在する場所に手動小節線が配置されても、自動小節線の効果は変更されません。
手動で挿入できる小節線として、単線の小節線は 2 種類あり、2 重線の小節線は 5 種類あります:
\relative {
  f'1 \bar "|"
  f1 \bar "."
  g1 \bar "||"
  a1 \bar ".|"
  b1 \bar ".."
  c1 \bar "|.|"
  d1 \bar "|."
  e1
}
![[image of music]](9f/lily-84412ea9.png)
さらに、点線と破線の小節線があります:
\relative {
  f'1 \bar ";"
  g1 \bar "!"
  a1
}
![[image of music]](6a/lily-9b54cd8e.png)
さらに、繰り返しの小節線が 5 種類あります:
f1 \bar ".|:"
g1 \bar ":..:"
a1 \bar ":|.|:"
b1 \bar ":|.:"
c1 \bar ":|."
e1
![[image of music]](ed/lily-09057573.png)
Additionally, a bar line can be printed as a simple tick:
f1 \bar "'"
![[image of music]](86/lily-163661fb.png)
However, as such ticks are typically used in Gregorian chant, it is preferable
to use \divisioMinima there instead, described in the section
Divisiones in Gregorian chant.
行内のセーニョ記号として、3 タイプの小節線があり、改行での振る舞いがそれぞれ異なります:
\relative c'' {
  c4 c c c
  \bar "S"
  c4 c c c \break
  \bar "S"
  c4 c c c
  \bar "S-|"
  c4 c c c \break
  \bar "S-|"
  c4 c c c
  \bar "S-S"
  c4 c c c \break
  \bar "S-S"
  c1
}
![[image of music]](f4/lily-9f26cf08.png)
繰り返しを表す小節線は手動で挿入される場合がありますが、それらの小節線自体は LilyPond に繰り返されるセクションを認識させることはしません。そのような繰り返されるセクションはさまざまな繰り返しのコマンドを使って入力した方が良いです (繰り返し を参照してください)。繰り返しのコマンドは自動的に適切な小節線を譜刻します。
さらに、"||:" を使用することができます。これは "|:" と等価ですが、例外として改行位置では、この小節線は行の終わりに 2 重線の小節線を置き、次の行の始めに繰り返し開始の小節線を置きます。
\relative c'' {
  c4 c c c
  \bar ".|:-||"
  c4 c c c \break
  \bar ".|:-||"
  c4 c c c
}
![[image of music]](6b/lily-fcce872f.png)
繰り返しとセーニョ記号の組み合わせは 6 種類あります:
\relative c'' {
  c4 c c c
  \bar ":|.S"
  c4 c c c \break
  \bar ":|.S"
  c4 c c c
  \bar ":|.S-S"
  c4 c c c \break
  \bar ":|.S-S"
  c4 c c c
  \bar "S.|:-S"
  c4 c c c \break
  \bar "S.|:-S"
  c4 c c c
  \bar "S.|:"
  c4 c c c \break
  \bar "S.|:"
  c4 c c c
  \bar ":|.S.|:"
  c4 c c c \break
  \bar ":|.S.|:"
  c4 c c c
  \bar ":|.S.|:-S"
  c4 c c c \break
  \bar ":|.S.|:-S"
  c1
}
![[image of music]](59/lily-afeb0b34.png)
さらに、\inStaffSegno コマンドがあります。これは、セーニョ小節線を作り出し、\repeat volta コマンドと連携します。
多くの譜を持つ楽譜では、ある譜の \bar コマンドは自動的にすべての譜に適用されます。結果として、StaffGroup, PianoStaff, あるいは
GrandStaff では、小節線は譜をまたがって 1 本に接続されます。
<<
  \new StaffGroup <<
    \new Staff \relative {
      e'4 d
      \bar "||"
      f4 e
    }
    \new Staff \relative { \clef bass c'4 g e g }
  >>
  \new Staff \relative { \clef bass c'2 c2 }
>>
![[image of music]](a4/lily-ace15942.png)
Selected Snippets
コマンド \bar bartype は
‘\set Timing.whichBar = bartype’ の短縮記法です。whichBar プロパティがセットされるといつでも小節線が作成されます。
自動的に挿入される小節線に使用されるデフォルトの小節線タイプは "|" です。これは ‘\set Timing.defaultBarType = bartype’ でいつでも変更することができます。
参照
記譜法リファレンス: 改行, 繰り返し, 譜をグループ化する
コード断片集: Rhythms
内部リファレンス:
BarLine (
Staff の階層で作成されます),
SpanBar (譜をまたぎます),
Timing_translator (Timing プロパティ用です)
| [ << 音楽記譜法 ] | [トップ][目次][インデックス][ ? ] | [ 専門的な記譜法 >> ] | ||
| [ < 小節線 ] | [ 上へ : 小節 ] | [ 小節と小節番号のチェック > ] | ||
小節番号
小節番号は、デフォルトでは、最初の行を除く各行の開始点で譜刻されます。番号自体は currentBarNumber プロパティに保存されていて、通常は各小節で自動的に更新されます。小節番号を手動で設定することも可能です:
c1 c c c
\break
\set Score.currentBarNumber = #50
c1 c c c
![[image of music]](3e/lily-1ba7f488.png)
小節番号は、各行の開始点に配置する代わりに、規則的な間隔で譜刻することができます。このようにするには、小節番号を行の開始点以外の位置に譜刻できるよう、デフォルトの振る舞いをオーバライドする必要があります。これは BarNumber の break-visibility プロパティによって制御されます。これは 3 つの値をとります
– 3 つの値は、対応する小節番号を可視にするかしないかを指定するために、#t または #f にセットされます。3 つの値の順番は、end of line visible,
middle of line visible, beginning of line visible
(行の終了点での可視性、行の途中での可視性、行の開始点での可視性) です。以下の例では、譜刻可能な場所すべてに小節番号を譜刻しています:
\override Score.BarNumber.break-visibility = #'#(#t #t #t)
\set Score.currentBarNumber = #11
% Permit first bar number to be printed
\bar ""
c1 | c | c | c
\break
c1 | c | c | c
![[image of music]](41/lily-db061204.png)
Selected Snippets
Printing the bar number for the first measure
By default, the first bar number in a score is suppressed if it is less
than or equal to ‘1’. By setting barNumberVisibility to
all-bar-numbers-visible, any bar number can be printed for the
first measure and all subsequent measures. Note that an empty bar line
must be inserted before the first note for this to work.
\layout {
  indent = 0
  ragged-right = ##t
}

\relative c' {
  \set Score.barNumberVisibility = #all-bar-numbers-visible
  \bar ""
  c1 | d | e | f \break
  g1 | e | d | c
}
![[image of music]](ad/lily-527f7481.png)
Printing bar numbers at regular intervals
Bar numbers can be printed at regular intervals by setting the property
barNumberVisibility. Here the bar numbers are printed every two
measures except at the end of the line.
\relative c' {
  \override Score.BarNumber.break-visibility = #end-of-line-invisible
  \set Score.currentBarNumber = #11
  % Permit first bar number to be printed
  \bar ""
  % Print a bar number every second measure
  \set Score.barNumberVisibility = #(every-nth-bar-number-visible 2)
  c1 | c | c | c | c
  \break
  c1 | c | c | c | c
}
![[image of music]](25/lily-572e320e.png)
Printing bar numbers inside boxes or circles
Bar numbers can also be printed inside boxes or circles.
\relative c' {
  % Prevent bar numbers at the end of a line and permit them elsewhere
  \override Score.BarNumber.break-visibility = #end-of-line-invisible
  \set Score.barNumberVisibility = #(every-nth-bar-number-visible 4)

  % Increase the size of the bar number by 2
  \override Score.BarNumber.font-size = #2

  % Draw a box round the following bar number(s)
  \override Score.BarNumber.stencil
    = #(make-stencil-boxer 0.1 0.25 ly:text-interface::print)
  \repeat unfold 5 { c1 }

  % Draw a circle round the following bar number(s)
  \override Score.BarNumber.stencil
    = #(make-stencil-circler 0.1 0.25 ly:text-interface::print)
  \repeat unfold 4 { c1 } \bar "|."
}
![[image of music]](14/lily-9aa226a0.png)
Alternative bar numbering
Two alternative methods for bar numbering can be set, especially for when using repeated music.
\relative c'{
  \set Score.alternativeNumberingStyle = #'numbers
  \repeat volta 3 { c4 d e f | }
    \alternative {
      { c4 d e f | c2 d \break }
      { f4 g a b | f4 g a b | f2 a | \break }
      { c4 d e f | c2 d }
    }
  c1 \break
  \set Score.alternativeNumberingStyle = #'numbers-with-letters
  \repeat volta 3 { c,4 d e f | }
    \alternative {
      { c4 d e f | c2 d \break }
      { f4 g a b | f4 g a b | f2 a | \break }
      { c4 d e f | c2 d }
    }
  c1
}
![[image of music]](22/lily-6e4a2455.png)
Aligning bar numbers
Bar numbers by default are right-aligned to their parent object. This is usually the left edge of a line or, if numbers are printed within a line, the left hand side of a bar line. The numbers may also be positioned directly over the bar line or left-aligned to the bar line.
\relative c' {
  \set Score.currentBarNumber = #111
  \override Score.BarNumber.break-visibility = #all-visible
  % Increase the size of the bar number by 2
  \override Score.BarNumber.font-size = #2
  % Print a bar number every second measure
  \set Score.barNumberVisibility = #(every-nth-bar-number-visible 2)
  c1 | c1
  % Center-align bar numbers
  \override Score.BarNumber.self-alignment-X = #CENTER
  c1 | c1
  % Left-align bar numbers
  \override Score.BarNumber.self-alignment-X = #LEFT
  c1 | c1
}
![[image of music]](dd/lily-ecac9c1d.png)
Removing bar numbers from a score
Bar numbers can be removed entirely by removing the
Bar_number_engraver from the Score context.
\layout {
  \context {
    \Score
    \omit BarNumber
    % or:
    %\remove "Bar_number_engraver"
  }
}

\relative c'' {
  c4 c c c \break
  c4 c c c
}
![[image of music]](de/lily-075845ca.png)
参照
コード断片集: Rhythms
内部リファレンス: BarNumber, Bar_number_engraver
既知の問題と警告
小節番号は StaffGroup の左括弧の上端と衝突する可能性があります。これを解決するには、BarNumber の padding プロパティを使って小節番号を適切な位置に配置します。詳細は
StaffGroup と
BarNumber を参照してください。
| [ << 音楽記譜法 ] | [トップ][目次][インデックス][ ? ] | [ 専門的な記譜法 >> ] | ||
| [ < 小節番号 ] | [ 上へ : 小節 ] | [ リハーサル記号 > ] | ||
小節と小節番号のチェック
小節チェックは入力された演奏時間の誤りを検出する手助けをします。小節チェックは、小節線が書き込まれると予想される場所ならどこにでも、小節記号 | を使うことで挿入できます。他の場所で小節チェックの線に遭遇した場合、警告のリストがログ ファイルに書き込まれ、小節チェックに失敗した行番号と行を示します。次の例では、2 番目の小節チェックがエラーを発します。
\time 3/4 c2 e4 | g2 |
歌詞でも小節チェックを使用することができます。以下に例を挙げます:
\lyricmode {
  \time 2/4
  Twin -- kle | Twin -- kle |
}
正しくない演奏時間は滅茶苦茶な楽譜を生成する可能性があります – 特にその楽譜が多声である場合はそうなる可能性があります。入力を修正するには、まずざっと見て失敗した小節チェックと演奏時間の誤りを探すと良いでしょう。
連続する小節チェックは同じ音楽的間隔で off になり、最初の警告メッセージだけが表示されます。これにより、警告の焦点がタイミング エラーの発生源に絞られます。
入力の中で小節チェックあるいはパイプ記号 | に遭遇した場合にとられるアクションを再定義することも可能です。これにより、小節チェック以外のことを行うことができます。再定義は音楽表記を "|" に代入することによって行います。以下の例では、| は小節の終わりをチェックするのではなく、それが現れた場所に 2 重線の小節線を挿入するようセットされています。
"|" = \bar "||"
{
  c'2 c' |
  c'2 c'
  c'2 | c'
  c'2 c'
}
![[image of music]](6b/lily-210b97a6.png)
大きな楽曲をコピーしている場合、LilyPond の小節番号とコピー元のオリジナルの小節番号の対応をチェックすると役に立ちます。この対応は \barNumberCheck によってチェックすることができます。例えば、
\barNumberCheck #123
を使用すると、currentBarNumber が処理された時に 123 でなければ、警告が表示されます。
参照
コード断片集: Rhythms
| [ << 音楽記譜法 ] | [トップ][目次][インデックス][ ? ] | [ 専門的な記譜法 >> ] | ||
| [ < 小節と小節番号のチェック ] | [ 上へ : 小節 ] | [ 特殊なリズム関連事項 > ] | ||
リハーサル記号
リハーサル記号を譜刻するには、\mark コマンドを使用します:
\relative c'' {
  c1 \mark \default
  c1 \mark \default
  c1 \mark \default
  c1 \mark \default
}
![[image of music]](15/lily-d6087996.png)
\mark \default を使用するとリハーサル記号は自動的に +1 されますが、手動で整数をリハーサル記号にセットすることもできます。セットした値は rehearsalMark に保存されます。
\relative c'' {
  c1 \mark \default
  c1 \mark \default
  c1 \mark #8
  c1 \mark \default
  c1 \mark \default
}
![[image of music]](d3/lily-b105eb63.png)
文字 ‘I’ は、譜刻の慣習に従って、スキップされます。文字 ‘I’ を含めたければ、リハーサル記号のスタイル (文字のみ、四角で囲まれた文字、丸で囲まれた文字) に合わせて以下のコマンドの 1 つを使用します:
\set Score.markFormatter = #format-mark-alphabet
\set Score.markFormatter = #format-mark-box-alphabet
\set Score.markFormatter = #format-mark-circle-alphabet
\relative c'' {
  \set Score.markFormatter = #format-mark-box-alphabet
  c1 \mark \default
  c1 \mark \default
  c1 \mark #8
  c1 \mark \default
  c1 \mark \default
}
![[image of music]](2e/lily-8d3759fd.png)
スタイルはプロパティ markFormatter によって定義されます。これは引数としてカレントの記号 (整数) とカレントのコンテキストをとる関数です。この関数はマークアップ オブジェクトを返します。以下の例では、markFormatter には定義済みの手続きがセットされています。数小節後では、四角で囲まれた番号を作り出す手続きがセットされています。
\relative c'' {
  \set Score.markFormatter = #format-mark-numbers
  c1 \mark \default
  c1 \mark \default
  \set Score.markFormatter = #format-mark-box-numbers
  c1 \mark \default
  \set Score.markFormatter = #format-mark-circle-numbers
  c1 \mark \default
  \set Score.markFormatter = #format-mark-circle-letters
  c1
}
![[image of music]](c0/lily-3c60262f.png)
ファイル ‘scm/translation-functions.scm’ は
format-mark-numbers (デフォルトのフォーマット),
format-mark-box-numbers, format-mark-letters それに
format-mark-box-letters の定義を保持しています。これらを参考にして他のフォーマット関数を作り出すこともできます。
加算された数字や文字の代わりに小節番号を取得するために
format-mark-barnumbers, format-mark-box-barnumbers, それに
format-mark-circle-barnumbers を使うことがあります。
リハーサル記号の他のスタイルを手動で指定することができます:
\mark "A1"
Score.markFormatter はこの方法で指定された記号に影響を与えません。しかしながら、文字列として \markup 使用することができます。
\mark \markup{ \box A1 }
音楽的図柄 (セーニョ記号など) を \mark の中に譜刻することができます:
\relative c' {
  c1 \mark \markup { \musicglyph #"scripts.segno" }
  c1 \mark \markup { \musicglyph #"scripts.coda" }
  c1 \mark \markup { \musicglyph #"scripts.ufermata" }
  c1
}
![[image of music]](c9/lily-fb774258.png)
\musicglyph を使用して譜刻できる記号のリストは、The Emmentaler font を参照してください。
リハーサル記号の配置の一般的な調整については、テキストをフォーマットする を参照してください。更に細かな制御を行う場合は、オブジェクトを揃える の break-alignable-interface を参照してください。
ファイル ‘scm/translation-functions.scm’ は
format-mark-numbers と format-mark-letters の定義を保持しています。ここにある定義を参考にして他のフォーマット関数を作り出すことができます。
参照
記譜法リファレンス: The Emmentaler font, テキストをフォーマットする, オブジェクトを揃える
インストールされているファイル: ‘scm/translation-functions.scm’
コード断片集: Rhythms
内部リファレンス: MarkEvent, Mark_engraver, RehearsalMark
| [ << 音楽記譜法 ] | [トップ][目次][インデックス][ ? ] | [ 専門的な記譜法 >> ] | ||
| [ < リハーサル記号 ] | [ 上へ : リズム ] | [ 装飾小音符 > ] | ||
1.2.6 特殊なリズム関連事項
| 装飾小音符 | ||
| カデンツァに揃える | ||
| 時間管理 |
| [ << 音楽記譜法 ] | [トップ][目次][インデックス][ ? ] | [ 専門的な記譜法 >> ] | ||
| [ < 特殊なリズム関連事項 ] | [ 上へ : 特殊なリズム関連事項 ] | [ カデンツァに揃える > ] | ||
装飾小音符
装飾小音符は装飾の音であり、小さなフォントで表示され、論理的には演奏時間を持ちません。
\relative {
  c''4 \grace b16 a4(
  \grace { b16 c16 } a2)
}
![[image of music]](fc/lily-30ab1861.png)
装飾音符には他にも 3 つのタイプがあります。acciaccatura (長さを持たない装飾小音符で、スラーでつなげられるスラッシュ付きの符幹を持つ音符) と、
appoggiatura (一定の比率で主音符から演奏時間を取り、スラッシュを持たない音符)
スラーで結ばれた主音符の間に装飾小音符を配置するために、\slashedGrace 関数を用いて、
acciaccatura のようにスラッシュ付きの符幹を持つがスラーは付かない装飾小音符を譜刻することもできます。
LilyPond はさらに 2 つ特殊なタイプの装飾小音符をサポートします: acciaccatura (長さを持たない装飾小音符で、スラッシュ付きの符幹を持つスラーでつなげられる小さな音符) と appoggiatura (一定の比率で主音符から演奏時間をとり、スラッシュを持たない小さな音符で譜刻されます) です。
\relative {
  \acciaccatura d''8 c4
  \appoggiatura e8 d4
  \acciaccatura { g16 f } e2
  \slashedGrace a,8 g4
  \slashedGrace b16 a4(
  \slashedGrace b8 a2)
}
![[image of music]](b5/lily-f5e446e7.png)
装飾小音符の配置は他の譜と同期されます。以下の例では、8 分の装飾小音符 1 つに対して 2 つの 16 分装飾小音符が割り当てられています:
<<
  \new Staff \relative { e''2 \grace { c16 d e f } e2 }
  \new Staff \relative { c''2 \grace { g8 b } c2 }
>>
![[image of music]](4a/lily-4310325b.png)
装飾小音符で記譜を終えたいのならば、\afterGrace コマンドを使用します。このコマンドは 2 つの引数をとります:
主音符と主音符の後に続く装飾小音符です。
\relative { c''1 \afterGrace d1 { c16[ d] } c1 }
![[image of music]](9d/lily-579a946f.png)
これは主音符の長さの 3/4 のスペースをとった後に装飾小音符を配置しています。デフォルトの分数 3/4 は afterGraceFraction を設定することにより変更することができます。以下の例では、スペースをデフォルト、主音符の 15/16、最後は 1/2 に設定した結果を示しています。
<<
  \new Staff \relative {
    c''1 \afterGrace d1 { c16[ d] } c1
  }
  \new Staff \relative {
    #(define afterGraceFraction (cons 15 16))
    c''1 \afterGrace d1 { c16[ d] } c1
  }
  \new Staff \relative {
    #(define afterGraceFraction (cons 1 2))
    c''1 \afterGrace d1 { c16[ d] } c1
  }
>>
![[image of music]](14/lily-a3846b47.png)
主音符と装飾小音符の間のスペースは空白音符を使って指定することもできます。以下の例では、主音符の長さの 7/8 のスペースをとった後に装飾小音符を配置しています。
\new Voice \relative {
  <<
    { d''1^\trill_( }
    { s2 s4. \grace { c16 d } }
  >>
  c1)
}
![[image of music]](d3/lily-e3c0616a.png)
\grace 音楽表記は特殊な譜刻設定を導入します
– 例えば、小さなフォントを作り出し、向きを設定するためです。それゆえ、装飾小音符の特殊な設定をオーバライドするためにレイアウトの調整を行う場合、調整は装飾小音符の表記の中に置くべきです。さらに、そのオーバライドは装飾小音符の表記の中で元に戻しておくべきです。以下の例では、装飾小音符の符幹のデフォルトの向きがオーバライドされ、それから元に戻されています。
\new Voice \relative {
  \acciaccatura {
    \stemDown
    f''16->
    \stemNeutral
  }
  g4 e c2
}
![[image of music]](c4/lily-6ac27812.png)
Selected Snippets
Using grace note slashes with normal heads
The slash through the stem found in acciaccaturas can be applied in other situations.
\relative c'' {
  \override Flag.stroke-style = #"grace"
  c8( d2) e8( f4)
}
![[image of music]](a5/lily-61b46131.png)
Tweaking grace layout within music
The layout of grace expressions can be changed throughout the music
using the functions add-grace-property and
remove-grace-property. The following example undefines the
Stem direction for this grace, so that stems do not always point
up, and changes the default note heads to crosses.
\relative c'' {
  \new Staff {
    $(remove-grace-property 'Voice 'Stem 'direction)
    $(add-grace-property 'Voice 'NoteHead 'style 'cross)
    \new Voice {
       \acciaccatura { f16 } g4
       \grace { d16 e } f4
       \appoggiatura { f,32 g a } e2
    }
  }
}
![[image of music]](08/lily-6742d848.png)
Redefining grace note global defaults
The global defaults for grace notes are stored in the identifiers
startGraceMusic, stopGraceMusic,
startAcciaccaturaMusic, stopAcciaccaturaMusic,
startAppoggiaturaMusic and stopAppoggiaturaMusic, which
are defined in the file ly/grace-init.ly. By redefining them
other effects may be obtained.
startAcciaccaturaMusic = {
  <>(
  \override Flag.stroke-style = #"grace"
  \slurDashed
}

stopAcciaccaturaMusic = {
  \revert Flag.stroke-style
  \slurSolid
  <>)
}

\relative c'' {
  \acciaccatura d8 c1
}
![[image of music]](89/lily-18cda6aa.png)
Positioning grace notes with floating space
Setting the property 'strict-grace-spacing makes the musical
columns for grace notes ’floating’, i.e., decoupled from the non-grace
notes: first the normal notes are spaced, then the (musical columns of
the) graces are put left of the musical columns for the main notes.
\relative c'' {
  <<
    \override Score.SpacingSpanner.strict-grace-spacing = ##t
    \new Staff \new Voice {
      \afterGrace c4 { c16[ c8 c16] }
      c8[ \grace { b16 d } c8]
      c4 r
    }
    \new Staff {
      c16 c c c c c c c c4 r
    }
  >>
}
![[image of music]](28/lily-cd1b371f.png)
参照
音楽用語集: grace notes, acciaccatura, appoggiatura
インストールされているファイル: ‘ly/grace-init.ly’
コード断片集: Rhythms
内部リファレンス: GraceMusic, Grace_beam_engraver, Grace_engraver, Grace_spacing_engraver
既知の問題と警告
複数の音符を連桁でつないだ アッチャカトゥーラ にはスラッシュは付けられず、複数の音符を連桁でつないだ アッポジャトゥーラ とまったく同じに見えます。
装飾小音符の同期は予期しない結果を引き起こす可能性があります。譜の記譜要素 – 拍子、小節線など – も同期をとられます。装飾小音符を持つ譜と持たない譜を混在させる場合は気をつけて下さい。例えば:
<<
  \new Staff \relative { e''4 \bar ".|:" \grace c16 d2. }
  \new Staff \relative { c''4 \bar ".|:" d2. }
>>
![[image of music]](b3/lily-25312367.png)
これは、他の譜にある装飾小音符の演奏時間に対応した空白の装飾小音符を挿入することによって修正することができます。上の例を以下のように修正します:
<<
  \new Staff \relative { e''4 \bar ".|:" \grace c16 d2. }
  \new Staff \relative { c''4 \bar ".|:" \grace s16 d2. }
>>
![[image of music]](77/lily-fe6a65cd.png)
ボイス コンテキストの中で装飾送音符を記述すると、ボイスの譜刻に混乱を招きます。これを克服するには、装飾小音符のセクションを変数に入れます。
accMusic = { \acciaccatura { f8 } e8 r8 \acciaccatura { f8 } e8 r4 } \new Staff { << \new Voice { \relative c'' { r8 r8 \voiceOne \accMusic \oneVoice r8 | r8 \voiceOne r8 \accMusic \oneVoice r8 | } } \new Voice { \relative c' { s8 s8 \voiceTwo \accMusic \oneVoice s8 | s8 \voiceTwo r8 \accMusic \oneVoice s8 | } } >> }
![[image of music]](79/lily-a356401f.png)
装飾小音符セクションはシーケンシャルな音楽表記の中でのみ使用すべきです。装飾小音符セクションのネスト、並置はサポートされておらず、クラッシュや他のエラーを引き起こすかもしれません。
MIDI 出力において装飾小音符はそれぞれ 1/4 の実演奏時間を持ちます。一連の装飾小音符の演奏時間が前の音符の演奏時間よりも長い場合、“Going back in MIDI time” エラーになります。エラーを避けるには、装飾小音符の演奏時間を短くします。例えば:
\acciaccatura { c'8[ d' e' f' g'] }
を以下のようにします:
\acciaccatura { c'16[ d' e' f' g'] }
あるいは、明示的に演奏時間を変更します:
\acciaccatura { \scaleDurations 1/2 { c'8[ d' e' f' g'] } }
演奏時間を変更する を参照してください。
| [ << 音楽記譜法 ] | [トップ][目次][インデックス][ ? ] | [ 専門的な記譜法 >> ] | ||
| [ < 装飾小音符 ] | [ 上へ : 特殊なリズム関連事項 ] | [ 時間管理 > ] | ||
カデンツァに揃える
オーケストラのコンテキストにおいて、カデンツァは特殊な問題を提起します: 楽譜の構成に演奏時間を持つカデンツァや他のソロ パッセージが含まれる場合、他のすべての楽器は、そのカデンツァの演奏時間の分だけスキップする必要があります。さもなければ、他の楽器はカデンツァの終わりよりも早すぎる (あるいは遅すぎる) タイミングで始まってしまいます。
この問題の解決方法の一つは、関数 mmrest-of-length と
skip-of-length を使用することです。これらの Scheme 関数は、引数として定義済みの音楽表記をとり、その音楽表記と同じ長さの複数小節休符または \skip を生成します。
MyCadenza = \relative { c'4 d8 e f g g4 f2 g4 g } \new GrandStaff << \new Staff { \MyCadenza c'1 \MyCadenza c'1 } \new Staff { #(mmrest-of-length MyCadenza) c'1 #(skip-of-length MyCadenza) c'1 } >>
![[image of music]](d1/lily-cca35027.png)
参照
音楽用語集: cadenza
コード断片集: Rhythms
| [ << 音楽記譜法 ] | [トップ][目次][インデックス][ ? ] | [ 専門的な記譜法 >> ] | ||
| [ < カデンツァに揃える ] | [ 上へ : 特殊なリズム関連事項 ] | [ 発想記号 > ] | ||
時間管理
時間は Timing_translator
– これは、デフォルトでは、Socre コンテキストの中にあります –
によって管理されます。エイリアス Timing は Timing_translator が配置されているコンテキストに付け加えられます。
エイリアス Timing が利用可能であることを保証するため、コンテキスト (Voice や Staff など) を明示的にインスタンス化する必要があるかもしれません。
以下の Timing のプロパティは、楽譜内でのタイミングの経過を追うために使用されます。
-
currentBarNumber カレントの小節番号。このプロパティの使用例は、小節番号 を参照してください。
-
measureLength カレントの拍子での小節の長さ。4/4 拍子では 1 であり、6/8 拍子では 3/4 です。この値は小節線を挿入するタイミングと自動連桁の生成の仕方を決定します。
-
measurePosition カレントで処理している小節内での位置。この値は、
measureLengthに到達するか超過したときに、この値からmeasureLengthを減算されることによって、リセットされます。リセットが起こるときに、currentBarNumberが +1 されます。-
timing 真にセットされている場合、各タイム ステップごとに上記の変数は更新されます。偽にセットされている場合、エングラーバはカレントの小節に永久に留まります。
タイミングは、上記の値のいずれかを明示的に設定することによって、変更することができます。次の例では、デフォルトの 4/4 拍子が譜刻されていますが、measureLength は 5/4 にセットされています。第 3 小節の 4/8 の位置で、measurePositoin は 1/8 進められて
5/8 になり、それによりその小節は 1/8 短くされます。次の小節線は 5/4 ではなく 9/8 の位置で引かれます。
\new Voice \relative { \set Timing.measureLength = #(ly:make-moment 5/4) c'1 c4 | c1 c4 | c4 c \set Timing.measurePosition = #(ly:make-moment 5/8) b4 b b8 | c4 c1 | }
![[image of music]](3b/lily-97003c3e.png)
この例が示すように、ly:make-moment n m は全音符の n/m の長さの演奏時間を構成します。例えば、ly:make-moment 1 8 は 1 個の 8 分音符の演奏時間であり、ly:make-moment 7 16 は 7 個の 16 分音符の演奏時間です。
参照
コード断片集: Rhythms
内部リファレンス: Timing_translator, Score @end ignore
| [ << 音楽記譜法 ] | [トップ][目次][インデックス][ ? ] | [ 専門的な記譜法 >> ] | ||
| [ < 時間管理 ] | [ 上へ : 音楽記譜法 ] | [ 音符に付けられる発想記号 > ] | ||
1.3 発想記号
![[image of music]](b2/lily-32f8e329.png)
このセクションでは楽譜の中で作成可能なさまざまな発想記号をリストアップします。
| 1.3.1 音符に付けられる発想記号 | ||
| 1.3.2 曲線の発想記号 | ||
| 1.3.3 直線の発想記号 |
| [ << 音楽記譜法 ] | [トップ][目次][インデックス][ ? ] | [ 専門的な記譜法 >> ] | ||
| [ < 発想記号 ] | [ 上へ : 発想記号 ] | [ アーティキュレーションと装飾 > ] | ||
1.3.1 音符に付けられる発想記号
このセクションでは、音符に添付される発想記号を作成する方法について説明します。音符に添付される発想記号には以下のものがあります: アーティキュレーション、装飾、強弱記号。新たに強弱記号を作成する方法についても議論します。
| アーティキュレーションと装飾 | ||
| 強弱記号 | ||
| 新たな強弱記号 |
| [ << 音楽記譜法 ] | [トップ][目次][インデックス][ ? ] | [ 専門的な記譜法 >> ] | ||
| [ < 音符に付けられる発想記号 ] | [ 上へ : 音符に付けられる発想記号 ] | [ 強弱記号 > ] | ||
アーティキュレーションと装飾
アーティキュレーション、装飾音それに他の演奏指示を表すさまざまな記号は以下の構文を用いて音符に付けることができます:
note\name
name に対してとり得る値は
List of articulations でリストアップしています。例えば:
\relative { c''4\staccato c\mordent b2\turn c1\fermata }
![[image of music]](f7/lily-00e22f3b.png)
これらのアーティキュレーションのいくつかはより容易に入力できるよう短縮記法を持っています。短縮記法は音符名の後ろに付けられ、ダッシュ - とそれに続くアーティキュレーションを表す記号から成ります。あらかじめ定義されている短縮記法は以下のアーティキュレーションです:
marcato, stopped, tenuto,
staccatissimo, accent, staccato
それに portato。これらの出力は以下のように表示されます:
c4-^ c-+ c-- c-! c4-> c-. c2-_
![[image of music]](a9/lily-81e906b4.png)
アーティキュレーションのデフォルトの配置規則はファイル ‘scm/script.scm’ で定義されています。アーティキュレーションと装飾は手動で譜の上または下に配置されることもあります – 向きと配置 を参照してください。
アーティキュレーションは Script オブジェクトです。これらのプロパティについて
Script に説明があります。
アーティキュレーションは音符と同様に休符に付けることもできますが、複数小節の休符に付けることはできません。特殊な定義済みコマンド \fermataMarkup は複数小節の休符に付けることができます (複数小節の休符にだけ付けることができます)。このコマンドは MultiMeasureRestText オブジェクトを作成します。
\override Script.color = #red \override MultiMeasureRestText.color = #blue a'2\fermata r\fermata R1\fermataMarkup
![[image of music]](22/lily-3bcfa500.png)
アーティキュレーションに加えて、テキストとマークアップを音符に付けることができます。テキスト スクリプト を参照してください。
音符につけられる Script と TextScript の配置順序についての更なる情報は、 オブジェクトの配置 を参照してください。
Selected Snippets
Modifying default values for articulation shorthand notation
The shorthands are defined in ‘ly/script-init.ly’, where the
variables dashHat, dashPlus, dashDash,
dashBar, dashLarger, dashDot, and
dashUnderscore are assigned default values. The default values
for the shorthands can be modified. For example, to associate the
-+ (dashPlus) shorthand with the trill symbol instead of
the default + symbol, assign the value trill to the variable
dashPlus:
\relative c'' { c1-+ } dashPlus = "trill" \relative c'' { c1-+ }
![[image of music]](90/lily-0f0b3594.png)
Controlling the vertical ordering of scripts
The vertical ordering of scripts is controlled with the
'script-priority property. The lower this number, the closer it
will be put to the note. In this example, the TextScript (the
sharp symbol) first has the lowest priority, so it is put lowest in the
first example. In the second, the prall trill (the Script) has
the lowest, so it is on the inside. When two objects have the same
priority, the order in which they are entered determines which one
comes first.
\relative c''' { \once \override TextScript.script-priority = #-100 a2^\prall^\markup { \sharp } \once \override Script.script-priority = #-100 a2^\prall^\markup { \sharp } }
![[image of music]](fb/lily-1d39c1b7.png)
Creating a delayed turn
Creating a delayed turn, where the lower note of the turn uses the
accidental, requires several overrides. The
outside-staff-priority property must be set to #f, as
otherwise this would take precedence over the avoid-slur
property. Changing the fractions 2/3 and 1/3 adjusts
the horizontal position.
\relative c'' { c2*2/3 ( s2*1/3\turn d4) r << { c4.( d8) } { s4 s\turn } >> \transpose c d \relative c'' << { c4.( d8) } { s4 \once \set suggestAccidentals = ##t \once \override AccidentalSuggestion.outside-staff-priority = ##f \once \override AccidentalSuggestion.avoid-slur = #'inside \once \override AccidentalSuggestion.font-size = -3 \once \override AccidentalSuggestion.script-priority = -1 \single \hideNotes b8-\turn \noBeam s8 } >> }
![[image of music]](7d/lily-8f7d75e1.png)
参照
音楽用語集: tenuto, accent, staccato, portato
記譜法リファレンス: 向きと配置, List of articulations, トリル
インストールされているファイル: ‘scm/script.scm’
コード断片集: 発想記号
内部リファレンス: Script, TextScript
| [ << 音楽記譜法 ] | [トップ][目次][インデックス][ ? ] | [ 専門的な記譜法 >> ] | ||
| [ < アーティキュレーションと装飾 ] | [ 上へ : 音符に付けられる発想記号 ] | [ 新たな強弱記号 > ] | ||
強弱記号
絶対強弱記号は音符の後にコマンドを用いて
– c4\ff などのように
– 指定します。
利用可能な強弱記号は
\ppppp, \pppp, \ppp, \pp, \p,
\mp, \mf, \f, \ff, \fff,
\ffff, \fffff, \fp, \sf, \sff,
\sp, \spp, \sfz, それに \rfz です。
強弱記号を手動で譜の上または下に配置することもできます –
向きと配置 を参照してください。
\relative c'' { c2\ppp c\mp c2\rfz c^\mf c2_\spp c^\ff }
![[image of music]](1b/lily-44be4594.png)
クレッシェンド 記号は \< で始まり、\!、絶対強弱記号あるいは追加のクレッシェンド記号またはデクレッシェンド記号で終わります。デクレッシェンド 記号は \> で始まり、\!、絶対強弱記号あるいは次のクレッシェンド記号またはデクレッシェンド記号で終わります。\cr と \decr を \< と \> の代わりに用いる場合もあります。この記譜法を用いるとデフォルトでは ヘアピン が譜刻されます。
\relative c'' { c2\< c\! d2\< d\f e2\< e\> f2\> f\! e2\> e\mp d2\> d\> c1\! }
![[image of music]](3f/lily-0a4e212a.png)
\! で終了するヘアピンは、\! が割り当てられた音符の右端で終了します。次の クレッシェンド または デクレッシェンド 記号の開始によってヘアピンが終了する場合、そのヘアピンは次の \< または \> が割り当てられた音符の中央で終了します。次のへアピンは、通常通りに音符の左端で始まる代わりに、右端から始まります。
\relative { c''1\< | c4 a c\< a | c4 a c\! a\< | c4 a c a\! }
![[image of music]](5e/lily-3b758734.png)
\! の代わりに絶対強弱記号で終了するヘアピも同じように譜刻されます。しかしながら、絶対強弱記号の幅によってヘアピンの終了点は変わります。
\relative { c''1\< | c4 a c\mf a | c1\< | c4 a c\ffff a }
![[image of music]](ec/lily-ad4b1694.png)
1 つの音符に複数の記号を譜刻するには、空白休符を用いる必要があります。これは特に、同じ音符に クレッシェンド と デクレッシェンド を付ける場合に有用です。
\relative { c''4\< c\! d\> e\! << f1 { s4 s4\< s4\> s4\! } >> }
![[image of music]](7f/lily-cf8af050.png)
\espressivo コマンドを用いて、同じ音符にクレッシェンドとデクレッシェンドを付けることができます。しかしながら、これは強弱記号ではなくアーティキュレーションとして実装されているということに注意してください。
\relative { c''2 b4 a g1\espressivo }
![[image of music]](0f/lily-ce609220.png)
テキストのクレッシェンド記号は \cresc で開始します。テキストのデクレッシェンド記号は \decresc または
\dim で開始します。必要に応じて延長線が譜刻されます。
\relative { g'8\cresc a b c b c d e\mf | f8\decresc e d c e\> d c b | a1\dim ~ | a2. r4\! | }
![[image of music]](73/lily-7d5bdd7c.png)
強弱のテキスト符号の変更でヘアピンを置換することもできます:
\relative c'' { \crescTextCresc c4\< d e f\! | \dimTextDecresc g4\> e d c\! | \dimTextDecr e4\> d c b\! | \dimTextDim d4\> c b a\! | \crescHairpin \dimHairpin c4\< d\! e\> d\! | }
![[image of music]](af/lily-dded0574.png)
新たに絶対強弱記号や強弱に対応させるテキストを作成するには、新たな強弱記号 を参照してください。
強弱記号の垂直方向の位置は DynamicLineSpanner によって処理されます。
Dynamics を用いて水平線上に強弱記号を譜刻することができます。タイミングを示すために空白休符を使用します。(Dynamics コンテキスト内の音符は音楽的時間を取りますが、譜刻されません。)Dynamics コンテキストはテキスト スクリプト、テキスト スパナ、ピアノ ペダル記号などを保持することができ、有用です。
<< \new Staff \relative { c'2 d4 e | c4 e e,2 | g'4 a g a | c1 | } \new Dynamics { s1\< | s1\f | s2\dim s2-"rit." | s1\p | } >>
![[image of music]](da/lily-b495a4ad.png)
定義済みコマンド
\dynamicUp,
\dynamicDown,
\dynamicNeutral,
\crescTextCresc,
\dimTextDim,
\dimTextDecr,
\dimTextDecresc,
\crescHairpin,
\dimHairpin
Selected Snippets
Setting hairpin behavior at bar lines
If the note which ends a hairpin falls on a downbeat, the hairpin stops
at the bar line immediately preceding. This behavior can be controlled
by overriding the 'to-barline property.
\relative c'' { e4\< e2. e1\! \override Hairpin.to-barline = ##f e4\< e2. e1\! }
![[image of music]](62/lily-a4444103.png)
Setting the minimum length of hairpins
If hairpins are too short, they can be lengthened by modifying the
minimum-length property of the Hairpin object.
\relative c'' { c4\< c\! d\> e\! << f1 { s4 s\< s\> s\! } >> \override Hairpin.minimum-length = #5 << f1 { s4 s\< s\> s\! } >> }
![[image of music]](ca/lily-b661e979.png)
Printing hairpins using al niente notation
Hairpin dynamics may be printed with a circled tip (“al niente”
notation) by setting the circled-tip property of the
Hairpin object to #t.
\relative c'' { \override Hairpin.circled-tip = ##t c2\< c\! c4\> c\< c2\! }
![[image of music]](80/lily-8880df0b.png)
Vertically aligned dynamics and textscripts
All DynamicLineSpanner objects (hairpins and dynamic texts) are
placed with their reference line at least 'staff-padding from
the staff, unless other notation forces them to be farther. Setting
'staff-padding to a sufficiently large value aligns the dynamics.
The same idea, together with \textLengthOn, is used to align
the text scripts along their baseline.
music = \relative c' { a'2\p b\f e4\p f\f\> g, b\p c2^\markup { \huge gorgeous } c^\markup { \huge fantastic } } { \music \break \override DynamicLineSpanner.staff-padding = #3 \textLengthOn \override TextScript.staff-padding = #1 \music }
![[image of music]](ae/lily-881e6114.png)
Hiding the extender line for text dynamics
Text style dynamic changes (such as cresc. and dim.) are printed with a dashed line showing their extent. This line can be suppressed in the following way:
\relative c'' { \override DynamicTextSpanner.style = #'none \crescTextCresc c1\< | d | b | c\! }
![[image of music]](57/lily-3ced2ed6.png)
Changing text and spanner styles for text dynamics
The text used for crescendos and decrescendos can be changed by
modifying the context properties crescendoText and
decrescendoText.
The style of the spanner line can be changed by modifying the
'style property of DynamicTextSpanner. The default value
is 'dashed-line, and other possible values include 'line,
'dotted-line and 'none.
\relative c'' { \set crescendoText = \markup { \italic { cresc. poco } } \set crescendoSpanner = #'text \override DynamicTextSpanner.style = #'dotted-line a2\< a a2 a a2 a a2 a\mf }
![[image of music]](34/lily-4785ebca.png)
参照
音楽用語集: al niente, crescendo, decrescendo, hairpin
学習マニュアル: アーティキュレーションと強弱記号
記譜法リファレンス: 向きと配置, 新たな強弱記号, 何が MIDI に出力されるのか?, MIDI での音の強弱を制御する
コード断片集: 発想記号
内部リファレンス: DynamicText, Hairpin, DynamicLineSpanner, Dynamics
| [ << 音楽記譜法 ] | [トップ][目次][インデックス][ ? ] | [ 専門的な記譜法 >> ] | ||
| [ < 強弱記号 ] | [ 上へ : 音符に付けられる発想記号 ] | [ 曲線の発想記号 > ] | ||
新たな強弱記号
強弱記号を作成する最も容易な方法は、\markup オブジェクトを使用することです。
moltoF = \markup { molto \dynamic f } \relative { <d' e>16_\moltoF <d e> <d e>2.. }
![[image of music]](62/lily-91def107.png)
マークアップ モードでは、注釈の強弱記号 (括弧や角括弧で囲まれます) を作成することができます。マークアップ モードの構文は テキストをフォーマットする で記述されています。
roundF = \markup { \center-align \concat { \bold { \italic ( } \dynamic f \bold { \italic ) } } } boxF = \markup { \bracket { \dynamic f } } \relative { c'1_\roundF c1_\boxF }
![[image of music]](16/lily-62c6be66.png)
単純に中央揃えの強弱記号は make-dynamic-script 関数を用いて簡単に作成できます。
sfzp = #(make-dynamic-script "sfzp") \relative { c'4 c c\sfzp c }
![[image of music]](92/lily-a8fb6d43.png)
一般に、make-dynamic-script は引数として何らかのマークアップ オブジェクトをとります。強弱記号のフォントに含まれる文字は f,m,p,r,s それに z だけです。このため、テキストや句読点を含む強弱記号を必要とする場合、フォント ファミリとフォント エンコーディングを通常のテキストに戻すためのマークアップ コマンド
– 例えば \normal-text – を用いる必要があります。通常のマークアップの代わりに make-dynamic-script を用いる利点は、同じ符頭に付けられるマークアップ オブジェクトとヘアピンが垂直方向に揃うことを保証されている点にあります。
roundF = \markup { \center-align \concat { \normal-text { \bold { \italic ( } } \dynamic f \normal-text { \bold { \italic ) } } } } boxF = \markup { \bracket { \dynamic f } } mfEspress = \markup { \center-align \line { \hspace #3.7 mf \normal-text \italic espress. } } roundFdynamic = #(make-dynamic-script roundF) boxFdynamic = #(make-dynamic-script boxF) mfEspressDynamic = #(make-dynamic-script mfEspress) \relative { c'4_\roundFdynamic\< d e f g,1~_\boxFdynamic\> g1 g'1~\mfEspressDynamic g1 }
![[image of music]](b2/lily-b81795aa.png)
Scheme 形式のマークアップ モードを用いることもできます。マークアップ Scheme の構文は Markup construction in Scheme で説明されています。
moltoF = #(make-dynamic-script (markup #:normal-text "molto" #:dynamic "f")) \relative { <d' e>16 <d e> <d e>2..\moltoF }
![[image of music]](18/lily-46a00a53.png)
強弱記号を音符に中央揃えさせるのではなく、左揃えさせるには、\tweak を使います:
moltoF = \tweak DynamicText.self-alignment-X #LEFT #(make-dynamic-script (markup #:normal-text "molto" #:dynamic "f")) \relative { <d' e>16 <d e> <d e>2..\moltoF <d e>1 }
![[image of music]](5f/lily-cf1cdfa5.png)
マークアップ モードでのフォント設定は フォントとフォント サイズを選択する で記述されています。
参照
記譜法リファレンス: テキストをフォーマットする, フォントとフォント サイズを選択する, 何が MIDI に出力されるのか?, MIDI での音の強弱を制御する
LilyPond の拡張: Markup construction in Scheme
コード断片集: 発想記号
| [ << 音楽記譜法 ] | [トップ][目次][インデックス][ ? ] | [ 専門的な記譜法 >> ] | ||
| [ < 新たな強弱記号 ] | [ 上へ : 発想記号 ] | [ スラー > ] | ||
1.3.2 曲線の発想記号
このセクションでは曲線を持つさまざまな発想記号 – 通常のスラー、フレージング スラー、ブレス記号、Fall それに Doit – を作成する方法について説明します。
| スラー | ||
| フレージング スラー | ||
| ブレス記号 | ||
| Fall と Doit |
| [ << 音楽記譜法 ] | [トップ][目次][インデックス][ ? ] | [ 専門的な記譜法 >> ] | ||
| [ < 曲線の発想記号 ] | [ 上へ : 曲線の発想記号 ] | [ フレージング スラー > ] | ||
スラー
スラー は括弧を用いて入力します:
Note: 多声音楽では、スラーが始まったボイスでそのスラーを終わらせる必要があります。
\relative { f''4( g a) a8 b( a4 g2 f4) <c e>2( <b d>2) }
![[image of music]](d9/lily-62c43e7b.png)
スラーを手動で音符の上または下に配置することができます。向きと配置 を参照してください。
同時進行または重なり合うスラーは許可されません。しかしながら、フレージング スラーはスラーと重なり合うことができます。これにより、2 つのスラーを同時に譜刻することができます。詳細は フレージング スラー を参照してください。
スラーは実線、点線あるいは破線のどれかになります。実線がスラーのデフォルト スタイルです:
\relative { c'4( e g2) \slurDashed g4( e c2) \slurDotted c4( e g2) \slurSolid g4( e c2) }
![[image of music]](9f/lily-f92bef60.png)
スラーの半分を破線 (前半を破線、後半を実線) にする、あるいは、半分を実線 (前半を実線、後半を破線) にすることもできます:
\relative { c'4( e g2) \slurHalfDashed g4( e c2) \slurHalfSolid c4( e g2) \slurSolid g4( e c2) }
![[image of music]](cf/lily-52297f2c.png)
スラーの破線パターンを定義することができます:
\relative { c'4( e g2) \slurDashPattern #0.7 #0.75 g4( e c2) \slurDashPattern #0.5 #2.0 c4( e g2) \slurSolid g4( e c2) }
![[image of music]](15/lily-704a4b9f.png)
定義済みコマンド
\slurUp,
\slurDown,
\slurNeutral,
\slurDashed,
\slurDotted,
\slurHalfDashed,
\slurHalfSolid,
\slurDashPattern,
\slurSolid
Selected Snippets
Using double slurs for legato chords
Some composers write two slurs when they want legato chords. This can
be achieved by setting doubleSlurs.
\relative c' { \set doubleSlurs = ##t <c e>4( <d f> <c e> <d f>) }
![[image of music]](3c/lily-b1021343.png)
Positioning text markups inside slurs
Text markups need to have the outside-staff-priority property
set to false in order to be printed inside slurs.
\relative c'' { \override TextScript.avoid-slur = #'inside \override TextScript.outside-staff-priority = ##f c2(^\markup { \halign #-10 \natural } d4.) c8 }
![[image of music]](4a/lily-f5e440db.png)
Making slurs with complex dash structure
Slurs can be made with complex dash patterns by defining the
dash-definition property. dash-definition is a list of
dash-elements. A dash-element is a list of parameters
defining the dash behavior for a segment of the slur.
The slur is defined in terms of the bezier parameter t which ranges
from 0 at the left end of the slur to 1 at the right end of the slur.
dash-element is a list (start-t stop-t dash-fraction
dash-period). The region of the slur from start-t to
stop-t will have a fraction dash-fraction of each
dash-period black. dash-period is defined in terms of
staff spaces. dash-fraction is set to 1 for a solid slur.
\relative c' { \once \override Slur.dash-definition = #'((0 0.3 0.1 0.75) (0.3 0.6 1 1) (0.65 1.0 0.4 0.75)) c4( d e f) \once \override Slur.dash-definition = #'((0 0.25 1 1) (0.3 0.7 0.4 0.75) (0.75 1.0 1 1)) c4( d e f) }
![[image of music]](67/lily-cbd5c502.png)
参照
音楽用語集: slur
学習マニュアル: ネストされない括弧とタイ
記譜法リファレンス: 向きと配置, フレージング スラー
コード断片集: 発想記号
内部リファレンス: Slur
| [ << 音楽記譜法 ] | [トップ][目次][インデックス][ ? ] | [ 専門的な記譜法 >> ] | ||
| [ < スラー ] | [ 上へ : 曲線の発想記号 ] | [ ブレス記号 > ] | ||
フレージング スラー
音楽センテンスを示す フレージング スラー (またはフレーズ記号) はコマンド \( と \) を用いて記述します:
\relative { c''4\( d( e) f( e2) d\) }
![[image of music]](2d/lily-00275281.png)
印刷の上では、フレージング スラーは通常のスラーとほとんど同じです。しかしながら、それぞれ異なるオブジェクトとして取り扱われます。\slurUp はフレージング スラーには影響を与えません。フレージング スラーを手動で音符の上または下に配置することができます。向きと配置 を参照してください。
同時進行あるいは重なり合うフレージング スラーは許可されません。
フレージング スラーを実線、点線あるいは破線にすることができます。実線がフレージング スラーのデフォルト スタイルです:
\relative { c'4\( e g2\) \phrasingSlurDashed g4\( e c2\) \phrasingSlurDotted c4\( e g2\) \phrasingSlurSolid g4\( e c2\) }
![[image of music]](b2/lily-e92acbc4.png)
フレージング スラーの半分を破線 (前半を破線、後半を実線) にする、あるいは、半分を実線 (前半を実線、後半を破線) にすることもできます:
\relative { c'4\( e g2\) \phrasingSlurHalfDashed g4\( e c2\) \phrasingSlurHalfSolid c4\( e g2\) \phrasingSlurSolid g4\( e c2\) }
![[image of music]](55/lily-4eae1d69.png)
フレージング スラーの破線パターンを定義することができます:
\relative { c'4\( e g2\) \phrasingSlurDashPattern #0.7 #0.75 g4\( e c2\) \phrasingSlurDashPattern #0.5 #2.0 c4\( e g2\) \phrasingSlurSolid g4\( e c2\) }
![[image of music]](9a/lily-0482a8f2.png)
フレージング スラーに対する破線パターンの定義は、スラーに対する破線パターンの定義と同じ構造をとります。複雑な破線パターンについての更なる情報は、スラー のコード断片集を参照してください。
定義済みコマンド
\phrasingSlurUp,
\phrasingSlurDown,
\phrasingSlurNeutral,
\phrasingSlurDashed,
\phrasingSlurDotted,
\phrasingSlurHalfDashed,
\phrasingSlurHalfSolid,
\phrasingSlurDashPattern,
\phrasingSlurSolid
参照
学習マニュアル: ネストされない括弧とタイ
コード断片集: 発想記号
内部リファレンス: PhrasingSlur
| [ << 音楽記譜法 ] | [トップ][目次][インデックス][ ? ] | [ 専門的な記譜法 >> ] | ||
| [ < フレージング スラー ] | [ 上へ : 曲線の発想記号 ] | [ Fall と Doit > ] | ||
ブレス記号
ブレス記号は \breathe を用いて入力します:
{ c''2. \breathe d''4 }
![[image of music]](ac/lily-9b975e01.png)
ブレス記号は自動連桁を終わらせます。この振る舞いをオーバライドする方法は、手動連桁 を参照してください。
\relative { c''8 \breathe d e f g2 }
![[image of music]](dd/lily-d6287827.png)
古代記譜法でのブレス記号の音楽指示子 – divisiones (ディビジョン: 区切り) がサポートされています。詳細は Divisiones を参照してください。
Selected Snippets
Changing the breath mark symbol
The glyph of the breath mark can be tuned by overriding the text
property of the BreathingSign layout object with any markup
text.
\relative c'' { c2 \override BreathingSign.text = \markup { \musicglyph #"scripts.rvarcomma" } \breathe d2 }
![[image of music]](d7/lily-355f3a13.png)
Using a tick as the breath mark symbol
Vocal and wind music frequently uses a tick mark as a breathing sign. This indicates a breath that subtracts a little time from the previous note rather than causing a short pause, which is indicated by the comma breath mark. The mark can be moved up a little to take it away from the stave.
\relative c'' { c2 \breathe d2 \override BreathingSign.Y-offset = #2.6 \override BreathingSign.text = \markup { \musicglyph #"scripts.tickmark" } c2 \breathe d2 }
![[image of music]](18/lily-7ff433ce.png)
Inserting a caesura
Caesura marks can be created by overriding the 'text property of
the BreathingSign object. A curved caesura mark is also
available.
\relative c'' { \override BreathingSign.text = \markup { \musicglyph #"scripts.caesura.straight" } c8 e4. \breathe g8. e16 c4 \override BreathingSign.text = \markup { \musicglyph #"scripts.caesura.curved" } g8 e'4. \breathe g8. e16 c4 }
![[image of music]](e6/lily-220cc33c.png)
参照
音楽用語集: caesura
記譜法リファレンス: Divisiones
コード断片集: 発想記号
内部リファレンス: BreathingEvent, BreathingSign, Breathing_sign_engraver
| [ << 音楽記譜法 ] | [トップ][目次][インデックス][ ? ] | [ 専門的な記譜法 >> ] | ||
| [ < ブレス記号 ] | [ 上へ : 曲線の発想記号 ] | [ 直線の発想記号 > ] | ||
Fall と Doit
\bendAfter コマンドを用いて、Fall と Doit 音符にを付け加えることができます。Fall あるいは Doit の向きはプラスあるいはマイナス (上あるいは下) で示します。指示の数は Fall あるいは Doit の主音符を展開させるピッチの幅を示します。
\relative c'' { c2\bendAfter #+4 c2\bendAfter #-4 c2\bendAfter #+6.5 c2\bendAfter #-6.5 c2\bendAfter #+8 c2\bendAfter #-8 }
![[image of music]](52/lily-070e926e.png)
Selected Snippets
Adjusting the shape of falls and doits
The shortest-duration-space property may be tweaked to adjust
the shape of falls and doits.
\relative c'' { \override Score.SpacingSpanner.shortest-duration-space = #4.0 c2-\bendAfter #5 c2-\bendAfter #-4.75 c2-\bendAfter #8.5 c2-\bendAfter #-6 }
![[image of music]](fd/lily-7943646f.png)
参照
コード断片集: 発想記号
| [ << 音楽記譜法 ] | [トップ][目次][インデックス][ ? ] | [ 専門的な記譜法 >> ] | ||
| [ < Fall と Doit ] | [ 上へ : 発想記号 ] | [ グリッサンド > ] | ||
1.3.3 直線の発想記号
このセクションでは直線的な軌道をとるさまざまな発想記号 – グリッサンド、アルペジオそれにトリル – を作成する方法について説明します。
| グリッサンド | ||
| アルペジオ | ||
| トリル |
| [ << 音楽記譜法 ] | [トップ][目次][インデックス][ ? ] | [ 専門的な記譜法 >> ] | ||
| [ < 直線の発想記号 ] | [ 上へ : 直線の発想記号 ] | [ アルペジオ > ] | ||
グリッサンド
グリッサンド は音符の後に \glissando を付けることによって作成されます:
\relative { g'2\glissando g' c2\glissando c, \afterGrace f,1\glissando f'16 }
![[image of music]](78/lily-c5974954.png)
グリッサンドは譜を跨いで音符を結ぶことができます:
\new PianoStaff << \new Staff = "right" { e'''2\glissando \change Staff = "left" a,,4\glissando \change Staff = "right" b''8 r | } \new Staff = "left" { \clef bass s1 } >>
![[image of music]](7b/lily-99d20d72.png)
グリッサンドは和音の中にある音符を結ぶことができます。2 つの和音の音符を平行に 1 対 1 で結ぶのではない場合、
\glissandoMap を設定することで、結び方を定義する必要があります。和音の音符は入力ファイル ‘.ly’ で出現する順に 0, 1, … と番号が付きます。
\relative { <c' e>1\glissando g' | <c, e>1\glissando | <g' b> | \break \set glissandoMap = #'((0 . 1) (1 . 0)) <c, g'>1\glissando | <d a'> | \set glissandoMap = #'((0 . 0) (0 . 1) (0 . 2)) c1\glissando | <d f a> | \set glissandoMap = #'((2 . 0) (1 . 0) (0 . 1)) <f d a'>1\glissando | <c c'> | }
![[image of music]](eb/lily-b9c95740.png)
異なるスタイルのグリッサンドを作成することもできます。詳細は ライン スタイル を参照してください。
Selected Snippets
Contemporary glissando
A contemporary glissando without a final note can be typeset using a hidden note and cadenza timing.
\relative c'' { \time 3/4 \override Glissando.style = #'zigzag c4 c \cadenzaOn c4\glissando \hideNotes c,,4 \unHideNotes \cadenzaOff \bar "|" }
![[image of music]](c0/lily-a743b6ae.png)
Adding timing marks to long glissandi
Skipped beats in very long glissandi are sometimes indicated by timing marks, often consisting of stems without noteheads. Such stems can also be used to carry intermediate expression markings.
If the stems do not align well with the glissando, they may need to be repositioned slightly.
glissandoSkipOn = { \override NoteColumn.glissando-skip = ##t \hide NoteHead \override NoteHead.no-ledgers = ##t } glissandoSkipOff = { \revert NoteColumn.glissando-skip \undo \hide NoteHead \revert NoteHead.no-ledgers } \relative c'' { r8 f8\glissando \glissandoSkipOn f4 g a a8\noBeam \glissandoSkipOff a8 r8 f8\glissando \glissandoSkipOn g4 a8 \glissandoSkipOff a8 | r4 f\glissando \< \glissandoSkipOn a4\f \> \glissandoSkipOff b8\! r | }
![[image of music]](92/lily-38b77180.png)
Making glissandi breakable
Setting the breakable property to #t in combination with
after-line-breaking allows a glissando to break if it occurs at
a line break:
glissandoSkipOn = { \override NoteColumn.glissando-skip = ##t \hide NoteHead \override NoteHead.no-ledgers = ##t } \relative c'' { \override Glissando.breakable = ##t \override Glissando.after-line-breaking = ##t f1\glissando | \break a4 r2. | f1\glissando \once \glissandoSkipOn \break a2 a4 r4 | }
![[image of music]](11/lily-0535f3cc.png)
Extending glissandi across repeats
A glissando which extends into several \alternative blocks can
be simulated by adding a hidden grace note with a glissando at the
start of each \alternative block. The grace note should be at
the same pitch as the note which starts the initial glissando. This is
implemented here with a music function which takes the pitch of the
grace note as its argument.
Note that in polyphonic music the grace note must be matched with corresponding grace notes in all other voices.
repeatGliss = #(define-music-function (grace) (ly:pitch?) #{ % the next two lines ensure the glissando is long enough % to be visible \once \override Glissando.springs-and-rods = #ly:spanner::set-spacing-rods \once \override Glissando.minimum-length = #3.5 \once \hideNotes \grace $grace \glissando #}) \score { \relative c'' { \repeat volta 3 { c4 d e f\glissando } \alternative { { g2 d } { \repeatGliss f g2 e } { \repeatGliss f e2 d } } } } music = \relative c' { \voiceOne \repeat volta 2 { g a b c\glissando } \alternative { { d1 } { \repeatGliss c \once \omit StringNumber e1\2 } } } \score { \new StaffGroup << \new Staff << \context Voice { \clef "G_8" \music } >> \new TabStaff << \context TabVoice { \clef "moderntab" \music } >> >> }
![[image of music]](87/lily-4f5b86fc.png)
参照
音楽用語集: glissando
記譜法リファレンス: ライン スタイル
コード断片集: 発想記号
内部リファレンス: Glissando
既知の問題と警告
線の上にテキストを譜刻する (グリッサンド など) ことはサポートされていません。
| [ << 音楽記譜法 ] | [トップ][目次][インデックス][ ? ] | [ 専門的な記譜法 >> ] | ||
| [ < グリッサンド ] | [ 上へ : 直線の発想記号 ] | [ トリル > ] | ||
アルペジオ
和音の アルペジオ (変則和音とも呼ばれます) は和音構造の後に
\arpeggio を付けることによって記述されます:
\relative { <c' e g c>1\arpeggio }
![[image of music]](24/lily-1b984e1e.png)
異なるタイプのアルペジオを描くこともできます。\arpeggioNormal は通常のアルペジオに戻します:
\relative { <c' e g c>2\arpeggio \arpeggioArrowUp <c e g c>2\arpeggio \arpeggioArrowDown <c e g c>2\arpeggio \arpeggioNormal <c e g c>2\arpeggio }
![[image of music]](46/lily-77db28ac.png)
特殊な 括弧スタイル のアルペジオ シンボルを作成することができます:
\relative { <c' e g c>2 \arpeggioBracket <c e g c>2\arpeggio \arpeggioParenthesis <c e g c>2\arpeggio \arpeggioParenthesisDashed <c e g c>2\arpeggio \arpeggioNormal <c e g c>2\arpeggio }
![[image of music]](98/lily-47dff4fc.png)
括弧スタイルのアルペジオの破線プロパティは 'dash-definition プロパティで制御します。'dash-definition プロパティについては スラー で説明しています。
アルペジオをタイを用いて明示的に描き出すことができます。詳細は タイ を参照してください。
定義済みコマンド
\arpeggio,
\arpeggioArrowUp,
\arpeggioArrowDown,
\arpeggioNormal,
\arpeggioBracket,
\arpeggioParenthesis
\arpeggioParenthesisDashed
Selected Snippets
Creating cross-staff arpeggios in a piano staff
In a PianoStaff, it is possible to let an arpeggio cross between
the staves by setting the property PianoStaff.connectArpeggios.
\new PianoStaff \relative c'' << \set PianoStaff.connectArpeggios = ##t \new Staff { <c e g c>4\arpeggio <g c e g>4\arpeggio <e g c e>4\arpeggio <c e g c>4\arpeggio } \new Staff { \clef bass \repeat unfold 4 { <c,, e g c>4\arpeggio } } >>
![[image of music]](bf/lily-edab7884.png)
Creating cross-staff arpeggios in other contexts
Cross-staff arpeggios can be created in contexts other than
GrandStaff, PianoStaff and StaffGroup if the
Span_arpeggio_engraver is included in the Score context.
\score { \new ChoirStaff { \set Score.connectArpeggios = ##t << \new Voice \relative c' { <c e>2\arpeggio <d f>2\arpeggio <c e>1\arpeggio } \new Voice \relative c { \clef bass <c g'>2\arpeggio <b g'>2\arpeggio <c g'>1\arpeggio } >> } \layout { \context { \Score \consists "Span_arpeggio_engraver" } } }
![[image of music]](f6/lily-eabd37c2.png)
Creating arpeggios across notes in different voices
An arpeggio can be drawn across notes in different voices on the same
staff if the Span_arpeggio_engraver is added to the Staff
context:
\new Staff \with { \consists "Span_arpeggio_engraver" } \relative c' { \set Staff.connectArpeggios = ##t << { <e' g>4\arpeggio <d f> <d f>2 } \\ { <d, f>2\arpeggio <g b>2 } >> }
![[image of music]](ab/lily-2a345d7d.png)
参照
音楽用語集: arpeggio
コード断片集: 発想記号
内部リファレンス: Arpeggio, Slur, PianoStaff
既知の問題と警告
ある PianoStaff の中の同時点で譜を跨ぐアルペジオと跨がないアルペジオを混在させることはできません。
譜を跨ぐアルペジオに括弧スタイルのアルペジオを適用することはできません。
| [ << 音楽記譜法 ] | [トップ][目次][インデックス][ ? ] | [ 専門的な記譜法 >> ] | ||
| [ < アルペジオ ] | [ 上へ : 直線の発想記号 ] | [ 繰り返し > ] | ||
トリル
延長線を持たない短い トリル は \trill で譜刻されます。アーティキュレーションと装飾 を参照してください。
延長線を持つ長いトリルは \startTrillSpan と \stopTrillSpan で作成されます:
\relative { d''1\startTrillSpan d1 c2\stopTrillSpan r2 }
![[image of music]](fe/lily-1ba0d527.png)
改行を跨ぐトリルは、次行の最初の音符の上から再開されます。
\relative { d''1\startTrillSpan \break d1 c2\stopTrillSpan r2 }
![[image of music]](3c/lily-985e601d.png)
連続したトリルには、明示的な \stopTrillSpan コマンドは必要ありません。なぜなら、自動的に次のトリルが前のトリルの右端となるからです。
\relative { d''1\startTrillSpan d1 b1\startTrillSpan d2\stopTrillSpan r2 }
![[image of music]](cb/lily-542878af.png)
トリルを装飾小音符と組み合わせることもできます。この組み合わせの構文と装飾小音符を正確に配置する方法については、装飾小音符 で説明しています。
\relative { d''1~\afterGrace d1\startTrillSpan { c32[ d]\stopTrillSpan } c2 r2 }
![[image of music]](05/lily-89b5d43a.png)
明示的なピッチを持つ予備の音符を必要とするトリルは
\pitchedTrill コマンドを用いて譜刻することができます。最初の引数は主音符です。2 番目の引数は トリル の音符であり、括弧で囲まれた符幹を持たない符頭として譜刻されます。
\relative { \pitchedTrill d''2\startTrillSpan fis d2 c2\stopTrillSpan r2 }
![[image of music]](a6/lily-77ec2b79.png)
同じ小節内で、同一音符のためデフォルトでは譜刻されない臨時記号を譜刻するには手動で譜刻を指定する必要があります。最初の小節では、最初のピッチを持つトリルだけに臨時記号が譜刻されています。
\pitchedTrill eis4\startTrillSpan fis eis4\stopTrillSpan \pitchedTrill eis4\startTrillSpan fis eis4\stopTrillSpan \pitchedTrill eis4\startTrillSpan fis eis4\stopTrillSpan \pitchedTrill eis4\startTrillSpan fis! eis4\stopTrillSpan
![[image of music]](6e/lily-450c663e.png)
定義済みコマンド
\startTrillSpan,
\stopTrillSpan
参照
音楽用語集: trill
記譜法リファレンス: アーティキュレーションと装飾, 装飾小音符
コード断片集: 発想記号
内部リファレンス: TrillSpanner
| [ << 音楽記譜法 ] | [トップ][目次][インデックス][ ? ] | [ 専門的な記譜法 >> ] | ||
| [ < トリル ] | [ 上へ : 音楽記譜法 ] | [ 長い繰り返し > ] | ||
1.4 繰り返し
![[image of music]](0f/lily-1fceaba8.png)
繰り返しは音楽の主要なコンセプトであり、繰り返しのために複数の記譜法が存在します。LilyPond は以下の種類の繰り返しをサポートします:
-
volta 繰り返される音楽は描き出されませんが、繰り返しの小節線で囲まれます。繰り返しが楽曲の先頭にある場合、繰り返しの小節線は繰り返しの終端にのみ譜刻されます。繰り返し時に入れ替えて演奏される部分 (volte) は囲みの右側に譜刻されます。これは入れ替えがある繰り返しの標準的な記譜法です。
-
unfold 繰り返される音楽は、repeatcount によって指定された回数だけ、描き出されます。これは反復の多い音楽を入力するときに有用です。
-
percent これには拍の繰り返しや小節の繰り返しがあります。スラッシュまたはパーセント記号のような外見をしています。
-
tremolo これはトレモロの連桁を描くために使用されます。
| 1.4.1 長い繰り返し | ||
| 1.4.2 短い繰り返し |
| [ << 音楽記譜法 ] | [トップ][目次][インデックス][ ? ] | [ 専門的な記譜法 >> ] | ||
| [ < 繰り返し ] | [ 上へ : 繰り返し ] | [ 通常の繰り返し > ] | ||
1.4.1 長い繰り返し
このセクションでは長い (通常は複数の小節) 繰り返しを入力する方法について議論します。繰り返しには 2 つの形式があります: 繰り返し記号によって囲まれる繰り返しと、描き出される繰り返し – これは反復の多い音楽を入力するために使用されます – です。繰り返し記号を手動で制御することもできます。
| 通常の繰り返し | ||
| 手動の繰り返し記号 | ||
| 繰り返しを描き出す |
| [ << 音楽記譜法 ] | [トップ][目次][インデックス][ ? ] | [ 専門的な記譜法 >> ] | ||
| [ < 長い繰り返し ] | [ 上へ : 長い繰り返し ] | [ 手動の繰り返し記号 > ] | ||
通常の繰り返し
通常の繰り返しの構文は以下の通りです。
\repeat volta repeatcount musicexpr
ここで、musicexpr は音楽表記です。
入れ替えを持たない 1 回の繰り返しは以下のようになります:
\relative { \repeat volta 2 { c''4 d e f } c2 d \repeat volta 2 { d4 e f g } }
![[image of music]](eb/lily-02e6bb52.png)
繰り返し時に入れ替えて演奏する部分は \alternative を用いて作り出すことができます。入れ替えの各グループを波括弧で囲んで、このブロックの中に配置します。
\repeat volta repeatcount musicexpr
\alternative {
{ musicexpr }
}
ここで、musicexpr は音楽表記です。
繰り返し回数が入れ替え部分の数よりも多い場合、始めの方の繰り返しには最初の入れ替え部分が使用されます。
繰り返しが 1 回で、入れ替えも 1 つの場合は以下のようになります:
\relative { \repeat volta 2 { c''4 d e f | } \alternative { { c2 e | } { f2 g | } } c1 }
![[image of music]](a3/lily-c98308d9.png)
複数の入れ替え部分を 1 回ずつ演奏する繰り返しは以下のようになります:
\relative { \repeat volta 4 { c''4 d e f | } \alternative { { c2 e | } { f2 g | } } c1 }
![[image of music]](bf/lily-5efa3020.png)
繰り返し部分を複数回繰り返す場合は以下のようになります:
\relative { \repeat volta 3 { c''4 d e f | } \alternative { { c2 e | } { f2 g | } { a2 g | } } c1 }
![[image of music]](0d/lily-b6cbdfaa.png)
Note: 入れ替えが複数ある場合、入れ替えの閉じ波括弧と次の入れ替えの開始の波括弧の間に何かを置くべきではありません。さもないと、予期せぬ数の入れ替えが発生します。
Note: Voice コンテキストを明示的にインスタンス化せずに\relative を \repeat の中に配置すると、余計な譜が表示されます。
余計な譜が表示される を参照してください。
繰り返しが小節の途中から始まり、入れ替え部分が無い場合、風通は繰り返しの終わりも小節の途中になります。そのため、1 つ小節に 2 つの終わりが加えられます。そのような場合、繰り返し記号は本来の小節線とは異なります。繰り返し記号を譜刻する場所で \partila コマンドや小節チェックを使わないで下さい:
\relative { % ここで \partial を使わないで下さい c'4 e g % ここで小節チェックを行わないで下さい % ここで \partial を使わないで下さい \repeat volta 4 { e4 | c2 e | % ここで \partial を使わないで下さい g4 g g % ここで小節チェックを行わないで下さい } % ここで \partial を使わないで下さい g4 | a2 a | g1 | }
![[image of music]](66/lily-ddc558ea.png)
同様に、繰り返しが楽譜の先頭の部分小節から始まり、入れ替え部分を持たない場合、楽譜の先頭で \partial コマンドを配置する必要があることを除いて、上の例と同じ条件が適用されます:
\relative { \partial 4 % \partial が必要です \repeat volta 4 { e'4 | c2 e | % ここで \partial を使わないで下さい g4 g g % ここで小節チェックを行わないで下さい } % ここで \partial を使わないで下さい g4 | a2 a | g1 | }
![[image of music]](cc/lily-99e59933.png)
完全な長さを持たない小節で始まる小節に入れ替え部分を付け加える場合、以下の場所で Timing.measureLength コンテキスト プロパティを手動で設定する必要があります:
-
\alternativeブロック内の不完全な小節の開始点。通常、これは (たいていの場合は) 最後の入れ替え部分を除く、各入れ替え部分の最後の小節になります。 - 最初の入れ替え部分を除く、各入れ替え部分の開始点。
\relative { \partial 4 \repeat volta 2 { e'4 | c2 e | } \alternative { { f2 d | \set Timing.measureLength = #(ly:make-moment 3/4) g4 g g % optional bar check is allowed here } { \set Timing.measureLength = #(ly:make-moment 4/4) a2 a | } } g1 | }
![[image of music]](dd/lily-2286e89a.png)
measureLength プロパティについての説明は 時間管理
にあります。
\inStaffSegno コマンドを用いて、セーニョ記号を配置して
\repeat volta コマンドと連携させることができます。差し替えの小節線記号は Score コンテキストの中でプロパティ segnoType,
startRepeatSegnoType, endRepeatSegnoType あるいは
doubleRepeatSegnoType を必要に応じてオーバライドすることにより設定することができます。
\relative { e'1 \inStaffSegno f2 g a b c1_"D.S." \bar "|." }
![[image of music]](c6/lily-d0f39a62.png)
繰り返しの 2 回目の部分にタイを付け加えることもできます:
\relative { c''1 \repeat volta 2 { c4 d e f~ } \alternative { { f2 d } { f2\repeatTie f, } } }
![[image of music]](17/lily-40ad132f.png)
Selected Snippets
Shortening volta brackets
By default, the volta brackets will be drawn over all of the
alternative music, but it is possible to shorten them by setting
voltaSpannerDuration. In the next example, the bracket only
lasts one measure, which is a duration of 3/4.
\relative c'' { \time 3/4 c4 c c \set Score.voltaSpannerDuration = #(ly:make-moment 3/4) \repeat volta 5 { d4 d d } \alternative { { e4 e e f4 f f } { g4 g g } } }
![[image of music]](bd/lily-56d9f3ab.png)
Adding volta brackets to additional staves
The Volta_engraver by default resides in the Score
context, and brackets for the repeat are thus normally only printed
over the topmost staff. This can be adjusted by adding the
Volta_engraver to the Staff context where the brackets
should appear; see also the “Volta multi staff” snippet.
<< \new Staff { \repeat volta 2 { c'1 } \alternative { c' } } \new Staff { \repeat volta 2 { c'1 } \alternative { c' } } \new Staff \with { \consists "Volta_engraver" } { c'2 g' e' a' } \new Staff { \repeat volta 2 { c'1 } \alternative { c' } } >>
![[image of music]](26/lily-338ea067.png)
Setting the double repeat default for volte
There are three different styles of double repeats for volte, that can
be set using doubleRepeatType.
\relative c'' { \repeat volta 1 { c1 } \set Score.doubleRepeatType = #":..:" \repeat volta 1 { c1 } \set Score.doubleRepeatType = #":|.|:" \repeat volta 1 { c1 } \set Score.doubleRepeatType = #":|.:" \repeat volta 1 { c1 } }
![[image of music]](07/lily-6e87e18b.png)
Alternative bar numbering
Two alternative methods for bar numbering can be set, especially for when using repeated music.
\relative c'{ \set Score.alternativeNumberingStyle = #'numbers \repeat volta 3 { c4 d e f | } \alternative { { c4 d e f | c2 d \break } { f4 g a b | f4 g a b | f2 a | \break } { c4 d e f | c2 d } } c1 \break \set Score.alternativeNumberingStyle = #'numbers-with-letters \repeat volta 3 { c,4 d e f | } \alternative { { c4 d e f | c2 d \break } { f4 g a b | f4 g a b | f2 a | \break } { c4 d e f | c2 d } } c1 }
参照
記譜法リファレンス: 小節線, コンテキストのプラグインを変更する, タイとスラーの形状を変更する, 時間管理
コード断片集: Repeats
内部リファレンス: VoltaBracket, RepeatedMusic, VoltaRepeatedMusic, UnfoldedRepeatedMusic
既知の問題と警告
\repeat ブロックから \alternative ブロックまで続くスラーは、最初の入れ替え部分に対してのみ機能します。他の入れ替え部分に対して見た目上、スラーを伸ばすには \repeatTie を使います。
しかしながら、この手法はスラーが 1 本の場合のみ可能であり、TabStaff
では機能しません。複数のスラーを入れ替え部分に伸ばし、TabStaff コンテキストでも機能する手法は タイとスラーの形状を変更する で示しています。
さらに、入れ替え部分の最後から繰り返しの開始点までスラーで結ぶこともできません。
\repeat ブロックから \alternative ブロックまで続くグリッサンドは最初の入れ替え部分に対してのみ機能します。他の入れ替え部分に対して見た目上、グリッサンドを伸ばすには、見えない装飾音符から始まるグリッサンドのコードを記述します。例として、グリッサンド の楽譜断片集にある
“繰り返しを跨いでグリッサンドを延長する” を参照してください。
不完全な小節で始まる繰り返しが measureLength プロパティの変更を行う\alternative ブロックを持つ場合、\unfoldRepeats を使用するとおかしな場所に小節線が引かれ、小節チェック警告が発生します。
以下のようにネストされた繰り返し
\repeat … \repeat … \alternative
はあいまいです。なぜなら、\alternative がどちらの \repeat に属するのかはっきりしないからです。このあいまいさは、常に \alternative を内側の \repeat に属させることによって解決されます。はっきりとさせるために、そのような状況では波括弧を使用すると賢明です。
| [ << 音楽記譜法 ] | [トップ][目次][インデックス][ ? ] | [ 専門的な記譜法 >> ] | ||
| [ < 通常の繰り返し ] | [ 上へ : 長い繰り返し ] | [ 繰り返しを描き出す > ] | ||
手動の繰り返し記号
Note: 以下の手法は特殊な繰り返し構造を表示するためだけに使用され、予期しない振る舞いをする可能性があります。たいていのケースでは、繰り返しは標準の \repeat コマンドを用いるか、適切な小節線を譜刻することによって作成すべきです。更なる情報は、小節線 を参照してください。
プロパティ repeatCommands を用いて繰り返しのレイアウトを制御することができます。このプロパティの値は繰り返しコマンドの Scheme リストです。
-
start-repeat |:小節線を譜刻します。\relative { c''1 \set Score.repeatCommands = #'(start-repeat) d4 e f g c1 }![[image of music]](a1/lily-67275801.png)
標準の譜刻習慣に従い、楽曲の先頭では繰り返し記号は譜刻されません。
-
end-repeat :|.小節線を譜刻します。\relative { c''1 d4 e f g \set Score.repeatCommands = #'(end-repeat) c1 }![[image of music]](a7/lily-1481c892.png)
-
(volta number) ... (volta #f) 指定された番号を持つ新しい volta を作成します。Volta 囲みは明示的に終了させる必要があります。さもなければ、譜刻されません。
\relative { f''4 g a b \set Score.repeatCommands = #'((volta "2")) g4 a g a \set Score.repeatCommands = #'((volta #f)) c1 }![[image of music]](58/lily-81b21a60.png)
複数の繰り返しコマンドが同時に発生することもあります:
\relative { f''4 g a b \set Score.repeatCommands = #'((volta "2, 5") end-repeat) g4 a g a c1 \set Score.repeatCommands = #'((volta #f) (volta "95") end-repeat) b1 \set Score.repeatCommands = #'((volta #f)) }
![[image of music]](c6/lily-6eaf0ac7.png)
テキストを volta 囲みに含めることができます。テキストに使用できるのは数字やマークアップ テキストです。テキストをフォーマットする を参照してください。マークアップ テキストを使用するための最も簡単な方法は、最初にマークアップを定義し、それからそのマークアップを Scheme リストに含める方法です。
voltaAdLib = \markup { 1. 2. 3... \text \italic { ad lib. } } \relative { c''1 \set Score.repeatCommands = #(list(list 'volta voltaAdLib) 'start-repeat) c4 b d e \set Score.repeatCommands = #'((volta #f) (volta "4.") end-repeat) f1 \set Score.repeatCommands = #'((volta #f)) }
![[image of music]](7f/lily-9e579894.png)
参照
記譜法リファレンス: 小節線, テキストをフォーマットする
コード断片集: Repeats
内部リファレンス: VoltaBracket, RepeatedMusic, VoltaRepeatedMusic
| [ << 音楽記譜法 ] | [トップ][目次][インデックス][ ? ] | [ 専門的な記譜法 >> ] | ||
| [ < 手動の繰り返し記号 ] | [ 上へ : 長い繰り返し ] | [ 短い繰り返し > ] | ||
繰り返しを描き出す
unfold コマンドを用いることにより、繰り返しを単に反復する音楽を描き出すために使用することができます。構文は以下の通りです:
\repeat unfold repeatcount musicexpr
ここで、musicexpr は音楽表記であり、repeatcount は
musicexpr を繰り返す回数です。
\relative { \repeat unfold 2 { c''4 d e f } c1 }
![[image of music]](58/lily-f99ccf5b.png)
いくつかのケースでは、特に \relative コンテキストの中では、\repeat unfold 関数は音楽表記を複数回記述したものと同じにはなりません。例えば、
\repeat unfold 2 { a'4 b c }
これは以下と等価ではありません。
a'4 b c | a'4 b c
入れ替え部分がある繰り返しを展開することもできます。
\relative { \repeat unfold 2 { c''4 d e f } \alternative { { c2 g' } { c,2 b } } c1 }
![[image of music]](a5/lily-f55978b3.png)
繰り返し回数が入れ替え部分の数よりも多い場合、最初の入れ替え部分だけが適用されます。残りの入れ替えは無視されて譜刻されません。
\relative { \repeat unfold 4 { c''4 d e f } \alternative { { c2 g' } { c,2 b } { e2 d } } c1 }
![[image of music]](c2/lily-be0eb12f.png)
入れ替え部分の数が繰り返し回数よりも多い場合、最初の入れ替え部分が使用され、残りの繰り返し部分は無視され、譜刻されません。
\relative { \repeat unfold 2 { c''4 d e f } \alternative { { c2 g' } { c,2 b } { e2 d } } c1 }
![[image of music]](e9/lily-0b438504.png)
複数の unfold 関数をネストすることも可能です。(unfold は入れ替え部分を持っていても、持っていなくても構いません。)
\relative { \repeat unfold 2 { \repeat unfold 2 { c''4 d e f } \alternative { { c2 g' } { c,2 b } } } c1 }
![[image of music]](01/lily-b4d253cb.png)
和音構造は和音の繰り返し記号 q で繰り返すことができます。和音の繰り返し を参照してください。
Note: Voice コンテキストを明示的にインスタンス化せずに\relative を \repeat の中に配置すると、余計な譜が表示されます。
余計な譜が表示される を参照してください。
参照
記譜法リファレンス: 和音の繰り返し
コード断片集: Repeats
内部リファレンス: RepeatedMusic, UnfoldedRepeatedMusic
| [ << 音楽記譜法 ] | [トップ][目次][インデックス][ ? ] | [ 専門的な記譜法 >> ] | ||
| [ < 繰り返しを描き出す ] | [ 上へ : 繰り返し ] | [ パーセント繰り返し > ] | ||
1.4.2 短い繰り返し
このセクションでは、短い繰り返しを入力する方法について議論します。短い繰り返しには 2 つの形式があります: 単一の音符、単一の小節あるいは 2 小節の繰り返しを表すスラッシュまたはパーセント記号と、トレモロです。
| パーセント繰り返し | ||
| トレモロの繰り返し |
| [ << 音楽記譜法 ] | [トップ][目次][インデックス][ ? ] | [ 専門的な記譜法 >> ] | ||
| [ < 短い繰り返し ] | [ 上へ : 短い繰り返し ] | [ トレモロの繰り返し > ] | ||
パーセント繰り返し
繰り返される短いパターンは 1 回だけ譜刻され、繰り返しは特殊な記号で置き換えられます。
構文は以下の通りです
\repeat percent number musicexpr
ここで、musicexpr は音楽表記です。
1 小節よりも短いパターンはスラッシュで置き換えられます。
\relative c'' { \repeat percent 4 { c128 d e f } \repeat percent 4 { c64 d e f } \repeat percent 5 { c32 d e f } \repeat percent 4 { c16 d e f } \repeat percent 4 { c8 d } \repeat percent 4 { c4 } \repeat percent 2 { c2 } }
![[image of music]](08/lily-f37e9759.png)
1 または 2 小節のパターンはパーセントのような記号で置き換えられます。
\relative c'' { \repeat percent 2 { c4 d e f } \repeat percent 2 { c2 d } \repeat percent 2 { c1 } }
![[image of music]](2b/lily-edcd7f57.png)
\relative { \repeat percent 3 { c''4 d e f | c2 g' } }
![[image of music]](fc/lily-fbda822b.png)
1 小節よりも短いけれども異なる演奏時間が含まれるパターンは2 重線のパーセント記号を用います。
\relative { \repeat percent 4 { c''8. <d f>16 } \repeat percent 2 { \tuplet 3/2 { r8 c d } e4 } }
![[image of music]](f1/lily-ce3cf31f.png)
Selected Snippets
Percent repeat counter
Measure repeats of more than two repeats can get a counter when the convenient property is switched, as shown in this example:
\relative c'' { \set countPercentRepeats = ##t \repeat percent 4 { c1 } }
![[image of music]](c0/lily-4d49f067.png)
Percent repeat count visibility
Percent repeat counters can be shown at regular intervals by setting
the context property repeatCountVisibility.
\relative c'' { \set countPercentRepeats = ##t \set repeatCountVisibility = #(every-nth-repeat-count-visible 5) \repeat percent 10 { c1 } \break \set repeatCountVisibility = #(every-nth-repeat-count-visible 2) \repeat percent 6 { c1 d1 } }
![[image of music]](83/lily-a9880f23.png)
Isolated percent repeats
Isolated percents can also be printed.
makePercent = #(define-music-function (note) (ly:music?) "Make a percent repeat the same length as NOTE." (make-music 'PercentEvent 'length (ly:music-length note))) \relative c'' { \makePercent s1 }
![[image of music]](74/lily-83e63670.png)
参照
音楽用語集: percent repeat, simile
コード断片集: Repeats
内部リファレンス: RepeatSlash, RepeatSlashEvent, DoubleRepeatSlash, PercentRepeat, PercentRepeatCounter, PercentRepeatedMusic, Percent_repeat_engraver, DoublePercentEvent, DoublePercentRepeat, DoublePercentRepeatCounter, Double_percent_repeat_engraver, Slash_repeat_engraver
| [ << 音楽記譜法 ] | [トップ][目次][インデックス][ ? ] | [ 専門的な記譜法 >> ] | ||
| [ < パーセント繰り返し ] | [ 上へ : 短い繰り返し ] | [ 同時進行する音符 > ] | ||
トレモロの繰り返し
トレモロには 2 つの形式があります: 2 つの和音あるいは 2 つの音符を交互に演奏するものと、単一の音符あるいは和音を素早く繰り返すものです。交互に演奏するトレモロは、音符あるいは和音の間に多重連桁を付け加えることによって示され、一方、単一の音符を素早く繰り返すトレモロは単一の音符に多重連桁あるいは多重スラッシュを付け加えることによって示されます。
2 つの音符の間にトレモロ記号を配置するには、トレモロ スタイルの \repeat
を使用します:
\relative c'' { \repeat tremolo 8 { c16 d } \repeat tremolo 6 { c16 d } \repeat tremolo 2 { c16 d } }
![[image of music]](bb/lily-9cb37ccc.png)
\repeat tremolo の構文では、波括弧の中にある音符の数がちょうど 2 つであること、それに、繰り返しの回数が普通の音符あるいは付点音符として表すことができる音価に相当することが必須です。それゆえ、\repeat tremolo 7 は有効であり、2 重付点音符を作り出します。しかしながら、\repeat tremolo 9 は無効です。
トレモロの演奏時間は、波括弧で囲まれた音楽表記の演奏時間に繰り返し回数を掛けたものに等しいです:
\repeat tremolo 8 { c16 d16 } は全音符のトレモロであり、トレモロの連桁でつながれた 2 つの全音符として譜刻されます。
単一の音符上にトレモロ記号を配置する方法は 2 つあります。\repeat tremolo 構文をここでも使用します
– この場合、音符を波括弧で囲むべきではありません:
\repeat tremolo 4 c'16
![[image of music]](21/lily-6f4ca5a6.png)
音符の後に :N を付け加えることによって同じ出力を得ることができます。N は細部の演奏時間を表し、8 以上である必要があります。N が 8 である場合、音符の符幹に 1 本の連桁が付け加えられます。N が省略された場合、
最後の値 (tremoloFlags に保存されています) が使用されます:
\relative { c''2:8 c:32 c: c: }
![[image of music]](c6/lily-57545bda.png)
Selected Snippets
Cross-staff tremolos
Since \repeat tremolo expects exactly two musical arguments for
chord tremolos, the note or chord which changes staff within a
cross-staff tremolo should be placed inside curly braces together with
its \change Staff command.
\new PianoStaff << \new Staff = "up" \relative c'' { \key a \major \time 3/8 s4. } \new Staff = "down" \relative c'' { \key a \major \time 3/8 \voiceOne \repeat tremolo 6 { <a e'>32 { \change Staff = "up" \voiceTwo <cis a' dis>32 } } } >>
![[image of music]](67/lily-2d920ad8.png)
参照
コード断片集: Repeats
| [ << 音楽記譜法 ] | [トップ][目次][インデックス][ ? ] | [ 専門的な記譜法 >> ] | ||
| [ < トレモロの繰り返し ] | [ 上へ : 音楽記譜法 ] | [ 単一のボイス > ] | ||
1.5 同時進行する音符
![[image of music]](31/lily-73daddf8.png)
楽譜の中で多声部は楽曲の 1 節の中にある複数のボイスを参照します。LilyPond の中で多声部は同じ譜にある複数のボイスを参照します。
| 1.5.1 単一のボイス | ||
| 1.5.2 複数のボイス |
| [ << 音楽記譜法 ] | [トップ][目次][インデックス][ ? ] | [ 専門的な記譜法 >> ] | ||
| [ < 同時進行する音符 ] | [ 上へ : 同時進行する音符 ] | [ 和音の音符 > ] | ||
1.5.1 単一のボイス
このセクションでは同じボイスの中にある同時進行する音符について議論します。
| 和音の音符 | ||
| 和音の繰り返し | ||
| 同時進行表記 | ||
| クラスタ |
| [ << 音楽記譜法 ] | [トップ][目次][インデックス][ ? ] | [ 専門的な記譜法 >> ] | ||
| [ < 単一のボイス ] | [ 上へ : 単一のボイス ] | [ 和音の繰り返し > ] | ||
和音の音符
和音は < と > で 1 組のピッチを囲むことによって形成されます。和音の後には – 普通の音符と同様に – 演奏時間が続くかもしれません:
\relative { <a' c e>1 <a c e>2 <f a c e>4 <a c>8. <g c e>16 }
![[image of music]](5f/lily-82e9bca9.png)
さらに、和音の後には – 普通の音符と同様に – アーティキュレーションが続くかもしれません:
\relative { <a' c e>1\fermata <a c e>2-> <f a c e>4\prall <a c>8.^! <g c e>16-. }
![[image of music]](61/lily-32305f66.png)
和音の中にある音符自体にもアーティキュレーションや装飾を付けることができます。
\relative { <a' c\prall e>1 <a-> c-^ e>2 <f-. a c-. e-.>4 <a-+ c-->8. <g\fermata c e\turn>16 }
![[image of music]](d0/lily-06b73878.png)
しかしながら、いくつかの記譜要素 – 強弱記号、ヘアピン、それにスラーなど – は和音の中の音符ではなく、和音に付ける必要があります。そうしなければ、譜刻されません。
\relative { <a'\f c( e>1 <a c) e>\f <a\< c e>( <a\! c e>) <a c e>\< <a c e> <a c e>\! }
![[image of music]](e7/lily-efa73d1d.png)
和音は和音に含まれる音符、アーティキュレーション、それに他の付属要素のコンテナにすぎません。従って、音符を持たない和音は演奏時間を持ちません。そのような和音に付属するアーティキュレーションは、後に続く音符や和音のタイミングで発生して、組み合わされます (そのような要素の複雑な組み合わせについては 同時進行表記 を参照してください):
\relative { \grace { g'8( a b } <> ) \p \< -. -\markup \italic "sempre staccato" \repeat unfold 4 { c4 e } c1\f }
![[image of music]](d1/lily-60d80aa7.png)
和音の中のピッチに対して相対モードを使うことができます。各和音の最初の音符は常に、前の和音の最初の音符との相対関係で決まります。前が和音でない場合は、その和音の前にある最後のピッチとの相対関係になります。和音の中にある残りの音符はすべて 同じ和音の中にある 前の音符との相対関係になります。
\relative { <a' c e>1 <f a c> <a c e> <f' a c> <b, e b,> }
![[image of music]](e3/lily-a34a1954.png)
和音についての更なる情報は、和音記譜法 を参照してください。
参照
音楽用語集: chord
学習マニュアル: Combining notes into chords
記譜法リファレンス: 和音記譜法, アーティキュレーションと装飾, 相対オクターブ入力, 複数のボイス
コード断片集: Simultaneous notes
既知の問題と警告
1 譜スペース内に 3 つ以上のピッチを保持している和音 – ‘<e f! fis!>’ など – では、符頭が重なります。状況に応じて、適切な表記を用います
| [ << 音楽記譜法 ] | [トップ][目次][インデックス][ ? ] | [ 専門的な記譜法 >> ] | ||
| [ < 和音の音符 ] | [ 上へ : 単一のボイス ] | [ 同時進行表記 > ] | ||
和音の繰り返し
入力の手間を省くために、前の和音を繰り返すための短縮記法があります。和音を繰り返すためのシンボルは q です:
\relative { <a' c e>1 q <f a c>2 q }
![[image of music]](1a/lily-5c1fcca1.png)
前の和音のピッチが複製されているだけなので、 通常の和音と同様に、和音の繰り返しのシンボルにも演奏時間、アーティキュレーション、マークアップ、スラー、連桁などを使うことができます。
\relative { <a' c e>1\p^"text" q2\<( q8)[-! q8.]\! q16-1-2-3 q8\prall }
![[image of music]](a9/lily-fa4c35a2.png)
和音繰り返しのシンボルは常に最後の和音を覚えているため、最後の和音の後に和音ではない音符や休符があったとしても、和音を繰り返すことができます。
\relative { <a' c e>1 c'4 q2 r8 q8 | q2 c, | }
![[image of music]](72/lily-84d2397e.png)
しかしながら、和音繰り返しのシンボルは前の和音の中にある、あるいは付属している強弱記号、アーティキュレーション、あるいは装飾を持ち越しません。
\relative { <a'-. c\prall e>1\sfz c'4 q2 r8 q8 | q2 c, | }
![[image of music]](60/lily-81f1c723.png)
それらのイベントを持ち越すには、\chordRepeats 関数を明示的に呼び出し、引数に持ち越す イベント タイプ を指定するリストを持たせます。これにより持ち越されるイベントはすでに和音 q に存在しているものだけです。
\relative { \chordRepeats #'(articulation-event) { <a'-. c\prall e>1\sfz c'4 q2 r8 q8-. } | q2 c, | }
![[image of music]](8a/lily-52a46657.png)
上記の例では \chordRepeats を \relative 構造の内部で使用することで予期しない結果になっています:
\chordRepeats の和音イベントが展開されると、通常どおりに入力された和音と区別が付かず、\relative はカレントのコンテキストに基づいて音程を割り当てます。
ネストされた \relative のインスタンスは内外のインスタンスに影響を与えないので、\chordRepeats の内側に \relative を配置することで\chordRepeats の和音を展開する前に音程を確定させることができます。今回のケースでは、内側にある \relative の内容は外側にある \relative の影響を受けないので、繰り返しの和音は前の和音の音程を維持しています。また、内側の \relative は外側の \relative に影響を与えないので、最後の音符のオクターブ入力が変化します。
\new Voice \relative c'' { \chordRepeats #'(articulation-event) \relative { <a'-. c\prall e>1\sfz c'4 q2 r8 q8-. } | q2 c | }
![[image of music]](f1/lily-920dcecf.png)
\chordRepeats は明示的に呼び出された場合にのみ
\relative と相互作用します:
暗黙的な繰り返し和音の展開はすべての \relative インスタンスが処理されてから行われます。
参照
記譜法リファレンス: 和音記譜法, アーティキュレーションと装飾
インストールされているファイル: ‘ly/chord-repetition-init.ly’
| [ << 音楽記譜法 ] | [トップ][目次][インデックス][ ? ] | [ 専門的な記譜法 >> ] | ||
| [ < 和音の繰り返し ] | [ 上へ : 単一のボイス ] | [ クラスタ > ] | ||
同時進行表記
2 重山括弧で囲まれた 1 つあるいは複数の音楽表記は同時進行します。最初の表記が単一の音符で始まる場合、あるいは同時進行する表記全体が明らかに単一のボイスの中にある場合、その表記全体は単一の譜の上に配置されます。そうでない場合、同時進行する表記の要素は別々の譜の上に配置されます。
以下の例は 1 つの譜の上にある同時進行表記を示しています:
\new Voice { % 明らかに単一のボイスです << \relative { a'4 b g2 } \relative { d'4 g c,2 } >> }
![[image of music]](6b/lily-d6fc61b1.png)
\relative { % 単一の音符で始まります a' << \relative { a'4 b g } \relative { d'4 g c, } >> }
![[image of music]](5e/lily-a6657b09.png)
これは同時進行するセクションが同一のリズムを持つ場合に役に立ちます。しかしながら、異なる演奏時間を持つ音符を同じ符幹に取り付けようとするとエラーとなります。単一の ‘Voice’ の中にある音符、アーティキュレーション、それにプロパティの変更は収集され、音楽的な順序で譜刻されます:
\relative { <a' c>4-. <>-. << c a >> << { c-. <c a> } { a s-. } >> }
![[image of music]](27/lily-f8b9439e.png)
同時に複数の符幹や連桁、あるいは異なる音符の演奏時間やプロパティが必要な場合、複数のボイスを使う必要があります。
以下の例は、同時進行する表記が暗黙的に複数の譜を生成する様子を示しています:
% 単一の音符で始まりません << \relative { a'4 b g2 } \relative { d'4 g2 c,4 } >>
![[image of music]](45/lily-b41811a8.png)
ここでは、リズムが異なっていても問題ありません。異なるボイスだと解釈されるからです。
既知の問題と警告
譜の同じ場所で、同じ向きの符幹を持つ複数のボイスから音符がシフトされずに (あるいは同じシフトで) 配置された場合、コンパイル中に以下のメッセージが表示されます:
warning: ignoring too many clashing note columns
以下でこのメッセージを表示させなくすることができます:
\override NoteColumn.ignore-collision = ##t
しかしながら、これは警告を非表示にするだけでなく、衝突解決に関するすべてのメッセージを非表示にして、他にも意図しない影響を与える可能性があります (衝突の解決 の 既知の問題 も参照してください)。
| [ << 音楽記譜法 ] | [トップ][目次][インデックス][ ? ] | [ 専門的な記譜法 >> ] | ||
| [ < 同時進行表記 ] | [ 上へ : 単一のボイス ] | [ 複数のボイス > ] | ||
クラスタ
クラスタは演奏すべき連続したピッチの範囲を示します。クラスタは 1 組の音符の範囲 (envelope) として表されます。クラスタはひと続きの和音に関数 \makeClusters
を適用することによって入力されます。例えば以下のように:
\relative \makeClusters { <g' b>2 <c g'> }
![[image of music]](04/lily-6e67d8ef.png)
通常の音符とクラスタを同じ譜に一緒にして配置することができます – たとえ、それらが同時進行であってもです。そのようなケースでは、通常の音符とクラスタの衝突を自動的に回避しようとする試みは行われません。
参照
音楽用語集: cluster
コード断片集: Simultaneous notes
内部リファレンス: ClusterSpanner, ClusterSpannerBeacon, Cluster_spanner_engraver
既知の問題と警告
クラスタは少なくとも 2 つの和音を持つ場合にのみうまく譜刻されます。さもなければ、あまりにも狭く譜刻されます。
クラスタは符幹を持たず、それ自体で演奏時間を示すことはできません。しかしながら、譜刻されるクラスタの長さはクラスタを定義する和音の演奏時間によって決定されます。クラスタを分割するには、クラスタとクラスタの間に分割するための休符が必要です。
クラスタは MIDI 出力を作り出しません。
| [ << 音楽記譜法 ] | [トップ][目次][インデックス][ ? ] | [ 専門的な記譜法 >> ] | ||
| [ < クラスタ ] | [ 上へ : 同時進行する音符 ] | [ 単一譜の多声 > ] | ||
1.5.2 複数のボイス
このセクションでは複数のボイスあるいは複数の譜の中にある同時進行する音符について議論します。
| 単一譜の多声 | ||
| ボイス スタイル | ||
| 衝突の解決 | ||
| 自動パート結合 | ||
| 音楽を並列に記述する |
| [ << 音楽記譜法 ] | [トップ][目次][インデックス][ ? ] | [ 専門的な記譜法 >> ] | ||
| [ < 複数のボイス ] | [ 上へ : 複数のボイス ] | [ ボイス スタイル > ] | ||
単一譜の多声
明示的にボイスをインスタンス化する
単一の譜の中に複数の独立したボイスを配置するのに必要とされる基本的な構造が以下の例で示されています:
\new Staff << \new Voice = "first" \relative { \voiceOne r8 r16 g'' e8. f16 g8[ c,] f e16 d } \new Voice= "second" \relative { \voiceTwo d''16 c d8~ 16 b c8~ 16 b c8~ 16 b8. } >>
![[image of music]](87/lily-a6949c64.png)
ここでは、ボイスは明示的にインスタンス化されていて、名前を与えられています。\voiceOne … \voiceFour コマンドはボイスをセット アップし、それにより、1 番目と 3 番目のボイスは上向きの符幹を持ち、2 番目と 4 番目のボイスは下向きの符幹を持ち、3 番目と 4 番目のボイスの符頭は水平方向にずれて、それぞれのボイスの中の休符は衝突を避けるために自動的に移動させられます。\oneVoice コマンドはすべてのボイス設定をニュートラルなデフォルトの向きに戻します。
一時的に多声となる楽節 (passage)
一時的に多声となる楽節は以下のような構成で作成することができます:
<< { \voiceOne ... }
\new Voice { \voiceTwo ... }
>> \oneVoice
ここで、一時多声楽節の中の最初の表記は直前に使われていた
Voice コンテキストに配置され、その Voice コンテキストは一時セクションの後も続いていきます。山括弧の中の他の表記は別の一時ボイスに代入されます。これと同様に、歌詞は多声セクションの前、最中、後に続いているボイスに代入されます:
\relative << \new Voice = "melody" { a'4 << { \voiceOne g f } \new Voice { \voiceTwo d2 } >> \oneVoice e4 } \new Lyrics \lyricsto "melody" { This is my song. } >>
![[image of music]](ca/lily-057f9e47.png)
ここで、\voiceOne と \voiceTwo コマンドはそれぞれのボイスの設定を定義するために必要とされています。
2 重バックスラッシュ構造
<< {...} \\ {...} >> 構造
– この中では 2 つ (あるいはそれ以上) の表記が
2 重バックスラッシュで区切られています –
は、同じような構造だが 2 重バックスラッシュを持たない構造とはまったく異なる振る舞いをします:
この構造の中にある すべての 表記は新たな Voice コンテキストに代入されます。それらの新しい Voice コンテキストは暗黙的に作成され、あらかじめ決められた名前 "1", "2" などを与えられます。
最初の例は以下のように書き換えることができます:
<< \relative { r8 r16 g'' e8. f16 g8[ c,] f e16 d } \\ \relative { d''16 c d8~ 16 b c8~ 16 b c8~ 16 b8. } >>
![[image of music]](ac/lily-939bd245.png)
一時ボイスが作成され、それから消去されることが問題にならない場合に、この構文を使用することができます。暗黙的に作成されるボイスには、それらがコードの中で現れる順番に従って、\voiceOne … \voiceFour コマンドと同じ設定が与えられます。
以下の例では、真ん中のボイスは上向きの符幹を持ちます。そのため、それを 3 番目に置いて、望みどおりに上向きの符幹を持つボイス 3 にしています。休符が 2 重に譜刻されることを避けるために、空白休符を使用しています。
<< \relative { r8 g'' g g g f16 ees f8 d } \\ \relative { ees'8 r ees r d r d r } \\ \relative { d''8 s c s bes s a s } >>
![[image of music]](86/lily-cf0f8966.png)
簡単なことですが、
コンテキストとエングラーバ と
ボイスを明示的にインスタンス化する で説明されているように、明示的に Voice コンテキストを作成しておくと賢明です。
Voice の順序
入力ファイルの中にある複数のボイスを譜刻する時、以下の順序で譜刻されます:
ボイス 1: 最上段 ボイス 2: 最下段 ボイス 3: 上から 2 番目 ボイス 4: 下から 2 番目 ボイス 5: 上から 3 番目 ボイス 6: 下から 3 番目 etc.
これは直感に反するように見えるかもしれませんが、自動レイアウト処理をシンプルにできます。奇数番号のボイスには上向きの符幹が与えられ、偶数番号のボイスには下向きの符幹が与えられるということに注意してください:
\new Staff << \time 2/4 { f''2 } % 1: 最上段 \\ { c'2 } % 2: 最下段 \\ { d''2 } % 3: 上から 2 番 \\ { e'2 } % 4: 下から 2 番 \\ { b'2 } % 5: 上から 2 番 \\ { g'2 } % 6: 下から 3 番 >>
![[image of music]](ad/lily-96bac5c2.png)
Note: 歌詞、スパナ (スラー、タイ、強弱のヘアピン等) はボイスを ‘跨ぐ’ ことはできません。
同一のリズム
同じリズムを持ち、並行して進行する音楽を譜刻するという特殊なケースでは、並行する音楽を単一の Voice の中に組み込み、それにより和音を形成することができます。これを実現するには、並行する音楽を明示的にインスタンス化されたボイス内の同時進行音楽構造の中に置きます:
\new Voice << \relative { e''4 f8 d e16 f g8 d4 } \relative { c''4 d8 b c16 d e8 b4 } >>
![[image of music]](db/lily-203dc579.png)
この手法では、音楽が同じリズムを持たない場合に、おかしな連桁と警告を生じます。
定義済みコマンド
\voiceOne,
\voiceTwo,
\voiceThree,
\voiceFour,
\oneVoice
参照
学習マニュアル: Voices contain music, Explicitly instantiating voices
コード断片集: Simultaneous notes
| [ << 音楽記譜法 ] | [トップ][目次][インデックス][ ? ] | [ 専門的な記譜法 >> ] | ||
| [ < 単一譜の多声 ] | [ 上へ : 複数のボイス ] | [ 衝突の解決 > ] | ||
ボイス スタイル
ボイス毎に異なる色と形を与えて、容易に見分けられるようにすることができます:
<< \relative { \voiceOneStyle d''4 c2 b4 } \\ \relative { \voiceTwoStyle e'2 e } \\ \relative { \voiceThreeStyle b2. c4 } \\ \relative { \voiceFourStyle g'2 g } >>
![[image of music]](8b/lily-e0e6eeb9.png)
\voiceNeutralstyle コマンドは標準の体裁に戻すために使用されます。
定義済みコマンド
\voiceOneStyle,
\voiceTwoStyle,
\voiceThreeStyle,
\voiceFourStyle,
\voiceNeutralStyle
参照
学習マニュアル: I'm hearing Voices, Other sources of information.
コード断片集: Simultaneous notes
| [ << 音楽記譜法 ] | [トップ][目次][インデックス][ ? ] | [ 専門的な記譜法 >> ] | ||
| [ < ボイス スタイル ] | [ 上へ : 複数のボイス ] | [ 自動パート結合 > ] | ||
衝突の解決
同じピッチ、同じ符頭を持ち、符幹の方向が逆で異なるボイスの中にある符頭は自動的に 1 つの符頭にまとめられます – マージされます。しかしながら、音符の符頭が異なっていたり、符幹の方向が同じである場合はマージされません。異なるボイスの中にあり、符幹の方向が逆の休符は垂直方向にずらされます。以下の例は 3 つの異なる状態を示しています – 第 1 小節の 1, 3 拍目、それに第 2 小節の 1 拍目で自動マージが失敗しています。
<< \relative { c''8 d e d c d c4 g'2 fis } \\ \relative { c''2 c8. b16 c4 e,2 r } \\ \relative { \oneVoice s1 e'8 a b c d2 } >>
![[image of music]](fa/lily-46aafd48.png)
以下に示すように、異なる符頭を持つ音符をマージすることができます – 例外として、半音符と 4 分音符のマージはできません。第 1 小節の 1 拍目の符頭がマージされました:
<< \relative { \mergeDifferentlyHeadedOn c''8 d e d c d c4 g'2 fis } \\ \relative { c''2 c8. b16 c4 e,2 r } \\ \relative { \oneVoice s1 e'8 a b c d2 } >>
![[image of music]](f6/lily-aaad88ae.png)
第 1 小節の 3 拍目のように異なる付点を持つ符頭もマージすることができます:
<< \relative { \mergeDifferentlyHeadedOn \mergeDifferentlyDottedOn c''8 d e d c d c4 g'2 fis } \\ \relative { c''2 c8. b16 c4 e,2 r } \\ \relative { \oneVoice s1 e'8 a b c d2 } >>
![[image of music]](49/lily-3abb0c55.png)
第 2 小節の最初の版音符と 8 分音符は正しくマージされていません。なぜなら 3 つ以上の音符が同じ列に並ぶ場合、自動マージは正しく機能できないからです。今回のケースでは、マージされた符頭が間違っています。マージが正しい符頭を選択できるようにするため、マージすべきでない符頭に \shift を適用する必要があります。ここでは、\shiftOn を適用することで、最上段にある g を列から外し、\mergeDifferentlyHeadedOn を正しく機能させています。
<< \relative { \mergeDifferentlyHeadedOn \mergeDifferentlyDottedOn c''8 d e d c d c4 \shiftOn g'2 fis } \\ \relative { c''2 c8. b16 c4 e,2 r } \\ \relative { \oneVoice s1 e'8 a b c d2 } >>
![[image of music]](3e/lily-0c020e1a.png)
\shiftOn コマンドは、ボイスの中にある音符がずれることを許可します
(強制はしません)。\shiftOn がボイスに適用されると、そのボイスの中にある音符あるいは和音は、同じ向きの符幹を持つ他のボイスと符幹が衝突する場合にのみ、ずらされます。\shiftOff コマンドは、適用された時点から、このタイプの音符の移動を禁止します。
デフォルトでは、外側のボイス (通常はボイス 1 と 2) には \shiftOff が指定されていて、内側のボイス (ボイス 3 以上) には \shiftOn が指定されています。音符をずらす場合、上向きの符幹を持つボイス (奇数番号のボイス) は右側にずらされ、下向きの符幹を持つボイス (偶数番号のボイス) は左側にずらされます。
簡略化された多声表記が内部的にどのように展開されるかをお見せするための例を挙げます。
Note: 3 つ以上のボイスがある場合、入力ファイルでのボイスの垂直方向の順序は、譜上でのボイスの垂直方向の順序と同じにすべきではありません!
\new Staff \relative { %% 簡略化された入力 << { f''2 } % 1: 最上段 \\ { g,2 } % 2: 最下段 \\ { d'2 } % 3: 真ん中の上側 \\ { b2 } % 4: 真ん中の下側 >> %% 上記の内部的な展開 << \new Voice = "1" { \voiceOne \shiftOff f'2 } \new Voice = "2" { \voiceTwo \shiftOff g,2 } \new Voice = "3" { \voiceThree \shiftOn d'2 } % shifts right \new Voice = "4" { \voiceFour \shiftOn b2 } % shifts left >> }
![[image of music]](9e/lily-9828913e.png)
さらに 2 つのコマンド – \shiftOnn と \shiftOnnn – は、複雑な状況で衝突を解決するために一時的に指定されるさらに大きなずれを提供します。
実際の音楽からの例 を参照してください。
音符は符幹の向きが反対である場合 (例えば、デフォルトのボイス 1 と 2 である場合や、明示的に符幹の向きが反対になるよう指定されている場合) にのみマージされます。
定義済みコマンド
\mergeDifferentlyDottedOn,
\mergeDifferentlyDottedOff,
\mergeDifferentlyHeadedOn,
\mergeDifferentlyHeadedOff
\shiftOn,
\shiftOnn,
\shiftOnnn,
\shiftOff
Selected Snippets
Additional voices to avoid collisions
In some instances of complex polyphonic music, additional voices are
necessary to prevent collisions between notes. If more than four
parallel voices are needed, additional voices can be added by defining
a variable using the Scheme function context-spec-music.
voiceFive = #(context-spec-music (make-voice-props-set 4) 'Voice) \relative c'' { \time 3/4 \key d \minor \partial 2 << \new Voice { \voiceOne a4. a8 e'4 e4. e8 f4 d4. c8 } \new Voice { \voiceTwo d,2 d4 cis2 d4 bes2 } \new Voice { \voiceThree f'2 bes4 a2 a4 s2 } \new Voice { \voiceFive s2 g4 g2 f4 f2 } >> }
![[image of music]](4b/lily-adbceafc.png)
Forcing horizontal shift of notes
When the typesetting engine cannot cope, the following syntax can be used to override typesetting decisions. The units of measure used here are staff spaces.
\relative c' << { <d g>2 <d g> } \\ { <b f'>2 \once \override NoteColumn.force-hshift = #1.7 <b f'>2 } >>
![[image of music]](ce/lily-e44d7789.png)
参照
音楽用語集: polyphony
学習マニュアル: Multiple notes at once, Voices contain music, Real music example
コード断片集: Simultaneous notes
内部リファレンス: NoteColumn, NoteCollision, RestCollision
既知の問題と警告
\override NoteColumn.ignore-collision = ##t を使うと異なるボイスにある符頭が異なる音符を不適切にマージします。
\mergeDifferentlyHeadedOn << \relative { c'16 a' b a } \\ \relative { c'2 } >> \override NoteColumn.ignore-collision = ##t << \relative { c'16 a' b a } \\ \relative { c'2 } >>
![[image of music]](6d/lily-97f184e4.png)
| [ << 音楽記譜法 ] | [トップ][目次][インデックス][ ? ] | [ 専門的な記譜法 >> ] | ||
| [ < 衝突の解決 ] | [ 上へ : 複数のボイス ] | [ 音楽を並列に記述する > ] | ||
自動パート結合
自動パート結合は 2 つのパートに分かれた音楽を単一の譜にマージします。これはオーケストラ譜を譜刻する時に特に有用です。ある範囲で 2 つのパートの音楽が同一である場合、1 つの Voice だけが譜刻されます。2 つのパートが異なる箇所では第 2 Voice が譜刻されます。この場合、符幹の向きはそれぞれ上と下ににセットされ、さらにソロ パートと 二重奏 (due) パートが識別されて適切なマークが付けられます。
自動パート結合の構文は以下の通りです:
\partcombine musicexpr1 musicexpr2
以下の例は自動パート結合の基本的な機能を示しています: 2 つのパートを単一の譜に多声部として配置し、それぞれの符幹の向きをセットしています。個々のパート譜と結合譜で同じ変数が使用されています。
instrumentOne = \relative { c'4 d e f | R1 | d'4 c b a | b4 g2 f4 | e1 | } instrumentTwo = \relative { R1 | g'4 a b c | d4 c b a | g4 f( e) d | e1 | } << \new Staff \instrumentOne \new Staff \instrumentTwo \new Staff \partcombine \instrumentOne \instrumentTwo >>
![[image of music]](4b/lily-d77695ee.png)
両パートの第 3 小節の音符は同じなので、片方の音符だけが譜刻されています。符幹、スラー、それにタイの向きは、ソロなのかあるいは斉奏なのかによって、自動的に設定されます。多声が必要になる場合、第 1 パート (one と呼ばれるコンテキストを持ちます)
は常に上向きの符幹を持ち、一方、第 2 パート (two と呼ばれるコンテキストを持ちます) は常に下向きの符幹を持ちます。ソロの場合、第 1 パートと第 2 パートにはそれぞれ ‘Solo’ と ‘Solo II’
というマークが付けられます。斉奏 (二重奏) パートには、デフォルトで、テキスト “a2” というマークが付けられます。
\partcombine の 2 つの引数は別個の Voice コンテキストとして解釈されます。そのため、相対オクターブを用いる場合、両方のパートで \relative を記述すべきです。すなわち、以下のように記述します:
\partcombine \relative … musicexpr1 \relative … musicexpr2
\partcombine の外側にある \relative セクションは musicexpr1
と musicexpr2 のピッチには影響を与えません。
プロの楽譜では長いパッセージで、2 つのボイスの音符のいくつかが同じでユニゾンとして譜刻できる場合であっても、ボイスを分けて譜刻することがあります。
ですから、音符を和音に組み合わせることと、1 つのボイスをソロとして表示することは等価ではありません。なぜなら、\partcombine 関数は各音符を個々に考慮するからです。
このような場合、\partcombine 関数を以下のコマンドでオーバライドすることができます:
...Once で終わるコマンドは、コマンドの次に来る音符だけに適用されます。
-
\partcombineApartと\once \partcombineApartは音符を 2 つの別個のボイスとして譜刻します – たとえ和音やユニゾンにできる場合であっても分けて譜刻します。 -
\partcombineChordsと\once \partcombineChordsは音符を組み合わせて、和音として譜刻します。 -
\partcombineUnisonoと\once \partcombineUnisonoは音符を組み合わせて、“ユニゾン” として譜刻します。 -
\partcombineSoloIと\once \partcombineSoloIはボイス 1 だけを譜刻して、“Solo” のマークを付けます。 -
\partcombineSoloIIと\once \partcombineSoloIIはボイス 2 だけを譜刻して、“Solo” のマークを付けます。 -
\partcombineAutomaticと\once \partcombineAutomaticは上記のコマンドの効果を終わらせ、標準の\partcombineに戻します。
instrumentOne = \relative c' { \partcombineApart c2^"apart" e | \partcombineAutomatic e2^"auto" e | \partcombineChords e'2^"chord" e | \partcombineAutomatic c2^"auto" c | \partcombineApart c2^"apart" \once \partcombineChords e^"chord once" | c2 c | } instrumentTwo = \relative { c'2 c | e2 e | a,2 c | c2 c' | c2 c | c2 c | } << \new Staff { \instrumentOne } \new Staff { \instrumentTwo } \new Staff { \partcombine \instrumentOne \instrumentTwo } >>
![[image of music]](13/lily-b1113ef1.png)
Selected Snippets
Combining two parts on the same staff
The part combiner tool ( \partcombine command ) allows the
combination of several different parts on the same staff. Text
directions such as “solo” or “a2” are added by default; to remove
them, simply set the property printPartCombineTexts to f.
For vocal scores (hymns), there is no need to add “solo/a2” texts,
so they should be switched off. However, it might be better not to use
it if there are any solos, as they won’t be indicated. In such cases,
standard polyphonic notation may be preferable.
This snippet presents the three ways two parts can be printed on a same
staff: standard polyphony, \partcombine without texts, and
\partcombine with texts.
musicDown = \relative c'' { g4 e4.( d8) c4 | r2 g'4( f8 e) | d2 \stemDown a } \score { << \new Staff \with { instrumentName = #"Standard polyphony" } << \musicUp \\ \musicDown >> \new Staff \with { instrumentName = #"PartCombine without text" printPartCombineTexts = ##f } \partcombine \musicUp \musicDown \new Staff \with { instrumentName = #"PartCombine with text" } \partcombine \musicUp \musicDown >> \layout { indent = 6.0\cm \context { \Score \override SystemStartBar.collapse-height = #30 } } }
![[image of music]](e1/lily-35e9c8f3.png)
Changing partcombine texts
When using the automatic part combining feature, the printed text for the solo and unison sections may be changed:
\new Staff << \set Staff.soloText = #"girl" \set Staff.soloIIText = #"boy" \set Staff.aDueText = #"together" \partcombine \relative c'' { g4 g r r a2 g } \relative c'' { r4 r a( b) a2 g } >>
![[image of music]](4d/lily-80dfe801.png)
参照
記譜法リファレンス: パートを記述する
コード断片集: Simultaneous notes
内部リファレンス: PartCombineMusic, Voice
既知の問題と警告
すべての \partcombine... はボイスを 2 つだけ受け取ることができ、歌詞を処理するようには設計されていません。ボイスに歌詞が付けられている場合、パート結合は処理を停止します。
\partcombine... 関数を \tuplet ブロックや \relative
ブロックの中に置くことはできません。
printPartCombineTexts がセットされていて、ある小節で 2 つのボイスの音符が同じである場合、パート結合はその小節で a2 を複数譜刻する可能性があります。
\partcombine は Voice の中の音符の開始だけを検知します。例えば、ある Voice でパート結合を開始した時に、他の Voice で音符がすでに開始しているかどうかを知ることはできません。このことは “Solo” や “Unison” が不適切に譜刻されるといった予期しない問題を引き起こす可能性があります
\partcombine はすべてのスパナ (スラー、タイ、強弱のヘアピン等) を同じ Voice で維持します。そのため、異なる Voice で始まる / 終わるスパナは不適切にの譜刻されたり、全く譜刻されなかったりする可能性があります。
\partcombine 関数が 2 つのパートを組み合わせることができない場合
(すなわち、2 つのボイスの演奏時間が異なる場合)、内部的に 2 つのボイスにカスタム名を付与します:
それぞれ one と two です。このことは、異なる名前を付けられた Voice への “切り替え”
があった場合、その Voice のイベントは無視されることを意味します。
デフォルトのタブ譜 のタブ譜や 自動連桁 の 音符
に対して \partcombine を使う場合は、それぞれの 既知の問題と警告 も参照してください。
| [ << 音楽記譜法 ] | [トップ][目次][インデックス][ ? ] | [ 専門的な記譜法 >> ] | ||
| [ < 自動パート結合 ] | [ 上へ : 複数のボイス ] | [ 譜の記譜法 > ] | ||
音楽を並列に記述する
複数のパートを持つ音楽を入力コードの途中に挿入することができます。関数 \parallelMusic は、作成する変数名をいくつか持つリストと音楽表記を受け付けます。各小節ごとの音楽表記は各変数の値となり、後で音楽を譜刻するために使用することができます。
Note: 小節チェック | を使用する必要があり、各小節は同じ長さでなければなりません。
\parallelMusic #'(voiceA voiceB voiceC) { % Bar 1 r8 g'16 c'' e'' g' c'' e'' r8 g'16 c'' e'' g' c'' e'' | r16 e'8.~ 4 r16 e'8.~ 4 | c'2 c'2 | % Bar 2 r8 a'16 d'' f'' a' d'' f'' r8 a'16 d'' f'' a' d'' f'' | r16 d'8.~ 4 r16 d'8.~ 4 | c'2 c'2 | } \new StaffGroup << \new Staff << \voiceA \\ \voiceB >> \new Staff { \clef bass \voiceC } >>
![[image of music]](ae/lily-52e30936.png)
相対モードを使用することができます。\relative コマンドを \parallelMusic 自体の中では使用しないということに注意してください。音符が前の音符と相対関係になるのはボイスの中であり、入力の中ではありません –
言い換えると、voiceA の相対音符は voiceB の音符を無視します。
\parallelMusic #'(voiceA voiceB voiceC) { % Bar 1 r8 g16 c e g, c e r8 g,16 c e g, c e | r16 e8.~ 4 r16 e8.~ 4 | c2 c | % Bar 2 r8 a,16 d f a, d f r8 a,16 d f a, d f | r16 d8.~ 4 r16 d8.~ 4 | c2 c | } \new StaffGroup << \new Staff << \relative c'' \voiceA \\ \relative c' \voiceB >> \new Staff \relative c' { \clef bass \voiceC } >>
![[image of music]](24/lily-cba32dd3.png)
これはピアノ譜で非常に良く機能します。以下の例は、4 つの連続する小節を 4 つの変数に割り当てています:
global = { \key g \major \time 2/4 } \parallelMusic #'(voiceA voiceB voiceC voiceD) { % Bar 1 a8 b c d | d4 e | c16 d e fis d e fis g | a4 a | % Bar 2 e8 fis g a | fis4 g | e16 fis g a fis g a b | a4 a | % Bar 3 ... } \score { \new PianoStaff << \new Staff { \global << \relative c'' \voiceA \\ \relative c' \voiceB >> } \new Staff { \global \clef bass << \relative c \voiceC \\ \relative c \voiceD >> } >> }
![[image of music]](56/lily-9774372e.png)
参照
学習マニュアル: Organizing pieces with variables
コード断片集: Simultaneous notes
| [ << 音楽記譜法 ] | [トップ][目次][インデックス][ ? ] | [ 専門的な記譜法 >> ] | ||
| [ < 音楽を並列に記述する ] | [ 上へ : 音楽記譜法 ] | [ 譜を表示する > ] | ||
1.6 譜の記譜法
![[image of music]](75/lily-c5b7fa84.png)
このセクションでは、譜の見た目を変える方法、複数の譜を持つ楽譜を譜刻する方法、それに、テンポ指示と演奏指示楽節の音符を譜に付け加える方法について説明します。
| 1.6.1 譜を表示する | ||
| 1.6.2 個々の譜を変更する | ||
| 1.6.3 パートを記述する |
| [ << 音楽記譜法 ] | [トップ][目次][インデックス][ ? ] | [ 専門的な記譜法 >> ] | ||
| [ < 譜の記譜法 ] | [ 上へ : 譜の記譜法 ] | [ 新たに譜をインスタンス化する > ] | ||
1.6.1 譜を表示する
このセクションでは、譜を作成する方法と、譜をグループ化する方法をいくつか説明します。
| 新たに譜をインスタンス化する | ||
| 譜をグループ化する | ||
| ネストされた譜グループ | ||
| Separating systems |
| [ << 音楽記譜法 ] | [トップ][目次][インデックス][ ? ] | [ 専門的な記譜法 >> ] | ||
| [ < 譜を表示する ] | [ 上へ : 譜を表示する ] | [ 譜をグループ化する > ] | ||
新たに譜をインスタンス化する
stave: 譜 (staff: 譜 (表) の単称) は
\new コマンドや \context コマンドで作成されます。詳細は コンテキストを作成して参照する を参照してください。
基本的な譜コンテキストは Staff です:
\new Staff \relative { c''4 d e f }
![[image of music]](39/lily-714ab9f7.png)
DrumStaff コンテキストは、一般的なドラム セットのための 5 線譜を作成します。各楽器は異なるシンボルで示されます。\drummode コマンドの後に続けて、楽器をドラム モードで入力します。各楽器は名前によって指定されます。詳細は 打楽器の譜 を参照してください。
\new DrumStaff { \drummode { cymc hh ss tomh } }
![[image of music]](74/lily-fb8ae76f.png)
RhythmicStaff は、入力のリズム価だけを表示する単線譜を作成します。(ピッチは無視されますが) 演奏時間が保持されます。詳細は 旋律のリズムを示す を参照してください。
\new RhythmicStaff { c4 d e f }
![[image of music]](6c/lily-b5f06aa3.png)
TabStaff は、標準のギター チューニングの 6 弦のタブ譜を作成します。詳細は デフォルトのタブ譜 を参照してください。
\new TabStaff \relative { c''4 d e f }
![[image of music]](67/lily-216e580a.png)
古代音楽の記譜法のために 2 つの譜コンテキストが用意されています:
MensuralStaff と VaticanaStaff です。これらのことは Pre-defined contexts で説明されています。
GregorianTranscriptionStaff コンテキストは、現代グレゴリア聖歌を記譜するための譜を作成します。これは小節線を譜刻しません。
\new GregorianTranscriptionStaff \relative { c''4 d e f e d }
![[image of music]](f3/lily-2be9a052.png)
新たに単一譜コンテキストを定義する場合があります。詳細は 新しいコンテキストを定義する を参照してください。
参照
記譜法リファレンス: コンテキストを作成して参照する, 打楽器の譜, 旋律のリズムを示す, デフォルトのタブ譜, Pre-defined contexts, 譜シンボル, Gregorian chant contexts, Mensural contexts, 新しいコンテキストを定義する
コード断片集: Staff notation
内部リファレンス: Staff, DrumStaff, GregorianTranscriptionStaff, RhythmicStaff, TabStaff, MensuralStaff, VaticanaStaff, StaffSymbol
| [ << 音楽記譜法 ] | [トップ][目次][インデックス][ ? ] | [ 専門的な記譜法 >> ] | ||
| [ < 新たに譜をインスタンス化する ] | [ 上へ : 譜を表示する ] | [ ネストされた譜グループ > ] | ||
譜をグループ化する
複数の譜からなるシステムを形成するために譜をグループ化するさまざまなコンテキストが存在します。グループ化を行うコンテキストはそれぞれにシステム開始境界線のスタイルと小節線の振る舞いを設定します。
コンテキストが指定されていない場合、デフォルトのプロパティが使用されます: グループは垂直の線で始まり、小節線はつながりません。
<< \new Staff \relative { c''1 c } \new Staff \relative { c''1 c } >>
![[image of music]](a7/lily-d556100b.png)
StaffGroup コンテキストでは、グループは角括弧で始まり、小節線はすべての譜を貫いて刻譜されます。
\new StaffGroup << \new Staff \relative { c''1 c } \new Staff \relative { c''1 c } >>
![[image of music]](69/lily-9c91c2b7.png)
ChoirStaff では、グループは角括弧で始まりますが、小節線はつながりません。
\new ChoirStaff << \new Staff \relative { c''1 c } \new Staff \relative { c''1 c } >>
![[image of music]](2a/lily-a82afe2a.png)
GrandStaff では、グループは波括弧で始まり、小節線はすべての譜を貫きます。
\new GrandStaff << \new Staff \relative { c''1 c } \new Staff \relative { c''1 c } >>
![[image of music]](5d/lily-27fffe13.png)
PianoStaff は GrandStaff と同一ですが、例外として楽器名を刻譜することができます。詳細は 楽器名 を参照してください。
\new PianoStaff << \set PianoStaff.instrumentName = #"Piano" \new Staff \relative { c''1 c } \new Staff \relative { \clef bass c1 c } >>
![[image of music]](2a/lily-a8f5f76c.png)
各譜グループ化コンテキストはプロパティ systemStartDelimiter を以下の値の 1 つにセットします:
SystemStartBar, SystemStartBrace あるいは
SystemStartBracket。4 つ目の境界線 – SystemStartSquare も利用可能ですが、これは明示的に指定する必要があります。
新たな譜グループ化コンテキストを定義することもできます。詳細は 新しいコンテキストを定義する を参照してください。
Selected Snippets
Use square bracket at the start of a staff group
The system start delimiter SystemStartSquare can be used by
setting it explicitly in a StaffGroup or ChoirStaff
context.
\score { \new StaffGroup { << \set StaffGroup.systemStartDelimiter = #'SystemStartSquare \new Staff { c'4 d' e' f' } \new Staff { c'4 d' e' f' } >> } }
![[image of music]](8a/lily-6758c63f.png)
Display bracket with only one staff in a system
If there is only one staff in one of the staff types ChoirStaff
or StaffGroup, by default the bracket and the starting bar line
will not be displayed. This can be changed by overriding
collapse-height to set its value to be less than the number of
staff lines in the staff.
Note that in contexts such as PianoStaff and GrandStaff
where the systems begin with a brace instead of a bracket, another
property has to be set, as shown on the second system in the example.
\score { \new StaffGroup << % Must be lower than the actual number of staff lines \override StaffGroup.SystemStartBracket.collapse-height = #4 \override Score.SystemStartBar.collapse-height = #4 \new Staff { c'1 } >> } \score { \new PianoStaff << \override PianoStaff.SystemStartBrace.collapse-height = #4 \override Score.SystemStartBar.collapse-height = #4 \new Staff { c'1 } >> }
![[image of music]](b2/lily-4f639188.png)
Mensurstriche layout (bar lines between the staves)
The mensurstriche-layout where the bar lines do not show on the staves
but between staves can be achieved with a StaffGroup instead of
a ChoirStaff. The bar line on staves is blanked out using
\hide.
global = { \hide Staff.BarLine s1 s % the final bar line is not interrupted \undo \hide Staff.BarLine \bar "|." } \new StaffGroup \relative c'' { << \new Staff { << \global { c1 c } >> } \new Staff { << \global { c c } >> } >> }
![[image of music]](e4/lily-92f1357d.png)
参照
音楽用語集: brace, bracket, grand staff
記譜法リファレンス: 楽器名, 新しいコンテキストを定義する
コード断片集: Staff notation
内部リファレンス: Staff, StaffGroup, ChoirStaff, GrandStaff, PianoStaff, SystemStartBar, SystemStartBrace, SystemStartBracket, SystemStartSquare
既知の問題と警告
デフォルトでは PianoStaff は ChordNames を受け付けません。
| [ << 音楽記譜法 ] | [トップ][目次][インデックス][ ? ] | [ 専門的な記譜法 >> ] | ||
| [ < 譜をグループ化する ] | [ 上へ : 譜を表示する ] | [ Separating systems > ] | ||
ネストされた譜グループ
譜グループ化コンテキストは任意の深さにネストすることができます。そうした場合、それぞれの子コンテキストは、親グループの角括弧に隣接して新しい角括弧を作成します。
\new StaffGroup << \new Staff { c2 c | c2 c } \new StaffGroup << \new Staff { g2 g | g2 g } \new StaffGroup \with { systemStartDelimiter = #'SystemStartSquare } << \new Staff { e2 e | e2 e } \new Staff { c2 c | c2 c } >> >> >>
![[image of music]](6f/lily-21a0cc84.png)
新たにネストされた譜グループ化コンテキストを定義することができます。詳細は 新しいコンテキストを定義する を参照してください。
Selected Snippets
Nesting staves
The property systemStartDelimiterHierarchy can be used to make
more complex nested staff groups. The command \set
StaffGroup.systemStartDelimiterHierarchy takes an alphabetical list of
the number of staves produced. Before each staff a system start
delimiter can be given. It has to be enclosed in brackets and takes as
much staves as the brackets enclose. Elements in the list can be
omitted, but the first bracket takes always the complete number of
staves. The possibilities are SystemStartBar,
SystemStartBracket, SystemStartBrace, and
SystemStartSquare.
\new StaffGroup \relative c'' << \set StaffGroup.systemStartDelimiterHierarchy = #'(SystemStartSquare (SystemStartBrace (SystemStartBracket a (SystemStartSquare b) ) c ) d) \new Staff { c1 } \new Staff { c1 } \new Staff { c1 } \new Staff { c1 } \new Staff { c1 } >>
![[image of music]](c4/lily-bc28fc6b.png)
参照
記譜法リファレンス: 譜をグループ化する, 楽器名, 新しいコンテキストを定義する
コード断片集: Staff notation
内部リファレンス: StaffGroup, ChoirStaff, SystemStartBar, SystemStartBrace, SystemStartBracket, SystemStartSquare
| [ << 音楽記譜法 ] | [トップ][目次][インデックス][ ? ] | [ 専門的な記譜法 >> ] | ||
| [ < ネストされた譜グループ ] | [ 上へ : 譜を表示する ] | [ 個々の譜を変更する > ] | ||
Separating systems
If the number of systems per page changes from page to page it is
customary to separate the systems by placing a system separator mark
between them. By default the system separator is blank, but can be
turned on with a \paper option.
\book { \score { \new StaffGroup << \new Staff { \relative { c''4 c c c \break c4 c c c } } \new Staff { \relative { c''4 c c c \break c4 c c c } } >> } \paper { system-separator-markup = \slashSeparator % following commands are needed only to format this documentation paper-width = 100\mm paper-height = 100\mm tagline = ##f } }
![[image of music]](a9/lily-ffd910ce.png)
参照
記譜法リファレンス: ページ レイアウト
コード断片集: Staff notation.
| [ << 音楽記譜法 ] | [トップ][目次][インデックス][ ? ] | [ 専門的な記譜法 >> ] | ||
| [ < Separating systems ] | [ 上へ : 譜の記譜法 ] | [ 譜シンボル > ] | ||
1.6.2 個々の譜を変更する
このセクションでは、譜の属性を変更する方法について説明します: 例えば、譜線の本数や譜サイズを変更します。譜を開始/終了する方法とオッシア セクションをセットする方法についても記述します。
| 譜シンボル | ||
| オッシア譜 | ||
| 譜を隠す |
| [ << 音楽記譜法 ] | [トップ][目次][インデックス][ ? ] | [ 専門的な記譜法 >> ] | ||
| [ < 個々の譜を変更する ] | [ 上へ : 個々の譜を変更する ] | [ オッシア譜 > ] | ||
譜シンボル
\stopStaff コマンドと \startStaff コマンドを使って、楽譜内の任意の場所で譜線を停止あるいは (再) 開始させることができます。
\relative { \stopStaff f''4 d \startStaff g, e f'4 d \stopStaff g, e f'4 d \startStaff g, e }
![[image of music]](f5/lily-4adaf548.png)
定義済みコマンド
\startStaff,
\stopStaff
StaffSymbol グラフィカル オブジェクト (加線を含む) に属する譜の線はStaffSymbol プロパティを用いて変更することができます。しかしながら、変更は譜が (再) 開始する前に行う必要があります。
譜線の本数を変更することができます:
\relative { f''4 d \stopStaff \override Staff.StaffSymbol.line-count = #2 \startStaff g, e | f'4 d \stopStaff \revert Staff.StaffSymbol.line-count \startStaff g, e | }
![[image of music]](39/lily-abf69cf8.png)
各譜線の位置を変更することもできます。値の単位は譜線の間隔の 半分 で、新しい位置は通常の中央線からの相対位置です。1 つの値に対して 1 本の譜線が譜刻されるので、1 つのオーバライドで譜線の位置と本数を変更することができます。
\relative { f''4 d \stopStaff \override Staff.StaffSymbol.line-positions = #'(1 3 5 -1 -3) \startStaff g, e | f'4 d \stopStaff \override Staff.StaffSymbol.line-positions = #'(8 6.5 -6 -8 -0.5) \startStaff g, e | }
![[image of music]](c7/lily-4ffc385c.png)
新しい譜線に対応して、音部記号とミドル C の位置を調節する必要があるかもしれません。音部記号 を参照してください。
譜線の太さを変えることができます。デフォルトでは、加線 (訳者注: ledger line, 譜の上下に突き出た符頭と符幹に付けられる短い譜線) と符幹の太さも影響を受けます。
\new Staff \with { \override StaffSymbol.thickness = #3 } \relative { f''4 d g, e }
![[image of music]](ff/lily-2502dd2f.png)
しかしながら、加線の太さを譜線の太さから独立して設定することができます。2 つの値は譜線の太さと譜線の間隔に掛け算され、それらを加算した値が加線の太さになります。
\new Staff \with { \override StaffSymbol.thickness = #2 \override StaffSymbol.ledger-line-thickness = #'(0.5 . 0.4) } \relative { f'''4 a, a,, f }
![[image of music]](94/lily-a345c176.png)
加線の垂直方向の位置を変更することができます:
\new Staff \with { \override StaffSymbol.ledger-positions = #'(-3 -2 -1 2 5 6) } \relative { f'''4 a, a,, f }
![[image of music]](1b/lily-7b243070.png)
符頭の位置と加線を持つ他の符頭との関係に応じて、符頭の上または下に追加の加線を配置することできます。
\new Staff \with { \override StaffSymbol.ledger-extra = #4 } \relative { f'''4 a, d, f, }
![[image of music]](6e/lily-85335eee.png)
譜の内部に加線を表示させることもできます。この場合、譜線のカスタマイズが必要です。以下の例は明示的に ledger-position をセットしない場合とした場合の加線のデフォルト位置を示しています。以下の例で、StaffSymbol 全体に対する \override を元に戻すには\stopStaff を行う必要があります。
![[image of music]](8e/lily-d1343abc.png)
譜線の間隔を変えることができます。この設定は加線の間隔にも影響を与えます。
\new Staff \with { \override StaffSymbol.staff-space = #1.5 } \relative { f'''4 d, g, e, }
![[image of music]](c6/lily-157ebedb.png)
Selected Snippets
Making some staff lines thicker than the others
For educational purposes, a staff line can be thickened (e.g., the
middle line, or to emphasize the line of the G clef). This can be
achieved by adding extra lines very close to the line that should be
emphasized, using the line-positions property of the
StaffSymbol object.
{ \override Staff.StaffSymbol.line-positions = #'(-4 -2 -0.2 0 0.2 2 4) d'4 e' f' g' }
![[image of music]](da/lily-6edd578a.png)
参照
音楽用語集: line, ledger line, staff
記譜法リファレンス: 音部記号
コード断片集: Staff notation
内部リファレンス: StaffSymbol, staff-symbol-interface
| [ << 音楽記譜法 ] | [トップ][目次][インデックス][ ? ] | [ 専門的な記譜法 >> ] | ||
| [ < 譜シンボル ] | [ 上へ : 個々の譜を変更する ] | [ 譜を隠す > ] | ||
オッシア譜
適切な位置で新しく同時進行の譜を作成することによって、オッシア 譜をセットすることができます:
\new Staff \relative { c''4 b d c << { c4 b d c } \new Staff { e4 d f e } >> c4 b c2 }
![[image of music]](66/lily-a591e10d.png)
しかしながら、上の例は通常は望ましいものではありません。オリジナルの譜の上にあり、拍子記号や音部記号を持たず、小さなサイズのフォントを使用するオッシア譜を作成するには調整が必要です。学習マニュアルの Nesting music expressions に望ましいオッシア譜を作成するための方法が記述されています。
以下の例は、オッシア譜をオリジナルの譜の上に配置するために
alignAboveContext プロパティを用いています。この手法は、2, 3 のオッシア譜が必要とされているだけである場合であれば、最も適切な方法です。
\new Staff = main \relative { c''4 b d c << { c4 b d c } \new Staff \with { \remove "Time_signature_engraver" alignAboveContext = #"main" fontSize = #-3 \override StaffSymbol.staff-space = #(magstep -3) \override StaffSymbol.thickness = #(magstep -3) firstClef = ##f } { e4 d f e } >> c4 b c2 }
![[image of music]](ed/lily-f0bee0eb.png)
多くの別個のオッシア譜が必要である場合、ある特有の コンテキスト ID を持つ空の Staff コンテキストを作成する方が適切かもしれません:
このコンテキストを 呼び出し、オッシア譜が必要とされる場所で \startStaff と \stopStaff
を用いることでオッシア譜が作成されます。この手法の利点は、以下の例よりも長い楽曲であれば、明らかです。
<< \new Staff = ossia \with { \remove "Time_signature_engraver" \hide Clef fontSize = #-3 \override StaffSymbol.staff-space = #(magstep -3) \override StaffSymbol.thickness = #(magstep -3) } { \stopStaff s1*6 } \new Staff \relative { c'4 b c2 << { e4 f e2 } \context Staff = ossia { \startStaff e4 g8 f e2 \stopStaff } >> g4 a g2 \break c4 b c2 << { g4 a g2 } \context Staff = ossia { \startStaff g4 e8 f g2 \stopStaff } >> e4 d c2 } >>
![[image of music]](81/lily-0c0b45ed.png)
オッシア譜を作成するための代替手段として、\RemoveEmptyStaffContext コマンドが用いられるかもしれません。この手法は、オッシア譜が改行の直後に発生する場合、最も便利な手法です。\RemoveEmptyStaffContext についての更なる情報は、譜を隠す を参照してください。
<< \new Staff = ossia \with { \remove "Time_signature_engraver" \hide Clef fontSize = #-3 \override StaffSymbol.staff-space = #(magstep -3) \override StaffSymbol.thickness = #(magstep -3) } \relative { R1*3 c''4 e8 d c2 } \new Staff \relative { c'4 b c2 e4 f e2 g4 a g2 \break c4 b c2 g4 a g2 e4 d c2 } >> \layout { \context { \Staff \RemoveEmptyStaves \override VerticalAxisGroup.remove-first = ##t } }
![[image of music]](1c/lily-a3874291.png)
Selected Snippets
Vertically aligning ossias and lyrics
This snippet demonstrates the use of the context properties
alignBelowContext and alignAboveContext to control the
positioning of lyrics and ossias.
\paper { ragged-right = ##t } \relative c' << \new Staff = "1" { c4 c s2 } \new Staff = "2" { c4 c s2 } \new Staff = "3" { c4 c s2 } { \skip 2 << \lyrics { \set alignBelowContext = #"1" lyrics4 below } \new Staff \with { alignAboveContext = #"3" fontSize = #-2 \override StaffSymbol.staff-space = #(magstep -2) \remove "Time_signature_engraver" } { \tuplet 6/4 { \override TextScript.padding = #3 c8[^"ossia above" d e d e f] } } >> } >>
![[image of music]](2c/lily-e02a8eca.png)
参照
音楽用語集: ossia, staff, Frenched staff
学習マニュアル: Nesting music expressions, Size of objects, Length and thickness of objects
記譜法リファレンス: 譜を隠す
コード断片集: Staff notation
内部リファレンス: StaffSymbol
| [ << 音楽記譜法 ] | [トップ][目次][インデックス][ ? ] | [ 専門的な記譜法 >> ] | ||
| [ < オッシア譜 ] | [ 上へ : 個々の譜を変更する ] | [ パートを記述する > ] | ||
譜を隠す
Staff コンテキストから Staff_symbol_engraver を削除することによって、譜線を隠すことができます。そうする代わりに、\stopStaff を用いることもできます。
\new Staff \with { \remove "Staff_symbol_engraver" } \relative { a''8 f e16 d c b a2 }
![[image of music]](63/lily-84d13f73.png)
\layout ブロックの中で
\RemoveEmptyStaffContext コマンドをセットすることによって、空の譜を隠すことができます。オーケストラ譜では、このようなスタイルの譜は ‘Frenched Score’ として知られています。デフォルトでは、このコマンドは最初のシステム以外のところにあるすべての空の譜を隠して、削除します。
Note: 譜が空であると見なされるのは、それが複数小節にわたる休符、休符、スキップ、空白休符、あるいはそれらの要素の組み合わせだけで構成されている場合です。
\layout { \context { \Staff \RemoveEmptyStaves } } \relative << \new Staff { e'4 f g a \break b1 \break a4 b c2 } \new Staff { c,4 d e f \break R1 \break f4 g c,2 } >>
![[image of music]](be/lily-0b12e000.png)
譜に対してオッシア セクションを作成するために、\RemoveEmptyStaffContext を用いることもできます。詳細は オッシア譜 を参照してください。
古代音楽コンテキストの中にある空の譜を隠すために、\VaticanaStaff \RemoveEmptyStaves コマンドが用いられることがあります。同様に、空の RhythmicStaff コンテキストを隠すために、\RhythmicStaff \RemoveEmptyStaves が用いられることがあります。
定義済みコマンド
\Staff \RemoveEmptyStaves,
\VaticanaStaff \RemoveEmptyStaves,
\RhythmicStaff \RemoveEmptyStaves
Selected Snippets
Removing the first empty line
The first empty staff can also be removed from the score by setting the
VerticalAxisGroup property remove-first. This can be done
globally inside the \layout block, or locally inside the
specific staff that should be removed. In the latter case, you have to
specify the context (Staff applies only to the current staff) in
front of the property.
The lower staff of the second staff group is not removed, because the setting applies only to the specific staff inside of which it is written.
\layout { \context { \Staff \RemoveEmptyStaves % To use the setting globally, uncomment the following line: % \override VerticalAxisGroup.remove-first = ##t } } \new StaffGroup << \new Staff \relative c' { e4 f g a \break c1 } \new Staff { % To use the setting globally, comment this line, % uncomment the line in the \layout block above \override Staff.VerticalAxisGroup.remove-first = ##t R1 \break R } >> \new StaffGroup << \new Staff \relative c' { e4 f g a \break c1 } \new Staff { R1 \break R } >>
![[image of music]](4b/lily-e5a55e6d.png)
参照
音楽用語集: Frenched staff
学習マニュアル: Visibility and color of objects
記譜法リファレンス: コンテキストのデフォルト設定を変更する, 譜シンボル, オッシア譜, 隠された音符, 不可視の休符, オブジェクトの可視性
コード断片集: Staff notation
内部リファレンス: ChordNames, FiguredBass, Lyrics, Staff, VerticalAxisGroup, Staff_symbol_engraver
既知の問題と警告
Staff_symbol_engraver を削除すると、小節線も隠されます。小節線が強制的に可視になるよう設定されている場合、フォーマット エラーが発生するかもしれません。そのような場合は、エングラーバを削除する代わりに、以下のオーバライドを使用してください:
\omit StaffSymbol \override NoteHead.no-ledgers = ##t
\Staff \RemoveEmptyStaves に関連する既知の問題と警告は
コンテキストのデフォルト設定を変更する を参照してください。
| [ << 音楽記譜法 ] | [トップ][目次][インデックス][ ? ] | [ 専門的な記譜法 >> ] | ||
| [ < 譜を隠す ] | [ 上へ : 譜の記譜法 ] | [ 楽器名 > ] | ||
1.6.3 パートを記述する
このセクションでは、テンポ指示と楽器名を楽譜に挿入する方法について説明します。他のボイスを引用する方法と、演奏指示音符を譜刻する方法についても記述します。
| 楽器名 | ||
| 他のボイスを引用する | ||
| 合図音符をフォーマットする |
| [ << 音楽記譜法 ] | [トップ][目次][インデックス][ ? ] | [ 専門的な記譜法 >> ] | ||
| [ < パートを記述する ] | [ 上へ : パートを記述する ] | [ 他のボイスを引用する > ] | ||
楽器名
Staff, PianoStaff, StaffGroup, GrandStaff
それに ChoirStaff コンテキストの中にある譜の左側に、楽器名を譜刻することができます。instrumentName の値が最初の行の譜に対して使用され、shortInstrumentName の値がそれに続くすべての行の譜に対して使用されます。
\new Staff \with { instrumentName = #"Violin " shortInstrumentName = #"Vln. " } \relative { c'4.. g'16 c4.. g'16 \break | c1 | }
![[image of music]](49/lily-d7bf7db1.png)
\markup を用いて、より複雑な楽器名を作成することができます:
\new Staff \with { instrumentName = \markup { \column { "Clarinetti" \line { "in B" \smaller \flat } } } } \relative { c''4 c,16 d e f g2 }
![[image of music]](8f/lily-17136bc0.png)
2 つ以上の譜コンテキストがグループ化されている場合、デフォルトでは楽器名と短縮楽器名は中央揃えされます。複数行にわたる楽器名を中央揃えするには、\center-column を用いる必要があります:
<< \new Staff \with { instrumentName = #"Flute" } \relative { f''2 g4 f } \new Staff \with { instrumentName = \markup { \center-column { "Clarinet" \line { "in B" \smaller \flat } } } } \relative { c''4 b c2 } >>
![[image of music]](c0/lily-e35e2587.png)
しかしながら、楽器名が長い場合、indent 設定と short-indent
設定の値を増やさない限り、譜グループの中にある楽器名は中央揃えされません。これらの設定についての詳細は シフトとインデントのための \paper 変数
を参照してください。
<< \new Staff \with { instrumentName = #"Alto Flute in G" shortInstrumentName = #"Flt." } \relative { f''2 g4 f \break g4 f g2 } \new Staff \with { instrumentName = #"Clarinet" shortInstrumentName = #"Clar." } \relative { c''4 b c2 \break c2 b4 c } >> \layout { indent = 3.0\cm short-indent = 1.5\cm }
![[image of music]](f1/lily-6ff8284c.png)
楽器名を他のコンテキスト (ChordNames や FiguredBass など)
に付け加えるには、
そのコンテキストに Instrument_name_engraver を追加する必要があります。詳細は コンテキストのプラグインを変更する を参照してください。
楽曲の途中で shortInstrumentName を変更することもできます。しかしながら、instrumentName は最初のインスタンスが譜刻され、楽曲の途中での変更は無視されます:
\new Staff \with { instrumentName = #"Flute" shortInstrumentName = #"Flt." } { c1 c c c \break c1 c c c \break \set Staff.instrumentName = #"Clarinet" \set Staff.shortInstrumentName = #"Clt." c1 c c c \break c1 c c c \break }
![[image of music]](b4/lily-86752001.png)
楽器の 切り替え が必要な場合、切り替えのために必要とされる変更の詳細なリストを作成するために、\addInstrumentDefinition を
\instrumentSwitch と組み合わせて使用することがあります。\addInstrumentDefinition コマンドは 2 つの引数をとります:
識別文字列と、楽器で使用されるコンテキスト プロパティと値の連想リストです。このコマンドは最上位のスコープに配置する必要があります。\instrumentSwitch は音楽表記の中で使用され、楽器の切り替えを宣言します:
\addInstrumentDefinition #"contrabassoon" #`((instrumentTransposition . ,(ly:make-pitch -1 0 0)) (shortInstrumentName . "Cbsn.") (clefGlyph . "clefs.F") (middleCPosition . 6) (clefPosition . 2) (instrumentCueName . ,(make-bold-markup "cbsn.")) (midiInstrument . "bassoon")) \new Staff \with { instrumentName = #"Bassoon" } \relative c' { \clef tenor \compressFullBarRests c2 g' R1*16 \instrumentSwitch "contrabassoon" c,,2 g \break c,1 ~ | 1 }
![[image of music]](31/lily-14c5be08.png)
参照
記譜法リファレンス:
シフトとインデントのための \paper 変数,
コンテキストのプラグインを変更する
コード断片集: Staff notation
内部リファレンス: InstrumentName, PianoStaff, Staff
| [ << 音楽記譜法 ] | [トップ][目次][インデックス][ ? ] | [ 専門的な記譜法 >> ] | ||
| [ < 楽器名 ] | [ 上へ : パートを記述する ] | [ 合図音符をフォーマットする > ] | ||
他のボイスを引用する
あるボイスが他のボイスと同じ音符を演奏することはごく一般的なことです。例えば、第 1 バイオリンと第2バイオリンがあるパッセージで同じフレーズを演奏することがあります。これは、ボイスに他のボイスを 引用 させることで実現でき、第 2 ボイスの音楽全体を再入力する必要はありません。
最上位レベルのスコープで用いる \addQuote コマンドは一部を引用することができる音楽を定義します。
\quoteDuring コマンドを用いて、引用を開始する位置を示します。このコマンドは 2 つの引数をとります:
\addQuote で定義した引用するボイスの名前と、引用部分の演奏時間を示す音楽表記です。
fluteNotes = \relative { a'4 gis g gis | b4^"quoted" r8 ais\p a4( f) } oboeNotes = \relative { c''4 cis c b \quoteDuring #"flute" { s1 } } \addQuote "flute" { \fluteNotes } \score { << \new Staff \with { instrumentName = "Flute" } \fluteNotes \new Staff \with { instrumentName = "Oboe" } \oboeNotes >> }
![[image of music]](19/lily-457eb37c.png)
\quoteDuring で使用される音楽表記が空白休符や複数小節休符ではなく音符を保持している場合、引用は多声となり、予期しない結果となる可能性があります。
fluteNotes = \relative { a'4 gis g gis | b4^"quoted" r8 ais\p a4( f) } oboeNotes = \relative { c''4 cis c b \quoteDuring #"flute" { e4 r8 ais b4 a } } \addQuote "flute" { \fluteNotes } \score { << \new Staff \with { instrumentName = "Flute" } \fluteNotes \new Staff \with { instrumentName = "Oboe" } \oboeNotes >> }
![[image of music]](ab/lily-4050f7a0.png)
\quoteDuring コマンドは引用されるパートと引用するパート両方の
\transposition を使用して、引用されるパートと同じ響きのピッチに変換して、引用するパートの音符を作り出します。
clarinetNotes = \relative c'' { \transposition bes \key d \major b4 ais a ais | cis4^"quoted" r8 bis\p b4( f) } oboeNotes = \relative { c''4 cis c b \quoteDuring #"clarinet" { s1 } } \addQuote "clarinet" { \clarinetNotes } \score { << \new Staff \with { instrumentName = "Clarinet" } \clarinetNotes \new Staff \with { instrumentName = "Oboe" } \oboeNotes >> }
![[image of music]](8a/lily-a47506ea.png)
デフォルトでは引用される音楽はすべてのアーティキュレーション、強弱記号、マークアップ等を含んでいます。quotedEventTypes コンテキスト プロパティを用いることで、引用される音楽から引用するオブジェクトを選択することが可能です。
fluteNotes = \relative { a'2 g2 | b4\<^"quoted" r8 ais a4\f( c->) } oboeNotes = \relative { c''2. b4 | \quoteDuring #"flute" { s1 } } \addQuote "flute" { \fluteNotes } \score { << \set Score.quotedEventTypes = #'(note-event articulation-event crescendo-event rest-event slur-event dynamic-event) \new Staff \with { instrumentName = "Flute" } \fluteNotes \new Staff \with { instrumentName = "Oboe" } \oboeNotes >> }
![[image of music]](f4/lily-7fdc4786.png)
引用にもタグを付けることができます。タグを使用する を参照してください。
参照
コード断片集: Staff notation
内部リファレンス: + Music classes, QuoteMusic, Voice
既知の問題と警告
\addQuote 中にある最初の Voice の内容だけが引用されます。そのため、音楽表記が \new や \context Voice を含んでいても、それらの内容は引用されません。装飾小音符の引用はサポートされておらず、LilyPond がクラッシュする可能性さえあります。
ネストされた連符を引用しようとしてもうまくいきません。
| [ << 音楽記譜法 ] | [トップ][目次][インデックス][ ? ] | [ 専門的な記譜法 >> ] | ||
| [ < 他のボイスを引用する ] | [ 上へ : パートを記述する ] | [ 編集者の注釈 > ] | ||
合図音符をフォーマットする
合図音符をフォーマットする最も簡単な方法は、パートの中で明示的に CueVoice コンテキストを作成することです。
\relative {
R1
<<
{ e'2\rest r4. e8 }
\new CueVoice {
\stemUp d'8^"flute" c d e fis2
}
>>
d,4 r a r
}
![[image of music]](59/lily-cedec23b.png)
音部記号の変更が必要で、合図音符に適切なサイズの音部記号を譜刻する場合、\cueClef コマンドは明示的な CueVoice コンテキストと共に用いられます。その後、\cueClefUnset コマンドを用いて、オリジナルの音部記号 – 再度、適切なサイズにされた – に戻すことができます。
\relative {
\clef "bass"
R1
<<
{ e'2\rest r4. \cueClefUnset e,8 }
\new CueVoice {
\cueClef "treble" \stemUp d''8^"flute" c d e fis2
}
>>
d,,4 r a r
}
![[image of music]](3b/lily-2d8d55c3.png)
必要があれば、CueVoice 無しで
\cueClef コマンドと \cueClefUnset コマンドを用いることもできます。
\relative {
\clef "bass"
R1
\cueClef "treble"
d''8^"flute" c d e fis2
\cueClefUnset
d,,4 r a r
}
![[image of music]](5c/lily-d190ffde.png)
もっと複雑な合図音符
– 例えば、移調を含んでいる、複数の音楽ソースからの合図音符を挿入する –
の場合、\cueDuring コマンドや \cueDuringWithClef コマンドを用いることができます。これらのコマンドは \quoteDuring を特殊化したものです。\quoteDuring については、前のセクションの 他のボイスを引用する を参照してください。
構文は以下の通りです:
\cueDuring #quotename #direction #music
と
\cueDuringWithClef #quotename #direction #clef #music
quotename に対応する小節の音楽は
CueVoice コンテキストとして追加されて
music と同時進行して、多声になります。direction は引数 UP または DOWN を取り、それぞれ第 1 及び第 2 ボイスと調和して、合図音符が他のボイスに対してどのように譜刻されるかを決定します。
このコマンドは partname の該当する小節から音符と休符だけを
CueVoice にコピーします。CueVoice は暗黙的に作成されて music と同時進行し、結果として多声になります。引数 voice は合図音符を第 1 ボイスとして記譜すべきか、第 2 ボイスとして記譜すべきかを決定します。UP は第 1 ボイスに相当し、DOWN は第 2 ボイスに相当します。
fluteNotes = \relative { r2. c''4 | d8 c d e fis2 | g2 d | } oboeNotes = \relative c'' { R1 \new CueVoice { \set instrumentCueName = "flute" } \cueDuring #"flute" #UP { R1 } g2 c, } \addQuote "flute" { \fluteNotes } \new Staff { \oboeNotes }
![[image of music]](bf/lily-685b78a8.png)
instrumentCueName プロパティを設定することによって、\cueDuring で音楽のどの側面を引用するか調節することができます。このプロパティのデフォルト値は '(note-event rest-event
tie-event beam-event tuplet-span-event) であり、音符、休符、タイ、連桁、それに連符だけが引用され、アーティキュレーション、強弱記号、マークアップ等は引用されません。
Note: 以下の例のように Voice が cueDuring で始まる場合、Voice を明示的に宣言する必要があります。そうしないと音楽表記全体が CueVoice コンテキストに属してしまいます。
oboeNotes = \relative { r2 r8 d''16(\f f e g f a) g8 g16 g g2. } \addQuote "oboe" { \oboeNotes } \new Voice \relative c'' { \set Score.quotedCueEventTypes = #'(note-event rest-event tie-event beam-event tuplet-span-event dynamic-event slur-event) \cueDuring #"oboe" #UP { R1 } g2 c, }
![[image of music]](71/lily-42eed127.png)
一時的な CueVoice コンテキストの中の instrumentCueName
プロパティを設定することで、合図を演奏する楽器の名前を表示させることができます。instrumentCueName の位置とスタイルは \instrumentSwitch
オブジェクトによって制御されます – 楽器名 を参照してください。合図音符が音符記号の変更を必要とする場合、手動で変更することができますが、合図音符が終わったところで手動で元の音部記号に戻す必要がありmす。
fluteNotes = \relative { r2. c''4 d8 c d e fis2 g2 d2 } bassoonNotes = \relative c { \clef bass R1 \clef treble \new CueVoice { \set instrumentCueName = "flute" } \cueDuring #"flute" #UP { R1 } \clef bass g4. b8 d2 } \addQuote "flute" { \fluteNotes } \new Staff { \bassoonNotes }
![[image of music]](2b/lily-d11ae52b.png)
あるいはまた、代わりに \cueDuringWithClef 関数を用いることができます。このコマンドは追加の引数で音部の変更を指定して、合図音符に音部記号を譜刻しますが、合図音部が終了したところで元の音部記号を自動的に譜刻します。
fluteNotes = \relative { r2. c''4 d8 c d e fis2 g2 d2 } bassoonNotes = \relative c { \clef bass R1 \new CueVoice { \set instrumentCueName = "flute" } \cueDuringWithClef #"flute" #UP #"treble" { R1 } g4. b8 d2 } \addQuote "flute" { \fluteNotes } \new Staff { \bassoonNotes }
![[image of music]](85/lily-0f8b50af.png)
\quoteDuring と同様に、\cueDuring は楽器の移調を考慮します。合図音符は合図を受け取る楽器のピッチで作り出され、ソース楽器の同じ響きのピッチになります。
合図音符を移調させるには \transposedCueDuring を使用します。このコマンドはコンサート ミドル C の音を表すピッチを (絶対モードで) 指定する追加の引数を取ります。これは、全く別の場所で登録された楽器から合図を取る場合に有用です。
piccoloNotes = \relative { \clef "treble^8" R1 c'''8 c c e g2 c4 g g2 } bassClarinetNotes = \relative c' { \key d \major \transposition bes, d4 r a r \transposedCueDuring #"piccolo" #UP d { R1 } d4 r a r } \addQuote "piccolo" { \piccoloNotes } << \new Staff \piccoloNotes \new Staff \bassClarinetNotes >>
![[image of music]](0d/lily-59561b91.png)
\killCues コマンドは音楽表記から合図音符を削除します。これにより、同じ音楽表記を使って合図を持つ楽器パートと楽譜を作り出すことが可能です。\killCues コマンドは \cueDuring によって引用された音符とイベントだけを削除します。合図に関連する他のマークアップ
– 音部変更と引用元の楽器を識別するラベルなど –
にはタグを付けて楽譜に含めるかどうかを選択することができます。タグを使用する を参照してください。
fluteNotes = \relative { r2. c''4 d8 c d e fis2 g2 d2 } bassoonNotes = \relative c { \clef bass R1 \tag #'part { \clef treble \new CueVoice { \set instrumentCueName = "flute" } } \cueDuring #"flute" #UP { R1 } \tag #'part \clef bass g4. b8 d2 } \addQuote "flute" { \fluteNotes } \new Staff { \bassoonNotes } \new StaffGroup << \new Staff { \fluteNotes } \new Staff { \removeWithTag #'part { \killCues { \bassoonNotes } } } >>
![[image of music]](ff/lily-c2c28b7a.png)
あるいはまた、音部変更や楽器ラベルを再利用するために、\addInstrumentDefinition を用いて楽器の定義に含めることができます。\addInstrumentDefinition についての説明は
楽器名 を参照してください。
参照
記譜法リファレンス: 他のボイスを引用する, 楽器の移調, 楽器名, 音部記号, 合図, タグを使用する
コード断片集: Staff notation
既知の問題と警告
\cueDuring を使用した場合、Voice コンテキストと CueVoice
コンテキストの間で休符の衝突が発生する可能性があります。\cueDuringWithClef や \transposedCueDuring を使用する場合、追加で必要となる引数は引用と向きの後に配置する必要があります。
| [ << 音楽記譜法 ] | [トップ][目次][インデックス][ ? ] | [ 専門的な記譜法 >> ] | ||
| [ < 合図音符をフォーマットする ] | [ 上へ : 音楽記譜法 ] | [ 譜の内部 > ] | ||
1.7 編集者の注釈
![[image of music]](2f/lily-dfa3e9b3.png)
このセクションでは、音符の見た目を変える方法と、分析や教育的な強調を付け加える方法について議論します。
| 1.7.1 譜の内部 | ||
| 1.7.2 譜の外部 |
| [ << 音楽記譜法 ] | [トップ][目次][インデックス][ ? ] | [ 専門的な記譜法 >> ] | ||
| [ < 編集者の注釈 ] | [ 上へ : 編集者の注釈 ] | [ 記譜フォント サイズを選択する > ] | ||
1.7.1 譜の内部
このセクションでは、譜の内部にある要素に強調を付け加える方法について説明します。
| 記譜フォント サイズを選択する | ||
| 運指の指示 | ||
| 隠された音符 | ||
| オブジェクトに色を付ける | ||
| 括弧 | ||
| 符幹 |
| [ << 音楽記譜法 ] | [トップ][目次][インデックス][ ? ] | [ 専門的な記譜法 >> ] | ||
| [ < 譜の内部 ] | [ 上へ : 譜の内部 ] | [ 運指の指示 > ] | ||
記譜フォント サイズを選択する
記譜要素のフォント サイズを変更することができます。これは連桁やスラーなどの可変シンボルのサイズは変更しません。
Note: テキストのフォント サイズを変更する方法については フォントとフォント サイズを選択する を参照してください。
\huge c4.-> d8---3 \large c4.-> d8---3 \normalsize c4.-> d8---3 \small c4.-> d8---3 \tiny c4.-> d8---3 \teeny c4.-> d8---3
![[image of music]](f1/lily-ff70e947.png)
内部的には、これは fontSize プロパティを設定します。この設定により font-size プロパティがすべてのレイアウト オブジェクトにセットされます。font-size の値は、カレントの譜の高さでの標準フォント サイズからの相対値を表している数字です。1 段階上がる毎にフォント サイズは約 12% 増加します。6 段階でちょうど 2 倍になります。Scheme 関数 magstep は font-size 数をスケーリング ファクタに変換します。font-size プロパティを直接設定することも可能です。そうした場合、特定のレイアウト オブジェクトだけが影響を受けます。
\set fontSize = #3 c4.-> d8---3 \override NoteHead.font-size = #-4 c4.-> d8---3 \override Script.font-size = #2 c4.-> d8---3 \override Stem.font-size = #-5 c4.-> d8---3
![[image of music]](53/lily-3f8588e7.png)
フォント サイズの変更は、ひな形のサイズが望みのサイズに最も近くなるよう
(一定の割合で) 増減することによって、達成されます標準フォント サイズ (font-size = #0 のフォント サイズ) は標準の譜の高さに基づきます。20pt の譜では、11pt のフォントが選択されます。
font-size プロパティはフォントを使用するレイアウト オブジェクトだけにセットすることができますそのようなオブジェクトは font-interface レイアウト インタフェイスをサポートします。
定義済みコマンド
\teeny,
\tiny,
\small,
\normalsize,
\large,
\huge
参照
コード断片集: Editorial annotations
内部リファレンス: font-interface
| [ << 音楽記譜法 ] | [トップ][目次][インデックス][ ? ] | [ 専門的な記譜法 >> ] | ||
| [ < 記譜フォント サイズを選択する ] | [ 上へ : 譜の内部 ] | [ 隠された音符 > ] | ||
運指の指示
運指の指示は 音符-数字 を用いることで挿入することができます:
c4-1 d-2 f-4 e-3
![[image of music]](0e/lily-99d0ac19.png)
指の変更のためにマークアップ テキストや文字列が使用されることもあります。
\relative { c''4-1 d-2 f-4 e-3 }
![[image of music]](5d/lily-00a8e953.png)
指の入れ替えのためにマークアップ テキストを使うこともできます。
\relative { c''4-1 d-2 f\finger \markup \tied-lyric #"4~3" c\finger "2 - 3" }
![[image of music]](c2/lily-ed870b90.png)
ある音符を親指で演奏するよう指示するために、サム-スクリプト (thumb-script) を付け加えることができます (例えば、チェロ音楽で)。
\relative { <a'_\thumb a'-3>2 <b_\thumb b'-3> }
![[image of music]](94/lily-dec79207.png)
和音の個々の音符の後に運指を付け加えることによって、和音に対する運指法を付け加えることができます。
\relative { <c''-1 e-2 g-3 b-5>2 <d-1 f-2 a-3 c-5> }
![[image of music]](4d/lily-b68bee77.png)
運指指示の配置を手動で譜の上または下にすることができます。向きと配置 を参照してください。
Selected Snippets
Controlling the placement of chord fingerings
The placement of fingering numbers can be controlled precisely. For fingering orientation to apply, you must use a chord construct <> even if it is a single note.
\relative c' { \set fingeringOrientations = #'(left) <c-1 e-3 a-5>4 \set fingeringOrientations = #'(down) <c-1 e-3 a-5>4 \set fingeringOrientations = #'(down right up) <c-1 e-3 a-5>4 \set fingeringOrientations = #'(up) <c-1 e-3 a-5>4 \set fingeringOrientations = #'(left) <c-1>2 \set fingeringOrientations = #'(down) <e-3>2 }
![[image of music]](bf/lily-15182227.png)
Allowing fingerings to be printed inside the staff
By default, vertically oriented fingerings are positioned outside the staff. However, this behavior can be canceled. Note: you must use a chord construct <>, even if it is only a single note.
\relative c' { <c-1 e-2 g-3 b-5>2 \override Fingering.staff-padding = #'() <c-1 e-2 g-3 b-5>4 <g'-0> }
![[image of music]](6a/lily-62c35a09.png)
Avoiding collisions with chord fingerings
Fingerings and string numbers applied to individual notes will automatically avoid beams and stems, but this is not true by default for fingerings and string numbers applied to the individual notes of chords. The following example shows how this default behavior can be overridden.
\relative c' { \set fingeringOrientations = #'(up) \set stringNumberOrientations = #'(up) \set strokeFingerOrientations = #'(up) % Default behavior r8 <f c'-5>8 <f c'\5>8 <f c'-\rightHandFinger #2 >8 % No tweak needed r8 <f c'-5>8 <f c'\5>8 % Corrected to avoid collisions \override StrokeFinger.add-stem-support = ##t <f c'-\rightHandFinger #2 >8 }
![[image of music]](7a/lily-fcf044af.png)
参照
記譜法リファレンス: 向きと配置
コード断片集: Editorial annotations
内部リファレンス: FingeringEvent, fingering-event, Fingering_engraver, New_fingering_engraver, Fingering
| [ << 音楽記譜法 ] | [トップ][目次][インデックス][ ? ] | [ 専門的な記譜法 >> ] | ||
| [ < 運指の指示 ] | [ 上へ : 譜の内部 ] | [ オブジェクトに色を付ける > ] | ||
隠された音符
隠された (または不可視、透明の) 音符は、preparing theory や作曲の演習の際に有用です。
\relative { c''4 d \hideNotes e4 f \unHideNotes g a \hideNotes b \unHideNotes c }
![[image of music]](1b/lily-078e147a.png)
符頭、符幹、旗、それに休符は不可視です。連桁は、隠された音符から始まる場合は、不可視です。 不可視の音符に取り付けられたオブジェクトは可視のままです。
\relative c'' { e8(\p f g a)-- \hideNotes e8(\p f g a)-- }
![[image of music]](b2/lily-26dfe8f9.png)
定義済みコマンド
\hideNotes,
\unHideNotes
参照
学習マニュアル: オブジェクトの可視性と色
Notation Reference: 不可視の休符, オブジェクトの可視性, 譜を隠す
コード断片集: Editorial annotations
内部リファレンス: Note_spacing_engraver, NoteSpacing
| [ << 音楽記譜法 ] | [トップ][目次][インデックス][ ? ] | [ 専門的な記譜法 >> ] | ||
| [ < 隠された音符 ] | [ 上へ : 譜の内部 ] | [ 括弧 > ] | ||
オブジェクトに色を付ける
個々のオブジェクトに色を割り振ることができます。有効なカラー名は List of colors でリストアップされています。
\override NoteHead.color = #red c''4 c'' \override NoteHead.color = #(x11-color 'LimeGreen) d'' \override Stem.color = #blue e''
![[image of music]](08/lily-b1b09c94.png)
Scheme 関数 x11-color を用いることによって、X11 のために定義された色の全範囲にアクセスすることができます。この関数は引数を 1 つとります。この引数は 'FooBar という形式のシンボルであったり、"FooBar" という形式の文字列であったりします。最初の形式はより素早く記述できて、より効率的です。しかしながら、2 番目の形式を使うと複数単語形式の X11 カラーにアクセスすることができます。
x11-color がパラメータとして意味をなさない場合、その色はデフォルトの黒になります。
\relative c'' { \override Staff.StaffSymbol.color = #(x11-color 'SlateBlue2) \set Staff.instrumentName = \markup { \with-color #(x11-color 'navy) "Clarinet" } gis8 a \override Beam.color = #(x11-color "medium turquoise") gis a \override Accidental.color = #(x11-color 'DarkRed) gis a \override NoteHead.color = #(x11-color "LimeGreen") gis a % 以下は意図的に意味をなさない色を指定しています。符幹が黒のままであることに注意してください \override Stem.color = #(x11-color 'Boggle) b2 cis }
![[image of music]](db/lily-37794c84.png)
Scheme 関数 rgb-color を用いることによって、厳密な RGB カラーを指定することができます。
\relative c'' { \override Staff.StaffSymbol.color = #(x11-color 'SlateBlue2) \set Staff.instrumentName = \markup { \with-color #(x11-color 'navy) "Clarinet" } \override Stem.color = #(rgb-color 0 0 0) gis8 a \override Stem.color = #(rgb-color 1 1 1) gis8 a \override Stem.color = #(rgb-color 0 0 0.5) gis4 a }
![[image of music]](e2/lily-9bbfa276.png)
参照
記譜法リファレンス:
List of colors,
\tweak コマンド
コード断片集: Editorial annotations
既知の問題と警告
X11 カラーは必ずしも同様の名前を持つノーマル カラーとまったく同じとなるわけではありません。
すべての X11 カラーが Web ブラウザで見分けられるわけではありません。つまり、ある Web ブラウザは LineGreen と ForestGreen を同じ色で表示するかもしれません。Web 向けでは、ノーマル カラーを使用することを推奨します
(つまり、blue, green, red)。
和音の中にある音符には \override で色を付けることはできません。\override の代わりに \tweak を使用してください
– \tweak コマンド を参照してください。
| [ << 音楽記譜法 ] | [トップ][目次][インデックス][ ? ] | [ 専門的な記譜法 >> ] | ||
| [ < オブジェクトに色を付ける ] | [ 上へ : 譜の内部 ] | [ 符幹 > ] | ||
括弧
音楽イベントの前に \parenthesize を置くことによって、そのオブジェクトに括弧を付けることができます。和音の前に \parenthesize を置くと、和音の音符それぞれに括弧が付けられます。和音内部の音符に個別に括弧を付けることもできます。
\relative { c''2 \parenthesize d c2 \parenthesize <c e g> c2 <c \parenthesize e g> }
![[image of music]](3a/lily-6be5f72e.png)
音符ではないオブジェクトにも括弧を付けることができます。アーティキュレーションに対して括弧をつける場合、\parenthesize コマンドの前にハイフンが必要です。
\relative { c''2-\parenthesize -. d c2 \parenthesize r }
![[image of music]](4f/lily-528ba80b.png)
参照
コード断片集: Editorial annotations
内部リファレンス: Parenthesis_engraver, ParenthesesItem, parentheses-interface
既知の問題と警告
和音に括弧を付けると、和音全体に単一の大きな括弧が付くのではなく、それぞれの音符に個別に括弧が付きます。
| [ << 音楽記譜法 ] | [トップ][目次][インデックス][ ? ] | [ 専門的な記譜法 >> ] | ||
| [ < 括弧 ] | [ 上へ : 譜の内部 ] | [ 譜の外部 > ] | ||
符幹
音符が見つかった場合はいつでも Stem オブジェクトが自動的に作成されます。全音符や休符の場合でも Stem オブジェクトが作成されますが、不可視になります。
符幹の向きを手動で上または下にすることができます – 向きと配置 を参照してください。
定義済みコマンド
\stemUp,
\stemDown,
\stemNeutral
Selected Snippets
Default direction of stems on the center line of the staff
The default direction of stems on the center line of the staff is set
by the Stem property neutral-direction.
\relative c'' { a4 b c b \override Stem.neutral-direction = #up a4 b c b \override Stem.neutral-direction = #down a4 b c b }
![[image of music]](3c/lily-3e0389ab.png)
参照
記譜法リファレンス: 向きと配置
コード断片集: Editorial annotations
内部リファレンス: Stem_engraver, Stem, stem-interface
| [ << 音楽記譜法 ] | [トップ][目次][インデックス][ ? ] | [ 専門的な記譜法 >> ] | ||
| [ < 符幹 ] | [ 上へ : 編集者の注釈 ] | [ バルーン ヘルプ > ] | ||
1.7.2 譜の外部
このセクションでは、譜の外側から譜の中にある要素を強調するための方法について説明します。
| バルーン ヘルプ | ||
| グリッド ライン | ||
| 分析の囲み |
| [ << 音楽記譜法 ] | [トップ][目次][インデックス][ ? ] | [ 専門的な記譜法 >> ] | ||
| [ < 譜の外部 ] | [ 上へ : 譜の外部 ] | [ グリッド ライン > ] | ||
バルーン ヘルプ
記譜要素に四角いバルーンで印を付けて、テキストを付け加えることができます。この機能の主目的は記譜法を説明することです。
\new Voice \with { \consists "Balloon_engraver" } \relative c'' { \balloonGrobText #'Stem #'(3 . 4) \markup { "I'm a Stem" } a8 \balloonGrobText #'Rest #'(-4 . -4) \markup { "I'm a rest" } r <c, g'-\balloonText #'(-2 . -2) \markup { "I'm a note head" } c>2. }
![[image of music]](69/lily-0c146c35.png)
上の例には 2 つの音楽関数が使われています
– balloonGrobText と balloonText です。前者は \once \override のように使用され、任意のグラフィカル オブジェクトにテキストを付加します。後者はたいてい和音の中で \tweak のように使用され、個々の音符にテキストを付加します。
通常、バルーン ヘルプのテキストは音符の間隔に影響を与えますが、影響を与えないよう変更することもできます:
Balloon text normally influences note spacing, but this can be altered:
\new Voice \with { \consists "Balloon_engraver" } { \balloonLengthOff \balloonGrobText #'Stem #'(3 . 4) \markup { "I'm a Stem" } a8 \balloonGrobText #'Rest #'(-4 . -4) \markup { "I'm a rest" } r \balloonLengthOn <c, g'-\balloonText #'(-2 . -2) \markup { "I'm a note head" } c>2. }
![[image of music]](c6/lily-deca884a.png)
定義済みコマンド
\balloonLengthOn,
\balloonLengthOff
参照
コード断片集: Editorial annotations
内部リファレンス: Balloon_engraver, BalloonTextItem, balloon-interface
| [ << 音楽記譜法 ] | [トップ][目次][インデックス][ ? ] | [ 専門的な記譜法 >> ] | ||
| [ < バルーン ヘルプ ] | [ 上へ : 譜の外部 ] | [ 分析の囲み > ] | ||
グリッド ライン
音符に同期して、譜の間に垂直な線を描くことができます。
線の終点を作成するために Grid_point_engraver を用いる必要があります。一方、実際に線を描くために Grid_line_span_engraver を用いる必要があります。デフォルトでは、グリッド ラインは各符頭の左端に揃えられます。グリッド ラインは上の譜の中央線から下の譜の中央線まで引かれます。gridInterval でグリッド ライン間の演奏時間を指定する必要があります。
\layout { \context { \Staff \consists "Grid_point_engraver" gridInterval = #(ly:make-moment 1/4) } \context { \Score \consists "Grid_line_span_engraver" } } \score { \new ChoirStaff << \new Staff \relative { \stemUp c''4. d8 e8 f g4 } \new Staff \relative { \clef bass \stemDown c4 g' f e } >> }
![[image of music]](32/lily-6a5101eb.png)
Selected Snippets
Grid lines: changing their appearance
The appearance of grid lines can be changed by overriding some of their properties.
\score { \new ChoirStaff << \new Staff { \relative c'' { \stemUp c'4. d8 e8 f g4 } } \new Staff { \relative c { % this moves them up one staff space from the default position \override Score.GridLine.extra-offset = #'(0.0 . 1.0) \stemDown \clef bass \once \override Score.GridLine.thickness = #5.0 c4 \once \override Score.GridLine.thickness = #1.0 g'4 \once \override Score.GridLine.thickness = #3.0 f4 \once \override Score.GridLine.thickness = #5.0 e4 } } >> \layout { \context { \Staff % set up grids \consists "Grid_point_engraver" % set the grid interval to one quarter note gridInterval = #(ly:make-moment 1/4) } \context { \Score \consists "Grid_line_span_engraver" % this moves them to the right half a staff space \override NoteColumn.X-offset = #-0.5 } } }
![[image of music]](8f/lily-a415e98f.png)
参照
コード断片集: Editorial annotations
内部リファレンス: Grid_line_span_engraver, Grid_point_engraver, GridLine, GridPoint, grid-line-interface, grid-point-interface.
| [ << 音楽記譜法 ] | [トップ][目次][インデックス][ ? ] | [ 専門的な記譜法 >> ] | ||
| [ < グリッド ライン ] | [ 上へ : 譜の外部 ] | [ テキスト > ] | ||
分析の囲み
音楽分析では、囲みを使って楽曲の構造を示します。シンプルな水平な囲みがサポートされています。
\layout { \context { \Voice \consists "Horizontal_bracket_engraver" } } \relative { c''2\startGroup d\stopGroup }
![[image of music]](98/lily-d0ac7612.png)
Analysis brackets may be nested.
\layout { \context { \Voice \consists "Horizontal_bracket_engraver" } } \relative { c''4\startGroup\startGroup d4\stopGroup e4\startGroup d4\stopGroup\stopGroup }
![[image of music]](75/lily-c07b1519.png)
参照
コード断片集: Editorial annotations
内部リファレンス: Horizontal_bracket_engraver, HorizontalBracket, horizontal-bracket-interface, Staff
| [ << 音楽記譜法 ] | [トップ][目次][インデックス][ ? ] | [ 専門的な記譜法 >> ] | ||
| [ < 分析の囲み ] | [ 上へ : 音楽記譜法 ] | [ テキストを記述する > ] | ||
1.8 テキスト
![[image of music]](cf/lily-352c8530.png)
このセクションでは、楽譜に (さまざまなフォーマットの) テキストを含める方法について説明します。
ここでは扱わないいくつかのテキスト要素については他のセクションで説明します: 声楽, タイトルとヘッダ。
| 1.8.1 テキストを記述する | ||
| 1.8.2 テキストをフォーマットする | ||
| 1.8.3 フォント |
| [ << 音楽記譜法 ] | [トップ][目次][インデックス][ ? ] | [ 専門的な記譜法 >> ] | ||
| [ < テキスト ] | [ 上へ : テキスト ] | [ テキスト スクリプト > ] | ||
1.8.1 テキストを記述する
このセクションでは、楽譜にテキストを付け加えるいくつかの方法を紹介します。
Note: アクセント付きのテキストや特殊なテキスト (他の言語の文字など) を記述するには、単純にその文字を直接 LilyPond ファイルに挿入します。ファイルは UTF-8 で保存しなければなりません。更なる情報は テキスト エンコーディング を参照してください。
| テキスト スクリプト | ||
| テキスト スパナ | ||
| テキスト マーク | ||
| 独立したテキスト |
| [ << 音楽記譜法 ] | [トップ][目次][インデックス][ ? ] | [ 専門的な記譜法 >> ] | ||
| [ < テキストを記述する ] | [ 上へ : テキストを記述する ] | [ テキスト スパナ > ] | ||
テキスト スクリプト
以下の例で示すように、シンプルな “引用符で囲まれたテキスト” 指示を楽譜に付け加えることができます。そのような指示は、向きと配置 で説明する構文を用いて、手動で譜の上または下に配置することができます。
\relative { a'8^"pizz." g f e a4-"scherz." f }
![[image of music]](74/lily-6bdf2f33.png)
この構文は実際には短縮記法です。テキストをフォーマットする で記述されているように、\markup ブロックを用いて明示的に、より複雑なテキスト フォーマットを音符に付け加えることができます。
\relative { a'8^\markup { \italic pizz. } g f e a4_\markup { \tiny scherz. \bold molto } f }
![[image of music]](63/lily-99508079.png)
デフォルトでは、テキスト指示は音符の間隔に影響を与えません。しかしながら、テキスト指示の幅を考慮に入れることもできます: 以下の例では、最初のテキスト文字列は音符の間隔に影響を与えていませんが、2 番目のテキスト文字列は影響を与えています。
\relative { a'8^"pizz." g f e \textLengthOn a4_"scherzando" f }
![[image of music]](e7/lily-23c41d74.png)
テキスト スクリプトだけでなく、アーティキュレーションを音符に付けることもできます。更なる情報は アーティキュレーションと装飾 を参照してください。
テキスト スクリプトとアーティキュレーションの順序についての更なる情報は オブジェクトの配置 を参照してください。
定義済みコマンド
\textLengthOn,
\textLengthOff
参照
学習マニュアル: オブジェクトの配置
記譜法リファレンス: テキストをフォーマットする, 向きと配置, アーティキュレーションと装飾
コード断片集: Text
内部リファレンス: TextScript
既知の問題と警告
テキスト スクリプトと歌詞がマージンに収まることを保証するためのチェックは計算量を増やします。処理速度を上げる必要がある場合は、以下を用います:
\override Score.PaperColumn.keep-inside-line = ##f
| [ << 音楽記譜法 ] | [トップ][目次][インデックス][ ? ] | [ 専門的な記譜法 >> ] | ||
| [ < テキスト スクリプト ] | [ 上へ : テキストを記述する ] | [ テキスト マーク > ] | ||
テキスト スパナ
いくつかの演奏指示 – 例えば rallentando や accelerando – は、テキストとして記述され、点線で複数の音符の上に伸ばされます。そのようなオブジェクト – “スパナ” と呼ばれます – は、以下の構文を用いることで、ある音符から他の音符までの範囲に作成することができます:
\relative { \override TextSpanner.bound-details.left.text = "rit." b'1\startTextSpan e,\stopTextSpan }
![[image of music]](74/lily-1141f164.png)
譜刻される文字列はオブジェクト プロパティを通じてセットされます。デフォルトでは文字列はイタリック体で譜刻されます。しかしながら、テキストをフォーマットする で記述されているように、\markup ブロックを用いることで他の書体にすることができます。
\relative { \override TextSpanner.bound-details.left.text = \markup { \upright "rit." } b'1\startTextSpan c e,\stopTextSpan }
![[image of music]](a7/lily-173376eb.png)
テキスト文字列と同様に、線のスタイルもオブジェクト プロパティとして定義することができます。線スタイルの構文は ライン スタイル で記述されています。
定義済みコマンド
\textSpannerUp,
\textSpannerDown,
\textSpannerNeutral
既知の問題と警告
LilyPond が処理できるテキスト スパナは 1 ボイスにつき、1 つだけです。
Selected Snippets
Dynamics text spanner postfix
Custom text spanners can be defined and used with hairpin and text
crescendos. \< and \> produce hairpins by default,
\cresc etc. produce text spanners by default.
% Some sample text dynamic spanners, to be used as postfix operators crpoco = #(make-music 'CrescendoEvent 'span-direction START 'span-type 'text 'span-text "cresc. poco a poco") \relative c' { c4\cresc d4 e4 f4 | g4 a4\! b4\crpoco c4 | c4 d4 e4 f4 | g4 a4\! b4\< c4 | g4\dim a4 b4\decresc c4\! }
![[image of music]](50/lily-ea18bbb7.png)
Dynamics custom text spanner postfix
Postfix functions for custom crescendo text spanners. The spanners should start on the first note of the measure. One has to use -\mycresc, otherwise the spanner start will rather be assigned to the next note.
% Two functions for (de)crescendo spanners where you can explicitly give the % spanner text. mycresc = #(define-music-function (mymarkup) (markup?) (make-music 'CrescendoEvent 'span-direction START 'span-type 'text 'span-text mymarkup)) mydecresc = #(define-music-function (mymarkup) (markup?) (make-music 'DecrescendoEvent 'span-direction START 'span-type 'text 'span-text mymarkup)) \relative c' { c4-\mycresc "custom cresc" c4 c4 c4 | c4 c4 c4 c4 | c4-\mydecresc "custom decresc" c4 c4 c4 | c4 c4\! c4 c4 }
![[image of music]](56/lily-b955148c.png)
参照
記譜法リファレンス: ライン スタイル, 強弱記号, テキストをフォーマットする
コード断片集: Text, Expressive marks
内部リファレンス: TextSpanner
| [ << 音楽記譜法 ] | [トップ][目次][インデックス][ ? ] | [ 専門的な記譜法 >> ] | ||
| [ < テキスト スパナ ] | [ 上へ : テキストを記述する ] | [ 独立したテキスト > ] | ||
テキスト マーク
リハーサル記号 で記述されている構文を用いて、さまざまなテキスト要素を楽譜に付け加えることができます:
\relative { c''4 \mark "Allegro" c c c }
![[image of music]](a7/lily-b39a9034.png)
この構文を用いることで、任意のテキストを小節線上に配置することが可能です。テキストをフォーマットする で記述されているように、\markup ブロックを用いてより複雑なテキスト フォーマットを付け加えることもできます:
\relative { <c' e>1 \mark \markup { \italic { colla parte } } <d f>2 <e g> <c f aes>1 }
![[image of music]](ef/lily-a18cf1ad.png)
さらに、マークアップ内部での音楽記譜法 で説明されているように、この構文で適切なシンボル名を指定することによって、特殊な記号 – コーダ、セーニョ、フェルマータなど – を譜刻することが可能です:
\relative { <bes' f>2 <aes d> \mark \markup { \musicglyph #"scripts.ufermata" } <e g>1 }
![[image of music]](a3/lily-dd1ab842.png)
このようなオブジェクトを配置できる位置は、楽譜の最上段の譜の上だけです。オブジェクトを小節の終わりで指定するか、途中で指定するか次第で、小節線の上に配置されたり、音符の間に配置されたりします。改行位置で指定した場合、そのマークは次の行の先頭に譜刻されます。
\relative c'' { \mark "Allegro" c1 c \mark "assai" \break c c }
![[image of music]](26/lily-25f8d4c5.png)
定義済みコマンド
\markLengthOn,
\markLengthOff
Selected Snippets
Printing marks at the end of a line
Marks can be printed at the end of the current line, instead of the beginning of the following line. In such cases, it might be preferable to align the right end of the mark with the bar line.
\relative c'' { g2 c d,2 a' \once \override Score.RehearsalMark.break-visibility = #end-of-line-visible \once \override Score.RehearsalMark.self-alignment-X = #RIGHT \mark "D.C. al Fine" \break g2 b, c1 \bar "||" }
![[image of music]](a8/lily-142ca841.png)
Printing marks on every staff
Although text marks are normally only printed above the topmost staff, they may also be printed on every staff.
\score { << \new Staff { c''1 \mark "molto" c'' } \new Staff { c'1 \mark "molto" c' } >> \layout { \context { \Score \remove "Mark_engraver" \remove "Staff_collecting_engraver" } \context { \Staff \consists "Mark_engraver" \consists "Staff_collecting_engraver" } } }
![[image of music]](64/lily-a191a0fc.png)
参照
記譜法リファレンス: リハーサル記号, テキストをフォーマットする, マークアップ内部での音楽記譜法, The Emmentaler font.
コード断片集: Text
内部リファレンス: MarkEvent, Mark_engraver, RehearsalMark
| [ << 音楽記譜法 ] | [トップ][目次][インデックス][ ? ] | [ 専門的な記譜法 >> ] | ||
| [ < テキスト マーク ] | [ 上へ : テキストを記述する ] | [ テキストをフォーマットする > ] | ||
独立したテキスト
\markup ブロックはそれ自体で、すべての \score ブロックの外側に、“最上位レベルの表記” として存在することができます。この構文は ファイル構造 で記述されています。
\markup { Tomorrow, and tomorrow, and tomorrow... }
![[image of music]](e5/lily-f60e3679.png)
これによりテキストを音楽から分離して譜刻することが可能になります。これは、book の中にある複数の score で記述されているように、入力ファイルが複数の楽曲を保持している場合に特に有用です。
\score { c'1 } \markup { Tomorrow, and tomorrow, and tomorrow... } \score { c'1 }
![[image of music]](50/lily-0c199ae3.png)
独立したテキスト ブロックは複数のページに広がることができます。これにより、テキスト ドキュメントやブック全体を LilyPond の中に譜刻することが可能になります。この機能と、この機能の構文は 複数ページにわたるマークアップ で記述されています。
定義済みコマンド
\markup,
\markuplist
Selected Snippets
Stand-alone two-column markup
Stand-alone text may be arranged in several columns using
\markup commands:
\markup { \fill-line { \hspace #1 \column { \line { O sacrum convivium } \line { in quo Christus sumitur, } \line { recolitur memoria passionis ejus, } \line { mens impletur gratia, } \line { futurae gloriae nobis pignus datur. } \line { Amen. } } \hspace #2 \column \italic { \line { O sacred feast } \line { in which Christ is received, } \line { the memory of His Passion is renewed, } \line { the mind is filled with grace, } \line { and a pledge of future glory is given to us. } \line { Amen. } } \hspace #1 } }
![[image of music]](44/lily-34df3f27.png)
参照
記譜法リファレンス: テキストをフォーマットする, ファイル構造, book の中にある複数の score, 複数ページにわたるマークアップ
コード断片集: Text
内部リファレンス: TextScript
| [ << 音楽記譜法 ] | [トップ][目次][インデックス][ ? ] | [ 専門的な記譜法 >> ] | ||
| [ < 独立したテキスト ] | [ 上へ : テキスト ] | [ テキスト マークアップの導入部 > ] | ||
1.8.2 テキストをフォーマットする
このセクションでは、\markup モード特有の構文を用いた基本的かつ高度なテキスト フォーマットについて説明します。
| テキスト マークアップの導入部 | ||
| フォントとフォント サイズを選択する | ||
| テキスト揃え | ||
| マークアップ内部でのグラフィック記譜法 | ||
| マークアップ内部での音楽記譜法 | ||
| 複数ページにわたるマークアップ |
| [ << 音楽記譜法 ] | [トップ][目次][インデックス][ ? ] | [ 専門的な記譜法 >> ] | ||
| [ < テキストをフォーマットする ] | [ 上へ : テキストをフォーマットする ] | [ フォントとフォント サイズを選択する > ] | ||
テキスト マークアップの導入部
\markup ブロックは “マークアップ モード” と呼ばれる拡張可能な構文でテキストを譜刻するために用いられます。
マークアップ構文は LilyPond の通常の構文と同様です:
\markup 表記は波括弧 { … } で囲まれます。単語 1 つが最小の表記と見なされ、その場合は波括弧で囲む必要はありません。
シンプルな “引用符で囲まれたテキスト” 指示とは異なり、\markup ブロックは、バックスラッシュ \ を用いて挿入されるネストされた表記やマークアップ コマンドを保持することができます。そのようなコマンドは直後の表記にのみ影響を与えます。
\relative { a'1-\markup intenso a2^\markup { poco \italic più forte } c e1 d2_\markup { \italic "string. assai" } e b1^\markup { \bold { molto \italic agitato } } c }
![[image of music]](41/lily-2b909090.png)
また、\markup ブロックは引用符で囲まれたテキスト文字列を保持することがあります。そのような文字列は最小のテキスト表記として扱われます。そのため、引用符で囲まれたマークアップ コマンドや特殊文字
(\ や # など) はテキストのフォーマットに影響を与えず、そのまま (逐語的に) 譜刻されます。ダブル クォーテーション自体は、それ自体の前にバックスラッシュを置くことによって譜刻されます。
\relative { a'1^"\italic markup..." a_\markup { \italic "... prints \"italic\" letters!" } a a }
![[image of music]](c1/lily-5c18938a.png)
表記をばらばらなものとして扱うには、単語のリストをダブル クォーテーションで囲むか、前にコマンドを置く必要があります。マークアップ表記の定義の仕方は、表記の配置のされ方
– 垂直に中央揃えして積み重ねられる、水平に並べられる –
に影響を与えます。以下の例では、2 番目の \markup 表記は 1 番目の表記と同じように扱われています:
\relative c'' { c1^\markup { \center-column { a bbb c } } c1^\markup { \center-column { a { bbb c } } } c1^\markup { \center-column { a \line { bbb c } } } c1^\markup { \center-column { a "bbb c" } } }
![[image of music]](5f/lily-cb684aea.png)
マークアップを変数に格納することができます。そのような変数は直接音符にくっつけることができます:
allegro = \markup { \bold \large Allegro } { d''8.^\allegro d'16 d'4 r2 }
![[image of music]](28/lily-d5a07f5c.png)
Text markup commands に
\markup 特有のコマンドの徹底したリストがあります。
参照
記譜法リファレンス: Text markup commands
インストールされているファイル: ‘scm/markup.scm’
コード断片集: Text
既知の問題と警告
マークアップ モードの構文エラーは混乱しやすいです。
| [ << 音楽記譜法 ] | [トップ][目次][インデックス][ ? ] | [ 専門的な記譜法 >> ] | ||
| [ < テキスト マークアップの導入部 ] | [ 上へ : テキストをフォーマットする ] | [ テキスト揃え > ] | ||
フォントとフォント サイズを選択する
マークアップ モードでは、基本的なフォント切り替えがサポートされています:
\relative { d''1^\markup { \bold { Più mosso } \italic { non troppo \underline Vivo } } r2 r4 r8 d,_\markup { \italic quasi \smallCaps Tromba } f1 d2 r }
![[image of music]](79/lily-a9f88927.png)
フォント サイズをいくつかの方法でグローバル譜サイズとの相対値で変更することができます。
フォント サイズをあらかじめ定義されているサイズに設定することができます:
\relative b' { b1_\markup { \huge Sinfonia } b1^\markup { \teeny da } b1-\markup { \normalsize camera } }
![[image of music]](82/lily-2b2706a2.png)
フォント サイズを前の値との相対関係で設定することができます:
\relative b' { b1_\markup { \larger Sinfonia } b1^\markup { \smaller da } b1-\markup { \magnify #0.6 camera } }
![[image of music]](22/lily-5eb08b7e.png)
フォント サイズをグローバル譜サイズによって設定されている値で拡大あるいは縮小させることができます:
\relative b' { b1_\markup { \fontsize #-2 Sinfonia } b1^\markup { \fontsize #1 da } b1-\markup { \fontsize #3 camera } }
![[image of music]](fc/lily-16f6b17a.png)
さらに、フォント サイズをグローバル譜サイズとは無関係に、固定ポイント サイズに設定することができます:
\relative b' { b1_\markup { \abs-fontsize #20 Sinfonia } b1^\markup { \abs-fontsize #8 da } b1-\markup { \abs-fontsize #14 camera } }
![[image of music]](ce/lily-0df407ec.png)
テキストにスペースが含まれる場合、各スペースのサイズが他の文字のサイズに適したものになるので、引用符の内側にすべて置くのがベストです。
\markup \fontsize #6 \bold { Sinfonia da camera } \markup \fontsize #6 \bold { "Sinfonia da camera" }
![[image of music]](da/lily-6cc78568.png)
テキストを下付き文字あるいは上付き文字として譜刻することができます。デフォルトでは、それらは小さなサイズで譜刻されますが、通常サイズにすることもできます:
\markup { \column { \line { 1 \super st movement } \line { 1 \normal-size-super st movement \sub { (part two) } } } }
![[image of music]](82/lily-996f2fca.png)
マークアップ モードは代わりのフォント ファミリを選択するための簡単な方法を提供します。他を指定しないかぎり、デフォルトの Serif フォント – ローマン体 – が自動的に選択されます。以下の例の最後の行では、最初の単語と 2 番目の単語はまったく同じです。
\markup { \column { \line { Act \number 1 } \line { \sans { Scene I. } } \line { \typewriter { Verona. An open place. } } \line { Enter \roman Valentine and Proteus. } } }
![[image of music]](02/lily-773c2e66.png)
新たな強弱記号 や 手動の繰り返し記号 で言及されているように、番号や強弱記号など特定の項目に用いられるフォント ファミリの中にはすべての文字を提供しないものもあります。
フォント切り替えやフォーマット コマンドの中には、単語の中で使用されると望まない空白を作り出すものがあります。これはテキスト要素をつなげることによって容易に解決できます:
\markup { \column { \line { \concat { 1 \super st } movement } \line { \concat { \dynamic p , } \italic { con dolce espressione } } } }
![[image of music]](a0/lily-eab4b973.png)
フォント に フォント切り換えとフォントのカスタム コマンドの徹底したリストがあります。
フォント で説明されているように、カスタム フォント セットを定義することも可能です。
定義済みコマンド
\teeny,
\tiny,
\small,
\normalsize,
\large,
\huge,
\smaller,
\larger
参照
記譜法リファレンス: フォント, 新たな強弱記号, 手動の繰り返し記号, フォント
インストールされているファイル: ‘scm/define-markup-commands.scm’
コード断片集: Text
内部リファレンス: TextScript
既知の問題と警告
フォントのサイズ コマンド \teeny, \tiny, \small,
\normalsize, \large それに \huge を用いると、\fontsize を用いた場合と比較して、つじつまの合わない行間になります。
| [ << 音楽記譜法 ] | [トップ][目次][インデックス][ ? ] | [ 専門的な記譜法 >> ] | ||
| [ < フォントとフォント サイズを選択する ] | [ 上へ : テキストをフォーマットする ] | [ マークアップ内部でのグラフィック記譜法 > ] | ||
テキスト揃え
このサブセクションでは、マークアップ モードのテキストを配置する方法について説明します。 オブジェクトを移動させる で記述されている構文を用いて、マークアップ オブジェクト全体を移動させることも可能です。
マークアップ オブジェクトの揃え方はいくつかあります。デフォルトでは、テキスト指示はそのテキストの左端で揃えられます: 以下の例では、最初のマークアップと 2 番目のマークアップの揃えられ方はまったく同じです。
\relative { d''1-\markup { poco } f d-\markup { \left-align poco } f d-\markup { \center-align { poco } } f d-\markup { \right-align poco } }
![[image of music]](76/lily-5961748c.png)
水平方向の揃え方は、数値を使って、微調整することができます:
\relative { a'1-\markup { \halign #-1 poco } e' a,-\markup { \halign #0 poco } e' a,-\markup { \halign #0.5 poco } e' a,-\markup { \halign #2 poco } }
![[image of music]](1b/lily-31ea654a.png)
オブジェクトの中には揃えるためのプロシージャをそれ自身で持っているものがあり、それらは上記のコマンドでは影響を受けません。テキスト マーク の中の例で示されているように、そのようなマークアップ オブジェクト全体を移動させることが可能です。
垂直方向に揃える方法はもう少し複雑です。上で述べたようにマークアップ オブジェクト全体を移動させることが可能ですが、マークアップ ブロックの中にある特定の要素を移動させることも可能です。 特定要素だけをを移動させるには、移動させる要素の前に アンカ ポイント – もう 1 つのオブジェクト要素、あるいは不可視のオブジェクト要素 – を置く必要があります。以下の例では 2 つのケースを示しています。最後のマークアップはアンカ ポイントを持たず、それゆえ移動されません。
\relative { d'2^\markup { Acte I \raise #2 { Scène 1 } } a' g_\markup { \null \lower #4 \bold { Très modéré } } a d,^\markup { \raise #4 \italic { Une forêt. } } a'4 a g2 a }
![[image of music]](73/lily-7160f632.png)
コマンドの中にはマークアップ モードの中にあるテキスト オブジェクトの水平方向と垂直方向の両方の揃え方に影響を与えることができるものもあります。そのようなコマンドで移動させるオブジェクトの前にはアンカ ポイントを置く必要があります:
\relative { d'2^\markup { Acte I \translate #'(-1 . 2) "Scène 1" } a' g_\markup { \null \general-align #Y #3.2 \bold "Très modéré" } a d,^\markup { \null \translate-scaled #'(-1 . 2) \teeny "Une forêt." } a'4 a g2 a }
![[image of music]](58/lily-869a9b5e.png)
マークアップ オブジェクトに何行かのテキストが含まれる場合もあります。以下の例では、それぞれの要素あるいは表記はそれ自体の行に配置され、左揃えあるいは中央揃えされています:
\markup { \column { a "b c" \line { d e f } } \hspace #10 \center-column { a "b c" \line { d e f } } }
![[image of music]](1d/lily-e102de7c.png)
同様に、要素あるいは表記のリストの広がりが水平の行幅いっぱいを占めることがあります (要素が 1 つだけの場合、その要素はページの中央に揃えられます)。さらに、そのような表記は複数行にわたるテキストや他の任意の表記を含むことができます:
\markup { \fill-line { \line { William S. Gilbert } \center-column { \huge \smallCaps "The Mikado" or \smallCaps "The Town of Titipu" } \line { Sir Arthur Sullivan } } } \markup { \fill-line { 1885 } }
![[image of music]](4f/lily-6a13a43c.png)
さらに、長いテキスト指示を自動的に行幅に合わせて折り返すことができます。そのようなテキスト指示は、以下の例で示すように、左揃えされるか両端揃えされます。
\markup { \column { \line \smallCaps { La vida breve } \line \bold { Acto I } \wordwrap \italic { (La escena representa el corral de una casa de gitanos en el Albaicín de Granada. Al fondo una puerta por la que se ve el negro interior de una Fragua, iluminado por los rojos resplandores del fuego.) } \hspace #0 \line \bold { Acto II } \override #'(line-width . 50) \justify \italic { (Calle de Granada. Fachada de la casa de Carmela y su hermano Manuel con grandes ventanas abiertas a través de las que se ve el patio donde se celebra una alegre fiesta) } } }
![[image of music]](e0/lily-1319f172.png)
Align にテキスト揃えコマンドの徹底したリストがあります。
参照
学習マニュアル: オブジェクトを移動させる
インストールされているファイル: ‘scm/define-markup-commands.scm’.
コード断片集: Text
内部リファレンス: TextScript
| [ << 音楽記譜法 ] | [トップ][目次][インデックス][ ? ] | [ 専門的な記譜法 >> ] | ||
| [ < テキスト揃え ] | [ 上へ : テキストをフォーマットする ] | [ マークアップ内部での音楽記譜法 > ] | ||
マークアップ内部でのグラフィック記譜法
マークアップ コマンドを用いて、さまざまなグラフィック オブジェクトを楽譜に付け加えることができます。
以下の例で示すように、マークアップ コマンドの中にはテキスト要素をグラフィックスで飾り付けることができるものがあります。
\markup \fill-line { \center-column { \circle Jack \box "in the box" \null \line { Erik Satie \hspace #3 \bracket "1866 - 1925" } \null \rounded-box \bold Prelude } }
![[image of music]](8d/lily-f64db0d5.png)
コマンドの中にはテキストの周りのパディングを増やすことを必要とするものもあります。パティングの増加は Align で徹底的に記述されているマークアップ コマンドを用いて達成できます。
\markup \fill-line { \center-column { \box "Charles Ives (1874 - 1954)" \null \box \pad-markup #2 "THE UNANSWERED QUESTION" \box \pad-x #8 "A Cosmic Landscape" \null } } \markup \column { \line { \hspace #10 \box \pad-to-box #'(-5 . 20) #'(0 . 5) \bold "Largo to Presto" } \pad-around #3 "String quartet keeps very even time, Flute quartet keeps very uneven time." }
![[image of music]](c7/lily-255e84c6.png)
テキストを持たないグラフィック要素やシンボルを譜刻することもできます。他のマークアップ表記と同様に、そのようなオブジェクトも組み合わせることができます。
\markup { \combine \draw-circle #4 #0.4 ##f \filled-box #'(-4 . 4) #'(-0.5 . 0.5) #1 \hspace #5 \center-column { \triangle ##t \combine \draw-line #'(0 . 4) \arrow-head #Y #DOWN ##f } }
![[image of music]](41/lily-65d4ebe5.png)
高度なグラフィック機能として、外部画像ファイルを Encapsulated PostScript フォーマット (eps) に変換してインクルードする機能や、ネイティブの PostScript コードを用いてグラフィックを直接に入力ファイルへ埋め込む機能があります。このような機能を使う場合、以下で示すように、描画サイズを明示的に指定することを推奨します:
c'1^\markup { \combine \epsfile #X #10 #"./context-example.eps" \with-dimensions #'(0 . 6) #'(0 . 10) \postscript #" -2 3 translate 2.7 2 scale newpath 2 -1 moveto 4 -2 4 1 1 arct 4 2 3 3 1 arct 0 4 0 3 1 arct 0 0 1 -1 1 arct closepath stroke" } c'
![[image of music]](12/lily-4bafdf36.png)
Graphic にグラフィック特有のコマンドの徹底したリストがあります。
参照
記譜法リファレンス: Align, Dimensions, 編集者の注釈, Graphic
インストールされているファイル: ‘scm/define-markup-commands.scm’, ‘scm/stencil.scm’
コード断片集: Text
内部リファレンス: TextScript
| [ << 音楽記譜法 ] | [トップ][目次][インデックス][ ? ] | [ 専門的な記譜法 >> ] | ||
| [ < マークアップ内部でのグラフィック記譜法 ] | [ 上へ : テキストをフォーマットする ] | [ 複数ページにわたるマークアップ > ] | ||
マークアップ内部での音楽記譜法
マークアップ オブジェクトの内部で、さまざまな音楽記譜要素を楽譜に付け加えることができます。
音符と臨時記号はマークアップ コマンドを用いて入力することができます:
a'2 a'^\markup { \note {4} #1 = \note-by-number #1 #1 #1.5 } b'1_\markup { \natural \semiflat \flat \sesquiflat \doubleflat } \glissando a'1_\markup { \natural \semisharp \sharp \sesquisharp \doublesharp } \glissando b'
![[image of music]](d1/lily-e5fa1b06.png)
他の記譜オブジェクトもマークアップ モードの中で譜刻することができます:
\relative { g1 bes ees\finger \markup \tied-lyric #"4~1" fis_\markup { \dynamic rf } bes^\markup { \beam #8 #0.1 #0.5 } cis d-\markup { \markalphabet #8 \markletter #8 } }
![[image of music]](ee/lily-3d0bfc6f.png)
より一般的には、以下で示すように、使用可能な音楽シンボルはすべてマークアップ オブジェクトに含めることができます。The Emmentaler font に、音楽シンボルと音楽シンボル名の徹底したリストがあります。
\relative { c''2 c'^\markup { \musicglyph #"eight" } c,4 c,8._\markup { \musicglyph #"clefs.G_change" } c16 c2^\markup { \musicglyph #"timesig.neomensural94" } }
![[image of music]](86/lily-1b9c896a.png)
テキストではない図柄を譜刻するもう 1 つの方法が フォントの説明 で記述されています。この方法はさまざまなサイズの波括弧を譜刻する場合に有用です。
さらに、マークアップ モードは特定の楽器のためのダイアグラムをサポートします:
\relative { c''1^\markup { \fret-diagram-terse #"x;x;o;2;3;2;" } c^\markup { \harp-pedal #"^-v|--ov^" } c c^\markup { \combine \musicglyph #"accordion.discant" \combine \raise #0.5 \musicglyph #"accordion.dot" \raise #1.5 \musicglyph #"accordion.dot" } }
![[image of music]](18/lily-6dfe5946.png)
そのようなダイアグラムは Instrument Specific Markup でドキュメント化されています。
楽譜全体でさえもマークアップ オブジェクト内部にネストさせることができます。そのような場合、以下で示すように、ネストされる \score ブロックには
\layout ブロックを含める必要があります:
\relative { c'4 d^\markup { \score { \relative { c'4 d e f } \layout { } } } e f | c d e f }
![[image of music]](43/lily-1afceec9.png)
Music に、音楽記譜法関連のコマンドの徹底したリストがあります。
参照
記譜法リファレンス: Music, The Emmentaler font, フォントの説明
インストールされているファイル: ‘scm/define-markup-commands.scm’, ‘scm/fret-diagrams.scm’, ‘scm/harp-pedals.scm’
コード断片集: Text
内部リファレンス: TextScript
| [ << 音楽記譜法 ] | [トップ][目次][インデックス][ ? ] | [ 専門的な記譜法 >> ] | ||
| [ < マークアップ内部での音楽記譜法 ] | [ 上へ : テキストをフォーマットする ] | [ フォント > ] | ||
複数ページにわたるマークアップ
標準のマークアップ オブジェクトは分割することができません。しかしながら、 ある特定の構文は複数ページにわたるテキストを入力することを可能にします:
\markuplist { \justified-lines { 両端揃えされた非常に長いテキスト。 ... } \wordwrap-lines { もう 1 つの非常に長いテキスト。 ... } ... }
![[image of music]](3c/lily-be9f78ba.png)
この構文はマークアップのリストを受け付けます。受け付けるものは以下の通りです:
- マークアップ リスト コマンドの結果
- マークアップのリスト
- マークアップ リストのリスト
Text markup list commands に、マークアップ リスト コマンドの徹底したリストがあります。
参照
記譜法リファレンス: Text markup list commands
拡張: New markup list command definition
インストールされているファイル: ‘scm/define-markup-commands.scm’
コード断片集: Text
内部リファレンス: TextScript
定義済みコマンド
\markuplist
| [ << 音楽記譜法 ] | [トップ][目次][インデックス][ ? ] | [ 専門的な記譜法 >> ] | ||
| [ < 複数ページにわたるマークアップ ] | [ 上へ : テキスト ] | [ フォントの説明 > ] | ||
1.8.3 フォント
このセクションでは、フォントを扱う方法と、楽譜の中でフォントを変更する方法について説明します。
| フォントの説明 | ||
| 個々に登録するフォント | ||
| ドキュメント全体のフォント |
| [ << 音楽記譜法 ] | [トップ][目次][インデックス][ ? ] | [ 専門的な記譜法 >> ] | ||
| [ < フォント ] | [ 上へ : フォント ] | [ 個々に登録するフォント > ] | ||
フォントの説明
フォントはいくつかのライブラリを通じて扱われます。FontConfig はシステムで利用可能なフォントを検出するために使用されます。選択されたフォントは Pango を用いて描かれます。
音楽記譜フォントはいくつかのファミリに分類された特殊な図柄のセットと言うことができます。以下の構文により、さまざまな LilyPond feta 非テキスト フォントをマークアップ モードの中で直接使用することが可能になります:
a'1^\markup { \vcenter { \override #'(font-encoding . fetaBraces) \lookup #"brace120" \override #'(font-encoding . fetaText) \column { 1 3 sf } \override #'(font-encoding . fetaMusic) \lookup #"noteheads.s0petrucci" } }
![[image of music]](30/lily-0f1dca6f.png)
しかしながら、これらの図柄はすべて
– fetaBraces で保持されているさまざまサイズの波括弧を除いて –
は、マークアップ内部での音楽記譜法 で記述されている、もっと簡単な構文を用いて利用することができます。
fetaBraces に保持されている図柄を使う場合、波括弧のサイズは図柄名の一部となっている任意の数値によって指定されます。0 から 575 までの整数すべてを指定でき、0 は最小の波括弧を提供します。最適な値はトライ&エラーで決定する必要があります。これらの図柄はすべて左波括弧です。右波括弧は回転によって得ることができます
– オブジェクトを回転させる を参照してください。
3 ファミリのテキスト フォントが利用可能になっています:
- roman (serif) フォントのデフォルトは LilyPond Serif (TeX Gyre Schola のエイリアス)です。
- sans フォントのデフォルトは LilyPond Sans Serif (TeX Gyre Heros のエイリアス)です。
- typewriter (monospaced) フォントのデフォルトは LilyPond Monospace (TeX Gyre Cursor のエイリアス)です。
それぞれのファミリには異なる形状とセットのフォントが保持されています。以下の例は、ファミリ、形状、セットそれにサイズを変更する様子を示しています。デフォルト サイズから変更する場合、font-size に提供する値が必要となります。
\override Score.RehearsalMark.font-family = #'typewriter \mark \markup "Ouverture" \override Voice.TextScript.font-shape = #'italic \override Voice.TextScript.font-series = #'bold d''2.^\markup "Allegro" \override Voice.TextScript.font-size = #-3 c''4^smaller
![[image of music]](78/lily-19fb2714.png)
同様の構文をマークアップ モードの中で使用することができます。しかしながら、マークアップ モードの中では、フォントとフォント サイズを選択する で説明されている、もっと簡単な構文を使用するほうが良いでしょう:
\markup { \column { \line { \override #'(font-shape . italic) \override #'(font-size . 4) Idomeneo, } \line { \override #'(font-family . typewriter) { \override #'(font-series . bold) re di } \override #'(font-family . sans) Creta } } }
![[image of music]](f4/lily-3311ad81.png)
あらかじめ構成されているフォント間で切り替えを行う方が簡単ですが、他のフォントを使用することも可能です。他のフォントを使用する方法は以下のセクションで説明されています: 個々に登録するフォント と ドキュメント全体のフォント。
参照
記譜法リファレンス: The Emmentaler font, マークアップ内部での音楽記譜法, オブジェクトを回転させる, フォントとフォント サイズを選択する, フォント
| [ << 音楽記譜法 ] | [トップ][目次][インデックス][ ? ] | [ 専門的な記譜法 >> ] | ||
| [ < フォントの説明 ] | [ 上へ : フォント ] | [ ドキュメント全体のフォント > ] | ||
個々に登録するフォント
以下の構文を用いることで、オペレーティング システムにインストールされていて、FontConfig に認識されている任意のフォントを楽譜の中で使用することができます:
\override Staff.TimeSignature.font-name = #"Bitstream Charter" \override Staff.TimeSignature.font-size = #2 \time 3/4 a'1_\markup { \override #'(font-name . "Bitstream Vera Sans,sans-serif, Oblique Bold") { Vera Oblique Bold } }
![[image of music]](ad/lily-ece005ea.png)
font-name はカンマ区切りの ‘フォント’ のリストと、スペース区切りの ‘スタイル’ のリストを記述できます。リスト中の ‘フォント’ がインストールされていて、要求されたグリフを含んでいれば、それが使われます。そうでないなら代わりにリストの 次 のフォントが使われます。
lilypond を以下のオプションを付けて実行するとオペレーティング システムで利用可能なすべてのフォントのリストを表示します:
lilypond -dshow-available-fonts x
参照
記譜法リファレンス: フォントの説明, ドキュメント全体のフォント
コード断片集: Text
| [ << 音楽記譜法 ] | [トップ][目次][インデックス][ ? ] | [ 専門的な記譜法 >> ] | ||
| [ < 個々に登録するフォント ] | [ 上へ : フォント ] | [ 専門的な記譜法 > ] | ||
ドキュメント全体のフォント
以下の例で示す方法に従ってフォント ファミリを指定することにより、roman, sans それに typewriter フォント ファミリとして使用されるデフォルト フォントを変更することができます。この例ではグローバル譜サイズにセットされた値で自動的にフォントのサイズを伸縮しています。個々に登録するフォント のように、カンマ区切りの ‘フォント’ のリストを記述できます。しかし、フォント ‘スタイル’ は記述できません。フォントについての説明は、フォントの説明 を参照してください。
\paper { #(define fonts (make-pango-font-tree "Times New Roman" "Nimbus Sans,Nimbus Sans L" "Luxi Mono" (/ staff-height pt 20))) } \relative c'{ c1-\markup { roman, \sans sans, \typewriter typewriter. } }
![[image of music]](5e/lily-b45ebff0.png)
参照
記譜法リファレンス: フォントの説明, 個々に登録するフォント, フォントとフォント サイズを選択する, フォント
| [ << 音楽記譜法 ] | [トップ][目次][インデックス][ ? ] | [ 入出力全般 >> ] | ||
| [ < ドキュメント全体のフォント ] | [ 上へ : Top ] | [ 声楽 > ] | ||
2. 専門的な記譜法
この章では、特定のタイプの楽器やスタイル向けの音楽記譜を作成するための方法について説明します。
| 2.1 声楽 | ||
| 2.2 キーボードと他の複数譜の楽器 | ||
| 2.3 フレットの無い弦楽器 | ||
| 2.4 フレットのある弦楽器 | ||
| 2.5 打楽器 | ||
| 2.6 管楽器 | ||
| 2.7 和音記譜法 | ||
| 2.8 現代音楽 | ||
| 2.9 Ancient notation | ||
| 2.10 世界の音楽 |
| [ << 専門的な記譜法 ] | [トップ][目次][インデックス][ ? ] | [ 入出力全般 >> ] | ||
| [ < 専門的な記譜法 ] | [ 上へ : 専門的な記譜法 ] | [ 声楽で共通の記譜法 > ] | ||
2.1 声楽
![[image of music]](5a/lily-da711481.png)
このセクションでは声楽を譜刻し、歌詞を旋律の音符に揃える方法について説明します。
| 2.1.1 声楽で共通の記譜法 | ||
| 2.1.2 歌詞に特有のテクニック | ||
| 2.1.3 歌詞の節 | ||
| 2.1.4 歌曲 | ||
| 2.1.5 合唱 | ||
| 2.1.6 オペラと舞台ミュージカル | ||
| 2.1.7 聖歌と賛美歌 | ||
| 2.1.8 古代の声楽 | ||
| [ << 専門的な記譜法 ] | [トップ][目次][インデックス][ ? ] | [ 入出力全般 >> ] | ||
| [ < 声楽 ] | [ 上へ : 声楽 ] | [ 声楽のためのリファレンス > ] | ||
2.1.1 声楽で共通の記譜法
このセクションでは声楽の譜刻に共通する問題について説明します。
| 声楽のためのリファレンス | ||
| 歌詞を入力する | ||
| 歌詞を旋律に揃える | ||
| 歌詞音節の自動演奏時間 | ||
| 歌詞音節の手動演奏時間 | ||
| 複数の歌詞音節を 1 つの音符に割り当てる | ||
| 複数の音符を 1 つの歌詞音節に割り当てる | ||
| 延長線とハイフン |
| [ << 専門的な記譜法 ] | [トップ][目次][インデックス][ ? ] | [ 入出力全般 >> ] | ||
| [ < 声楽で共通の記譜法 ] | [ 上へ : 声楽で共通の記譜法 ] | [ 歌詞を入力する > ] | ||
声楽のためのリファレンス
このセクションでは声楽を譜刻する際に発生する記譜法の問題についての詳細について記述している場所を示します。
- たいていの声楽では歌詞として記述されたテキストを用います。この記譜法についての導入部は Setting simple songs にあります。
-
声楽はたいてい歌詞や他のテキスト要素 (配役の名前等) のために
markupモードの使用を必要とします。markupモードの構文は テキスト マークアップの導入部 で説明しています。 - 声楽譜の最初に 音域 (ambitus) が追加されることがあります。音域について 音域 で説明しています。
- デフォルトでは強弱記号は譜の下に配置されます。しかしながら、たいていの合唱の楽譜では、合唱のための楽譜レイアウト で説明しているように、強弱記号は歌詞を避けるために譜の上に配置されます。
参照
音楽用語集: ambitus
学習マニュアル: Setting simple songs
記譜法リファレンス: テキスト マークアップの導入部, 音域, 合唱のための楽譜レイアウト
コード断片集: Vocal music
| [ << 専門的な記譜法 ] | [トップ][目次][インデックス][ ? ] | [ 入出力全般 >> ] | ||
| [ < 声楽のためのリファレンス ] | [ 上へ : 声楽で共通の記譜法 ] | [ 歌詞を旋律に揃える > ] | ||
歌詞を入力する
歌詞は \lyricmode で始めるか
\addlyrics または \lyricsto を用いる特殊な入力モードで入力されます。この特殊な入力モードでは、入力 d はピッチ D とは解釈されず、テキストの 1 文字の歌詞と解釈されます。言い換えると、歌詞を音符のように入力して、ピッチではなくテキストとして譜刻します。
例:
\lyricmode { Three4 blind mice,2 three4 blind mice2 }
歌詞の水平方向の配置を指定するための手法は主に 2 つあります
– 上記の例のように歌詞の各音節の演奏時間を指定するか、\addlyrics または \lyricsto を用いて歌詞を自動的に旋律や他のボイスに揃えさせるかのどちらかです。前者は 歌詞音節の手動演奏時間 で説明します。後者は 歌詞音節の自動演奏時間 で説明します。
歌詞の単語または音節はアルファベット (さらに他のいくつかの文字 – 以下を読んでください) で始まり、空白か数字で終わります。歌詞の音節の頭文字以後の文字は、数字や空白を除く、任意の文字になります。
数字や空白ではない文字は歌詞の一部と見なされるため、} で終わる単語であっても有効です
– このことが以下のミスを引き起こします:
\lyricmode { lah lah lah}
上記の例で、} は歌詞の最後の音節に含まれるため、波括弧 { は閉じられず、入力ファイルはおそらくコンパイルされません。これを避けるため、波括弧の前後に常に空白を記述すべきです:
\lyricmode { lah lah lah }
句読点、アクセントが付いた文字を持つ歌詞、英語以外の言語の文字、あるいは特殊文字 (ハート記号や引用符等) は、UTF-8 エンコードで保存することで、直接入力することができます。さらなる情報は、特殊文字 を参照してください。
\relative { d''8 c16 a bes8 f e' d c4 } \addlyrics { „Schad’ um das schö -- ne grü -- ne Band, }
![[image of music]](fb/lily-b78135dd.png)
歌詞モードで通常の引用符を使うことができますが、引用符の前にバックスラッシュを配置し、歌詞の音節全体を追加の引用符で囲む必要があります。例を挙げます:
\relative { \time 3/4 e'4 e4. e8 d4 e d c2. } \addlyrics { "\"I" am so lone -- "ly,\"" said she }
![[image of music]](0f/lily-6f80d2f4.png)
歌詞モードでの単語の開始の完全な定義は複雑です。歌詞モードでの単語はアルファベット, _, ?, !,
歌詞モードでの単語の開始の完全な定義は複雑です。歌詞モードで、単語は以下の文字で始まります:
アルファベット, _, ?, !, :, ',
制御文字 ^A から ^F, ^Q から ^W, ^Y,
^^, 128 以上の ASCII コードの 8 ビット文字,
バックスラッシュとの組み合わせ \`, \', \",
または \^。
歌詞の中で \markup を用いることで、歌詞の体裁を様々に制御することができます。多くのオプションの説明は、テキストをフォーマットする を参照してください。
Selected Snippets
Formatting lyrics syllables
Markup mode may be used to format individual syllables in lyrics.
mel = \relative c'' { c4 c c c } lyr = \lyricmode { Lyrics \markup { \italic can } \markup { \with-color #red contain } \markup { \fontsize #8 \bold Markup! } } << \new Voice = melody \mel \new Lyrics \lyricsto melody \lyr >>
![[image of music]](24/lily-090c2fe4.png)
参照
学習マニュアル: Songs
記譜法リファレンス: 歌詞音節の自動演奏時間, フォント, テキストをフォーマットする, 入力モード, 歌詞音節の手動演奏時間, 特殊文字
内部リファレンス: LyricText
コード断片集: Text
| [ << 専門的な記譜法 ] | [トップ][目次][インデックス][ ? ] | [ 入出力全般 >> ] | ||
| [ < 歌詞を入力する ] | [ 上へ : 声楽で共通の記譜法 ] | [ 歌詞音節の自動演奏時間 > ] | ||
歌詞を旋律に揃える
歌詞はコンテキスト Lyrics の中で解釈されることで譜刻されます。コンテキストの説明 を参照してください。
\new Lyrics \lyricmode { … }
歌詞は主に 2 つの方法で歌詞に揃えることができます:
-
\addlyric,\lyricstoを用いるか、プロパティassociatedVoiceを設定することにより、他のボイスあるいは (特殊な状況ですが) 関連付けされた旋律から歌詞の音節の演奏時間を取ることで、歌詞を自動的に揃えることができます。詳細は 歌詞音節の自動演奏時間 を参照してください。<< \new Staff << \time 2/4 \new Voice = "one" \relative { \voiceOne c''4 b8. a16 g4. r8 a4 ( b ) c2 } \new Voice = "two" \relative { \voiceTwo s2 s4. f'8 e4 d c2 } >> % "one" の音符に揃えます \new Lyrics \lyricsto "one" { Life is __ _ love, live __ life. } % 最初は "one" の音符に揃えて、それから "two" に切り替えます \new Lyrics \lyricsto "one" { No more let \set associatedVoice = "two" % 切り替える音節の前にセットする必要があります sins and sor -- rows grow. } >>![[image of music]](b6/lily-8a783cc3.png)
歌詞の 1 番は通常の歌詞の入力方法を示しています。
歌詞の 2 番は歌詞を揃えるボイスを切り替える方法を示しています。この方法は、歌詞の 1 番と 2 番で音符への単語の揃え方が異なり、単語を揃えるべき音符がすべてボイス コンテキストの中にある場合に有用です。詳細は 歌詞の節 を参照してください。
-
歌詞を
¥lyricmodeで入力し、音節の演奏時間を明示的に示すことで、歌詞を音符とは独立して揃えることができます。<< \new Voice = "one" \relative { \time 2/4 c''4 b8. a16 g4. f8 e4 d c2 } % 前で指定された演奏時間 2 を用います \new Lyrics \lyricmode { Joy to the earth! } % 音符とは異なるリズムをセットするために、演奏時間を明示します \new Lyrics \lyricmode { Life4 is love,2. live4 life.2 } >>![[image of music]](96/lily-a2b5c1ae.png)
歌詞の 1 番は演奏時間が指定されず、各単語には前の値 2 がされるため、音符と揃いません。
歌詞の 2 番は音符とは全く独立して単語を揃える方法を示しています。この方法は、歌詞の 1 番と 2 番で音符への単語の揃え方が異なり、単語を揃えるべき音符がボイス コンテキストから得られない場合に有用です。詳細は 歌詞音節の手動演奏時間 を参照してください。このテクニックは譜の上に会話をセットする場合にも有用です – これの例は 音楽の中での会話 を参照してください。
この方法で入力した音符はデフォルトでは音符に左揃えされますが、関連付されたボイスが存在する場合はそれを指定することで中央揃えされます。詳細は 歌詞音節の手動演奏時間 を参照してください。
参照
学習マニュアル: Aligning lyrics to a melody
記譜法リファレンス: コンテキストの説明, 歌詞音節の自動演奏時間, 歌詞の節, 歌詞音節の手動演奏時間, 音楽の中での会話, 歌詞音節の手動演奏時間
内部リファレンス: Lyrics
| [ << 専門的な記譜法 ] | [トップ][目次][インデックス][ ? ] | [ 入出力全般 >> ] | ||
| [ < 歌詞を旋律に揃える ] | [ 上へ : 声楽で共通の記譜法 ] | [ 歌詞音節の手動演奏時間 > ] | ||
歌詞音節の自動演奏時間
以下の 3 つの方法で歌詞を旋律の音符に揃えることができます:
-
¥lyricstoで旋律を保持しているボイス コンテキストを指定します。 -
¥addlyricsで歌詞を入力して、それを旋律を保持しているボイス コンテキストの直後に配置します。 -
任意のタイミングで
associatedVoiceプロパティを設定することで歌詞の揃えを名前を持つ他のボイス コンテキストに切り替えます。
3 つの方法のいずれでも、単語の音節の間にハイフンを描き、単語の後ろに延長線を描くことができます。詳細は 延長線とハイフン を参照してください。
歌詞を揃える Voice コンテキストが “消滅” してはいけません。さもないと、その後の歌詞は失われてしまいます。ボイスは何もすることが無くなると消滅する可能性があります
– コンテキストを残しておく を参照してください。
\lyricsto を用いる
旋律を保持している名前の付いたボイス コンテキストを
¥lyricsto で指定することにより、歌詞を旋律の下に揃えることができます:
<< \new Voice = "melody" { a4 a a a } \new Lyrics \lyricsto "melody" { These are the words } >>
![[image of music]](b1/lily-4c608b21.png)
これは歌詞を名前の付いた Voice コンテキストに揃えます
– Voice コンテキストは既に存在している必要があります。このため、普通は Voice コンテキストを先に記述して、その後に Lyrics コンテキストを記述します。歌詞自体は ¥lyricsto コマンドの後に記述します。¥lyricsto コマンドは自動的に歌詞モードを呼び出すため、¥lyricmode の記述は省略できます。デフォルトでは、歌詞は音符の下に配置されます。配置場所を変更する方法は 歌詞の垂直方向の配置 を参照してください。
\addlyrics を用いる
¥addlyrics コマンドは便利なショートカットで、もっと複雑な LilyPond 構造を使う歌詞のセットアップの代わりとして用いることができます。
{ MUSIC }
\addlyrics { LYRICS }
上記は下記と同等です:
\new Voice = "blah" { MUSIC }
\new Lyrics \lyricsto "blah" { LYRICS }
ここで例を挙げます:
{ \time 3/4 \relative { c'2 e4 g2. } \addlyrics { play the game } }
![[image of music]](3b/lily-a48f63a4.png)
¥addlyrics セクションを追加することで、歌詞の 2 番、3 番を追加することができます:
{ \time 3/4 \relative { c'2 e4 g2. } \addlyrics { play the game } \addlyrics { speel het spel } \addlyrics { joue le jeu } }
![[image of music]](e1/lily-f1b04953.png)
コマンド ¥addlyrics は多声を扱うことはできません。そのような場合は ¥lyricsto を使うべきです。
associatedVoice を用いる
associatedVoice プロパティを設定することで、歌詞を揃える旋律を変更することができます:
\set associatedVoice = #"lala"
プロパティの値 (ここでは "lala" です) は
Voice コンテキストの名前になります。技術的な理由により、変更を適用する歌詞の音節の前にこの set コマンドを配置する必要があります。
ここで、使用例を挙げます:
<< \new Staff << \time 2/4 \new Voice = "one" \relative { \voiceOne c''4 b8. a16 g4. r8 a4 ( b ) c2 } \new Voice = "two" \relative { \voiceTwo s2 s4. f'8 e8 d4. c2 } >> % 最初は "one" の音符に揃えます % それから "two" に切り替えます \new Lyrics \lyricsto "one" { No more let \set associatedVoice = "two" % 切り替える音節の前にセットする必要があります sins and sor -- rows grow. } >>
![[image of music]](ab/lily-86bcf150.png)
参照
記譜法リファレンス: 延長線とハイフン, コンテキストを残しておく, 歌詞の垂直方向の配置
| [ << 専門的な記譜法 ] | [トップ][目次][インデックス][ ? ] | [ 入出力全般 >> ] | ||
| [ < 歌詞音節の自動演奏時間 ] | [ 上へ : 声楽で共通の記譜法 ] | [ 複数の歌詞音節を 1 つの音符に割り当てる > ] | ||
歌詞音節の手動演奏時間
複雑な声楽では、歌詞を音符とは完全に独立させて配置する方が望ましい場合があります。そのような場合、\lyricsto や \addlyrics を用いたり、associatedVoice プロパティを設定したりはしません。歌詞の音節を音符のように
– しかしながら、ピッチをテキストに置き換えて –
入力し、歌詞の各音節の後には演奏時間を明示的に記述します。
デフォルトでは、歌詞の音節は対応する音楽イベントに左揃えされます。音節の間にハイフンを描くことは普通にできますが、延長線を描くには関連付されたボイスが存在する必要があります。
ここで、2 つの例を挙げます:
<< \new Voice = "melody" \relative { \time 3/4 c'2 e4 g2 f } \new Lyrics \lyricmode { play1 the4 game4 } >>
![[image of music]](22/lily-1e51be9e.png)
<< \new Staff { \relative { c''2 c2 d1 } } \new Lyrics { \lyricmode { I2 like4. my8 cat!1 } } \new Staff { \relative { c'8 c c c c c c c c8 c c c c c c c } } >>
![[image of music]](cd/lily-c7ed57a4.png)
このテクニックは、譜の上に会話を書く場合に有用です – 音楽の中での会話 を参照してください。
歌詞を音符に中央揃えさせるには、associatedVoice に音符を保持しているボイス コンテキストをセットします。associatedVoice がセットされると、2 重ハイフンと 2 重アンダースコアを記述することで、メリスマにハイフンと延長線を描くことができます。
<< \new Voice = "melody" { \time 3/4 c2 e4 g f g } \new Lyrics \lyricmode { \set associatedVoice = #"melody" play2 the4 game2. __ } >>
![[image of music]](7a/lily-aafc8107.png)
参照
記譜法リファレンス: 音楽の中での会話
| [ << 専門的な記譜法 ] | [トップ][目次][インデックス][ ? ] | [ 入出力全般 >> ] | ||
| [ < 歌詞音節の手動演奏時間 ] | [ 上へ : 声楽で共通の記譜法 ] | [ 複数の音符を 1 つの歌詞音節に割り当てる > ] | ||
複数の歌詞音節を 1 つの音符に割り当てる
1 つの音符にスペースで区切られた複数の音節を割り当てるには、そのフレーズを引用符で囲むか、_ 文字を用います。代替手段として、チルド記号 (~) を用いて音節をタイで結ぶこともできます。
{ \relative { \autoBeamOff r8 b' c fis, fis c' b e, } \addlyrics { Che_in ques -- ta_e_in quel -- l'al -- tr'on -- da } \addlyrics { "Che in" ques -- "ta e in" quel -- l'al -- tr'on -- da } \addlyrics { Che~in ques -- ta~e~in quel -- l'al -- tr'on -- da } }
![[image of music]](a1/lily-cb6ba563.png)
参照
内部リファレンス: LyricCombineMusic
| [ << 専門的な記譜法 ] | [トップ][目次][インデックス][ ? ] | [ 入出力全般 >> ] | ||
| [ < 複数の歌詞音節を 1 つの音符に割り当てる ] | [ 上へ : 声楽で共通の記譜法 ] | [ 延長線とハイフン > ] | ||
複数の音符を 1 つの歌詞音節に割り当てる
しばしば、特に中世の音楽では、1 つの音節を複数の音符で歌います。そのような歌い方をメリスマ (melismata または melisma) と呼びます。通常、メリスマの音節はメリスマの最初の音符に左揃えされます。
メリスマが単語の最後ではない音節で発生する場合、その音節と次の音節をハイフンで結びます。これは音節の直後に 2 重ハイフン -- を配置することで示します。
メリスマが単語の最後の音節または音節が 1 つしかない単語で発生する場合、最後の音節からメリスマの最後の音符まで延長線を描きます。これは単語の直後に 2 重アンダースコア __ を配置することで示します。
メリスマを示す方法は 5 つあります:
-
タイで結ばれた音符には、自動的にメリスマが作成されます:
<< \new Voice = "melody" \relative { \time 3/4 f''4 g2 ~ | 4 e2 ~ | 8 } \new Lyrics \lyricsto "melody" { Ky -- ri -- e __ } >>![[image of music]](b2/lily-9f22b72a.png)
-
各メリスマの音符にスラーを配置することで、譜から自動的にメリスマを作成することができます。これが歌詞を入力する通常の方法です:
<< \new Voice = "melody" \relative { \time 3/4 f''4 g8 ( f e f ) e8 ( d e2 ) } \new Lyrics \lyricsto "melody" { Ky -- ri -- e __ } >>![[image of music]](78/lily-572f64ff.png)
フレージング スラーはメリスマの作成には影響を与えないことに注意してください。
-
自動連桁を off にして、手動で連桁を付けられた音符はメリスマと見なされます。自動連桁の振る舞いを設定する を参照してください。
<< \new Voice = "melody" \relative { \time 3/4 \autoBeamOff f''4 g8[ f e f] e2. } \new Lyrics \lyricsto "melody" { Ky -- ri -- e } >>![[image of music]](ac/lily-c2ed6878.png)
この例はメリスマに 8 分音符よりも長い音符を含めているため、明らかに不適切です。
-
スラーが付いていない音符でも、
\melismaと\melismaEndで囲まれていればメリスマとして扱われます。<< \new Voice = "melody" \relative { \time 3/4 f''4 g8 \melisma f e f \melismaEnd e2. } \new Lyrics \lyricsto "melody" { Ky -- ri -- e } >>![[image of music]](ce/lily-a52e3d13.png)
-
メリスマに含まれる余分な各音符に対して歌詞の中にアンダースコア
_を記述することで、メリスマを定義することができます。<< \new Voice = "melody" \relative { \time 3/4 f''4 g8 f e f e8 d e2 } \new Lyrics \lyricsto "melody" { Ky -- ri -- _ _ _ e __ _ _ } >>![[image of music]](93/lily-f2537e16.png)
旋律の中のタイ、スラー、それに手動連桁をメリスマにしないことも可能です。メリスマにしないためには、melismaBusyProperties を設定します:
<< \new Voice = "melody" \relative { \time 3/4 \set melismaBusyProperties = #'() c'4 d ( e ) g8 [ f ] f4 ~ 4 } \new Lyrics \lyricsto "melody" { Ky -- ri -- e e -- le -- i -- son } >>
![[image of music]](73/lily-c3ba647f.png)
melismaBusyProperties に対する設定を変えることで、メリスマの自動検出にタイ、スラー、それに連桁を含める / 除外することができます。
Tunable context properties の melismaBusyProperties
を参照してください。
代替手段として、ignoreMelismata に真をセットすることですべてのメリスマを無視することができます。リズムが異なる歌詞の節 を参照してください。
melismaBusyProperties がアクティブになっているパッセージの中でメリスマを使う必要がある場合、メリスマに含める各音符に対して歌詞の中にアンダースコアを記述します:
<< \new Voice = "melody" \relative { \time 3/4 \set melismaBusyProperties = #'() c'4 d ( e ) g8 [ f ] ~ 4 ~ f } \new Lyrics \lyricsto "melody" { Ky -- ri -- _ e __ _ _ _ } >>
![[image of music]](23/lily-0ea207fa.png)
定義済みコマンド
\autoBeamOff,
\autoBeamOn,
\melisma,
\melismaEnd
参照
音楽用語集: melisma
学習マニュアル: Aligning lyrics to a melody
記譜法リファレンス: 歌詞を旋律に揃える, 歌詞音節の自動演奏時間, 自動連桁の振る舞いを設定する, リズムが異なる歌詞の節
内部リファレンス: Tunable context properties
既知の問題と警告
メリスマの延長線は自動的には作成されません。手動で 2 重アンダースコアを記述する必要があります。
| [ << 専門的な記譜法 ] | [トップ][目次][インデックス][ ? ] | [ 入出力全般 >> ] | ||
| [ < 複数の音符を 1 つの歌詞音節に割り当てる ] | [ 上へ : 声楽で共通の記譜法 ] | [ 歌詞に特有のテクニック > ] | ||
延長線とハイフン
しばしば単語の最後の音節で、その音節から次の音節まで長い水平の線を描いてメリスマを示すことがあります。そのような線のことを延長線と呼び、‘ __ ’ で記述します (2 重アンダースコアの前後にスペースがあることに注意してください)。
Note: 楽譜の中でメリスマは延長線で示され、延長線は 2 重のアンダースコアとして入力します。しかしながら、個々の音符をスキップすることで短いメリスマを作ることも可能です。音符のスキップには単一のアンダースコアを記述します – デフォルトでは、音符のスキップは延長線を作り出しません。
同じ単語の音節間の中央にハイフンを記譜するには、‘ -- ’ を記述します (2 重ハイフンの前後にスペースがあることに注意してください)。ハイフンは音節の間の中央に配置され、長さは音節の間のスペースによって調節されます。
密に譜刻された楽譜では、ハイフンが削除されることもあります。ハイフンが削除されるかどうかを
LyricHyphen のプロパティ
minimum-distance (2 つの音節の間の最小間隔) と
minimum-length (ハイフンを削除するかどうかの閾値) で制御することができます。
参照
内部リファレンス: LyricExtender, LyricHyphen
| [ << 専門的な記譜法 ] | [トップ][目次][インデックス][ ? ] | [ 入出力全般 >> ] | ||
| [ < 延長線とハイフン ] | [ 上へ : 声楽 ] | [ 歌詞と変数に取り組む > ] | ||
2.1.2 歌詞に特有のテクニック
| 歌詞と変数に取り組む | ||
| 歌詞の垂直方向の配置 | ||
| 歌詞の水平方向の配置 | ||
| 歌詞と繰り返し | ||
| 歌詞のディヴィージ |
| [ << 専門的な記譜法 ] | [トップ][目次][インデックス][ ? ] | [ 入出力全般 >> ] | ||
| [ < 歌詞に特有のテクニック ] | [ 上へ : 歌詞に特有のテクニック ] | [ 歌詞の垂直方向の配置 > ] | ||
歌詞と変数に取り組む
歌詞を保持する変数を作成することができます。歌詞は歌詞モードで入力する必要があります:
musicOne = \relative { c''4 b8. a16 g4. f8 e4 d c2 } verseOne = \lyricmode { Joy to the world, the Lord is come. } \score { << \new Voice = "one" { \time 2/4 \musicOne } \new Lyrics \lyricsto "one" { \verseOne } >> }
![[image of music]](e6/lily-6dbd7b65.png)
変数が \addlyrics または \lyricsto で呼び出される場合、歌詞に演奏時間を付ける必要はありません。
順序が異なったり、もっと複雑だったりする場合、最も良い方法は最初に音楽と歌詞を保持する変数を定義して、
譜と歌詞の階層をセットアップして (歌詞自体は省略します) から、\context を用いて歌詞を追加します。この方法は、\lyricsto によって参照されるボイスが常に定義済みであることを保証します。例を挙げます:
sopranoMusic = \relative { c''4 c c c } contraltoMusic = \relative { a'4 a a a } sopranoWords = \lyricmode { Sop -- ra -- no words } contraltoWords = \lyricmode { Con -- tral -- to words } \score { \new ChoirStaff << \new Staff { \new Voice = "sopranos" { \sopranoMusic } } \new Lyrics = "sopranos" \new Lyrics = "contraltos" \new Staff { \new Voice = "contraltos" { \contraltoMusic } } \context Lyrics = "sopranos" { \lyricsto "sopranos" { \sopranoWords } } \context Lyrics = "contraltos" { \lyricsto "contraltos" { \contraltoWords } } >> }
![[image of music]](43/lily-93080766.png)
参照
記譜法リファレンス: 歌詞の垂直方向の配置
内部リファレンス: LyricCombineMusic, Lyrics
| [ << 専門的な記譜法 ] | [トップ][目次][インデックス][ ? ] | [ 入出力全般 >> ] | ||
| [ < 歌詞と変数に取り組む ] | [ 上へ : 歌詞に特有のテクニック ] | [ 歌詞の水平方向の配置 > ] | ||
歌詞の垂直方向の配置
音楽の種類によって、歌詞が譜の上、下、あるいは間に配置されることもあります。歌詞を関連する譜の下に配置することが最も簡単で、Staff コンテキストの下に Lyrics コンテキストを定義するだけで実現できます:
\score { << \new Staff { \new Voice = "melody" { \relative { c''4 c c c } } } \new Lyrics { \lyricsto "melody" { Here are the words } } >> }
![[image of music]](d7/lily-56db3fe2.png)
歌詞を譜の上に配置する方法は 2 つあります。簡単な (そして好まれる) のは、上記と同じ構文を用いて歌詞の配置を明示的に指定する方法です:
\score { << \new Staff = "staff" { \new Voice = "melody" { \relative { c''4 c c c } } } \new Lyrics \with { alignAboveContext = "staff" } { \lyricsto "melody" { Here are the words } } >> }
![[image of music]](9d/lily-8d124b3c.png)
代替手段として、2 ステップのプロセスを用いることもできます。最初に、Staff コンテキストと Voice コンテキストより先に
Lyrics コンテキストを宣言して (内容は記述しません)、それから参照する Voice コンテキストの宣言の後に
\context を用いて \lyricsto コマンドを配置します。以下のようにします:
\score { << \new Lyrics = "lyrics" \with { % 譜の上に配置する歌詞は以下のオーバライドを行う必要があります \override VerticalAxisGroup.staff-affinity = #DOWN } \new Staff { \new Voice = "melody" { \relative { c''4 c c c } } } \context Lyrics = "lyrics" { \lyricsto "melody" { Here are the words } } >> }
![[image of music]](11/lily-37e98f5b.png)
別々の譜に配置される 2 つのボイスがある場合、上記の方法のいずれかを用いて歌詞を譜の間に配置することができます。ここでは、2 番目の方法を用いる例を挙げます:
\score { \new ChoirStaff << \new Staff { \new Voice = "sopranos" { \relative { c''4 c c c } } } \new Lyrics = "sopranos" \new Lyrics = "contraltos" \with { % 譜の上に配置する歌詞は以下のオーバライドを行う必要があります % lyrics above a staff should have this override \override VerticalAxisGroup.staff-affinity = #DOWN } \new Staff { \new Voice = "contraltos" { \relative { a'4 a a a } } } \context Lyrics = "sopranos" { \lyricsto "sopranos" { Sop -- ra -- no words } } \context Lyrics = "contraltos" { \lyricsto "contraltos" { Con -- tral -- to words } } >> }
![[image of music]](57/lily-9527cd32.png)
他の歌詞と譜の組み合わせは、上記の例に磨きをかけるか、学習マニュアルの中にあるテンプレート – Vocal ensembles templates を参照してください – を吟味することによって作り出すことができます。
Selected Snippets
Obtaining 2.12 lyrics spacing in newer versions
The vertical spacing engine changed since version 2.14. This can cause lyrics to be spaced differently.
It is possible to set properties for Lyric and Staff
contexts to get the spacing engine to behave as it did in version 2.12.
global = { \key d \major \time 3/4 } sopMusic = \relative c' { % VERSE ONE fis4 fis fis | \break fis4. e8 e4 } altoMusic = \relative c' { % VERSE ONE d4 d d | d4. b8 b4 | } tenorMusic = \relative c' { a4 a a | b4. g8 g4 | } bassMusic = \relative c { d4 d d | g,4. g8 g4 | } words = \lyricmode { Great is Thy faith -- ful -- ness, } \score { \new ChoirStaff << \new Lyrics = sopranos \new Staff = women << \new Voice = "sopranos" { \voiceOne \global \sopMusic } \new Voice = "altos" { \voiceTwo \global \altoMusic } >> \new Lyrics = "altos" \new Lyrics = "tenors" \new Staff = men << \clef bass \new Voice = "tenors" { \voiceOne \global \tenorMusic } \new Voice = "basses" { \voiceTwo \global \bassMusic } >> \new Lyrics = basses \context Lyrics = sopranos \lyricsto sopranos \words \context Lyrics = altos \lyricsto altos \words \context Lyrics = tenors \lyricsto tenors \words \context Lyrics = basses \lyricsto basses \words >> \layout { \context { \Lyrics \override VerticalAxisGroup.staff-affinity = ##f \override VerticalAxisGroup.staff-staff-spacing = #'((basic-distance . 0) (minimum-distance . 2) (padding . 2)) } \context { \Staff \override VerticalAxisGroup.staff-staff-spacing = #'((basic-distance . 0) (minimum-distance . 2) (padding . 2)) } } }
![[image of music]](38/lily-85d003ac.png)
参照
学習マニュアル: Vocal ensembles templates
記譜法リファレンス: コンテキストの配置順序, コンテキストを作成して参照する
| [ << 専門的な記譜法 ] | [トップ][目次][インデックス][ ? ] | [ 入出力全般 >> ] | ||
| [ < 歌詞の垂直方向の配置 ] | [ 上へ : 歌詞に特有のテクニック ] | [ 歌詞と繰り返し > ] | ||
歌詞の水平方向の配置
歌詞の間隔を広げるには
LyricSpace の minimum-distance プロパティを設定します。
\relative c' { c c c c \override Lyrics.LyricSpace.minimum-distance = #1.0 c c c c } \addlyrics { longtext longtext longtext longtext longtext longtext longtext longtext }
![[image of music]](23/lily-f4f89f26.png)
この変更を楽譜の全ての歌詞に適用するには、\layout ブロックの中でプロパティの設定を行います。
\score { \relative { c' c c c c c c c } \addlyrics { longtext longtext longtext longtext longtext longtext longtext longtext } \layout { \context { \Lyrics \override LyricSpace.minimum-distance = #1.0 } } }
![[image of music]](2a/lily-585ff0c9.png)
Selected Snippets
Lyrics alignment
Horizontal alignment for lyrics can be set by overriding the
self-alignment-X property of the LyricText object.
#-1 is left, #0 is center and #1 is right;
however, you can use #LEFT, #CENTER and #RIGHT as
well.
\layout { ragged-right = ##f } \relative c'' { c1 c1 c1 } \addlyrics { \once \override LyricText.self-alignment-X = #LEFT "This is left-aligned" \once \override LyricText.self-alignment-X = #CENTER "This is centered" \once \override LyricText.self-alignment-X = #1 "This is right-aligned" }
![[image of music]](a0/lily-bb532c47.png)
テキスト スクリプトと歌詞がマージンの中に納まることを確認するチェックはより多くの計算を必要とします。この機能を無効にすることで、処理をわずかにスピードアップすることができます:
\override Score.PaperColumn.keep-inside-line = ##f
歌詞が小節線を避けるようにするには、以下を使います:
\layout {
\context {
\Lyrics
\consists "Bar_engraver"
\consists "Separating_line_group_engraver"
\hide BarLine
}
}
| [ << 専門的な記譜法 ] | [トップ][目次][インデックス][ ? ] | [ 入出力全般 >> ] | ||
| [ < 歌詞の水平方向の配置 ] | [ 上へ : 歌詞に特有のテクニック ] | [ 歌詞のディヴィージ > ] | ||
歌詞と繰り返し
1 回の繰り返し
音楽 の繰り返しは別の場所で説明しています – 繰り返し を参照してください。このセクションでは、歌詞を繰り返しのある音楽に追加する方法について説明します。
繰り返しで歌詞の単語が変わらないのであれば、歌詞を音楽と同じ繰り返し構造にすることで、音楽に歌詞を付けることができます。
\score { << \new Staff { \new Voice = "melody" { \relative { a'4 a a a \repeat volta 2 { b4 b b b } } } } \new Lyrics { \lyricsto "melody" { Not re -- peat -- ed. \repeat volta 2 { Re -- peat -- ed twice. } } } >> }
![[image of music]](ac/lily-a2186138.png)
繰り返しが展開された場合、歌詞も展開されます。
\score { \unfoldRepeats { << \new Staff { \new Voice = "melody" { \relative { a'4 a a a \repeat volta 2 { b4 b b b } } } } \new Lyrics { \lyricsto "melody" { Not re -- peat -- ed. \repeat volta 2 { Re -- peat -- ed twice. } } } >> } }
![[image of music]](cb/lily-2e206e8b.png)
繰り返しが展開されて、異なる歌詞を持つ場合、単に歌詞の全ての単語を記述します:
\score { << \new Staff { \new Voice = "melody" { \relative { a'4 a a a \repeat unfold 2 { b4 b b b } } } } \new Lyrics { \lyricsto "melody" { Not re -- peat -- ed. The first time words. Sec -- ond time words. } } >> }
![[image of music]](0f/lily-69d71760.png)
繰り返しの歌詞が異なる場合、並列に正しくネストされた別々の Lyrics コンテキストに各繰り返しの歌詞を入力する必要があります:
\score { << \new Staff { \new Voice = "melody" { \relative { a'4 a a a \repeat volta 2 { b4 b b b } } } } \new Lyrics \lyricsto "melody" { Not re -- peat -- ed. << { The first time words. } \new Lyrics { \set associatedVoice = "melody" Sec -- ond time words. } >> } >> }
![[image of music]](96/lily-86b16738.png)
同様の方法でさらに歌詞の行を追加することができます:
\score { << \new Staff { \new Voice = "singleVoice" { \relative { a'4 a a a \repeat volta 3 { b4 b b b } c4 c c c } } } \new Lyrics \lyricsto "singleVoice" { Not re -- peat -- ed. << { The first time words. } \new Lyrics { \set associatedVoice = "singleVoice" Sec -- ond time words. } \new Lyrics { \set associatedVoice = "singleVoice" The third time words. } >> The end sec -- tion. } >> }
![[image of music]](39/lily-fd652fdf.png)
しかしながら、この構造が ChoirStaff のような複数の譜を持つコンテキストに埋め込まれた場合、歌詞の 2 番と 3 番は譜の下に表示されます。
歌詞を正しく配置するには alignBelowContext を用います:
\score { << \new Staff { \new Voice = "melody" { \relative { a'4 a a a \repeat volta 3 { b4 b b b } c4 c c c } } } \new Lyrics = "firstVerse" \lyricsto "melody" { Not re -- peat -- ed. << { The first time words. } \new Lyrics = "secondVerse" \with { alignBelowContext = #"firstVerse" } { \set associatedVoice = "melody" Sec -- ond time words. } \new Lyrics = "thirdVerse" \with { alignBelowContext = #"secondVerse" } { \set associatedVoice = "melody" The third time words. } >> The end sec -- tion. } \new Voice = "harmony" { \relative { f'4 f f f \repeat volta 2 { g8 g g4 g2 } a4 a8. a16 a2 } } >> }
![[image of music]](b8/lily-3dbcb3a6.png)
差し替えのある繰り返し
繰り返し部分の歌詞が同じであれば、歌詞と音楽で同じ構造を使うことができます。
\score { << \new Staff { \time 2/4 \new Voice = "melody" { \relative { a'4 a a a \repeat volta 2 { b4 b } \alternative { { b b } { b c } } } } } \new Lyrics { \lyricsto "melody" { Not re -- peat -- ed. \repeat volta 2 { Re -- peat -- } \alternative { { ed twice. } { ed twice. } } } } >> }
![[image of music]](f1/lily-a61cc514.png)
しかしながら、繰り返し部分の歌詞が異なる場合、歌詞に繰り返し構造を用いることはできず、歌詞を適用しない差し替え部分の音符をスキップするために手動で \skip コマンドを挿入する必要があります。
注意: 音符のスキップにアンダースコア _ を使わないでください
– アンダースコアはメリスマを意味するため、前の音節が左揃えされてしまいます。
Note: \skip コマンドの後に数字を記述する必要があります。しかしながら、歌詞は addlyrics や lyricsto で関連付けた旋律の音符から演奏時間を引き出すため、この数字は無視されます。各 \skip は後に続く数字の値に関係なく、任意の音価の音符を 1 つスキップします。
\score { << \new Staff { \time 2/4 \new Voice = "melody" { \relative { \repeat volta 2 { b'4 b } \alternative { { b b } { b c } } c4 c } } } \new Lyrics { \lyricsto "melody" { The first time words. \repeat unfold 2 { \skip 1 } End here. } } \new Lyrics { \lyricsto "melody" { Sec -- ond \repeat unfold 2 { \skip 1 } time words. } } >> }
![[image of music]](be/lily-8f8bc847.png)
タイが途中で複数の差し替えに分かれる場合、最初の差し替えの音符がタイで結ばれ、2 番目以降の差し替えには \repeatTie が使用されます。この構造に歌詞が含まれることにより差し替え部分が長くなると、歌詞を音符に揃えることが困難となり、差し替え部分に含まれるタイの音符が受け入れがたい結果を発生させるかもしれません。
タイは最初の差し替えまで続くメリスマを作り出しますが、2 番目以降の差し替えには作りません。このため、歌詞を正しく揃えるには、差し替え部分でメリスマの自動作成を無効にして、手動でスキップを挿入する必要があります。
\score { << \new Staff { \time 2/4 \new Voice = "melody" { \relative { \set melismaBusyProperties = #'() \repeat volta 2 { b'4 b ~} \alternative { { b b } { b \repeatTie c } } \unset melismaBusyProperties c4 c } } } \new Lyrics { \lyricsto "melody" { \repeat volta 2 { Here's a __ } \alternative { { \skip 1 verse } { \skip 1 sec } } ond one. } } >> }
![[image of music]](00/lily-02e0a159.png)
\repeatTie を含むセクションの周辺で
\unfoldRepeats が使われると、両方のタイプのタイが譜刻されるの避けるために
\repeatTie は削除されます。
繰り返される部分の歌詞が異なる場合、その歌詞の周囲で \repeat を使うことはできず、前述のように手動で \skip コマンドを挿入する必要があります。
\score { << \new Staff { \time 2/4 \new Voice = "melody" { \relative { \repeat volta 2 { b'4 b ~} \alternative { { b b } { b \repeatTie c } } c4 c } } } \new Lyrics { \lyricsto "melody" { Here's a __ verse. \repeat unfold 2 { \skip 1 } } } \new Lyrics { \lyricsto "melody" { Here's one \repeat unfold 2 { \skip 1 } more to sing. } } >> }
![[image of music]](ca/lily-54004108.png)
繰り返し部分から差し替え部分に延長線やハイフンを描きたいのであれば、それらを手動で挿入する必要があります。差し替え部分から次の部分に延長線やハイフンを描く場合も同様です。
\score { << \new Staff { \time 2/4 \new Voice = "melody" { \relative { \repeat volta 2 { b'4 b ~} \alternative { { b b } { b \repeatTie c } } c4 c } } } \new Lyrics { \lyricsto "melody" { Here's a __ verse. \repeat unfold 2 { \skip 1 } } } \new Lyrics { \lyricsto "melody" { Here's "a_" \skip 1 "_" sec -- ond one. } } >> }
![[image of music]](d3/lily-ed387037.png)
参照
記譜法リファレンス: コンテキストを残しておく, 繰り返し
| [ << 専門的な記譜法 ] | [トップ][目次][インデックス][ ? ] | [ 入出力全般 >> ] | ||
| [ < 歌詞と繰り返し ] | [ 上へ : 歌詞に特有のテクニック ] | [ 歌詞の節 > ] | ||
歌詞のディヴィージ
ピッチが同じで歌詞とリズムが異なる 2 つのパートがある場合、一時的にメリスマの自動検出を off にして、歌詞の中でのメリスマ指示する手法を用いると適切な場合があります:
\score { << \new Voice = "melody" { \relative c' { \set melismaBusyProperties = #'() \slurDown \slurDashed e4 e8 ( e ) c4 c | \unset melismaBusyProperties c } } \new Lyrics \lyricsto "melody" { They shall not o -- ver -- come } \new Lyrics \lyricsto "melody" { We will _ } >> }
![[image of music]](f0/lily-02a3ee91.png)
2 つのパートの音楽と歌詞の両方が異なる場合、2 つの名前付きボイス コンテキストを作成して、それぞれに歌詞を付属させることで、異なる音楽と歌詞として表示させた方が良いかもしれません:
\score { << \new Voice = "melody" { \relative { << { \voiceOne e'4 e8 e } \new Voice = "splitpart" { \voiceTwo c4 c } >> \oneVoice c4 c | c } } \new Lyrics \lyricsto "melody" { They shall not o -- ver -- come } \new Lyrics \lyricsto "splitpart" { We will } >> }
![[image of music]](2d/lily-cd61428a.png)
| [ << 専門的な記譜法 ] | [トップ][目次][インデックス][ ? ] | [ 入出力全般 >> ] | ||
| [ < 歌詞のディヴィージ ] | [ 上へ : 声楽 ] | [ 歌詞の節番号を追加する > ] | ||
2.1.3 歌詞の節
| 歌詞の節番号を追加する | ||
| 歌詞の節に強弱記号を追加する | ||
| 歌詞の節に歌手の名前を追加する | ||
| リズムが異なる歌詞の節 | ||
| 歌詞の節を楽譜の終わりに譜刻する | ||
| 歌詞の節を楽譜の終わりに複数の列で譜刻する |
| [ << 専門的な記譜法 ] | [トップ][目次][インデックス][ ? ] | [ 入出力全般 >> ] | ||
| [ < 歌詞の節 ] | [ 上へ : 歌詞の節 ] | [ 歌詞の節に強弱記号を追加する > ] | ||
歌詞の節番号を追加する
stanza を設定することにより、歌詞の節番号を追加することができます。例を挙げます:
\new Voice \relative { \time 3/4 g'2 e4 a2 f4 g2. } \addlyrics { \set stanza = #"1. " Hi, my name is Bert. } \addlyrics { \set stanza = #"2. " Oh, ché -- ri, je t'aime }
![[image of music]](79/lily-e935e471.png)
これらの番号は歌詞の前に配置されます。
| [ << 専門的な記譜法 ] | [トップ][目次][インデックス][ ? ] | [ 入出力全般 >> ] | ||
| [ < 歌詞の節番号を追加する ] | [ 上へ : 歌詞の節 ] | [ 歌詞の節に歌手の名前を追加する > ] | ||
歌詞の節に強弱記号を追加する
歌詞の前に強弱記号を配置することによって、歌詞の音の大きさの違いを示すことができます。LilyPond では、歌詞の前に配置されるものはすべて StanzaNumber オブジェクトに格納します – 強弱記号も同じです。技術的な理由により、歌詞の設定を \lyricmode の外で行う必要があります:
text = { \set stanza = \markup { \dynamic "ff" "1. " } \lyricmode { Big bang } } << \new Voice = "tune" { \time 3/4 g'4 c'2 } \new Lyrics \lyricsto "tune" \text >>
![[image of music]](d8/lily-5eaa847d.png)
| [ << 専門的な記譜法 ] | [トップ][目次][インデックス][ ? ] | [ 入出力全般 >> ] | ||
| [ < 歌詞の節に強弱記号を追加する ] | [ 上へ : 歌詞の節 ] | [ リズムが異なる歌詞の節 > ] | ||
歌詞の節に歌手の名前を追加する
歌手の名前を追加することもできます。歌手の名前は、楽器名と同様に、行の先頭に譜刻されます。vocalName を設定することにより、歌手名を作成します。shortVocalName として短縮名を入力することができます。
\new Voice \relative { \time 3/4 g'2 e4 a2 f4 g2. } \addlyrics { \set vocalName = #"Bert " Hi, my name is Bert. } \addlyrics { \set vocalName = #"Ernie " Oh, ché -- ri, je t'aime }
![[image of music]](7e/lily-7d72de3c.png)
| [ << 専門的な記譜法 ] | [トップ][目次][インデックス][ ? ] | [ 入出力全般 >> ] | ||
| [ < 歌詞の節に歌手の名前を追加する ] | [ 上へ : 歌詞の節 ] | [ 歌詞の節を楽譜の終わりに譜刻する > ] | ||
リズムが異なる歌詞の節
しばしば、1 つの歌で歌詞の節によって歌詞を旋律に配置する仕方が若干異なる場合があります。そのような変化も \lyricsto で対応することができます。
メリスマを無視する
歌詞のある節ではメリスマになっているものが、他の節では複数の音節に分かれている場合があります。これを実現するには、複数音節に分かれるボイスはメリスマを無視するようにします。これは Lyrics コンテキストの中で ignoreMelismata を設定します。
<< \relative \new Voice = "lahlah" { \set Staff.autoBeaming = ##f c'4 \slurDotted f8.[( g16]) a4 } \new Lyrics \lyricsto "lahlah" { more slow -- ly } \new Lyrics \lyricsto "lahlah" { go \set ignoreMelismata = ##t fas -- ter \unset ignoreMelismata still } >>
![[image of music]](0c/lily-f561e5c3.png)
既知の問題と警告
たいていの \set コマンドとは異なり、\set ignoreMelismata は前に \once があると機能しません。メリスマを無視させる歌詞の範囲を
\set と \unset で囲む必要があります。
装飾小音符に音節を割り当てる
デフォルトでは、\lyricsto を用いても装飾小音符 (つまり、\grace)
には音節は割り当てられません。しかしながら、この振る舞いを変更することができます:
<< \new Voice = melody \relative { f'4 \appoggiatura a32 b4 \grace { f16 a16 } b2 \afterGrace b2 { f16[ a16] } \appoggiatura a32 b4 \acciaccatura a8 b4 } \new Lyrics \lyricsto melody { normal \set includeGraceNotes = ##t case, gra -- ce case, after -- grace case, \set ignoreMelismata = ##t app. case, acc. case. } >>
![[image of music]](30/lily-1f91d39c.png)
既知の問題と警告
associatedVoice と同様に、includeGraceNotes は少なくとも装飾小音符に割り当てる音節よりも前に設定する必要があります。装飾小音符が音楽の始めにある場合は、\with または \context ブロックを使うことを検討してください:
<< \new Voice = melody \relative c' { \grace { c16( d e f } g1) f } \new Lyrics \with { includeGraceNotes = ##t } \lyricsto melody { Ah __ fa } >>
![[image of music]](10/lily-e100b95c.png)
代替の旋律に切り替える
音楽への歌詞の割り当て方をもっと複雑に変化させることができます。associatedVoice プロパティを設定することで、歌詞の中で歌詞を割り当てる旋律を変更することができます:
<< \relative \new Voice = "lahlah" { \set Staff.autoBeaming = ##f c'4 << \new Voice = "alternative" { \voiceOne \tuplet 3/2 { % show associations clearly. \override NoteColumn.force-hshift = #-3 f8 f g } } { \voiceTwo f8.[ g16] \oneVoice } >> a8( b) c } \new Lyrics \lyricsto "lahlah" { Ju -- ras -- sic Park } \new Lyrics \lyricsto "lahlah" { % トリック: associatedVoice を 1 音節早く設定する必要があります! \set associatedVoice = "alternative" % "ran" に適用されます Ty -- ran -- no -- \set associatedVoice = "lahlah" % "rus" に適用されます sau -- rus Rex } >>
![[image of music]](3b/lily-c1f52cd1.png)
歌詞の 1 番のテキストは通常の方法で旋律 ‘lahlah’ に割り当てられます。しかしながら、歌詞の 2 番は最初は lahlah コンテキストに割り当てられていますが、音節 ‘ran’ から ‘sau’ までの割り当てが旋律 alternative に切り替わります:
\set associatedVoice = "alternative" % "ran" に適用されます Ty -- ran -- no -- \set associatedVoice = "lahlah" % "rus" に適用されます sau -- rus Rex
ここで、alternative は 3 連符を保持している Voice コンテキストの名前です。
\set associatedVoice コマンドの配置に注意してください
– 1 音節早く出現していますが、これで正しく機能します。
Note: set associatedVoice コマンドは、割り当てが新しいボイスに切り替わる音節の前に配置する必要があります。言い換えると、ボイスの変更は予想よりも 1 音節遅く発生します。これは技術的な理由によるものであり、バグではありません。
| [ << 専門的な記譜法 ] | [トップ][目次][インデックス][ ? ] | [ 入出力全般 >> ] | ||
| [ < リズムが異なる歌詞の節 ] | [ 上へ : 歌詞の節 ] | [ 歌詞の節を楽譜の終わりに複数の列で譜刻する > ] | ||
歌詞の節を楽譜の終わりに譜刻する
しばしば、歌詞の 1 番を音楽にセットして、残りを詩の形式で楽譜の終わりに追加する方が適切な場合があります。これは、2 番以降を score ブロックの外の \markup セクションに追加することで実現できます。\markup で 2 つの方法で改行していることに注意してください。
melody = \relative { e' d c d | e e e e | d d e d | c1 | } text = \lyricmode { \set stanza = #"1." Ma- ry had a lit- tle lamb, its fleece was white as snow. } \score{ << \new Voice = "one" { \melody } \new Lyrics \lyricsto "one" \text >> \layout { } } \markup { \column{ \line{ Verse 2. } \line{ All the children laughed and played } \line{ To see a lamb at school. } } } \markup{ \wordwrap-string #" Verse 3. Mary took it home again, It was against the rule." }
![[image of music]](da/lily-10b44002.png)
| [ << 専門的な記譜法 ] | [トップ][目次][インデックス][ ? ] | [ 入出力全般 >> ] | ||
| [ < 歌詞の節を楽譜の終わりに譜刻する ] | [ 上へ : 歌詞の節 ] | [ 歌曲 > ] | ||
歌詞の節を楽譜の終わりに複数の列で譜刻する
歌詞の節が多い場合、ページを複数の列に分けて歌詞を譜刻することがあります。しばしば、歌詞番号を列の外側に置くこともあります。以下の例は、LilyPond でそのような出力を作り出す方法を示しています。
melody = \relative { c'4 c c c | d d d d } text = \lyricmode { \set stanza = #"1." This is verse one. It has two lines. } \score { << \new Voice = "one" { \melody } \new Lyrics \lyricsto "one" \text >> \layout { } } \markup { \fill-line { \hspace #0.1 % この列を左マージンから離します % ページが過密な場合はこの設定を削除します \column { \line { \bold "2." \column { "This is verse two." "It has two lines." } } \combine \null \vspace #0.1 % 次の歌詞との間に垂直方向のスペースを入れます \line { \bold "3." \column { "This is verse three." "It has two lines." } } } \hspace #0.1 % 列の間に水平方向のスペースを入れます \column { \line { \bold "4." \column { "This is verse four." "It has two lines." } } \combine \null \vspace #0.1 % 次の歌詞との間に垂直方向のスペースを入れます \line { \bold "5." \column { "This is verse five." "It has two lines." } } } \hspace #0.1 % 右マージンに追加のスペースを加えます % ページが過密な場合はこの設定を削除します } }
![[image of music]](80/lily-3d674758.png)
参照
内部リファレンス: LyricText, StanzaNumber
| [ << 専門的な記譜法 ] | [トップ][目次][インデックス][ ? ] | [ 入出力全般 >> ] | ||
| [ < 歌詞の節を楽譜の終わりに複数の列で譜刻する ] | [ 上へ : 声楽 ] | [ 歌曲のためのリファレンス > ] | ||
2.1.4 歌曲
| 歌曲のためのリファレンス | ||
| リード譜 |
| [ << 専門的な記譜法 ] | [トップ][目次][インデックス][ ? ] | [ 入出力全般 >> ] | ||
| [ < 歌曲 ] | [ 上へ : 歌曲 ] | [ リード譜 > ] | ||
歌曲のためのリファレンス
通常、歌曲は 3 つの譜に記譜され、上の譜を歌の旋律、下の 2 つの譜をピアノ伴奏とします。歌詞の 1 番は旋律の譜の直下に譜刻されます。歌詞の節が少しであれば 2 番以降を 1 番の下に譜刻することができます。しかしながら、歌詞の節が多くて収容し難い場合は、2 番以降の歌詞を楽譜の後に独立したテキストとして譜刻します。
歌曲を記述するのに必要とされる記譜要素はすべて別の場所で説明しています:
- 譜レイアウトを構築する際は、譜を表示する を参照してください。
- ピアノ譜を記述する際は、キーボードと他の複数譜の楽器 を参照してください。
- 旋律に沿って歌詞を記述する際は、声楽で共通の記譜法 を参照してください。
- 歌詞を配置する際は、歌詞の垂直方向の配置 を参照してください。
- 歌詞の節を入力する際は、歌詞の節 を参照してください。
- しばしば、歌曲は譜の上にコード ネームを付けて譜刻されます。これは、和音を表示する で説明しています。
- ギター伴奏や他のフレット楽器による伴奏の和音のフレット ダイアグラムを譜刻する際は、フレットのある弦楽器で共通の記譜法 の “フレット ダイアグラム マークアップ” を参照してください。
参照
学習マニュアル: Songs
記譜法リファレンス: 声楽で共通の記譜法, 和音を表示する, 譜を表示する, キーボードと他の複数譜の楽器, 歌詞の垂直方向の配置, 歌詞の節
コード断片集: Vocal music
| [ << 専門的な記譜法 ] | [トップ][目次][インデックス][ ? ] | [ 入出力全般 >> ] | ||
| [ < 歌曲のためのリファレンス ] | [ 上へ : 歌曲 ] | [ 合唱 > ] | ||
リード譜
ボーカル パートと ‘和音モード’ を組み合わせることによって、リード譜を譜刻することができます。和音モードの構文についての説明は 和音記譜法 にあります。
Selected Snippets
Simple lead sheet
When put together, chord names, a melody, and lyrics form a lead sheet:
<< \chords { c2 g:sus4 f e } \relative c'' { a4 e c8 e r4 b2 c4( d) } \addlyrics { One day this shall be free __ } >>
![[image of music]](ff/lily-fbf4180f.png)
参照
記譜法リファレンス: 和音記譜法
| [ << 専門的な記譜法 ] | [トップ][目次][インデックス][ ? ] | [ 入出力全般 >> ] | ||
| [ < リード譜 ] | [ 上へ : 声楽 ] | [ 合唱のためのリファレンス > ] | ||
2.1.5 合唱
このセクションでは、合唱との関連が最も強い記譜法について説明します。合唱には、賛美歌、パート ソング、聖譚曲等が含まれます。
| 合唱のためのリファレンス | ||
| 合唱のための楽譜レイアウト | ||
| ボイスの分割 |
| [ << 専門的な記譜法 ] | [トップ][目次][インデックス][ ? ] | [ 入出力全般 >> ] | ||
| [ < 合唱 ] | [ 上へ : 合唱 ] | [ 合唱のための楽譜レイアウト > ] | ||
合唱のためのリファレンス
通常、合唱は ChoirStaff グループ内の 2, 3,
あるいは 4 つの譜に記譜します。伴奏が必要であれば、合唱譜の下に PianoStaff グループを配置します。アカペラ であれば、普通は伴奏譜のサイズを小さくします。各ボーカル パートの音符は Voice コンテキストの中に配置し、各譜は単一のボーカル パート (つまり、1 つの Voice)
あるいはボーカル パートのペア (つまり、2 つの Voice)
を受け持ちます。
歌詞は Lyrics コンテキストの中に配置します。各歌詞は対応するの譜の下に配置するか、
あるいは譜が 2 パートを保持している場合は 1 つを譜の上、
合唱に共通するいくつかのトピックスは別の場所で説明しています:
- SATB (S: ソプラノ、A: アルト、T: テナー、B: バス) ボーカル譜の導入部は学習マニュアルにあります。 Four-part SATB vocal score を参照してください。
- 学習マニュアルには、様々なスタイルの合唱に適したいくつかのテンプレートもあります。 Vocal ensembles templates を参照してください。
-
ChoirStaffとPianoStaffについての情報は、譜をグループ化する を参照してください。 - セイクリッド ハープや動揺の記譜法で用いられるシェイプ符頭について、シェイプ符頭 で説明しています。
-
2 つのボーカル パートが 1 つの譜を共有する場合、上のパートの符幹、タイ、スラー等は上向きになり、下のパートは下向きになります。これを実現するには、
\voiceOneと\voiceTwoを用います。単一譜の多声 を参照してください。
定義済みコマンド
\oneVoice,
\voiceOne,
\voiceTwo
参照
学習マニュアル: Four-part SATB vocal score, Vocal ensembles templates
記譜法リファレンス: コンテキストの配置順序, 譜をグループ化する, シェイプ符頭, 単一譜の多声
コード断片集: Vocal music
内部リファレンス: ChoirStaff, Lyrics, PianoStaff
| [ << 専門的な記譜法 ] | [トップ][目次][インデックス][ ? ] | [ 入出力全般 >> ] | ||
| [ < 合唱のためのリファレンス ] | [ 上へ : 合唱 ] | [ ボイスの分割 > ] | ||
合唱のための楽譜レイアウト
通常、4 つの譜を保持している合唱のシステムは、ピアノ伴奏があっても無くても、ページ毎に 2 つ配置されます。ページのサイズによっては、これを実現するためにいくつかのデフォルト設定を変更する必要があるかもしれません。以下の設定を考慮する必要があります:
- グローバル譜サイズを変更することで、楽譜の要素全体のサイズを変更することができます。譜サイズを設定する を参照してください。
- システム、譜、それに歌詞の間隔はすべて独立して調節することができます。垂直方向のスペース を参照してください。
- 垂直方向のレイアウト変数の値を表示することで、垂直方向のスペースを調節する手助けとすることができます。少ないページに音楽を収めるための方法として、レイアウト変数の表示と他の事柄を 音楽を少ないページに収める で説明しています。
- ページ毎のシステム数を 1 から 2 に変更した場合、そのことを示すために慣例として 2 つのシステムの間にシステム セパレータを配置します。Separating systems を参照してください。
- 他のページ フォーマット プロパティについての詳細は ページ レイアウト を参照してください。
強弱記号はデフォルトでは譜の下に配置されます。しかしながら、合唱では歌詞を避けるために、普通は強弱記号を譜の上に配置します。あらかじめ定義されているコマンド \dynamicUp は
1 つの Voice コンテキストの強弱記号の配置を譜の上にします。Voice コンテキストが複数ある場合、このコマンドを各コンテキスト内に配置する必要があります。代替手段として、強弱記号のプロパティを変更することで、
楽譜全体ですべての強弱記号を対応する譜の上に配置させることができます。以下に方法を示します:
\score { \new ChoirStaff << \new Staff { \new Voice { \relative { g'4\f g g g } } } \new Staff { \new Voice { \relative { d'4 d d\p d } } } >> \layout { \context { \Score \override DynamicText.direction = #UP \override DynamicLineSpanner.direction = #UP } } }
![[image of music]](01/lily-b986c8e7.png)
定義済みコマンド
\dynamicUp, \dynamicDown, \dynamicNeutral
参照
記譜法リファレンス: スペースを変更する, スペースを表示する, 音楽を少ないページに収める, ページ レイアウト, 楽譜レイアウト, Separating systems, 譜サイズを設定する, 改行/改ページのために追加のボイスを使用する, 垂直方向のスペース
内部リファレンス: VerticalAxisGroup, StaffGrouper
| [ << 専門的な記譜法 ] | [トップ][目次][インデックス][ ? ] | [ 入出力全般 >> ] | ||
| [ < 合唱のための楽譜レイアウト ] | [ 上へ : 合唱 ] | [ オペラと舞台ミュージカル > ] | ||
ボイスの分割
Using arpeggioBracket to make divisi more visible
The arpeggioBracket can be used to indicate the division of
voices where there are no stems to provide the information. This is
often seen in choral music.
\include "english.ly" \score { \relative c'' { \key a \major \time 2/2 << \new Voice = "upper" << { \voiceOne \arpeggioBracket a2( b2 <b d>1\arpeggio) <cs e>\arpeggio ~ <cs e>4 } \addlyrics { \lyricmode { A -- men. } } >> \new Voice = "lower" { \voiceTwo a1 ~ a a ~ a4 \bar "|." } >> } \layout { ragged-right = ##t } }
![[image of music]](b0/lily-7b06da1d.png)
参照
記譜法リファレンス: 直線の発想記号
| [ << 専門的な記譜法 ] | [トップ][目次][インデックス][ ? ] | [ 入出力全般 >> ] | ||
| [ < ボイスの分割 ] | [ 上へ : 声楽 ] | [ オペラや舞台ミュージカルのためのリファレンス > ] | ||
2.1.6 オペラと舞台ミュージカル
通常、オペラや舞台ミュージカルの音楽、歌詞、それに会話は、以下の形式の 1 つまたは複数により構築されます:
- A 指揮譜 はフル オーケストラとボーカル パート、台詞がある場合は台詞の合図を保持します。
- オーケストラ パート はオーケストラやバンドの個々の楽器の音楽を保持します。
- ボーカル譜 は全てのボーカル パートとピアノ伴奏を保持します。通常、伴奏はオーケストラの縮小版であり、しばしばオーケストラのオリジナルの楽器名が示されます。ボーカル譜に舞台指示や台詞の合図が含まれることもあります。
- ボーカル ブック はボーカル パートだけを保持します (伴奏はありません)。台詞の合図が含まれることもあります。
- 台詞 はミュージカルの台詞と歌詞を保持します。普通は、舞台指示が含まれます。LilyPond で台詞を譜刻することはできますが、台詞には音楽が無いため、他の手段を用いる方が好ましいかもしれません。
オペラや舞台ミュージカルに共通するスタイルの楽譜を作り出すのに必要なトピックスをカバーしているLilyPond ドキュメントのセクションを以下のリファレンスで示します。その後のセクションでオペラや舞台ミュージカルの譜刻に特有のテクニックをカバーします。
| オペラや舞台ミュージカルのためのリファレンス | ||
| 役名 | ||
| 合図 | ||
| Spoken music | ||
| 音楽の中での会話 |
| [ << 専門的な記譜法 ] | [トップ][目次][インデックス][ ? ] | [ 入出力全般 >> ] | ||
| [ < オペラと舞台ミュージカル ] | [ 上へ : オペラと舞台ミュージカル ] | [ 役名 > ] | ||
オペラや舞台ミュージカルのためのリファレンス
- 指揮譜は多くのグループ化された譜と歌詞を保持します。譜をグループ化する方法は 譜をグループ化する で説明しています。譜のグループをネストする方法は ネストされた譜グループ を参照してください。
- 指揮譜とボーカル譜では、空の譜の譜刻を抑制することがあります。そのような “Frenched score” を作成する方法は 譜を隠す を参照してください。
- オーケストラ パートを記述する方法は パートを記述する でカバーしています。オーケストラの楽器編成によっては、専門的な記譜法の他のセクションも関係するかもしれません。多くの楽器は移調楽器です – 楽器の移調 を参照してください。
- ページのシステム数をページ毎に変える場合、慣習的にシステムの間にシステム分離記号を配置します。Separating systems を参照してください。
- 他のページ フォーマット プロパティの詳細は ページ レイアウト を参照してください。
-
台詞の合図、舞台指示、それに脚注を挿入することができます
– 脚注を作成する と テキスト を参照してください。2 つの
\scoreの間に独立したセクションとして詳細な舞台指示を追加することもできます – 独立したテキスト を参照してください。
参照
音楽用語集: Frenched score, Frenched staves, transposing instrument
記譜法リファレンス: 脚注を作成する, 譜をグループ化する, 譜を隠す, 楽器の移調, ネストされた譜グループ, ページ レイアウト, Separating systems, 移調, パートを記述する, テキストを記述する
コード断片集: Vocal music
| [ << 専門的な記譜法 ] | [トップ][目次][インデックス][ ? ] | [ 入出力全般 >> ] | ||
| [ < オペラや舞台ミュージカルのためのリファレンス ] | [ 上へ : オペラと舞台ミュージカル ] | [ 合図 > ] | ||
役名
通常、1 つの役に割り当てられている譜には左側に役名を示します:
\score { << \new Staff { \set Staff.vocalName = \markup \smallCaps Kaspar \set Staff.shortVocalName = \markup \smallCaps Kas. \relative { \clef "G_8" c'4 c c c \break c4 c c c } } \new Staff { \set Staff.vocalName = \markup \smallCaps Melchior \set Staff.shortVocalName = \markup \smallCaps Mel \clef "bass" \relative { a4 a a a a4 a a a } } >> }
![[image of music]](6d/lily-1eacdcfb.png)
複数の役が 1 つの譜を共有する場合、それぞれの役に適用されるセクションの開始時に、その役名を譜の上に譜刻します。 これは、マークアップで実現できます。しばしば、この目的のために専用のフォントを用います。
\relative c' { \clef "G_8" c4^\markup \fontsize #1 \smallCaps Kaspar c c c \clef "bass" a4^\markup \fontsize #1 \smallCaps Melchior a a a \clef "G_8" c4^\markup \fontsize #1 \smallCaps Kaspar c c c }
![[image of music]](a9/lily-29402bab.png)
役の入れ替えが頻繁にある場合、最上位階層でそれぞれの役に対して “楽器” 定義をセットアップして、役の入れ替えを \instrumentSwitch を用いて示す方が簡単かもしれません。
\addInstrumentDefinition #"kaspar" #`((instrumentTransposition . ,(ly:make-pitch -1 0 0)) (shortInstrumentName . "Kas.") (clefGlyph . "clefs.G") (clefTransposition . -7) (middleCPosition . 1) (clefPosition . -2) (instrumentCueName . ,(markup #:fontsize 1 #:smallCaps "Kaspar")) (midiInstrument . "voice oohs")) \addInstrumentDefinition #"melchior" #`((instrumentTransposition . ,(ly:make-pitch 0 0 0)) (shortInstrumentName . "Mel.") (clefGlyph . "clefs.F") (clefTransposition . 0) (middleCPosition . 6) (clefPosition . 2) (instrumentCueName . ,(markup #:fontsize 1 #:smallCaps "Melchior")) (midiInstrument . "choir aahs")) \relative c' { \instrumentSwitch "kaspar" c4 c c c \instrumentSwitch "melchior" a4 a a a \instrumentSwitch "kaspar" c4 c c c }
![[image of music]](80/lily-02d07bef.png)
参照
記譜法リファレンス: 楽器名, Scheme functions, テキスト, Text markup commands
LilyPond の拡張: Markup construction in Scheme
| [ << 専門的な記譜法 ] | [トップ][目次][インデックス][ ? ] | [ 入出力全般 >> ] | ||
| [ < 役名 ] | [ 上へ : オペラと舞台ミュージカル ] | [ Spoken music > ] | ||
合図
入りの直前にある他のパートの音楽を示すため、合図をボーカル譜、ボーカル ブック、それにオーケストラ パートに挿入することができます。さらに、合図はボーカル譜のピアノ伴奏にもしばしば挿入され、どのオーケストラ楽器が演奏されるのかを示します。これはフルの指揮譜を使用できない場合に、指揮者の助けとなります。
合図を挿入する基本的な仕組みはメインのテキストで完全に説明しています – 他のボイスを引用する と テキストをフォーマットする を参照してください。しかしながら、多くの合図を挿入する必要がある場合 – 例えば、ボーカル譜のピアノ伴奏に楽器名を入れる場合、楽器名を合図音符の直前に注意深く配置する必要があります。以下の例は、これを実現する方法を示しています。
flute = \relative { s4 s4 e'' g } \addQuote "flute" { \flute } pianoRH = \relative { c''4. g8 % 合図音符の楽器名を、合図音符の直前、かつ譜の上に配置します \new CueVoice { \override InstrumentSwitch.self-alignment-X = #RIGHT \set instrumentCueName = "Flute" } \cueDuring "flute" #UP { g4 bes4 } } pianoLH = \relative { c4 <c' e> e, <g c> } \score { \new PianoStaff << \new Staff { \pianoRH } \new Staff { \clef "bass" \pianoLH } >> }
![[image of music]](bb/lily-98f0549d.png)
移調楽器が引用される場合、その楽器の合図音符が自動的に変換されるよう、楽器パートでキーを指定しておく必要があります。以下の例は B-フラットのクラリネットの移調を示しています。この例では合図音符は譜の下方に配置されるため、\cueDuring の中で DOWN を指定し
(これにより、符幹が下向きになります)、楽器名を譜の下に配置しています。ピアノの右手のボイスを明示的に宣言していることにも注意してください。これは、この例の合図音符は最初の小節の先頭から始まるため、明示的に宣言しないとピアノの右手のボイス全体が
CueVoice コンテキストの中に配置されてしまうからです。
clarinet = \relative c' { \transposition bes fis4 d d c } \addQuote "clarinet" { \clarinet } pianoRH = \relative c'' { \transposition c' % 合図音符の楽器名を譜の下に配置します \new CueVoice { \override InstrumentSwitch.self-alignment-X = #RIGHT \override InstrumentSwitch.direction = #DOWN \set instrumentCueName = "Clar." } \cueDuring "clarinet" #DOWN { c4. g8 } g4 bes4 } pianoLH = \relative { c4 <c' e> e, <g c> } \score { << \new PianoStaff << \new Staff { \new Voice { \pianoRH } } \new Staff { \clef "bass" \pianoLH } >> >> }
![[image of music]](4f/lily-03b6d52c.png)
上記の 2 例から、ボーカル譜に多くの合図を挿入することは退屈な作業で、入力ファイルでピアノ パートの音符が不明瞭になることは明白です。しかしながら、以下のコード断片で示すように、タイピングを減らして、ピアノの音符を明瞭にする音楽関数を定義することが可能です。
Selected Snippets
Adding orchestral cues to a vocal score
This shows one approach to simplify adding many orchestral cues to the
piano reduction in a vocal score. The music function \cueWhile
takes four arguments: the music from which the cue is to be taken, as
defined by \addQuote, the name to be inserted before the cue
notes, then either #UP or #DOWN to specify either
\voiceOne with the name above the staff or \voiceTwo
with the name below the staff, and finally the piano music in parallel
with which the cue notes are to appear. The name of the cued
instrument is positioned to the left of the cued notes. Many passages
can be cued, but they cannot overlap each other in time.
cueWhile = #(define-music-function (instrument name dir music) (string? string? ly:dir? ly:music?) #{ \cueDuring $instrument #dir { \once \override TextScript.self-alignment-X = #RIGHT \once \override TextScript.direction = $dir <>-\markup { \tiny #name } $music } #}) flute = \relative c'' { \transposition c' s4 s4 e g } \addQuote "flute" { \flute } clarinet = \relative c' { \transposition bes fis4 d d c } \addQuote "clarinet" { \clarinet } singer = \relative c'' { c4. g8 g4 bes4 } words = \lyricmode { here's the lyr -- ics } pianoRH = \relative c'' { \transposition c' \cueWhile "clarinet" "Clar." #DOWN { c4. g8 } \cueWhile "flute" "Flute" #UP { g4 bes4 } } pianoLH = \relative c { c4 <c' e> e, <g c> } \score { << \new Staff { \new Voice = "singer" { \singer } } \new Lyrics { \lyricsto "singer" \words } \new PianoStaff << \new Staff { \new Voice { \pianoRH } } \new Staff { \clef "bass" \pianoLH } >> >> }
![[image of music]](d1/lily-96d871aa.png)
参照
音楽用語集: cue-notes
記譜法リファレンス: オブジェクトを揃える, 向きと配置, 合図音符をフォーマットする, 他のボイスを引用する, 音楽関数を使用する
コード断片集: Vocal music
内部リファレンス: InstrumentSwitch, CueVoice
既知の問題と警告
\cueDuring は自動的に CueVoice コンテキストを挿入し、すべての合図音符がこのコンテキストの中に配置されます。このことは、この方法では 1 つの合図音符の途中には他の合図音符を挿入することはできないということを意味します。これを行うには、別々の CueVoice コンテキストを明示的に宣言して、合図音符の抽出と挿入に \quoteDuring を用います。
| [ << 専門的な記譜法 ] | [トップ][目次][インデックス][ ? ] | [ 入出力全般 >> ] | ||
| [ < 合図 ] | [ 上へ : オペラと舞台ミュージカル ] | [ 音楽の中での会話 > ] | ||
Spoken music
‘parlato’ や ‘Sprechgesang’ などのエフェクトは、演者にピッチを持たずに、しかしながらリズムを持ちながら話すことを要求します。これは、特殊な符頭 で示すように、×の符頭で記譜します。
| [ << 専門的な記譜法 ] | [トップ][目次][インデックス][ ? ] | [ 入出力全般 >> ] | ||
| [ < Spoken music ] | [ 上へ : オペラと舞台ミュージカル ] | [ 聖歌と賛美歌 > ] | ||
音楽の中での会話
通常、音楽の中での会話は譜の上にイタリック体で譜刻され、各フレーズの開始は特定の音楽イベントに紐付けられます。
短いフレーズであれば、単純なマークアップ接尾辞を用います。
\relative { a'4^\markup { \smallCaps { Alex - } \italic { He's gone } } a a a a4 a a^\markup { \smallCaps { Bethan - } \italic Where? } a a4 a a a }
![[image of music]](6b/lily-3ab0bf62.png)
長いフレーズの場合は、フレーズをきちんと収められるよう楽譜を拡張する必要があるかもしれません。 LilyPond はこれを完全に自動的に行う機能を備えておらず、ページをレイアウトするために何らかの手作業が必要です。
密に詰め込まれた長い会話を持つフレーズやパッセージでは、Lyrics コンテキストを用いると良い結果を得られます。この Lryics コンテキストをボイスに関連付けすべきではなく、代わりに会話の各セクションの演奏時間を明示的に指定します。会話にずれがある場合、会話から最後の言葉を分離させて、それぞれに演奏時間を割り当てることで、下の音楽に対してスムーズに配置されます。
会話が複数行に広がる場合、手動で \break を挿入して、右マージンが不足しないよう会話の配置を調節する必要があります。各行の最終小節に配置される最後の単語も上記と同様に分離させる必要があります。
ここで、これまで述べてきたことを行う例を挙げます:
music = \relative { \repeat unfold 3 { a'4 a a a } } dialogue = \lyricmode { \markup { \fontsize #1 \upright \smallCaps Abe: "Say this over measures one and" }4*7 "two"4 | \break "and this over measure"4*3 "three"4 | } \score { << \new Lyrics \with { \override LyricText.font-shape = #'italic \override LyricText.self-alignment-X = #LEFT } { \dialogue } \new Staff { \new Voice { \music } } >> }
![[image of music]](5b/lily-53024566.png)
参照
記譜法リファレンス: 歌詞音節の手動演奏時間, テキスト
内部リファレンス: LyricText
| [ << 専門的な記譜法 ] | [トップ][目次][インデックス][ ? ] | [ 入出力全般 >> ] | ||
| [ < 音楽の中での会話 ] | [ 上へ : 声楽 ] | [ 聖歌と賛美歌のためのリファレンス > ] | ||
2.1.7 聖歌と賛美歌
通常、詠唱、聖歌、それに賛美歌の音楽と言葉は特定の教会で確立されたフォーマットに従います。教会毎にフォーマットが異なりますが、発生する譜刻の問題は概して共通していて、このセクションでカバーします。
| 聖歌と賛美歌のためのリファレンス | ||
| 聖歌を設定する | ||
| 賛美歌を配置する | ||
| 賛美歌での部分小節 |
| [ << 専門的な記譜法 ] | [トップ][目次][インデックス][ ? ] | [ 入出力全般 >> ] | ||
| [ < 聖歌と賛美歌 ] | [ 上へ : 聖歌と賛美歌 ] | [ 聖歌を設定する > ] | ||
聖歌と賛美歌のためのリファレンス
グレゴリオ聖歌を様々なスタイルの古代記譜法で譜刻する方法を Ancient notation で説明しています。
参照
記譜法リファレンス: Ancient notation
コード断片集: Vocal music
| [ << 専門的な記譜法 ] | [トップ][目次][インデックス][ ? ] | [ 入出力全般 >> ] | ||
| [ < 聖歌と賛美歌のためのリファレンス ] | [ 上へ : 聖歌と賛美歌 ] | [ 賛美歌を配置する > ] | ||
聖歌を設定する
現代の聖歌のための設定では、種々の古代記譜法の要素を加えた現代の記譜法を用います。考慮すべき要素や手法のいくつかを以下で示します。
聖歌ではしばしば、符幹の無い 4 分音符でピッチを示します。リズムは単語の音声リズムから取ります。
stemOff = { \hide Staff.Stem } \relative c' { \stemOff a'4 b c2 | }
![[image of music]](98/lily-7ca7e715.png)
聖歌ではしばしば小節線を省略したり、短い小節線や点線の小節線を用いて音楽の一時停止を示したりします。譜の小節線をすべて省略するには、小節線エングラーバを完全に削除します:
\score { \new StaffGroup << \new Staff { \relative { a'4 b c2 | a4 b c2 | a4 b c2 | } } \new Staff { \relative { a'4 b c2 | a4 b c2 | a4 b c2 | } } >> \layout { \context { \Staff \remove "Bar_engraver" } } }
![[image of music]](e2/lily-b3ae4c1c.png)
譜毎に小節線を削除することもできます:
\score { \new ChoirStaff << \new Staff \with { \remove "Bar_engraver" } { \relative { a'4 b c2 | a4 b c2 | a4 b c2 | } } \new Staff { \relative { a'4 b c2 | a4 b c2 | a4 b c2 | } } >> }
![[image of music]](72/lily-6e478ca2.png)
譜の一部の小節線だけを削除するには、その部分を即興 (カデンツァ) として扱います。小節線を削除する範囲が長い場合、改行位置を示すためにダミーの小節線 \bar "" を挿入する必要があるかもしれません。
\relative a' { a4 b c2 | \cadenzaOn a4 b c2 a4 b c2 \bar "" a4 b c2 a4 b c2 \cadenzaOff a4 b c2 | a4 b c2 | }
![[image of music]](6f/lily-79a6166b.png)
小節線を変更することによって、聖歌の休止や一時停止を示すことができます。
\relative a' { a4 \cadenzaOn b c2 a4 b c2 \bar "'" a4 b c2 a4 b c2 \bar ";" a4 b c2 \bar "!" a4 b c2 \bar "||" }
![[image of music]](74/lily-532eefa4.png)
現代の記譜法を用いながらも、休止や一時停止にグレゴリオ聖歌で用いられる記譜法を用いる場合もあります。これには \breathe 記号を変更して使います:
divisioMinima = { \once \override BreathingSign.stencil = #ly:breathing-sign::divisio-minima \once \override BreathingSign.Y-offset = #0 \breathe } divisioMaior = { \once \override BreathingSign.stencil = #ly:breathing-sign::divisio-maior \once \override BreathingSign.Y-offset = #0 \breathe } divisioMaxima = { \once \override BreathingSign.stencil = #ly:breathing-sign::divisio-maxima \once \override BreathingSign.Y-offset = #0 \breathe } finalis = { \once \override BreathingSign.stencil = #ly:breathing-sign::finalis \once \override BreathingSign.Y-offset = #0 \breathe } \score { \relative { g'2 a4 g \divisioMinima g2 a4 g \divisioMaior g2 a4 g \divisioMaxima g2 a4 g \finalis } \layout { \context { \Staff \remove "Bar_engraver" } } }
![[image of music]](43/lily-8e5cb46f.png)
聖歌は通常、拍子記号を省略し、しばしば音部記号も省略します。
\score { \new Staff { \relative { a'4 b c2 | a4 b c2 | a4 b c2 | } } \layout { \context { \Staff \remove "Bar_engraver" \remove "Time_signature_engraver" \remove "Clef_engraver" } } }
![[image of music]](4c/lily-50473f81.png)
通常、英国教会の伝統的な聖歌は シングル – 7 小節の音楽 – か、ダブル – 7 小節の音楽を 2 組 – のどちらかです。歌詞の各節が半分に分けられるのに対応して、7 小節の各グループは半分に分けられ、通常は 2 重小節線で区切られます。使われる音符は全音符と半音符だけです。半分に分けられたグループの最初の小節は常に全音符の和音を保持します。これが “主要音” です。通常、聖歌はページの中央に配置されます。
SopranoMusic = \relative { g'1 | c2 b | a1 | \bar "||" a1 | d2 c | c b | c1 | \bar "||" } AltoMusic = \relative { e'1 | g2 g | f1 | f1 | f2 e | d d | e1 | } TenorMusic = \relative { c'1 | c2 c | c1 | d1 | g,2 g | g g | g1 | } BassMusic = \relative { c1 | e2 e | f1 | d1 | b2 c | g' g | c,1 | } global = { \time 2/2 } % マークアップを使って聖歌をページの中央に配置します \markup { \fill-line { \score { % 中央揃え << \new ChoirStaff << \new Staff << \global \clef "treble" \new Voice = "Soprano" << \voiceOne \SopranoMusic >> \new Voice = "Alto" << \voiceTwo \AltoMusic >> >> \new Staff << \clef "bass" \global \new Voice = "Tenor" << \voiceOne \TenorMusic >> \new Voice = "Bass" << \voiceTwo \BassMusic >> >> >> >> \layout { \context { \Score \override SpacingSpanner.base-shortest-duration = #(ly:make-moment 1 2) } \context { \Staff \remove "Time_signature_engraver" } } } % score の終わり } } % markup の終わり
![[image of music]](f1/lily-8286a6cb.png)
このような聖歌を設定するための他のアプローチを以下の最初のコード断片で示します。
Selected Snippets
Chant or psalms notation
This form of notation is used for Psalm chant, where verses aren’t always the same length.
stemOff = \hide Staff.Stem stemOn = \undo \stemOff \score { \new Staff \with { \remove "Time_signature_engraver" } { \key g \minor \cadenzaOn \stemOff a'\breve bes'4 g'4 \stemOn a'2 \bar "||" \stemOff a'\breve g'4 a'4 \stemOn f'2 \bar "||" \stemOff a'\breve^\markup { \italic flexe } \stemOn g'2 \bar "||" } }
![[image of music]](29/lily-92a051c0.png)
雅歌や他の典礼書の設定はもっと自由度が高く、古代音楽の記譜要素を使うかもしれません。しばしば単語を譜の下に音符に揃えて配置します。そのような場合、音符の間隔を音符の演奏時間ではなく、音節に合わせます。
Ancient notation template – modern transcription of gregorian music
This example demonstrates how to do modern transcription of Gregorian music. Gregorian music has no measure, no stems; it uses only half and quarter note heads, and special marks, indicating rests of different length.
\include "gregorian.ly" chant = \relative c' { \set Score.timing = ##f f4 a2 \divisioMinima g4 b a2 f2 \divisioMaior g4( f) f( g) a2 \finalis } verba = \lyricmode { Lo -- rem ip -- sum do -- lor sit a -- met } \score { \new Staff << \new Voice = "melody" \chant \new Lyrics = "one" \lyricsto melody \verba >> \layout { \context { \Staff \remove "Time_signature_engraver" \remove "Bar_engraver" \hide Stem } \context { \Voice \override Stem.length = #0 } \context { \Score barAlways = ##t } } }
![[image of music]](62/lily-5827dd95.png)
参照
学習マニュアル: Visibility and color of objects, Vocal ensembles templates
記譜法リファレンス: Ancient notation, 小節線, コンテキストのプラグインを変更する, Typesetting Gregorian chant, 無韻律の音楽, オブジェクトの可視性
| [ << 専門的な記譜法 ] | [トップ][目次][インデックス][ ? ] | [ 入出力全般 >> ] | ||
| [ < 聖歌を設定する ] | [ 上へ : 聖歌と賛美歌 ] | [ 賛美歌での部分小節 > ] | ||
賛美歌を配置する
通常、英国教会の聖歌の歌詞は曲とは別に楽譜の下の中央に譜刻されます。
シングルの聖歌 (7 小節) は歌詞の節毎に繰り返されます。ダブルの聖歌 (14 小節) は歌詞の節のペア毎に繰り返されます。歌詞をどのように聖歌に当てはめるかを示すために記号が挿入されます。歌詞の各節は 2 つに分割されます。通常、この分割を示すためにコロンが用いられます。これは楽譜の 2 重小節線に対応します。コロンの前にある歌詞は楽譜の最初の 3 小節で歌われ、コロンの後にある歌詞は次の 4 小節で歌われます。
楽譜の小節線に対応して、歌詞に単線の小節線
(あるいはカンマを逆さまにしたような記号) が挿入されます。マークアップ モードでは、小節線を小節チェック記号 | で挿入することができます。
\markup { \fill-line { \column { \left-align { \line { O come let us sing | unto the | Lord : let } \line { us heartily rejoice in the | strength of | our } \line { sal- | -vation. } } } } }
![[image of music]](46/lily-2dbb1e27.png)
fetaMusic フォントの図柄を必要とする記号があるかもしれません。詳細は フォント を参照してください。
tick = \markup { \raise #1 \fontsize #-5 \musicglyph #"scripts.rvarcomma" } \markup { \fill-line { \column { \left-align { \line { O come let us sing \tick unto the \tick Lord : let } \line { us heartily rejoice in the \tick strength of \tick our } \line { sal \tick vation. } } } } }
![[image of music]](a5/lily-679c73b6.png)
1 小節に 1 つの全音符が配置されている場合、その小節に対応する歌詞は音読のリズムで朗読されます。1 小節に 2 つの音符が配置されている場合、普通はそれに対応する歌詞には 1 つまたは 2 つの音節しかありません。3 以上の音節がある場合、普通は音符が変わる場所を示すためにドット (中黒) が挿入されます。
dot = \markup { \raise #0.7 \musicglyph #"dots.dot" } tick = \markup { \raise #1 \fontsize #-5 \musicglyph #"scripts.rvarcomma" } \markup { \fill-line { \column { \left-align { \line { O come let us sing \tick unto \dot the \tick Lord : let } \line { us heartily rejoice in the \tick strength of \tick our } \line { sal \tick vation. } } } } }
![[image of music]](11/lily-8e961bfe.png)
聖歌の中には朗読セクションの終わりを示すためにカンマの代わりにアスタリスクを用いて、強調したり長く伸ばしたりする音節をボールド体で示すものがあります。
dot = \markup { \raise #0.7 \musicglyph #"dots.dot" } tick = \markup { \raise #1 \fontsize #-5 \musicglyph #"scripts.rvarcomma" } \markup { \fill-line { \column { \left-align { \line { Today if ye will hear his voice * } \line { \concat { \bold hard en } | not your | hearts : as in the pro- } \line { vocation * and as in the \bold day of tempt- | } \line { -ation | in the | wilderness. } } } } }
![[image of music]](63/lily-90c00927.png)
また、強調する音節の上にアクセント記号を配置する聖歌もあります。
tick = \markup { \raise #2 \fontsize #-5 \musicglyph #"scripts.rvarcomma" } \markup { \fill-line { \column { \left-align { \line { O come let us \concat { si \combine \tick ng } | unto the | Lord : let } \line { us heartily \concat { rejo \combine \tick ice } in the | strength of | our } \line { sal- | -vation. } } } } }
![[image of music]](ed/lily-f1ee4d72.png)
マークアップを使用してテキストを中央に配置し、テキスト行をいくつかの列に配列する方法は、テキストをフォーマットする で説明しています。
これらの要素のほとんどをテンプレートの歌詞で示しています。 Psalms を参照してください。
参照
学習マニュアル: Psalms, Vocal ensembles templates
記譜法リファレンス: フォント, テキストをフォーマットする
| [ << 専門的な記譜法 ] | [トップ][目次][インデックス][ ? ] | [ 入出力全般 >> ] | ||
| [ < 賛美歌を配置する ] | [ 上へ : 聖歌と賛美歌 ] | [ 古代の声楽 > ] | ||
賛美歌での部分小節
しばしば、賛美歌は各行の始めと終わりを部分小節として、楽譜の各行がテキストの各行にうまく対応させます。これを行うには音楽の始めに \partial コマンドを配置して、各行の終わりに \bar "|" または \bar "||" を配置する必要があります。
Hymn template
This code shows one way of setting out a hymn tune when each line starts and ends with a partial measure. It also shows how to add the verses as stand-alone text under the music.
Timeline = { \time 4/4 \tempo 4=96 \partial 2 s2 | s1 | s2 \breathe s2 | s1 | s2 \bar "||" \break s2 | s1 | s2 \breathe s2 | s1 | s2 \bar "||" } SopranoMusic = \relative g' { g4 g | g g g g | g g g g | g g g g | g2 g4 g | g g g g | g g g g | g g g g | g2 } AltoMusic = \relative c' { d4 d | d d d d | d d d d | d d d d | d2 d4 d | d d d d | d d d d | d d d d | d2 } TenorMusic = \relative a { b4 b | b b b b | b b b b | b b b b | b2 b4 b | b b b b | b b b b | b b b b | b2 } BassMusic = \relative g { g4 g | g g g g | g g g g | g g g g | g2 g4 g | g g g g | g g g g | g g g g | g2 } global = { \key g \major } \score { % Start score << \new PianoStaff << % Start pianostaff \new Staff << % Start Staff = RH \global \clef "treble" \new Voice = "Soprano" << % Start Voice = "Soprano" \Timeline \voiceOne \SopranoMusic >> % End Voice = "Soprano" \new Voice = "Alto" << % Start Voice = "Alto" \Timeline \voiceTwo \AltoMusic >> % End Voice = "Alto" >> % End Staff = RH \new Staff << % Start Staff = LH \global \clef "bass" \new Voice = "Tenor" << % Start Voice = "Tenor" \Timeline \voiceOne \TenorMusic >> % End Voice = "Tenor" \new Voice = "Bass" << % Start Voice = "Bass" \Timeline \voiceTwo \BassMusic >> % End Voice = "Bass" >> % End Staff = LH >> % End pianostaff >> } % End score \markup { \fill-line { "" { \column { \left-align { "This is line one of the first verse" "This is line two of the same" "And here's line three of the first verse" "And the last line of the same" } } } "" } } \paper { % Start paper block indent = 0 % don't indent first system line-width = 130 % shorten line length to suit music } % End paper block
![[image of music]](00/lily-ee39b0dd.png)
| [ << 専門的な記譜法 ] | [トップ][目次][インデックス][ ? ] | [ 入出力全般 >> ] | ||
| [ < 賛美歌での部分小節 ] | [ 上へ : 声楽 ] | [ キーボードと他の複数譜の楽器 > ] | ||
2.1.8 古代の声楽
古代の声楽がサポートされます。Ancient notation で説明しています。
参照
記譜法リファレンス: Ancient notation
| [ << 専門的な記譜法 ] | [トップ][目次][インデックス][ ? ] | [ 入出力全般 >> ] | ||
| [ < 古代の声楽 ] | [ 上へ : 専門的な記譜法 ] | [ キーボードで共通の記譜法 > ] | ||
2.2 キーボードと他の複数譜の楽器
![[image of music]](fd/lily-5544ab45.png)
このセクションでは、キーボード楽器と複数の譜を用いる他の楽器 – ハープやビブラフォン等 – に固有の音楽記譜について説明します。キーボードを含む複数の譜を用いる楽器のグループ全体をまとめて “キーボード” と呼びます。
| 2.2.1 キーボードで共通の記譜法 | ||
| 2.2.2 ピアノ | ||
| 2.2.3 アコーディオン | ||
| 2.2.4 ハープ |
| [ << 専門的な記譜法 ] | [トップ][目次][インデックス][ ? ] | [ 入出力全般 >> ] | ||
| [ < キーボードと他の複数譜の楽器 ] | [ 上へ : キーボードと他の複数譜の楽器 ] | [ キーボードのためのリファレンス > ] | ||
2.2.1 キーボードで共通の記譜法
このセクションでは多くのキーボードで生じる記譜の問題について説明します。
| キーボードのためのリファレンス | ||
| 譜を手動で変更する | ||
| 譜を自動で変更する | ||
| 譜変更線 | ||
| 譜を跨ぐ符幹 |
| [ << 専門的な記譜法 ] | [トップ][目次][インデックス][ ? ] | [ 入出力全般 >> ] | ||
| [ < キーボードで共通の記譜法 ] | [ 上へ : キーボードで共通の記譜法 ] | [ 譜を手動で変更する > ] | ||
キーボードのためのリファレンス
通常、キーボードはピアノ譜で記譜します。これらは波括弧で括られた 2 つ以上の普通の譜です。他のキーを持つ楽器も同じ記譜法を用います。オルガン譜は通常、PianoStaff グループ内部にある 2 つの譜と、ペダル用の通常の譜によって記述されます。
キーボードの譜はそれぞれの独立性が高いですが、ボイスが 2 つの譜を跨ぐこともあります。このセクションではキーボードに特有の記譜テクニックについて説明します。
キーボードに共通する問題のいくつかは他の場所でカバーします:
- 通常、キーボードは複数のボイスを持ち、ボイスの数はしょっちゅう変わります。このことは 衝突の解決 で説明しています。
- 音楽を並列に記述する で説明しているように、キーボードは並列に記述することができます。
- 強弱指示を 2 つの
Staffコンテキストの間にあるDynamicsコンテキストの中に配置して、強弱記号を 2 つの譜の間に配置することができます。強弱記号 を参照してください。 - 運指は 運指の指示 で説明しています。
- オルガン ペダルの指示はアーティキュレーションとして挿入します。List of articulations を参照してください。
- グリッド ライン で垂直のグリッド ラインを表示させることができます。
- キーボードはしばしばアルペジオでのタイや、レセ ヴィブレ タイを持ちます。タイ で説明しています。
- 複数のボイスや譜を跨ぐアルペジオの配置は、アルペジオ でカバーしています。
- トレモロ記号は トレモロの繰り返し で説明しています。
- キーボードで必要となる可能性がある調整のいくつかを 実際の音楽からの例 で示しています。
- ボイスを跨ぐタイを作り出すために隠れた音符を使うことがあります。 調整のその他の使用方法 で示しています。
参照
学習マニュアル: Real music example, Other uses for tweaks
記譜法リファレンス: 譜をグループ化する, 楽器名, 衝突の解決, 音楽を並列に記述する, 運指の指示, List of articulations, グリッド ライン, タイ, アルペジオ, トレモロの繰り返し
内部リファレンス: PianoStaff
コード断片集: Keyboards
| [ << 専門的な記譜法 ] | [トップ][目次][インデックス][ ? ] | [ 入出力全般 >> ] | ||
| [ < キーボードのためのリファレンス ] | [ 上へ : キーボードで共通の記譜法 ] | [ 譜を自動で変更する > ] | ||
譜を手動で変更する
以下のコマンドを用いて、ボイスの譜を手動で切り換えることができます:
\change Staff = staffname
文字列 staffname は譜の名前です。このコマンドはボイスをカレント譜から staffname という譜に切り換えます。staffname の一般的な値は "up" と "down"、あるいは "RH" と "LH" です。
ボイスの切り換え先となる譜は、切り換え時点で存在している必要があります。必要があれば、譜を “残しておく” べきです。コンテキストを残しておく を参照してください。
譜を跨ぐ音符には自動的に連桁が付けられます:
\new PianoStaff << \new Staff = "up" { <e' c'>8 \change Staff = "down" g8 fis g \change Staff = "up" <g'' c''>8 \change Staff = "down" e8 dis e \change Staff = "up" } \new Staff = "down" { \clef bass % 譜を残しておきます s1 } >>
![[image of music]](a6/lily-5a98e919.png)
連桁を調整する必要がある場合、符幹の向きの変更を最初に行ってください。連桁の位置は最も近い譜の中央から算出します。連桁の調整の簡単な例が 表記の重なりを修正する にあります。
ボイスが譜を跨ぐ時に、記譜要素の重なりが発生することがあります:
\new PianoStaff << \new Staff = "up" { \voiceOne % 譜を跨ぐボイスの中にある運指記号のためのスペースを作ります \once\override DynamicLineSpanner.staff-padding = #3.4 e''2\p\< d''\> c''1\! } \new Staff = "down" << { \clef bass s4. e,8\rest g,2\rest c1 } \\ { c8\( g c' \change Staff = "up" e' g' b'-3 a' g'\) f'1 } >> >>
![[image of music]](fb/lily-00e103d7.png)
符幹とスラーは譜の間にある強弱記号と重なります。なぜなら、異なる譜にある音符を結ぶ連桁、スラー、他のスパナに対して、自動衝突解決は抑制されるからです。同様に、譜を跨ぐスパナによって配置に影響を受ける符幹やアーティキュレーションに対しても、自動衝突解決は抑制されます。そのような場合、必要に応じて、手動で衝突を解決する必要があります – 解決手段は 表記の重なりを修正する を参照してください。
参照
学習マニュアル: Fixing overlapping notation
記譜法リファレンス: 符幹, 自動連桁, コンテキストを残しておく
コード断片集: Keyboards
内部リファレンス: Beam, ContextChange
既知の問題と警告
譜の変更の直前に終了する自動連桁に対して、連桁衝突回避は機能しません。衝突回避を行うには、手動連桁を使用してください。
| [ << 専門的な記譜法 ] | [トップ][目次][インデックス][ ? ] | [ 入出力全般 >> ] | ||
| [ < 譜を手動で変更する ] | [ 上へ : キーボードで共通の記譜法 ] | [ 譜変更線 > ] | ||
譜を自動で変更する
譜の上端と下端の間で、ボイスを自動的に切り換えることができます。構文は以下の通りです:
\autochange …music…
これはカレントの譜グループ (普通は、PianoStaff) 内部に
"up" と "down" という 2 つの譜を作成します。デフォルトで下の譜は低音部となります。自動変更は基準ピッチ (ミドル C が切り換えポイントです) で譜を切り換え、次の切り換えまで休符でスキップしていきます。
\new PianoStaff { \autochange { g4 a b c' d'4 r a g } }
![[image of music]](40/lily-9075f3b6.png)
\autochange の外側にある \relative セクションは、\autochange の内部にある音符のピッチに影響を与えません。そのため、必要に応じて \autochange の内部に \relative を配置します。
個々の譜に個別の制御を行う必要がある場合、手動で "up" と "down" という名前の譜を作成して、制御を行います。\autochange コマンドは、作成された譜間で、ボイスを切り換えます。
Note: 譜を手動で作成する場合、譜の名前を "up" と "down"
にする 必要があります。
例えば、下の譜に調号を配置するには、譜を手動で作成する必要があります:
\new PianoStaff << \new Staff = "up" { \new Voice = "melOne" { \key g \major \autochange \relative { g8 b a c b d c e d8 r fis, g a2 } } } \new Staff = "down" { \key g \major \clef bass } >>
![[image of music]](0b/lily-d6633fa5.png)
参照
記譜法リファレンス: 譜を手動で変更する
コード断片集: Keyboards
内部リファレンス: AutoChangeMusic
既知の問題と警告
譜の切り換えが最適な場所で行われない場合もあります。高品位の出力を得るには、譜の切り換えを手動で指定する必要があります。
和音は譜を跨って配置されません。和音構造の中にある最初の音符に基づく譜に割り当てられます。
| [ << 専門的な記譜法 ] | [トップ][目次][インデックス][ ? ] | [ 入出力全般 >> ] | ||
| [ < 譜を自動で変更する ] | [ 上へ : キーボードで共通の記譜法 ] | [ 譜を跨ぐ符幹 > ] | ||
譜変更線
ボイスが他の譜に切り替わる時に、音符を繋げる線を自動的に譜刻することができます:
\new PianoStaff << \new Staff = "one" { \showStaffSwitch c'1 \change Staff = "two" b2 a } \new Staff = "two" { \clef bass s1*2 } >>
![[image of music]](94/lily-511627ba.png)
定義済みコマンド
\showStaffSwitch,
\hideStaffSwitch
参照
コード断片集: Keyboards
内部リファレンス: Note_head_line_engraver, VoiceFollower
| [ << 専門的な記譜法 ] | [トップ][目次][インデックス][ ? ] | [ 入出力全般 >> ] | ||
| [ < 譜変更線 ] | [ 上へ : キーボードで共通の記譜法 ] | [ ピアノ > ] | ||
譜を跨ぐ符幹
Span_stem_engraver を用いて譜を跨ぐ和音を作ることができます。片方の譜の音符に自動連桁機能が連桁を付けないことを間違いなく確認するよう注意してください。
\layout { \context { \PianoStaff \consists #Span_stem_engraver } } { \new PianoStaff << \new Staff { <b d'>4 r d'16\> e'8. g8 r\! e'8 f' g'4 e'2 } \new Staff { \clef bass \voiceOne \autoBeamOff \crossStaff { <e g>4 e, g16 a8. c8} d \autoBeamOn g8 f g4 c2 } >> }
![[image of music]](00/lily-6c76f621.png)
このエングラーバは、名前をダブル クォートで囲っても指定することができませんが、名前の前にハッシュ記号 # を置くことで指定できます。
Selected Snippets
Indicating cross-staff chords with arpeggio bracket
An arpeggio bracket can indicate that notes on two different staves are
to be played with the same hand. In order to do this, the
PianoStaff must be set to accept cross-staff arpeggios and the
arpeggios must be set to the bracket shape in the PianoStaff
context.
(Debussy, Les collines d’Anacapri, m. 65)
\new PianoStaff << \set PianoStaff.connectArpeggios = ##t \override PianoStaff.Arpeggio.stencil = #ly:arpeggio::brew-chord-bracket \new Staff { \relative c' { \key b \major \time 6/8 b8-.(\arpeggio fis'-.\> cis-. e-. gis-. b-.)\!\fermata^\laissezVibrer \bar "||" } } \new Staff { \relative c' { \clef bass \key b \major << { <a e cis>2.\arpeggio } \\ { <a, e a,>2. } >> } } >>
![[image of music]](1c/lily-38dd6f4c.png)
参照
コード断片集: Keyboards
内部リファレンス: Stem
| [ << 専門的な記譜法 ] | [トップ][目次][インデックス][ ? ] | [ 入出力全般 >> ] | ||
| [ < 譜を跨ぐ符幹 ] | [ 上へ : キーボードと他の複数譜の楽器 ] | [ ピアノ ペダル > ] | ||
2.2.2 ピアノ
このセクションでは、ピアノに関係する記譜法を説明します。
| ピアノ ペダル |
| [ << 専門的な記譜法 ] | [トップ][目次][インデックス][ ? ] | [ 入出力全般 >> ] | ||
| [ < ピアノ ] | [ 上へ : ピアノ ] | [ アコーディオン > ] | ||
ピアノ ペダル
一般的に、ピアノは音を変化させるために 3 本のペダルを持ちます: サステイン, ソステヌート (sos.), それに ウナ コルダ (una corda, U.C.) です。サステイン ペダルは、ビブラフォンやチェレスタにもあります。
\relative { c''4\sustainOn d e g <c, f a>1\sustainOff c4\sostenutoOn e g c, <bes d f>1\sostenutoOff c4\unaCorda d e g <d fis a>1\treCorde }
![[image of music]](dc/lily-5fba6c14.png)
ペダル指示には 3 つのスタイルがあります: テキスト、囲み、それにテキストと囲みの混合です。デフォルトで、サステイン ペダルとウナ コルダ ペダルの指示はテキスト スタイルですが、ソステヌート ペダル指示は混合スタイルです。
\relative { c''4\sustainOn g c2\sustainOff \set Staff.pedalSustainStyle = #'mixed c4\sustainOn g c d d\sustainOff\sustainOn g, c2\sustainOff \set Staff.pedalSustainStyle = #'bracket c4\sustainOn g c d d\sustainOff\sustainOn g, c2 \bar "|." }
![[image of music]](5e/lily-92fa8db2.png)
ペダル コマンドの配置は、ピアノ演奏中の物理的なサステイン ペダルの動きに一致します。最後の小節線でのペダル指示は、最後のペダル オフ コマンドを省略することで挿入されます。
ペダル指示を Dynamics コンテキストに配置させることができます。
参照
記譜法リファレンス: タイ
コード断片集: Keyboards
内部リファレンス: SustainPedal, SustainPedalLineSpanner, SustainEvent, SostenutoPedal, SostenutoPedalLineSpanner, SostenutoEvent, UnaCordaPedal, UnaCordaPedalLineSpanner, UnaCordaEvent, PianoPedalBracket, Piano_pedal_engraver
| [ << 専門的な記譜法 ] | [トップ][目次][インデックス][ ? ] | [ 入出力全般 >> ] | ||
| [ < ピアノ ペダル ] | [ 上へ : キーボードと他の複数譜の楽器 ] | [ ディスカント記号 > ] | ||
2.2.3 アコーディオン
このセクションでは、アコーディオンに特有の記譜法について説明します。
| ディスカント記号 |
| [ << 専門的な記譜法 ] | [トップ][目次][インデックス][ ? ] | [ 入出力全般 >> ] | ||
| [ < アコーディオン ] | [ 上へ : アコーディオン ] | [ ハープ > ] | ||
ディスカント記号
アコーディオン演奏はしばしば、指定されたピッチよりも 1 オクターブ上または下のピッチとユニゾンになるリードのセットで構成されます。各アコーディオン メーカは、さまざまなリードの組み合わせを選択する シフト に異なる名前を付けています: oboe, musette, あるいは bandonium などです。そのため、演奏指示を単純にするための記号システムを用います。
Selected Snippets
Accordion-discant symbols
This snippet has been obsoleted by predefined markup commands, see
’Accordion Registers’ in the Notation Reference. It’s still useful as
a simple demonstration of how to combine symbols: the placement of the
symbols added with \markup can be tweaked by changing the
\translate-scaled arguments. \translate-scaled is used
here rather than \translate in order to let the positioning of
the symbol parts adapt to changes of font-size.
discant = \markup { \musicglyph #"accordion.discant" } dot = \markup { \musicglyph #"accordion.dot" } \layout { ragged-right = ##t } % 16 voets register accBasson = ^\markup { \combine \discant \translate-scaled #'(0 . 0.5) \dot } % een korig 8 en 16 voets register accBandon = ^\markup { \combine \discant \combine \translate-scaled #'(0 . 0.5) \dot \translate-scaled #'(0 . 1.5) \dot } accVCello = ^\markup { \combine \discant \combine \translate-scaled #'(0 . 0.5) \dot \combine \translate-scaled #'(0 . 1.5) \dot \translate-scaled #'(1 . 1.5) \dot } % 4-8-16 voets register accHarmon = ^\markup { \combine \discant \combine \translate-scaled #'(0 . 0.5) \dot \combine \translate-scaled #'(0 . 1.5) \dot \translate-scaled #'(0 . 2.5) \dot } accTrombon = ^\markup { \combine \discant \combine \translate-scaled #'(0 . 0.5) \dot \combine \translate-scaled #'(0 . 1.5) \dot \combine \translate-scaled #'(1 . 1.5) \dot \translate-scaled #'(-1 . 1.5) \dot } % eenkorig 4 en 16 voets register accOrgan = ^\markup { \combine \discant \combine \translate-scaled #'(0 . 0.5) \dot \translate-scaled #'(0 . 2.5) \dot } accMaster = ^\markup { \combine \discant \combine \translate-scaled #'(0 . 0.5) \dot \combine \translate-scaled #'(0 . 1.5) \dot \combine \translate-scaled #'(1 . 1.5) \dot \combine \translate-scaled #'(-1 . 1.5) \dot \translate-scaled #'(0 . 2.5) \dot } accAccord = ^\markup { \combine \discant \combine \translate-scaled #'(0 . 1.5) \dot \combine \translate-scaled #'(1 . 1.5) \dot \combine \translate-scaled #'(-1 . 1.5) \dot \translate-scaled #'(0 . 2.5) \dot } accMusette = ^\markup { \combine \discant \combine \translate-scaled #'(0 . 1.5) \dot \combine \translate-scaled #'(1 . 1.5) \dot \translate-scaled #'(-1 . 1.5) \dot } accCeleste = ^\markup { \combine \discant \combine \translate-scaled #'(0 . 1.5) \dot \translate-scaled #'(-1 . 1.5) \dot } accOboe = ^\markup { \combine \discant \combine \translate-scaled #'(0 . 1.5) \dot \translate-scaled #'(0 . 2.5) \dot } accClarin = ^\markup { \combine \discant \translate-scaled #'(0 . 1.5) \dot } accPiccolo = ^\markup { \combine \discant \translate-scaled #'(0 . 2.5) \dot } accViolin = ^\markup { \combine \discant \combine \translate-scaled #'(0 . 1.5) \dot \combine \translate-scaled #'(1 . 1.5) \dot \translate-scaled #'(0 . 2.5) \dot } \relative c'' { c4 d\accBasson e f c4 d\accBandon e f c4 d\accVCello e f c4 d\accHarmon e f c4 d\accTrombon e f \break c4 d\accOrgan e f c4 d\accMaster e f c4 d\accAccord e f c4 d\accMusette e f c4 d\accCeleste e f \break c4 d\accOboe e f c4 d\accClarin e f c4 d\accPiccolo e f c4 d\accViolin e f }
![[image of music]](4f/lily-d6d1ae72.png)
参照
コード断片集: Keyboards
| [ << 専門的な記譜法 ] | [トップ][目次][インデックス][ ? ] | [ 入出力全般 >> ] | ||
| [ < ディスカント記号 ] | [ 上へ : キーボードと他の複数譜の楽器 ] | [ ハープのためのリファレンス > ] | ||
2.2.4 ハープ
このセクションでは、ハープに特有の記譜法について説明します。
| ハープのためのリファレンス | ||
| ハープ ペダル |
| [ << 専門的な記譜法 ] | [トップ][目次][インデックス][ ? ] | [ 入出力全般 >> ] | ||
| [ < ハープ ] | [ 上へ : ハープ ] | [ ハープ ペダル > ] | ||
ハープのためのリファレンス
ハープ音楽に共通する特性のいくつかが、他の場所でカバーされています:
- グリッサンドは最も特徴的なハープのテクニックです – グリッサンド。
- ビズビッリャンド (bisbigliando) はトレモロとして記述されます – トレモロの繰り返し。
- ナチュラル ハーモニクスは ハーモニクス でカバーされています。
- アルペジオの向きと非アルペジオについては、アルペジオ を参照してください。
参照
記譜法リファレンス: トレモロの繰り返し, グリッサンド, アルペジオ, ハーモニクス
| [ << 専門的な記譜法 ] | [トップ][目次][インデックス][ ? ] | [ 入出力全般 >> ] | ||
| [ < ハープのためのリファレンス ] | [ 上へ : ハープ ] | [ フレットの無い弦楽器 > ] | ||
ハープ ペダル
ハープはオクターブ毎に 7 本の弦を持ち、それらはナチュラル ピッチ、フラット ピッチ、あるいはシャープ ピッチの音を出すことができます。レバー ハープは各弦を個別に調整することができますが、ペダル ハープは 1 つのペダルで同じピッチ名を持つすべての弦を制御します。演奏者の左から右に向かって、左のペダル D, C, それに B、右のペダルは E, F, G, それに A です。ペダルのポジションをテキスト記号で指示することがあります:
\textLengthOn cis''1_\markup \concat \vcenter { [D \flat C \sharp B|E \sharp F \sharp G A \flat] } c''!1_\markup \concat \vcenter { [ C \natural ] }
![[image of music]](f0/lily-815e3e90.png)
あるいはペダル ダイアグラムで指示することもあります:
\textLengthOn cis''1_\markup { \harp-pedal #"^v-|vv-^" } c''!1_\markup { \harp-pedal #"^o--|vv-^" }
![[image of music]](38/lily-ed337ea8.png)
\harp-pedal コマンドは文字列を受け取ります。^ はペダル ポジションを上 (フラット ピッチ)、- はペダル ポジションを真ん中 (ナチュラル ピッチ)、v はペダル ポジションを下 (シャープ ピッチ)、| 区切り線です。接頭辞 o は、その後のペダル記号を丸で囲みます。
参照
記譜法リファレンス: テキスト スクリプト, Instrument Specific Markup
| [ << 専門的な記譜法 ] | [トップ][目次][インデックス][ ? ] | [ 入出力全般 >> ] | ||
| [ < ハープ ペダル ] | [ 上へ : 専門的な記譜法 ] | [ フレットの無い弦楽器で共通の記譜法 > ] | ||
2.3 フレットの無い弦楽器
![[image of music]](b4/lily-01076393.png)
このセクションではフレットの無い弦楽器 – 主にオーケストラで使用される弦楽器 – のための楽譜を記述する際に有用な情報とリファレンスを提供します。 orchestral strings.
| 2.3.1 フレットの無い弦楽器で共通の記譜法 |
| [ << 専門的な記譜法 ] | [トップ][目次][インデックス][ ? ] | [ 入出力全般 >> ] | ||
| [ < フレットの無い弦楽器 ] | [ 上へ : フレットの無い弦楽器 ] | [ フレットの無い弦楽器のためのリファレンス > ] | ||
2.3.1 フレットの無い弦楽器で共通の記譜法
フレットの無い弦楽器のための特殊な記譜法は少ししかありません。フレットの無い弦楽器の演奏は単一の譜で記譜され、通常は 1 つのボイスしか必要としません。ダブル ストップ (重音奏法) やディヴィジ (divisi) パッセージで 2 つのボイスが必要となる場合もあります。
| フレットの無い弦楽器のためのリファレンス | ||
| ボーイング指示 | ||
| ハーモニクス | ||
| スナップ (バルトーク) ピッツィカート |
| [ << 専門的な記譜法 ] | [トップ][目次][インデックス][ ? ] | [ 入出力全般 >> ] | ||
| [ < フレットの無い弦楽器で共通の記譜法 ] | [ 上へ : フレットの無い弦楽器で共通の記譜法 ] | [ ボーイング指示 > ] | ||
フレットの無い弦楽器のためのリファレンス
オーケストラの弦楽器や他の弓を使う楽器で用いられる記譜法のほとんどは他の場所でカバーされています。
- “pizz.” や “arco” などのテキスト指示は、単なるテキストとして付け加えます – テキスト スクリプト を参照してください。
- 親指の指示も含めた運指は、運指の指示 で説明しています。
- ダブル ストップは通常、和音として記述します – 和音の音符 を参照してください。和音を弾く方向を付け加えることもできます – アルペジオ を参照してください。
- 弦楽四重奏のためのテンプレートが String quartet templates にあります。他の例はコード断片集で示されています。
参照
学習マニュアル: String quartet templates
記譜法リファレンス: テキスト スクリプト, 運指の指示, 和音の音符, アルペジオ
コード断片集: Unfretted strings
| [ << 専門的な記譜法 ] | [トップ][目次][インデックス][ ? ] | [ 入出力全般 >> ] | ||
| [ < フレットの無い弦楽器のためのリファレンス ] | [ 上へ : フレットの無い弦楽器で共通の記譜法 ] | [ ハーモニクス > ] | ||
ボーイング指示
ボーイング指示はアーティキュレーションとして作成します。アーティキュレーションについては、アーティキュレーションと装飾 で説明しています。
ボーイングのコマンド
– \upbow と \downbow –
は、以下のようにスラーと一緒に用います:
\relative { c''4(\downbow d) e(\upbow f) }
![[image of music]](41/lily-487f5d0d.png)
以下の例は、バイオリンで A の開放弦を表す 3 つの方法を示しています:
a4 \open a^\markup { \teeny "II" } a2^\markup { \small "sul A" }
![[image of music]](70/lily-8eb73e18.png)
定義済みコマンド
\downbow,
\upbow,
\open
参照
記譜法リファレンス: アーティキュレーションと装飾, スラー
| [ << 専門的な記譜法 ] | [トップ][目次][インデックス][ ? ] | [ 入出力全般 >> ] | ||
| [ < ボーイング指示 ] | [ 上へ : フレットの無い弦楽器で共通の記譜法 ] | [ スナップ (バルトーク) ピッツィカート > ] | ||
ハーモニクス
ナチュラル ハーモニクス
いくつかの方法でナチュラル ハーモニクスを記譜することができます。一般的に、ダイアモンド形の符頭は、符頭がダイアモンド形ではない場合に押さえる弦に触れることを意味します。
\relative d'' { d4 e4. \harmonicsOn d8 e e d4 e4. \harmonicsOff d8 e e }
![[image of music]](74/lily-718da6c7.png)
一方、鳴らすピッチに通常の符頭を記譜すると共に、小さな丸を付けることでハーモニクスとして演奏することを示す方法もあります:
d''2^\flageolet d''_\flageolet
![[image of music]](34/lily-e4fa1652.png)
より小さな丸を描くこともできます。フレットの無い弦楽器のためのリファレンス にあるコード断片集を参照してください。
アーティフィシャル ハーモニクス
アーティフィシャル ハーモニクスは 2 つの音符で記譜します – 1 つは通常の符頭でストップ ポジションを示し、もう 1 つは中空のダイアモンド形の符頭でハーモニクス ポジションを示します。
\harmonic で記譜したアーティフィシャル ハーモニクスは符点を持ちません。符点を付ける必要がある場合は、コンテキスト プロパティ harmonicDots を設定します。
\relative e' { <e a\harmonic>2. <c g'\harmonic>4 \set harmonicDots = ##t <e a\harmonic>2. <c g'\harmonic>4 }
![[image of music]](b4/lily-382727ec.png)
Note: \harmonic は、単一の音符しかない場合であっても、和音構造の中に配置する 必要があります。通常、単一の音符のハーモニクスには \harmonicsOn を使います。
参照
音楽用語集: harmonics
記譜法リファレンス: 特殊な符頭, フレットの無い弦楽器のためのリファレンス
| [ << 専門的な記譜法 ] | [トップ][目次][インデックス][ ? ] | [ 入出力全般 >> ] | ||
| [ < ハーモニクス ] | [ 上へ : フレットの無い弦楽器で共通の記譜法 ] | [ フレットのある弦楽器 > ] | ||
スナップ (バルトーク) ピッツィカート
スナップ ピッツィカート (snap pizzicato) – バルトーク ピッツィカート (Bartók pizzicato) とも呼ばれます – は、ピッツィカートの 1 つで、故意に弦を上 (フィンガーボードと垂直) に引いて、弦をフィンガーボードにぶつけます。
\relative { c'4\snappizzicato <c' e g>4\snappizzicato <c' e g>4^\snappizzicato <c, e g>4_\snappizzicato }
![[image of music]](ad/lily-5c2dee89.png)
| [ << 専門的な記譜法 ] | [トップ][目次][インデックス][ ? ] | [ 入出力全般 >> ] | ||
| [ < スナップ (バルトーク) ピッツィカート ] | [ 上へ : 専門的な記譜法 ] | [ フレットのある弦楽器で共通の記譜法 > ] | ||
2.4 フレットのある弦楽器
![[image of music]](6e/lily-4308a539.png)
このセクションでは、フレットのある弦楽器に特有の記譜法のいくつかの側面について説明します。
| 2.4.1 フレットのある弦楽器で共通の記譜法 | ||
| 2.4.2 ギター | ||
| 2.4.3 バンジョー |
| [ << 専門的な記譜法 ] | [トップ][目次][インデックス][ ? ] | [ 入出力全般 >> ] | ||
| [ < フレットのある弦楽器 ] | [ 上へ : フレットのある弦楽器 ] | [ フレットのある弦楽器のためのリファレンス > ] | ||
2.4.1 フレットのある弦楽器で共通の記譜法
このセクションでは、フレットのある弦楽器で共通する記譜法について説明します。
| フレットのある弦楽器のためのリファレンス | ||
| 弦番号の指示 | ||
| デフォルトのタブ譜 | ||
| カスタム タブ譜 | ||
| フレット ダイアグラム マークアップ | ||
| あらかじめ定義されたフレット ダイアグラム | ||
| 自動フレット ダイアグラム | ||
| 右手の運指 |
| [ << 専門的な記譜法 ] | [トップ][目次][インデックス][ ? ] | [ 入出力全般 >> ] | ||
| [ < フレットのある弦楽器で共通の記譜法 ] | [ 上へ : フレットのある弦楽器で共通の記譜法 ] | [ 弦番号の指示 > ] | ||
フレットのある弦楽器のためのリファレンス
フレットのある弦楽器の演奏は通常、単一の譜で、伝統的な音楽記譜法あるいはタブ譜で記譜されます。これら 2 つが組み合わされることがあり、特にポピュラー音楽では伝統的な記譜法の譜の上にコード ダイアグラムを配置することが一般的です。ギターとバンジョーは移調楽器であり、楽譜よりも 1 オクターブ下の音を出します。これらの楽器のための楽譜は音部記号 "treble_8"
(あるいは、正しい MIDI 出力を得るために \transposition c)
を使うべきです。フレットのある弦楽器に関係する他のいくつかの要素は他の場所でカバーされています:
- 運指は 運指の指示 で説明しています。
- レセ ヴィブレ (Laissez vibrer) タイは、アルペジオとトレモロで使われるタイと同様に、タイ で説明しています。
- 複数のボイスを処理するための説明は、衝突の解決 にあります。
- ハーモニクス指示についての説明は、ハーモニクス にあります。
参照
記譜法リファレンス: 運指の指示, タイ, 衝突の解決, 楽器名, 音楽を並列に記述する, アルペジオ, List of articulations, 音部記号, 楽器の移調
| [ << 専門的な記譜法 ] | [トップ][目次][インデックス][ ? ] | [ 入出力全般 >> ] | ||
| [ < フレットのある弦楽器のためのリファレンス ] | [ 上へ : フレットのある弦楽器で共通の記譜法 ] | [ デフォルトのタブ譜 > ] | ||
弦番号の指示
音符の後に \number を付けることによって、演奏する音符の弦を指示することができます。
\clef "treble_8" c4\5 e\4 g2\3 <c\5 e\4 g\3>1
![[image of music]](f3/lily-77bb31a9.png)
運指と弦の指示を一緒に使う場合、明示的に作成された和音の中にある場合に のみ、 それら 2 要素を記述する順序で配置を制御することができます: 和音全体や和音の 中にない 単独の音符に適用される場合、運指記号は異なるメカニズムで配置されます。
\clef "treble_8" g4\3-0 g-0\3 <g\3-0> <g-0\3>
![[image of music]](ec/lily-bbc45f99.png)
Selected Snippets
Controlling the placement of chord fingerings
The placement of fingering numbers can be controlled precisely. For fingering orientation to apply, you must use a chord construct <> even if it is a single note.
\relative c' { \set fingeringOrientations = #'(left) <c-1 e-3 a-5>4 \set fingeringOrientations = #'(down) <c-1 e-3 a-5>4 \set fingeringOrientations = #'(down right up) <c-1 e-3 a-5>4 \set fingeringOrientations = #'(up) <c-1 e-3 a-5>4 \set fingeringOrientations = #'(left) <c-1>2 \set fingeringOrientations = #'(down) <e-3>2 }
![[image of music]](55/lily-0b70c457.png)
Allowing fingerings to be printed inside the staff
By default, vertically oriented fingerings are positioned outside the staff. However, this behavior can be canceled. Note: you must use a chord construct <>, even if it is only a single note.
\relative c' { <c-1 e-2 g-3 b-5>2 \override Fingering.staff-padding = #'() <c-1 e-2 g-3 b-5>4 <g'-0> }
参照
記譜法リファレンス: 運指の指示
コード断片集: Fretted strings
内部リファレンス: StringNumber, Fingering
| [ << 専門的な記譜法 ] | [トップ][目次][インデックス][ ? ] | [ 入出力全般 >> ] | ||
| [ < 弦番号の指示 ] | [ 上へ : フレットのある弦楽器で共通の記譜法 ] | [ カスタム タブ譜 > ] | ||
デフォルトのタブ譜
弦をはじく楽器の楽譜は、しばしばタブ譜で記譜されます。伝統的な記譜法ではピッチが符頭で記述されるのに対して、数字 (あるいは、歴史上存在する楽譜では文字のような記号) で記述されます。タブ譜では、譜線は演奏される音符の弦を意味し、譜線上に配置される数字は対応する弦で押さえるべきフレットを意味します。同時に弾く音符は垂直方向に揃えられていることに注意してください。
デフォルトでは、弦 1 は一番上の弦であり、TabStaff の一番上の線に対応します。TabStaff のチューニングは、デフォルトでは、標準ギター (6 弦) のチューニングです。音符は、TabStaff コンテキストと TabVoice コンテキストを用いて、タブ譜として譜刻されます。筆記体のタブ譜の音部記号が自動的に付け加えられます。
\new TabStaff \relative { a,8 a' <c e> a d,8 a' <d f> a }
![[image of music]](05/lily-5f6308b3.png)
デフォルトのタブ譜は、音符の演奏時間や他の音楽記号 – 例えば、表現記号など – を保持しません。
symbols = { \time 3/4 c4-.^"Allegro" d( e) f4-.\f g a^\fermata \mark \default c8_.\<\( c16 c~ 2\! c'2.\prall\) } \score { << \new Staff { \clef "G_8" \symbols } \new TabStaff { \symbols } >> }
![[image of music]](a0/lily-5b832cb9.png)
伝統的な記譜法で用いられるすべての音楽記号をタブ譜に表示させるには、TabStaff コンテキスト内でコマンド \tabFullNotation を適用する必要があります。四分音符と区別するために、半音符には 2 重線の符幹が付けられるということを覚えておいてください。
symbols = { \time 3/4 c4-.^"Allegro" d( e) f4-.\f g a^\fermata \mark \default c8_.\<\( c16 c~ 2\! c'2.\prall\) } \score { \new TabStaff { \tabFullNotation \symbols } }
![[image of music]](81/lily-f8d7ea83.png)
デフォルトでは、ピッチはフレット ボードの最も低い演奏ポジション
(ファースト ポジション) に割り当てられます。自動的に開放弦が優先されます。ピッチを弾く弦を指定したい場合は、ピッチ名に弦番号指示を付け加えます。弦番号指示を伝統的な記譜法の譜に譜刻したくないのであれば、弦番号指示のステンシルを上書きすることでそうできます。通常、minimumFret の値を使って演奏ポジションを定義する方が入力しやすいです。minimumFret のデフォルト値は 0 です。
minimumFret がセットされている場合であっても、可能であれば開放弦が用いられます。この振る舞いは、restrainOpenStrings に #t をセットすることで変更することができます。
\layout { \omit Voice.StringNumber } \new StaffGroup << \new Staff \relative { \clef "treble_8" \time 2/4 c16 d e f g4 c,16\5 d\5 e\4 f\4 g4\4 c,16 d e f g4 } \new TabStaff \relative { c16 d e f g4 c,16\5 d\5 e\4 f\4 g4\4 \set TabStaff.minimumFret = #5 \set TabStaff.restrainOpenStrings = ##t c,16 d e f g4 } >>
![[image of music]](65/lily-d2d88531.png)
和音繰り返し記号 q を使って和音構造を繰り返すことができます。この機能をタブ譜で用いる場合、弦の削除や運指番号等のイベントがやっかいです。そのため、和音の繰り返し を用いたタブ譜の音楽表記で以下を明示的に実行したいと思うでしょう:
\chordRepeats #'(string-number-event fingering-event)
このコマンドは共通するものなので、\tabChordRepeats でも用いることができます。
guitar = \relative { r8 <gis-2 cis-3 b-0>~ q4 q8~ 8 q4 } \new StaffGroup << \new Staff { \clef "treble_8" \guitar } \new TabStaff { \tabChordRepeats \guitar } >>
![[image of music]](b4/lily-85eb3c7b.png)
デフォルトでは、改行されるタイには括弧が付けられます。繰り返しの差し替え部分でも同様です。
ties = \relative { \repeat volta 2 { e'2. f4~ 2 g2~ } \alternative { { g4 f2. } { g4\repeatTie c,2. } } b1~ \break b1 \bar "|." } \score { << \new StaffGroup << \context Staff { \clef "treble_8" \ties } \context TabStaff { \ties } >> >> \layout { indent = #0 ragged-right = ##t } }
![[image of music]](98/lily-a1347c2c.png)
コマンド \hideSplitTiedTabNotes は、括弧付きフレット番号の譜刻をキャンセルします:
ties = \relative { \repeat volta 2 { e'2. f4~ 2 g2~ } \alternative { { g4 f2. } { g4\repeatTie c,2. } } b1~ \break b1 \bar "|." } \score { << \new StaffGroup << \context Staff { \clef "treble_8" \ties } \context TabStaff { \hideSplitTiedTabNotes \ties } >> >> \layout { indent = #0 ragged-right = ##t } }
![[image of music]](9e/lily-9bca3ac4.png)
ハーモニック指示を演奏するピッチとしてタブ譜に付け加えることができます:
\layout { \omit Voice.StringNumber } firstHarmonic = { d'4\4\harmonic g'4\3\harmonic b'2\2\harmonic } \score { << \new Staff { \clef "treble_8" \firstHarmonic } \new TabStaff { \firstHarmonic } >> }
![[image of music]](af/lily-4edd3d52.png)
コマンド \harmonic は常に和音ではなく単一の音符
(和音の中にあることもあり得ます) にくっつける必要があります。12 フレットの開放弦ハーモニクス (ナチュラル ハーモニクス) でのみ意味をなします。他の全てのハーモニクスは LilyPond によって算出されます。これは、フレットを行う手の指が触れる弦のフレットを指示することにより実現されます。
fretHarmonics = { \harmonicByFret #5 d16\4 \harmonicByFret #4 d16\4 \harmonicByFret #3 d8\4 \harmonicByFret #5 <g\3 b\2>2. } \score { << \new Staff { \clef "treble_8" \fretHarmonics } \new TabStaff { \fretHarmonics } >> }
![[image of music]](24/lily-a0b303ae.png)
上記の方法の代わりに、ハーモニクスの運指に弦の長さの比率を指定することによってハーモニクスを算出させることもできます。
ratioHarmonics = { \harmonicByRatio #1/2 <g\3 b\2 e'\1>4 \harmonicByRatio #1/3 <g\3 b\2 e'\1>4 \harmonicByRatio #1/4 { g8\3 b8\2 e'4\1 } } \score { << \new Staff { \clef "treble_8" \ratioHarmonics } \new TabStaff { \ratioHarmonics } >> }
![[image of music]](8a/lily-d2bc5840.png)
Selected Snippets
Stem and beam behavior in tablature
The direction of stems is controlled the same way in tablature as in traditional notation. Beams can be made horizontal, as shown in this example.
\new TabStaff { \relative c { \tabFullNotation g16 b d g b d g b \stemDown \override Beam.concaveness = #10000 g,,16 b d g b d g b } }
![[image of music]](b9/lily-d141ce64.png)
Polyphony in tablature
Polyphony is created the same way in a TabStaff as in a regular
staff.
upper = \relative c' { \time 12/8 \key e \minor \voiceOne r4. r8 e, fis g16 b g e e' b c b a g fis e } lower = \relative c { \key e \minor \voiceTwo r16 e d c b a g4 fis8 e fis g a b c } \score { << \new StaffGroup = "tab with traditional" << \new Staff = "guitar traditional" << \clef "treble_8" \context Voice = "upper" \upper \context Voice = "lower" \lower >> \new TabStaff = "guitar tab" << \context TabVoice = "upper" \upper \context TabVoice = "lower" \lower >> >> >> }
![[image of music]](82/lily-cb8e711c.png)
Open string harmonics in tablature
This snippet demonstrates open-string harmonics
openStringHarmonics = { \textSpannerDown \override TextSpanner.staff-padding = #3 \override TextSpanner.dash-fraction = #0.3 \override TextSpanner.dash-period = #1 %first harmonic \override TextSpanner.bound-details.left.text = \markup\small "1st harm. " \harmonicByFret #12 e,2\6\startTextSpan \harmonicByRatio #1/2 e,\6\stopTextSpan %second harmonic \override TextSpanner.bound-details.left.text = \markup\small "2nd harm. " \harmonicByFret #7 e,\6\startTextSpan \harmonicByRatio #1/3 e,\6 \harmonicByFret #19 e,\6 \harmonicByRatio #2/3 e,\6\stopTextSpan %\harmonicByFret #19 < e,\6 a,\5 d\4 > %\harmonicByRatio #2/3 < e,\6 a,\5 d\4 > %third harmonic \override TextSpanner.bound-details.left.text = \markup\small "3rd harm. " \harmonicByFret #5 e,\6\startTextSpan \harmonicByRatio #1/4 e,\6 \harmonicByFret #24 e,\6 \harmonicByRatio #3/4 e,\6\stopTextSpan \break %fourth harmonic \override TextSpanner.bound-details.left.text = \markup\small "4th harm. " \harmonicByFret #4 e,\6\startTextSpan \harmonicByRatio #1/5 e,\6 \harmonicByFret #9 e,\6 \harmonicByRatio #2/5 e,\6 \harmonicByFret #16 e,\6 \harmonicByRatio #3/5 e,\6\stopTextSpan %fifth harmonic \override TextSpanner.bound-details.left.text = \markup\small "5th harm. " \harmonicByFret #3 e,\6\startTextSpan \harmonicByRatio #1/6 e,\6\stopTextSpan \break %sixth harmonic \override TextSpanner.bound-details.left.text = \markup\small "6th harm. " \harmonicByFret #2.7 e,\6\startTextSpan \harmonicByRatio #1/7 e,\6\stopTextSpan %seventh harmonic \override TextSpanner.bound-details.left.text = \markup\small "7th harm. " \harmonicByFret #2.3 e,\6\startTextSpan \harmonicByRatio #1/8 e,\6\stopTextSpan %eighth harmonic \override TextSpanner.bound-details.left.text = \markup\small "8th harm. " \harmonicByFret #2 e,\6\startTextSpan \harmonicByRatio #1/9 e,\6\stopTextSpan } \score { << \new Staff \with { \omit StringNumber } { \new Voice { \clef "treble_8" \openStringHarmonics } } \new TabStaff { \new TabVoice { \openStringHarmonics } } >> }
![[image of music]](59/lily-b6a66df7.png)
Fretted-string harmonics in tablature
Demonstrates fretted-string harmonics in tablature
pinchedHarmonics = { \textSpannerDown \override TextSpanner.bound-details.left.text = \markup {\halign #-0.5 \teeny "PH" } \override TextSpanner.style = #'dashed-line \override TextSpanner.dash-period = #0.6 \override TextSpanner.bound-details.right.attach-dir = #1 \override TextSpanner.bound-details.right.text = \markup { \draw-line #'(0 . 1) } \override TextSpanner.bound-details.right.padding = #-0.5 } harmonics = { %artificial harmonics (AH) \textLengthOn <\parenthesize b b'\harmonic>4_\markup{ \teeny "AH 16" } <\parenthesize g g'\harmonic>4_\markup{ \teeny "AH 17" } <\parenthesize d' d''\harmonic>2_\markup{ \teeny "AH 19" } %pinched harmonics (PH) \pinchedHarmonics <a'\harmonic>2\startTextSpan <d''\harmonic>4 <e'\harmonic>4\stopTextSpan %tapped harmonics (TH) <\parenthesize g\4 g'\harmonic>4_\markup{ \teeny "TH 17" } <\parenthesize a\4 a'\harmonic>4_\markup{ \teeny "TH 19" } <\parenthesize c'\3 c''\harmonic>2_\markup{ \teeny "TH 17" } %touch harmonics (TCH) a4( <e''\harmonic>2. )_\markup{ \teeny "TCH" } } frettedStrings = { %artificial harmonics (AH) \harmonicByFret #4 g4\3 \harmonicByFret #5 d4\4 \harmonicByFret #7 g2\3 %pinched harmonics (PH) \harmonicByFret #7 d2\4 \harmonicByFret #5 d4\4 \harmonicByFret #7 a4\5 %tapped harmonics (TH) \harmonicByFret #5 d4\4 \harmonicByFret #7 d4\4 \harmonicByFret #5 g2\3 %touch harmonics (TCH) a4 \harmonicByFret #9 g2.\3 } \score { << \new Staff \with { \omit StringNumber } { \new Voice { \clef "treble_8" \harmonics } } \new TabStaff { \new TabVoice { \frettedStrings } } >> }
![[image of music]](d6/lily-c10a0363.png)
Slides in tablature
Slides can be typeset in both Staff and TabStaff
contexts:
slides = { c'8\3(\glissando d'8\3) c'8\3\glissando d'8\3 \hideNotes \grace { g16\glissando } \unHideNotes c'4\3 \afterGrace d'4\3\glissando { \stemDown \hideNotes g16 } \unHideNotes } \score { << \new Staff { \clef "treble_8" \slides } \new TabStaff { \slides } >> \layout { \context { \Score \override Glissando.minimum-length = #4 \override Glissando.springs-and-rods = #ly:spanner::set-spacing-rods \override Glissando.thickness = #2 \omit StringNumber % or: %\override StringNumber.stencil = ##f } } }
![[image of music]](8e/lily-8a213411.png)
Chord glissando in tablature
Slides for chords are indicated by default in both Staff and
TabStaff. String numbers are necessary for TabStaff
because automatic string calculations are different for chords and for
single notes.
myMusic = \relative c' { <c e g>1 \glissando <f a c> } \score { << \new Staff { \clef "treble_8" \myMusic } \new TabStaff \myMusic >> } \score { << \new Staff { \clef "treble_8" \myMusic } \new TabStaff \with { \override Glissando.style = #'none } { \myMusic } >> }
![[image of music]](96/lily-bf82caba.png)
参照
記譜法リファレンス: 和音の繰り返し, グリッサンド, ハーモニクス, 符幹, 繰り返しを描き出す
コード断片集: Fretted strings
内部リファレンス: TabNoteHead, TabStaff, TabVoice, Beam
既知の問題と警告
和音は特殊な方法では処理できません。そのため、自動弦セレクタは和音の中にある 2 つの音符に対して同じ弦を選択することが容易に起こり得ます。
\partcombine を処理するには、TabStaff は特別なやり方で作成されたボイスを使う必要があります:
melodia = \partcombine { e4 g g g } { e4 e e e } << \new TabStaff << \new TabVoice = "one" s1 \new TabVoice = "two" s1 \new TabVoice = "shared" s1 \new TabVoice = "solo" s1 { \melodia } >> >>
![[image of music]](52/lily-f6bb662b.png)
ギターの特殊効果はハーモニクスとスライドに制限されています。
| [ << 専門的な記譜法 ] | [トップ][目次][インデックス][ ? ] | [ 入出力全般 >> ] | ||
| [ < デフォルトのタブ譜 ] | [ 上へ : フレットのある弦楽器で共通の記譜法 ] | [ フレット ダイアグラム マークアップ > ] | ||
カスタム タブ譜
LilyPond のタブ譜は、音符に対するフレットを、その音符が割り当てられている弦に基づいて、自動的に算出します。フレットの算出を行うために、弦のチューニングを指定する必要があります。弦のチューニングは stringTunings プロパティで指定します。
LilyPond にはあらかじめ定義された弦チューニングが用意されています – バンジョー、マンドリン、ギター、バス ギター、ウクレレ、バイオリン、ビオラ、チェロ、それにダブル バス用があります。LilyPond は、あらかじめ定義されたチューニングに対して、適切な移調をセットします。以下の例はバス ギター用であり、記述されている音符よりも 1 オクターブ低く演奏されます。
<< \new Voice \with { \omit StringNumber } { \clef "bass_8" \relative { c,4 d e f } } \new TabStaff \with { stringTunings = #bass-tuning } { \relative { c,4 d e f } } >>
![[image of music]](24/lily-9d3837f7.png)
デフォルトの弦チューニングは guitar-tuning で、これは標準の EADGBE チューニングです。他のあらかじめ定義されたチューニングには、guitar-open-g-tuning, mandolin-tuning それに
banjo-open-g-tuning があります。あらかじめ定義された弦チューニングは ‘ly/string-tunings-init.ly’ の中にあります。
望みに応じて任意の弦チューニングを作成することができます。\stringTuning 関数を用いて弦チューニングを定義し、カレント コンテキストの stringTunings としてセットすることができます。
\stringTuning の引数は、チューニングにおける各弦のピッチを定義する和音構造です。和音構造は絶対オクターブ モードにする必要があります
– 絶対オクターブ入力 を参照してください。和音の中で、一番大きな番号を持つ弦 (一般的に低い音の弦) が最初に来る必要があります。例えば、a'', d'', g', それに c' のピッチを持つ
4 弦の楽器用の弦チューニングを定義することができます:
mynotes = { c'4 e' g' c'' | e''4 g'' b'' c''' } << \new Staff { \clef treble \mynotes } \new TabStaff { \set Staff.stringTunings = \stringTuning <c' g' d'' a''> \mynotes } >>
![[image of music]](b8/lily-830baf7e.png)
FretBoards で stringTunings プロパティ用いることで、自動的にフレット ダイアグラムを算出させることもできます。
弦チューニングは、あらかじめ定義されたフレット ダイアグラムに対するハッシュ キーの一部として使われます
上記の例を、以下のように書き換えることができます:
custom-tuning = \stringTuning <c' g' d'' a''> mynotes = { c'4 e' g' c'' | e''4 g'' b'' c''' } << \new Staff { \clef treble \mynotes } \new TabStaff { \set TabStaff.stringTunings = #custom-tuning \mynotes } >>
![[image of music]](46/lily-e9db5326.png)
内部的には、弦チューニングは弦ピッチの Scheme リストです – それぞれの弦ピッチは各弦に対するピッチで、弦番号 1 から N の順に並んでいて、弦 1 はタブ譜の最上段、弦 N はタブ譜の最下段となります。通常、このリストは高いピッチから低いピッチの順になりますが、いくつかの楽器 (例えば、ウクレレ) の弦はピッチの高低順に並んでいません。
弦チューニング リストの中の弦ピッチは 1 つ 1 つが
LilyPond ピッチ オブジェクトです。ピッチ オブジェクトは Scheme 関数 ly:make-pitch
(Scheme functions を参照してください) で作成されます。
\stringTuning は和音構造から弦チューニング リストを作成します。
LilyPond は、TabStaff の行数と自動的に算出される FretBoard の弦数
(これは stringTunings の要素数です) を自動的に算出します。
すべての TabStaff コンテキストに同じカスタム チューニングを適用するには、下記のようにします:
\layout {
\context {
\TabStaff
stringTunings = \stringTuning <c' g' d'' a''>
}
}
現代タブ譜の音部記号を使うこともできます。
\new TabStaff { \clef moderntab <a, e a>1 \break \clef tab <a, e a>1 }
![[image of music]](c7/lily-07bd0565.png)
現代タブ譜の音部記号は、4 から 7 弦までのタブ譜をサポートします。
参照
記譜法リファレンス: 絶対オクターブ入力, あらかじめ定義されたフレット ダイアグラム, Scheme functions
インストールされているファイル: ‘ly/string-tunings-init.ly’ ‘scm/tablature.scm’
コード断片集: Fretted strings
内部リファレンス: Tab_note_heads_engraver
既知の問題と警告
ウクレレなどのように弦がピッチ順に並んでいない楽器では、大抵の場合、 タブ譜の自動算出は正しく機能しません。
| [ << 専門的な記譜法 ] | [トップ][目次][インデックス][ ? ] | [ 入出力全般 >> ] | ||
| [ < カスタム タブ譜 ] | [ 上へ : フレットのある弦楽器で共通の記譜法 ] | [ あらかじめ定義されたフレット ダイアグラム > ] | ||
フレット ダイアグラム マークアップ
フレット ダイアグラムを注釈のマークアップとして楽譜に追加することができます。このマークアップは記譜するフレット ダイアグラムについての情報を保持します。fret-diagram マークアップ インターフェイスは 3 種類あります: 標準、簡易、それに冗長です。これら 3 種類のインターフェイスが作り出すマークアップは等価ですが、そのマークアップ文字列が持つ情報量は異なります。フレット ダイアグラムを定義するのに用いられるマークアップ文字列の文法についての詳細は、Instrument Specific Markup を参照してください。
標準フレット ダイアグラムのマークアップ文字列は、弦の上に配置されるドットの弦番号とフレット番号を示します。さらに、開放弦と消音 (ミュート) 弦を示すこともできます。
<< \context ChordNames { \chordmode { c1 d:m } } \context Staff { \clef "treble_8" <c e g c' e'>1^\markup { \fret-diagram #"6-x;5-3;4-2;3-o;2-1;1-o;" } <d a d' f'>1^\markup { \fret-diagram #"6-x;5-x;4-o;3-2;2-3;1-1;" } } >>
![[image of music]](2f/lily-05a2f416.png)
fret-diagram マークアップ文字列のダイアグラムに、バレー指示を追加することができます。
<< \context ChordNames { \chordmode { f1 g } } \context Staff { \clef "treble_8" <f, c f a c' f'>1^\markup { \fret-diagram #"c:6-1-1;6-1;5-3;4-3;3-2;2-1;1-1;" } <g, d g b d' g'>1^\markup { \fret-diagram #"c:6-1-3;6-3;5-5;4-5;3-4;2-3;1-3;" } } >>
![[image of music]](b7/lily-3e101b1c.png)
フレット ダイアグラムのサイズ、それにダイアグラムの中のフレット数をfret-diagram マークアップ文字列の中で変更することができます。
<< \context ChordNames { \chordmode { f1 g } } \context Staff { \clef "treble_8" <f, c f a c' f'>1^\markup { \fret-diagram #"s:1.5;c:6-1-1;6-1;5-3;4-3;3-2;2-1;1-1;" } <g, b, d g b g'>1^\markup { \fret-diagram #"h:6;6-3;5-2;4-o;3-o;2-o;1-3;" } } >>
![[image of music]](8a/lily-511245a5.png)
バンジョーやウクレレなどの弦数に合わせて、fret-diagram マークアップ文字列でフレット ダイアグラムの弦数を変更することができます。
<< \context ChordNames { \chordmode { a1 } } \context Staff { % ウクレレの 'A' コード a'1^\markup { \fret-diagram #"w:4;4-2-2;3-1-1;2-o;1-o;" } } >>
![[image of music]](16/lily-0e74c331.png)
fret-diagram マークアップ文字列で運指の指示を追加して、配置を制御することができます。
<< \context ChordNames { \chordmode { c1 d:m } } \context Staff { \clef "treble_8" <c e g c' e'>1^\markup { \fret-diagram #"f:1;6-x;5-3-3;4-2-2;3-o;2-1-1;1-o;" } <d a d' f'>1^\markup { \fret-diagram #"f:2;6-x;5-x;4-o;3-2-2;2-3-3;1-1-1;" } } >>
![[image of music]](3b/lily-de137577.png)
fret-diagram マークアップ文字列でドットの大きさと位置を制御することができます。
<< \context ChordNames { \chordmode { c1 d:m } } \context Staff { \clef "treble_8" <c e g c' e'>1^\markup { \fret-diagram #"d:0.35;6-x;5-3;4-2;3-o;2-1;1-o;" } <d a d' f'>1^\markup { \fret-diagram #"p:0.2;6-x;5-x;4-o;3-2;2-3;1-1;" } } >>
![[image of music]](d7/lily-2ac6d2da.png)
fret-diagram-terse マークアップ文字列は弦番号を省略します。弦番号はセミコロンで示します。ダイアグラムの弦毎にセミコロンを記述します。最初のセミコロンは最高の弦番号に対応し、最後のセミコロンは第 1 弦に対応します。消音弦、開放弦、それにフレット番号を示すことができます。
<< \context ChordNames { \chordmode { c1 d:m } } \context Staff { \clef "treble_8" <c e g c' e'>1^\markup { \fret-diagram-terse #"x;3;2;o;1;o;" } <d a d' f'>1^\markup { \fret-diagram-terse #"x;x;o;2;3;1;" } } >>
![[image of music]](90/lily-2e63d1d9.png)
fret-diagram-terse マークアップ文字列にバレー指示を含めることができます。
<< \context ChordNames { \chordmode { f1 g } } \context Staff { \clef "treble_8" <f, c f a c' f'>1^\markup { \fret-diagram-terse #"1-(;3;3;2;1;1-);" } <g, d g b d' g'>1^\markup { \fret-diagram-terse #"3-(;5;5;4;3;3-);" } } >>
![[image of music]](f1/lily-28dea011.png)
fret-diagram-terse マークアップ文字列に運指の指示を含めることができます。
<< \context ChordNames { \chordmode { c1 d:m } } \context Staff { \override Voice.TextScript.fret-diagram-details.finger-code = #'below-string \clef "treble_8" <c e g c' e'>1^\markup { \fret-diagram-terse #"x;3-3;2-2;o;1-1;o;" } <d a d' f'>1^\markup { \fret-diagram-terse #"x;x;o;2-2;3-3;1-1;" } } >>
![[image of music]](c2/lily-742aef84.png)
fret-diagram-terse マークアップを使っている時、他のフレット ダイアグラム プロパティの調節には
\override を用いる必要があります。
fret-diagram-verbose マークアップ文字列のフォーマットは Scheme リストです。リストの各要素はフレット ダイアグラム上に配置する要素を示しています。
<< \context ChordNames { \chordmode { c1 d:m } } \context Staff { \clef "treble_8" <c e g c' e'>1^\markup { \fret-diagram-verbose #'( (mute 6) (place-fret 5 3) (place-fret 4 2) (open 3) (place-fret 2 1) (open 1) ) } <d a d' f'>1^\markup { \fret-diagram-verbose #'( (mute 6) (mute 5) (open 4) (place-fret 3 2) (place-fret 2 3) (place-fret 1 1) ) } } >>
![[image of music]](6d/lily-be4af47b.png)
fret-diagram-verbose マークアップ文字列に運指の指示とバレー指示を含めることができます。fret-diagram-verbose インターフェイスに特有なこととして、 カポ指示をフレット ダイアグラム上に配置することができます。カポ指示はすべての弦に重なる太い線です。カポを持つフレットは、フレット ダイアグラムの中の最も低いフレットです。
<< \context ChordNames { \chordmode { f1 g c } } \context Staff { \clef "treble_8" \override Voice.TextScript.fret-diagram-details.finger-code = #'below-string <f, c f a c' f'>1^\markup { \fret-diagram-verbose #'( (place-fret 6 1) (place-fret 5 3) (place-fret 4 3) (place-fret 3 2) (place-fret 2 1) (place-fret 1 1) (barre 6 1 1) ) } <g, b, d g b g'>1^\markup { \fret-diagram-verbose #'( (place-fret 6 3 2) (place-fret 5 2 1) (open 4) (open 3) (open 2) (place-fret 1 3 3) ) } <c g c' e' g'>1^\markup { \fret-diagram-verbose #'( (capo 3) (mute 6) (place-fret 4 5 1) (place-fret 3 5 2) (place-fret 2 5 3) ) } } >>
![[image of music]](da/lily-dcbedce2.png)
fret-diagram-verbose マークアップを使っている時、他のフレット ダイアグラム プロパティの調節には
\override を用いる必要があります。
ユーザの好みに応じて、fret-diagram-interface プロパティでフレット ダイアグラムのグラフィック レイアウトをカスタマイズすることが可能です。
詳細は、
fret-diagram-interface を参照してください。フレット ダイアグラム マークアップ用のインターフェイス プロパティは
Voice.TextScript に属します。
Selected Snippets
Changing fret orientations
Fret diagrams can be oriented in three ways. By default the top string or fret in the different orientations will be aligned.
\include "predefined-guitar-fretboards.ly" << \chords { c1 c1 c1 } \new FretBoards { \chordmode { c1 \override FretBoard.fret-diagram-details.orientation = #'landscape c1 \override FretBoard.fret-diagram-details.orientation = #'opposing-landscape c1 } } \new Voice { c'1 c'1 c' } >>
![[image of music]](d6/lily-d3407bf6.png)
Customizing markup fret diagrams
Fret diagram properties can be set through
'fret-diagram-details. For markup fret diagrams, overrides can
be applied to the Voice.TextScript object or directly to the
markup.
<< \chords { c1 | c | c | d } \new Voice = "mel" { \textLengthOn % Set global properties of fret diagram \override TextScript.size = #'1.2 \override TextScript.fret-diagram-details.finger-code = #'in-dot \override TextScript.fret-diagram-details.dot-color = #'white %% C major for guitar, no barre, using defaults % terse style c'1^\markup { \fret-diagram-terse #"x;3-3;2-2;o;1-1;o;" } %% C major for guitar, barred on third fret % verbose style % size 1.0 % roman fret label, finger labels below string, straight barre c'1^\markup { % standard size \override #'(size . 1.0) { \override #'(fret-diagram-details . ( (number-type . roman-lower) (finger-code . in-dot) (barre-type . straight))) { \fret-diagram-verbose #'((mute 6) (place-fret 5 3 1) (place-fret 4 5 2) (place-fret 3 5 3) (place-fret 2 5 4) (place-fret 1 3 1) (barre 5 1 3)) } } } %% C major for guitar, barred on third fret % verbose style % landscape orientation, arabic numbers, M for mute string % no barre, fret label down or left, small mute label font c'1^\markup { \override #'(fret-diagram-details . ( (finger-code . below-string) (number-type . arabic) (label-dir . -1) (mute-string . "M") (orientation . landscape) (barre-type . none) (xo-font-magnification . 0.4) (xo-padding . 0.3))) { \fret-diagram-verbose #'((mute 6) (place-fret 5 3 1) (place-fret 4 5 2) (place-fret 3 5 3) (place-fret 2 5 4) (place-fret 1 3 1) (barre 5 1 3)) } } %% simple D chord % terse style % larger dots, centered dots, fewer frets % label below string d'1^\markup { \override #'(fret-diagram-details . ( (finger-code . below-string) (dot-radius . 0.35) (dot-position . 0.5) (fret-count . 3))) { \fret-diagram-terse #"x;x;o;2-1;3-2;2-3;" } } } >>
![[image of music]](cb/lily-c91a5728.png)
参照
記譜法リファレンス: Instrument Specific Markup
コード断片集: Fretted strings
内部リファレンス: fret-diagram-interface
| [ << 専門的な記譜法 ] | [トップ][目次][インデックス][ ? ] | [ 入出力全般 >> ] | ||
| [ < フレット ダイアグラム マークアップ ] | [ 上へ : フレットのある弦楽器で共通の記譜法 ] | [ 自動フレット ダイアグラム > ] | ||
あらかじめ定義されたフレット ダイアグラム
フレット ダイアグラムを FretBoards コンテキストを用いて表示させることができます。デフォルトでは、 FretBoards コンテキストは参照テーブルに保存されいているフレット ダイアグラムを表示します:
\include "predefined-guitar-fretboards.ly" \context FretBoards { \chordmode { c1 d } }
![[image of music]](62/lily-8965ef14.png)
あらかじめ定義されたフレット ダイアグラムのデフォルトは
ファイル ‘predefined-guitar-fretboards.ly’ の中にあります。
フレット ダイアグラムは、コードのピッチと現在使われている stringTunings の値に基づいて保存されます。‘predefined-guitar-fretboards.ly’ が保持しているあらかじめ定義されたフレット ダイアグラムは、ギター用だけです。‘predefined-guitar-fretboards.ly’ の中にある例に従って、他の楽器あるいは他のチューニング用のあらかじめ定義されたフレット ダイアグラムを追加することができます。
ウクレレ用のフレット ダイアグラムはファイル ‘predefined-ukulele-fretboards.ly’ の中にあります。
\include "predefined-ukulele-fretboards.ly" myChords = \chordmode { a1 a:m a:aug } \new ChordNames { \myChords } \new FretBoards { \set Staff.stringTunings = #ukulele-tuning \myChords }
![[image of music]](28/lily-1dffeff7.png)
マンドリン用のフレット ダイアグラムはファイル ‘predefined-mandolin-fretboards.ly’ の中にあります。
\include "predefined-mandolin-fretboards.ly" myChords = \chordmode { c1 c:m7.5- c:aug } \new ChordNames { \myChords } \new FretBoards { \set Staff.stringTunings = #mandolin-tuning \myChords }
![[image of music]](d6/lily-c2b2f298.png)
コードのピッチを入力する方法は、同時進行する音楽として入力するか、コード モード (和音モードの概要 を参照してください) を用いて入力するかのどちらかです。
\include "predefined-guitar-fretboards.ly" \context FretBoards { \chordmode { c1 } <c' e' g'>1 }
![[image of music]](bb/lily-1779e45f.png)
コード ネームとフレット ダイアグラムを一緒に表示させることが一般的に行われます。これを実現するには、ChordNames コンテキストを FretBoards コンテキストと並列に配置して、両方のコンテキストに同じ音楽を与えます。
\include "predefined-guitar-fretboards.ly" mychords = \chordmode{ c1 f g } << \context ChordNames { \mychords } \context FretBoards { \mychords } >>
![[image of music]](fe/lily-b1e377aa.png)
あらかじめ定義されたフレット ダイアグラムは、c 移調されたコードに対するダイアグラムがフレット ダイアグラム テーブルに保存されていれば、移調可能です。
\include "predefined-guitar-fretboards.ly" mychords = \chordmode{ c1 f g } mychordlist = { \mychords \transpose c e { \mychords } } << \context ChordNames { \mychordlist } \context FretBoards { \mychordlist } >>
![[image of music]](f5/lily-9f08f629.png)
ギター用のあらかじめ定義されたフレット ダイアグラム テーブルは、17 キーのそれぞれに対して 8 つのコード (major, minor, augmented, diminished, dominant seventh, major seventh, minor seventh, dominant ninth) を保持しています。ウクレレ用のあらかじめ定義されたフレット ダイアグラム テーブルは、上記のコードに加えて、3 つのコード (major sixth, suspended second, それに suspended fourth) を保持しています。あらかじめ定義されたフレット ダイアグラムの完全なリストは Predefined fretboard diagrams で示されています。テーブルにエントリされていないコードがある場合、FretBoards エングラーバは 自動フレット ダイアグラム で説明する自動フレット ダイアグラム機能を用いて fret-diagram を算出します。
\include "predefined-guitar-fretboards.ly" mychords = \chordmode{ c1 c:maj9 } << \context ChordNames { \mychords } \context FretBoards { \mychords } >>
![[image of music]](f1/lily-16547444.png)
フレット ダイアグラムをフレット ダイアグラム テーブルに追加することができます。ダイアグラムを追加するには、ダイアグラムのハッシュ テーブル、ダイアグラムのコード、使用するチューニング、それにダイアグラムの定義を指定する必要があります。通常、ハッシュ テーブルは default-fret-table です。ダイアグラムの定義は fret-diagram-terse 定義文字列またはfret-diagram-verbose マーキング リストのどちらかです。
\include "predefined-guitar-fretboards.ly" \storePredefinedDiagram #default-fret-table \chordmode { c:maj9 } #guitar-tuning #"x;3-2;o;o;o;o;" mychords = \chordmode { c1 c:maj9 } << \context ChordNames { \mychords } \context FretBoards { \mychords } >>
![[image of music]](71/lily-d5b5c06a.png)
ピッチのオクターブを変えることで、同じコード ネームに対して異なるフレット ダイアグラムを保存することができます。オクターブを変える場合は、デフォルトのオクターブに対して少なくとも 2 オクターブ上げるか下げる必要があります。デフォルトの 1 オクターブ上または下のオクターブは、フレットボードの移調に使用されるためです。
\include "predefined-guitar-fretboards.ly" \storePredefinedDiagram #default-fret-table \chordmode { c'' } #guitar-tuning #(offset-fret 2 (chord-shape 'bes guitar-tuning)) mychords = \chordmode { c1 c'' } << \context ChordNames { \mychords } \context FretBoards { \mychords } >>
![[image of music]](1b/lily-51fc89ca.png)
In addition to fret diagrams, LilyPond stores an internal list of chord shapes. The chord shapes are fret diagrams that can be shifted along the neck to different positions to provide different chords. Chord shapes can be added to the internal list and then used to define predefined fret diagrams. Because they can be moved to various positions on the neck, chord shapes will normally not contain any open strings. Like fret diagrams, chord shapes can be entered as either fret-diagram-terse strings or fret-diagram-verbose marking lists.
\include "predefined-guitar-fretboards.ly" % Add a new chord shape \addChordShape #'powerf #guitar-tuning #"1-1;3-3;3-4;x;x;x;" % add some new chords based on the power chord shape \storePredefinedDiagram #default-fret-table \chordmode { f'' } #guitar-tuning #(chord-shape 'powerf guitar-tuning) \storePredefinedDiagram #default-fret-table \chordmode { g'' } #guitar-tuning #(offset-fret 2 (chord-shape 'powerf guitar-tuning)) mychords = \chordmode{ f1 f'' g g'' } << \context ChordNames { \mychords } \context FretBoards { \mychords } >>
![[image of music]](82/lily-86474402.png)
fret-diagram-interface のプロパティを通じて、フレット ダイアグラムのグラフィカル レイアウトをユーザの好みに応じてカスタマイズすることができます。詳細は
fret-diagram-interface を参照してください。あらかじめ定義されたフレット ダイアグラムのインターフェイス プロパティはFretBoards.FretBoard に属します。
Selected Snippets
Customizing fretboard fret diagrams
Fret diagram properties can be set through
'fret-diagram-details. For FretBoard fret diagrams, overrides
are applied to the FretBoards.FretBoard object. Like
Voice, FretBoards is a bottom level context, therefore
can be omitted in property overrides.
\include "predefined-guitar-fretboards.ly" \storePredefinedDiagram #default-fret-table \chordmode { c' } #guitar-tuning #"x;1-1-(;3-2;3-3;3-4;1-1-);" << \new ChordNames { \chordmode { c1 | c | c | d } } \new FretBoards { % Set global properties of fret diagram \override FretBoards.FretBoard.size = #'1.2 \override FretBoard.fret-diagram-details.finger-code = #'in-dot \override FretBoard.fret-diagram-details.dot-color = #'white \chordmode { c \once \override FretBoard.size = #'1.0 \once \override FretBoard.fret-diagram-details.barre-type = #'straight \once \override FretBoard.fret-diagram-details.dot-color = #'black \once \override FretBoard.fret-diagram-details.finger-code = #'below-string c' \once \override FretBoard.fret-diagram-details.barre-type = #'none \once \override FretBoard.fret-diagram-details.number-type = #'arabic \once \override FretBoard.fret-diagram-details.orientation = #'landscape \once \override FretBoard.fret-diagram-details.mute-string = #"M" \once \override FretBoard.fret-diagram-details.label-dir = #LEFT \once \override FretBoard.fret-diagram-details.dot-color = #'black c' \once \override FretBoard.fret-diagram-details.finger-code = #'below-string \once \override FretBoard.fret-diagram-details.dot-radius = #0.35 \once \override FretBoard.fret-diagram-details.dot-position = #0.5 \once \override FretBoard.fret-diagram-details.fret-count = #3 d } } \new Voice { c'1 | c' | c' | d' } >>
![[image of music]](c2/lily-caf1139b.png)
Defining predefined fretboards for other instruments
Predefined fret diagrams can be added for new instruments in addition to the standards used for guitar. This file shows how this is done by defining a new string-tuning and a few predefined fretboards for the Venezuelan cuatro.
This file also shows how fingerings can be included in the chords used
as reference points for the chord lookup, and displayed in the fret
diagram and the TabStaff, but not the music.
These fretboards are not transposable because they contain string information. This is planned to be corrected in the future.
% add FretBoards for the Cuatro % Note: This section could be put into a separate file % predefined-cuatro-fretboards.ly % and \included into each of your compositions cuatroTuning = #`(,(ly:make-pitch 0 6 0) ,(ly:make-pitch 1 3 SHARP) ,(ly:make-pitch 1 1 0) ,(ly:make-pitch 0 5 0)) dSix = { <a\4 b\1 d\3 fis\2> } dMajor = { <a\4 d\1 d\3 fis \2> } aMajSeven = { <a\4 cis\1 e\3 g\2> } dMajSeven = { <a\4 c\1 d\3 fis\2> } gMajor = { <b\4 b\1 d\3 g\2> } \storePredefinedDiagram #default-fret-table \dSix #cuatroTuning #"o;o;o;o;" \storePredefinedDiagram #default-fret-table \dMajor #cuatroTuning #"o;o;o;3-3;" \storePredefinedDiagram #default-fret-table \aMajSeven #cuatroTuning #"o;2-2;1-1;2-3;" \storePredefinedDiagram #default-fret-table \dMajSeven #cuatroTuning #"o;o;o;1-1;" \storePredefinedDiagram #default-fret-table \gMajor #cuatroTuning #"2-2;o;1-1;o;" % end of potential include file /predefined-cuatro-fretboards.ly #(set-global-staff-size 16) primerosNames = \chordmode { d:6 d a:maj7 d:maj7 g } primeros = { \dSix \dMajor \aMajSeven \dMajSeven \gMajor } \score { << \new ChordNames { \set chordChanges = ##t \primerosNames } \new Staff { \new Voice \with { \remove "New_fingering_engraver" } \relative c'' { \primeros } } \new FretBoards { \set Staff.stringTunings = #cuatroTuning % \override FretBoard % #'(fret-diagram-details string-count) = #'4 \override FretBoard.fret-diagram-details.finger-code = #'in-dot \primeros } \new TabStaff \relative c'' { \set TabStaff.stringTunings = #cuatroTuning \primeros } >> \layout { \context { \Score \override SpacingSpanner.base-shortest-duration = #(ly:make-moment 1 16) } } \midi { } }
![[image of music]](18/lily-0df00120.png)
ChordChanges for FretBoards
FretBoards can be set to display only when the chord changes or at the beginning of a new line.
\include "predefined-guitar-fretboards.ly" myChords = \chordmode { c1 c1 \break \set chordChanges = ##t c1 c1 \break c1 c1 } << \new ChordNames { \myChords } \new FretBoards { \myChords } \new Staff { \myChords } >>
![[image of music]](36/lily-9fc07777.png)
Fretboards alternate tables
Alternate fretboard tables can be created. These would be used in order to have alternate fretboards for a given chord.
In order to use an alternate fretboard table, the table must first be created. Fretboards are then added to the table.
The created fretboard table can be blank, or it can be copied from an existing table.
The table to be used in displaying predefined fretboards is selected by
the property \predefinedDiagramTable.
\include "predefined-guitar-fretboards.ly" % Make a blank new fretboard table #(define custom-fretboard-table-one (make-fretboard-table)) % Make a new fretboard table as a copy of default-fret-table #(define custom-fretboard-table-two (make-fretboard-table default-fret-table)) % Add a chord to custom-fretboard-table-one \storePredefinedDiagram #custom-fretboard-table-one \chordmode{c} #guitar-tuning "3-(;3;5;5;5;3-);" % Add a chord to custom-fretboard-table-two \storePredefinedDiagram #custom-fretboard-table-two \chordmode{c} #guitar-tuning "x;3;5;5;5;o;" << \chords { c1 | d1 | c1 | d1 | c1 | d1 | } \new FretBoards { \chordmode { \set predefinedDiagramTable = #default-fret-table c1 | d1 | \set predefinedDiagramTable = #custom-fretboard-table-one c1 | d1 | \set predefinedDiagramTable = #custom-fretboard-table-two c1 | d1 | } } \new Staff { \clef "treble_8" << \chordmode { c1 | d1 | c1 | d1 | c1 | d1 | } { s1_\markup "Default table" | s1 | s1_\markup \column {"New table" "from empty"} | s1 | s1_\markup \column {"New table" "from default"} | s1 | } >> } >>
![[image of music]](13/lily-6acf8b94.png)
参照
記譜法リファレンス: カスタム タブ譜, 自動フレット ダイアグラム, 和音モードの概要, Predefined fretboard diagrams
インストールされているファイル:
‘ly/predefined-guitar-fretboards.ly’,
‘ly/predefined-guitar-ninth-fretboards.ly’,
‘ly/predefined-ukulele-fretboards.ly’,
‘ly/predefined-mandolin-fretboards.ly’
コード断片集: Fretted strings
内部リファレンス: fret-diagram-interface
| [ << 専門的な記譜法 ] | [トップ][目次][インデックス][ ? ] | [ 入出力全般 >> ] | ||
| [ < あらかじめ定義されたフレット ダイアグラム ] | [ 上へ : フレットのある弦楽器で共通の記譜法 ] | [ 右手の運指 > ] | ||
自動フレット ダイアグラム
FretBoards コンテキストを用いて、入力された音符からフレット ダイアグラムを自動的に作成することができます。アクティブな stringTunings で入力された音符に対してあらかじめ定義されたダイアグラムが用意されていない場合、このコンテキストはその音符を演奏するために使用する弦とフレットを算出します。
<< \context ChordNames { \chordmode { f1 g } } \context FretBoards { <f, c f a c' f'>1 <g,\6 b, d g b g'>1 } \context Staff { \clef "treble_8" <f, c f a c' f'>1 <g, b, d g b' g'>1 } >>
![[image of music]](8f/lily-a3875bdc.png)
デフォルトではあらかじめ定義されたダイアグラムは読み込まれないため、フレット ダイアグラムの自動算出がデフォルトの振る舞いとなります。一旦デフォルトのダイアグラムが読み込まれると、あらかじめ定義されたコマンドで自動算出を有効または無効にすることができます:
\storePredefinedDiagram #default-fret-table <c e g c' e'> #guitar-tuning #"x;3-1-(;5-2;5-3;5-4;3-1-1-);" << \context ChordNames { \chordmode { c1 c c } } \context FretBoards { <c e g c' e'>1 \predefinedFretboardsOff <c e g c' e'>1 \predefinedFretboardsOn <c e g c' e'>1 } \context Staff { \clef "treble_8" <c e g c' e'>1 <c e g c' e'>1 <c e g c' e'>1 } >>
![[image of music]](90/lily-1dbfa400.png)
フレットボード算出機能が適切なダイアグラムを算出できないことがあります。これは、手動で音符を弦に割り当てることにより修復できることがあります。多くの場合、手動で割り当てる必要のある音符は 1 つだけです。その音符を手動で割り当てると、他の音符は FretBoards コンテキストにより適切に配置されます。
FretBoard フレット ダイアグラムに運指を追加することができます。
<< \context ChordNames { \chordmode { c1 d:m } } \context FretBoards { <c-3 e-2 g c'-1 e'>1 <d a-2 d'-3 f'-1>1 } \context Staff { \clef "treble_8" <c e g c' e'>1 <d a d' f'>1 } >>
![[image of music]](88/lily-07e06f15.png)
FretBoard コンテキストの弦とフレットを算出する際に使用される最小フレットを minimumFret プロパティでセットすることができます。
property.
<< \context ChordNames { \chordmode { d1:m d:m } } \context FretBoards { <d a d' f'>1 \set FretBoards.minimumFret = #5 <d a d' f'>1 } \context Staff { \clef "treble_8" <d a d' f'>1 <d a d' f'>1 } >>
![[image of music]](53/lily-a5895c75.png)
TabStaff コンテキストと同様に、FretBoards コンテキストの弦とフレットは
stringTunings プロパティに依存します。stringTunings プロパティについての情報は、カスタム タブ譜 を参照してください。
fret-diagram-interface のプロパティを通じて、フレット ダイアグラムのグラフィカル レイアウトをユーザの好みに応じてカスタマイズすることができます。詳細は
fret-diagram-interface を参照してください。FretBoards フレット ダイアグラムののインターフェイス プロパティはFretBoards.FretBoard に属します。
定義済みコマンド
\predefinedFretboardsOff,
\predefinedFretboardsOn
参照
記譜法リファレンス: カスタム タブ譜
コード断片集: Fretted strings
内部リファレンス: fret-diagram-interface
既知の問題と警告
自動フレットボード算出機能は、モノトーン チューニングではない楽器では適切に機能しません。
| [ << 専門的な記譜法 ] | [トップ][目次][インデックス][ ? ] | [ 入出力全般 >> ] | ||
| [ < 自動フレット ダイアグラム ] | [ 上へ : フレットのある弦楽器で共通の記譜法 ] | [ ギター > ] | ||
右手の運指
右手の運指 p-i-m-a は後に数字が続く \rightHandFinger を用いて入力する必要があります。
Note: Scheme 表記で数字を入力する場合、数字の後にくるもの (閉じ括弧 >
等であっても) の前にスペースを置くことを忘れないで下さい。
\clef "treble_8" c4\rightHandFinger #1 e\rightHandFinger #2 g\rightHandFinger #3 c'\rightHandFinger #4 <c\rightHandFinger #1 e\rightHandFinger #2 g\rightHandFinger #3 c'\rightHandFinger #4 >1
![[image of music]](54/lily-a6e62a5c.png)
入力しやすくするために、\rightHandFinger を短縮することができます。
例えば、RH に短縮します:
RH=#rightHandFinger
Selected Snippets
Placement of right-hand fingerings
It is possible to exercise greater control over the placement of right-hand fingerings by setting a specific property, as demonstrated in the following example. Note: you must use a chord construct
#(define RH rightHandFinger) \relative c { \clef "treble_8" \set strokeFingerOrientations = #'(up down) <c-\RH #1 e-\RH #2 g-\RH #3 c-\RH #4 >4 \set strokeFingerOrientations = #'(up right down) <c-\RH #1 e-\RH #2 g-\RH #3 c-\RH #4 >4 \set strokeFingerOrientations = #'(left) <c-\RH #1 e-\RH #2 g-\RH #3 c-\RH #4 >2 }
![[image of music]](82/lily-69a43911.png)
Fingerings string indications and right-hand fingerings
This example combines left-hand fingering, string indications, and right-hand fingering.
#(define RH rightHandFinger) \relative c { \clef "treble_8" <c-3\5-\RH #1 >4 <e-2\4-\RH #2 >4 <g-0\3-\RH #3 >4 <c-1\2-\RH #4 >4 }
![[image of music]](4e/lily-d54fdb24.png)
参照
コード断片集: Fretted strings
内部リファレンス: StrokeFinger
| [ << 専門的な記譜法 ] | [トップ][目次][インデックス][ ? ] | [ 入出力全般 >> ] | ||
| [ < 右手の運指 ] | [ 上へ : フレットのある弦楽器 ] | [ ポジションとバレーの指示 > ] | ||
2.4.2 ギター
ギターに関する記譜の問題の大部分は、フレットのある楽器全般のセクションで十分にカバーされています。しかしながら、ここでは 2, 3 の価値のあることをカバーします。歌詞の上にコード指示を配置しただけの歌集タイプのドキュメントを作成したいと望むユーザが時々います。LilyPond は楽譜譜刻プログラムなので、音楽記譜を持たないドキュメントの作成には推奨できません。ワード プロセッサ、テキスト エディタ、経験のあるユーザであれば GuitarTeX のような譜刻プログラムの方が適しています。
| ポジションとバレーの指示 | ||
| ハーモニクスとデッド ノートの指示 | ||
| パワー コードの指示 |
| [ << 専門的な記譜法 ] | [トップ][目次][インデックス][ ? ] | [ 入出力全般 >> ] | ||
| [ < ギター ] | [ 上へ : ギター ] | [ ハーモニクスとデッド ノートの指示 > ] | ||
ポジションとバレーの指示
以下の例は、楽譜にギターのポジションとバレーの指示を含める方法を示しています。
\relative { \clef "treble_8" b,16 d g b e \textSpannerDown \override TextSpanner.bound-details.left.text = #"XII " g16\startTextSpan b16 e g e b g\stopTextSpan e16 b g d }
![[image of music]](b9/lily-6592c45f.png)
参照
記譜法リファレンス: テキスト スパナ
コード断片集: Fretted strings, Expressive marks
| [ << 専門的な記譜法 ] | [トップ][目次][インデックス][ ? ] | [ 入出力全般 >> ] | ||
| [ < ポジションとバレーの指示 ] | [ 上へ : ギター ] | [ パワー コードの指示 > ] | ||
ハーモニクスとデッド ノートの指示
デッド ノートやハーモニクスを示すための特殊な符頭を使うことができます。通常、ハーモニクスにはテキスト マークアップによる説明も付け加えます。
\relative { \clef "treble_8" \override Staff.NoteHead.style = #'harmonic-mixed d'^\markup { \italic { \fontsize #-2 { "harm. 12" }}} <g b>1 }
![[image of music]](c2/lily-8ff6679c.png)
デッド ノート (ゴースト ノートとも呼ばれます) が通常の譜とタブ譜でサポートされます:
music = \relative { < a\3 \deadNote c\2 a'\1 >4 < b\3 \deadNote d\2 b'\1 > < c\3 \deadNote e\2 c'\1 > \deadNotesOn \tuplet 3/2 { g8 b e } \deadNotesOff < a,\3 c\2 e\1 >1 } \new StaffGroup << \new Staff { \clef "treble_8" \music } \new TabStaff { \music } >>
![[image of music]](9d/lily-6b8cbb40.png)
もう 1 つの演奏テクニックに パーム ミュート (特に、エレキ ギターで使用されます) があります。弦を弾く手の平で弦にミュートをかけます (訳者: 手の平=パーム(palm))。LilyPond は、符頭を三角形に変更することで、パーム ミュートの音符記譜をサポートします。
\new Voice { % 警告: 楽曲の先頭に palmMuteOn がある場合、 % palmMuteOff を正しく機能させるには Voice を % 明示的にインスタンス化する必要があります。 \relative c, { \clef "G_8" \palmMuteOn e8^\markup { \musicglyph #"noteheads.u2do" = palm mute } < e b' e > e \palmMuteOff e e \palmMute e e e | e8 \palmMute { e e e } e e e e | < \palmMute e b' e >8 \palmMute { e e e } < \palmMute e b' e >2 } }
![[image of music]](dd/lily-d84197ae.png)
参照
コード断片集: Fretted strings
記譜法リファレンス: 特殊な符頭, Note head styles
| [ << 専門的な記譜法 ] | [トップ][目次][インデックス][ ? ] | [ 入出力全般 >> ] | ||
| [ < ハーモニクスとデッド ノートの指示 ] | [ 上へ : ギター ] | [ バンジョー > ] | ||
パワー コードの指示
パワー コードのそのシンボルをコード モードの中、あるいは和音構造として譜刻することができます:
ChordsAndSymbols = { \chordmode { \powerChords e,,1:5 a,,1:5.8 \set minimumFret = #8 c,1:5 f,1:5.8 } \set minimumFret = #5 <a, e>1 <g d' g'>1 } \score { << \new ChordNames { \ChordsAndSymbols } \new Staff { \clef "treble_8" \ChordsAndSymbols } \new TabStaff { \ChordsAndSymbols } >> }
![[image of music]](b8/lily-3f71d4e6.png)
パワー コードのシンボルは、他の一般的な和音修飾子が使用されると自動的に Off になります:
mixedChords = \chordmode { c,1 \powerChords b,,1:5 fis,,1:5.8 g,,1:m } \score { << \new ChordNames { \mixedChords } \new Staff { \clef "treble_8" \mixedChords } \new TabStaff { \mixedChords } >> }
![[image of music]](a9/lily-4a8db5bc.png)
参照
音楽用語集: power chord
記譜法リファレンス: 和音の拡張と変形, コード ネームを譜刻する
コード断片集: Fretted strings
| [ << 専門的な記譜法 ] | [トップ][目次][インデックス][ ? ] | [ 入出力全般 >> ] | ||
| [ < パワー コードの指示 ] | [ 上へ : フレットのある弦楽器 ] | [ バンジョーのタブ譜 > ] | ||
2.4.3 バンジョー
| バンジョーのタブ譜 |
| [ << 専門的な記譜法 ] | [トップ][目次][インデックス][ ? ] | [ 入出力全般 >> ] | ||
| [ < バンジョー ] | [ 上へ : バンジョー ] | [ 打楽器 > ] | ||
バンジョーのタブ譜
LilyPond は 5 弦バンジョーの基本的なサポートを提供します。5 弦バンジョーのタブ譜を作成するときは、5 番目の弦のフレット番号を正しく取得するためにバンジョー タブ譜フォーマット関数を使用してください:
\new TabStaff << \set TabStaff.tablatureFormat = #fret-number-tablature-format-banjo \set TabStaff.stringTunings = #banjo-open-g-tuning { \stemDown g8 d' g'\5 a b g e d' | g4 d''8\5 b' a'\2 g'\5 e'\2 d' | g4 } >>
![[image of music]](7a/lily-b72e1cba.png)
5 弦バンジョーの一般的なチューニングのいくつかは、あらかじめ定義されています:
banjo-c-tuning (gCGBD), banjo-modal-tuning (gDGCD),
banjo-open-d-tuning (aDF#AD) それに banjo-open-dm-tuning
(aDFAD) です。
four-string-banjo 関数を用いて、これらを 4 弦バンジョーのチューニングに変換することができます:
\set TabStaff.stringTunings = #(four-string-banjo banjo-c-tuning)
参照
インストールされているファイル: ‘ly/string-tunings-init.ly’
コード断片集: Fretted strings
| [ << 専門的な記譜法 ] | [トップ][目次][インデックス][ ? ] | [ 入出力全般 >> ] | ||
| [ < バンジョーのタブ譜 ] | [ 上へ : 専門的な記譜法 ] | [ 打楽器で共通の記譜法 > ] | ||
2.5 打楽器
| 2.5.1 打楽器で共通の記譜法 |
| [ << 専門的な記譜法 ] | [トップ][目次][インデックス][ ? ] | [ 入出力全般 >> ] | ||
| [ < 打楽器 ] | [ 上へ : 打楽器 ] | [ 打楽器のためのリファレンス > ] | ||
2.5.1 打楽器で共通の記譜法
リズム音楽は主に打楽器とドラム記譜法で使用されますが、旋律のリズムを示すために使うこともできます。
| 打楽器のためのリファレンス | ||
| 基本的な打楽器の記譜法 | ||
| ドラム ロール | ||
| ピッチを持つ打楽器 | ||
| 打楽器の譜 | ||
| カスタム打楽器譜 | ||
| ゴースト ノート |
| [ << 専門的な記譜法 ] | [トップ][目次][インデックス][ ? ] | [ 入出力全般 >> ] | ||
| [ < 打楽器で共通の記譜法 ] | [ 上へ : 打楽器で共通の記譜法 ] | [ 基本的な打楽器の記譜法 > ] | ||
打楽器のためのリファレンス
- 打楽器の音楽はリズム譜で記譜されることがあります。リズム譜は 旋律のリズムを示す と 新たに譜をインスタンス化する で説明しています。
- MIDI 出力については、別のセクションで説明します。MIDI での打楽器 を参照してください。
参照
記譜法リファレンス: 旋律のリズムを示す, 新たに譜をインスタンス化する, MIDI での打楽器
コード断片集: Percussion
| [ << 専門的な記譜法 ] | [トップ][目次][インデックス][ ? ] | [ 入出力全般 >> ] | ||
| [ < 打楽器のためのリファレンス ] | [ 上へ : 打楽器で共通の記譜法 ] | [ ドラム ロール > ] | ||
基本的な打楽器の記譜法
打楽器の音符は \drummode モードで入力することができます。このモードでの音符の入力の仕方は標準モードに似ています。打楽器の音符を入力する最も簡単な方法は、打楽器用のコンテキストとエントリを作成する \drums コマンドを用いる方法です:
\drums { hihat4 hh bassdrum bd }
![[image of music]](99/lily-d50591a5.png)
上記の例は、下記を短縮したものです:
\new DrumStaff { \drummode { hihat4 hh bassdrum bd } }
![[image of music]](cf/lily-97211e57.png)
打楽器の音符名には完全名と省略名があり、どちらも入力ファイルで使うことができます。打楽器の音符名の完全なリストが Percussion notes にあります。
DrumStaff コンテキスト内で通常の記譜法でのピッチ (cis4 等)
を使うとエラーになるということに注意してください。打楽器の音部記号は自動的に DrumStaff に付け加えられますが、明示的に付け加えることもできます。他の音部記号も使うことができます。
\drums { \clef percussion bd4 bd bd bd \clef treble hh4 hh hh hh }
![[image of music]](bd/lily-9cf441e3.png)
打楽器のための MIDI サポートにはいくつか考慮すべき問題があります。MIDI での打楽器 を参照してください。
参照
記譜法リファレンス: MIDI での打楽器, Percussion notes.
インストールされているファイル: ‘ly/drumpitch-init.ly’
コード断片集: Percussion
| [ << 専門的な記譜法 ] | [トップ][目次][インデックス][ ? ] | [ 入出力全般 >> ] | ||
| [ < 基本的な打楽器の記譜法 ] | [ 上へ : 打楽器で共通の記譜法 ] | [ ピッチを持つ打楽器 > ] | ||
ドラム ロール
ドラム ロールは符幹に 3 本のスラッシュを付けて示します。4 分音符以上の長さの音符には 3 本のスラッシュが明示的に示され、8 分音符には 2 本のスラッシュが付けられ (連桁が 3 本目のスラッシュになります)、8 分音符よりも短い音符には連桁に 1 本のスラッシュが付け加えられます。これは、トレモロ記譜法によって実現されます – トレモロの繰り返し を参照してください。
\drums { \time 2/4 sn16 sn8 sn16 sn8 sn8:32 ~ sn8 sn8 sn4:32 ~ sn4 sn8 sn16 sn16 sn4 r4 }
![[image of music]](f5/lily-12026d29.png)
スティックは音符の上または下にマークアップ "R" または "L" を配置することによって示すことができます。マークアップの配置については 向きと配置
を参照してください。staff-padding プロパティを上書きして、ベースラインを好みに合わせることができます。
\drums { \repeat unfold 2 { sn16^"L" sn^"R" sn^"L" sn^"L" sn^"R" sn^"L" sn^"R" sn^"R" \stemUp sn16_"L" sn_"R" sn_"L" sn_"L" sn_"R" sn_"L" sn_"R" sn_"R" } }
![[image of music]](18/lily-1ed7403f.png)
参照
記譜法リファレンス: トレモロの繰り返し
コード断片集: Percussion
| [ << 専門的な記譜法 ] | [トップ][目次][インデックス][ ? ] | [ 入出力全般 >> ] | ||
| [ < ドラム ロール ] | [ 上へ : 打楽器で共通の記譜法 ] | [ 打楽器の譜 > ] | ||
ピッチを持つ打楽器
ピッチを持つ打楽器 (シロフォン、ビブラフォン、それにティンパニー) は通常の譜を用いて記述します。通常の譜については、このマニュアルの他のセクションでカバーしています。
参照
記譜法リファレンス: MIDI での打楽器
コード断片集: Percussion
| [ << 専門的な記譜法 ] | [トップ][目次][インデックス][ ? ] | [ 入出力全般 >> ] | ||
| [ < ピッチを持つ打楽器 ] | [ 上へ : 打楽器で共通の記譜法 ] | [ カスタム打楽器譜 > ] | ||
打楽器の譜
通常、複数の楽器での打楽器パートは複数線の譜を使い、譜の高さで打楽器を指定します。譜刻するには、音符を DrumStaff コンテキストや
DrumVoice コンテキスト内に配置する必要があります。
up = \drummode { crashcymbal4 hihat8 halfopenhihat hh hh hh openhihat } down = \drummode { bassdrum4 snare8 bd r bd sn4 } \new DrumStaff << \new DrumVoice { \voiceOne \up } \new DrumVoice { \voiceTwo \down } >>
![[image of music]](35/lily-d4581d3a.png)
上記の例は冗長な多声記譜法です。 私はボイスを聴いている で説明した短い多声記譜法を使うこともできます。例えば、以下のようになります:
\new DrumStaff << \drummode { bd4 sn4 bd4 sn4 << { \repeat unfold 16 hh16 } \\ { bd4 sn4 bd4 sn4 } >> } >>
![[image of music]](55/lily-b4e23093.png)
他のレイアウトでも実現できます。コンテキスト DrumVoice の中にある プロパティ drumStyleTable をセットすることによってレイアウトを変更できます。以下の変数があらかじめ定義されています:
-
drums-style これがデフォルトです。これは五線譜上に通常のドラム キットを刻譜します:
![[image of music]](fa/lily-ab448882.png)
このドラム構成は 6 種類のタムをサポートします。タムの種類が少ない場合は、望みの結果となるタムを選択してください。例えば、タムを五線譜の中間の 3 本の線に配置するのであれば、
tommh,tomml, それにtomfhを使います。-
timbales-style これは二線譜上にティンバレスを譜刻します:
![[image of music]](ca/lily-f6174a4f.png)
-
congas-style これは二線譜上にコンガを譜刻します:
![[image of music]](9f/lily-90919e1b.png)
-
bongos-style これは二線譜上にボンゴを譜刻します:
![[image of music]](8c/lily-cd957b16.png)
-
percussion-style これは全ての種類の打楽器を一線譜上に譜刻します:
![[image of music]](f3/lily-b604ffed.png)
| [ << 専門的な記譜法 ] | [トップ][目次][インデックス][ ? ] | [ 入出力全般 >> ] | ||
| [ < 打楽器の譜 ] | [ 上へ : 打楽器で共通の記譜法 ] | [ ゴースト ノート > ] | ||
カスタム打楽器譜
あらかじめ定義されている打楽器の音符名リストのいずれも気に入らなければ、入力ファイルの先頭でリストを定義することができます。
#(define mydrums '( (bassdrum default #f -1) (snare default #f 0) (hihat cross #f 1) (halfopenhihat cross "halfopen" 1) (pedalhihat xcircle "stopped" 2) (lowtom diamond #f 3))) up = \drummode { hh8 hh hhho hhho hhp4 hhp } down = \drummode { bd4 sn bd toml8 toml } \new DrumStaff << \set DrumStaff.drumStyleTable = #(alist->hash-table mydrums) \new DrumVoice { \voiceOne \up } \new DrumVoice { \voiceTwo \down } >>
![[image of music]](c0/lily-699f6fc0.png)
Selected Snippets
ここでいくつか例を挙げます:
2 つのウッド ブロックを ‘wbh’ (ハイ ウッド ブロック) と ‘wbl’ (ロー ウッド ブロック) で入力します:
% 以下の行でウッド ブロックの譜の中での位置を定義します。 % 好みに応じて位置を変更したり、特殊な譜頭を使うすることができます。 #(define mydrums '((hiwoodblock default #t 3) (lowoodblock default #t -2))) woodstaff = { % 以下は二線の譜を定義します。 % また、二線の位置も定義します。 \override Staff.StaffSymbol.line-positions = #'(-2 3) % 以下の行が必要です。この行を省略すると、小節線は短すぎます! \override Staff.BarLine.bar-extent = #'(-1.5 . 1.5) } \new DrumStaff { \set DrumStaff.drumStyleTable = #(alist->hash-table mydrums) % 以下の行で新しく定義したドラム スタイル テーブルを読み込みます。 \woodstaff \drummode { \time 2/4 wbl8 wbl16 wbl wbh8-> wbl | wbl8 wbl16 wbh-> ~ wbh wbl16 r8 | } }
![[image of music]](95/lily-ded864cb.png)
上記の特殊なケースでは、小節線の長さを \override Staff.BarLine.bar-extent #'(from . to)
で変更する必要があります。さもないと、小節線の長さが短すぎます。また、2 本の譜線の位置を定義する必要があります。これらの細かな内容についての更なる情報は 譜シンボル を参照してください。
タンバリンを ‘tamb’ で入力します:
#(define mydrums '((tambourine default #t 0))) tambustaff = { \override Staff.StaffSymbol.line-positions = #'( 0 ) \override Staff.BarLine.bar-extent = #'(-1.5 . 1.5) \set DrumStaff.instrumentName = #"Tambourine" } \new DrumStaff { \tambustaff \set DrumStaff.drumStyleTable = #(alist->hash-table mydrums) \drummode { \time 6/8 tamb8. tamb16 tamb8 tamb tamb tamb | tamb4. tamb8 tamb tamb | % トリルを正しい位置で終了させるために、演奏時間を伸縮して % 短い空白休符を配置するトリックが必要です! tamb2.*5/6 \startTrillSpan s8 \stopTrillSpan | } }
![[image of music]](60/lily-84b9f462.png)
タムタムを ‘tt’ で入力します:
#(define mydrums '((tamtam default #t 0))) tamtamstaff = { \override Staff.StaffSymbol.line-positions = #'( 0 ) \override Staff.BarLine.bar-extent = #'(-1.5 . 1.5) \set DrumStaff.instrumentName = #"Tamtam" } \new DrumStaff { \tamtamstaff \set DrumStaff.drumStyleTable = #(alist->hash-table mydrums) \drummode { tt 1 \pp \laissezVibrer } }
![[image of music]](92/lily-b7db72a0.png)
2 種類のベルを ‘cb’ (カウベル) と ‘rb’ (ライドベル) で入力します:
#(define mydrums '((ridebell default #t 3) (cowbell default #t -2))) bellstaff = { \override DrumStaff.StaffSymbol.line-positions = #'(-2 3) \set DrumStaff.drumStyleTable = #(alist->hash-table mydrums) \override Staff.BarLine.bar-extent = #'(-1.5 . 1.5) \set DrumStaff.instrumentName = #"Different Bells" } \new DrumStaff { \bellstaff \drummode { \time 2/4 rb8 rb cb cb16 rb-> ~ | 16 rb8 rb16 cb8 cb | } }
![[image of music]](12/lily-8098bc82.png)
ここで Stravinsky の ‘L’histoire du Soldat’ からの短い例を挙げます。
#(define mydrums '((bassdrum default #t 4) (snare default #t -4) (tambourine default #t 0))) global = { \time 3/8 s4. \time 2/4 s2*2 \time 3/8 s4. \time 2/4 s2 } drumsA = { \context DrumVoice << { \global } { \drummode { \autoBeamOff \stemDown sn8 \stemUp tamb s8 | sn4 \stemDown sn4 | \stemUp tamb8 \stemDown sn8 \stemUp sn16 \stemDown sn \stemUp sn8 | \stemDown sn8 \stemUp tamb s8 | \stemUp sn4 s8 \stemUp tamb } } >> } drumsB = { \drummode { s4 bd8 s2*2 s4 bd8 s4 bd8 s8 } } \layout { indent = #40 } \score { \new StaffGroup << \new DrumStaff { \set DrumStaff.instrumentName = \markup { \column { "Tambourine" "et" "caisse claire s. timbre" } } \set DrumStaff.drumStyleTable = #(alist->hash-table mydrums) \drumsA } \new DrumStaff { \set DrumStaff.instrumentName = #"Grosse Caisse" \set DrumStaff.drumStyleTable = #(alist->hash-table mydrums) \drumsB } >> }
![[image of music]](de/lily-0820aef6.png)
参照
コード断片集: Percussion
内部リファレンス: DrumStaff, DrumVoice
| [ << 専門的な記譜法 ] | [トップ][目次][インデックス][ ? ] | [ 入出力全般 >> ] | ||
| [ < カスタム打楽器譜 ] | [ 上へ : 打楽器で共通の記譜法 ] | [ 管楽器 > ] | ||
ゴースト ノート
ドラムと打楽器のゴースト ノートは \parenthesize コマンドを用いて作ることができます。詳細は 括弧 を参照してください。しかしながら、デフォルトの drummode は括弧を記譜する
Parenthesis_engraver プラグインを含みません。
\new DrumStaff \with { \consists "Parenthesis_engraver" } << \context DrumVoice = "1" { s1 } \context DrumVoice = "2" { s1 } \drummode { << { hh8[ hh] <hh sn> hh16 < \parenthesize sn > hh < \parenthesize sn > hh8 <hh sn> hh } \\ { bd4 r4 bd8 bd r8 bd } >> } >>
![[image of music]](be/lily-a9556bea.png)
また、各 \parenthesize 表現を和音構造 (< >) で囲む必要があるということに注意してください。
参照
コード断片集: Percussion
| [ << 専門的な記譜法 ] | [トップ][目次][インデックス][ ? ] | [ 入出力全般 >> ] | ||
| [ < ゴースト ノート ] | [ 上へ : 専門的な記譜法 ] | [ 管楽器で共通の記譜法 > ] | ||
2.6 管楽器
![[image of music]](18/lily-37713486.png)
このセクションでは管楽器の楽譜を記述する際に現れる記譜要素について説明します。
| 2.6.1 管楽器で共通の記譜法 | ||
| 2.6.2 バグパイプ | ||
| 2.6.3 木管楽器 |
| [ << 専門的な記譜法 ] | [トップ][目次][インデックス][ ? ] | [ 入出力全般 >> ] | ||
| [ < 管楽器 ] | [ 上へ : 管楽器 ] | [ 管楽器のためのリファレンス > ] | ||
2.6.1 管楽器で共通の記譜法
このセクションでは多くの管楽器で共通の記譜法について説明します。
| 管楽器のためのリファレンス | ||
| 運指 |
| [ << 専門的な記譜法 ] | [トップ][目次][インデックス][ ? ] | [ 入出力全般 >> ] | ||
| [ < 管楽器で共通の記譜法 ] | [ 上へ : 管楽器で共通の記譜法 ] | [ 運指 > ] | ||
管楽器のためのリファレンス
管楽器のための多くの記譜の問題は、ブレスとタンギングに関係します:
- ブレスは休符や ブレス記号 によって示すことができます。
- レガート奏法は スラー で示します。
- タンギングの種類 – レガートからノンレガート、スタッカートまでの範囲 – は、通常、アーティキュレーション記号で示し、スラーと組み合わせる場合もあります。アーティキュレーションと装飾 と breathing を参照してください。
- フラッター タンギングは、通常、音符の上にトレモロ記号とテキスト マークアップを配置して示します。トレモロの繰り返し を参照してください。
他の記譜要素を管楽器に適用することができます:
- 多くの管楽器は移調楽器です。楽器の移調 を参照してください。
- スライド グリッサンドはトロンボーンの特徴ですが、他の管楽器でもキーやバルブのグリッサンドを演奏できます。グリッサンド を参照してください。
- ハーモニック シリーズ (倍音連鎖) のグリッサンド – これは、全ての金管楽器で可能ですが、フレンチ ホルンでよく使われます – は、通常、装飾小音符 として記述します。
- 音符の終わりでのピッチの変化は Fall と Doit で説明しています。
- キー スラップとバルブ スラップはしばしば 特殊な符頭 の
crossスタイルで示します。 - 木管楽器は低い音符をオーバーブローして、ハーモニクスを鳴らすことができます。これは
flageoletアーティキュレーションによって示します。List of articulations を参照してください。 - 金管楽器のミュートは通常、テキスト マークアップで示しますが、頻繁に変更する場合は、
stoppedアーティキュレーションとopenアーティキュレーションを使う方が良いでしょう。アーティキュレーションと装飾 と List of articulations を参照してください。 - ホルンのストップット (閉塞音) は
stoppedアーティキュレーションで示します。アーティキュレーションと装飾 を参照してください。
Selected Snippets
Changing \flageolet mark size
To make the \flageolet circle smaller use the following Scheme
function.
smallFlageolet = #(let ((m (make-articulation "flageolet"))) (set! (ly:music-property m 'tweaks) (acons 'font-size -3 (ly:music-property m 'tweaks))) m) \layout { ragged-right = ##f } \relative c'' { d4^\flageolet_\markup { default size } d_\flageolet c4^\smallFlageolet_\markup { smaller } c_\smallFlageolet }
![[image of music]](ff/lily-e2d21823.png)
参照
記譜法リファレンス: ブレス記号, スラー, アーティキュレーションと装飾, List of articulations, トレモロの繰り返し, 楽器の移調, グリッサンド, 装飾小音符, Fall と Doit, 特殊な符頭
コード断片集: Winds
| [ << 専門的な記譜法 ] | [トップ][目次][インデックス][ ? ] | [ 入出力全般 >> ] | ||
| [ < 管楽器のためのリファレンス ] | [ 上へ : 管楽器で共通の記譜法 ] | [ バグパイプ > ] | ||
運指
トロンボーン以外の管楽器は各ピッチを鳴らすためにいくつかの指を使う必要があります。以下でいくつかの運指の例を示します。
木管楽器のダイアグラムを作り出すことができます。木管楽器のダイアグラム で説明します。
Selected Snippets
Fingering symbols for wind instruments
Special symbols can be achieved by combining existing glyphs, which is useful for wind instruments.
centermarkup = { \once \override TextScript.self-alignment-X = #CENTER \once \override TextScript.X-offset =#(lambda (g) (+ (ly:self-alignment-interface::centered-on-x-parent g) (ly:self-alignment-interface::x-aligned-on-self g))) } \score { \relative c'{ g\open \once \override TextScript.staff-padding = #-1.0 \centermarkup g^\markup { \combine \musicglyph #"scripts.open" \musicglyph #"scripts.tenuto" } \centermarkup g^\markup { \combine \musicglyph #"scripts.open" \musicglyph #"scripts.stopped" } g\stopped } }
![[image of music]](a9/lily-f5ee15af.png)
Recorder fingering chart
The following example demonstrates how fingering charts for wind instruments can be realized.
% range chart for paetzold contrabass recorder centermarkup = { \once \override TextScript.self-alignment-X = #CENTER \once \override TextScript.X-offset =#(lambda (g) (+ (ly:self-alignment-interface::centered-on-x-parent g) (ly:self-alignment-interface::x-aligned-on-self g))) } \score { \new Staff \with { \remove "Time_signature_engraver" \omit Stem \omit Flag \consists "Horizontal_bracket_engraver" } { \clef bass \set Score.timing = ##f f,1*1/4 \glissando \clef violin gis'1*1/4 \stemDown a'4^\markup{1)} \centermarkup \once \override TextScript.padding = #2 bes'1*1/4_\markup{\override #'(baseline-skip . 1.7) \column { \fontsize #-5 \slashed-digit #0 \finger 1 \finger 2 \finger 3 \finger 4 \finger 5 \finger 6 \finger 7} } b'1*1/4 c''4^\markup{1)} \centermarkup \once \override TextScript.padding = #2 cis''1*1/4 deh''1*1/4 \centermarkup \once \override TextScript.padding = #2 \once \override Staff.HorizontalBracket.direction = #UP e''1*1/4_\markup{\override #'(baseline-skip . 1.7) \column { \fontsize #-5 \slashed-digit #0 \finger 1 \finger 2 \finger 4 \finger 5} }\startGroup f''1*1/4^\markup{2)}\stopGroup } }
![[image of music]](4e/lily-34687338.png)
参照
記譜法リファレンス: 木管楽器のダイアグラム
コード断片集: Winds
| [ << 専門的な記譜法 ] | [トップ][目次][インデックス][ ? ] | [ 入出力全般 >> ] | ||
| [ < 運指 ] | [ 上へ : 管楽器 ] | [ バグパイプの定義 > ] | ||
2.6.2 バグパイプ
このセクションではバグパイプで共通の記譜法について説明します。
| バグパイプの定義 | ||
| バグパイプの例 |
| [ << 専門的な記譜法 ] | [トップ][目次][インデックス][ ? ] | [ 入出力全般 >> ] | ||
| [ < バグパイプ ] | [ 上へ : バグパイプ ] | [ バグパイプの例 > ] | ||
バグパイプの定義
LilyPond はスコティッシュ、ハイランド バグパイプ音楽のための特殊な定義を保持しています。この定義を使うには、入力ファイルの先頭に以下を付け加えます:
\include "bagpipe.ly"
これにより、バグパイプ音楽で共通の特殊な装飾小音符を短いコマンドで付け加えられるようになります。例えば、以下を \taor と記述することができます:
\grace { \small G32[ d G e] }
さらに、‘bagpipe.ly’ はバグパイプ音符のために、適切なオクターブのピッチ定義を保持しています。そのため、\relative や \transpose について配慮する必要はありません。
\include "bagpipe.ly" { \grg G4 \grg a \grg b \grg c \grg d \grg e \grg f \grA g A }
![[image of music]](9e/lily-b2fe3189.png)
通常、バグパイプ音楽は D メジャーの調を使います
(実際にはその調ではない場合であってもです)。しかしながら、使える調は D メジャーだけであるため、通常は調号を記譜しません。調号を記譜しないために、楽譜を \hideKeySignature で始めます。何らかの理由で調号を記譜したい場合は、代わりに \showKeySignature を使います。
現代音楽のなかには、C と F をフラットにするためクロス フィンガリングを使うものがあります。これは c-flat や f-flat で示すことができます。同様に、軽音楽のピブロホ ハイ G (piobaireachd high g) は、g-flat で示すことができます。
参照
コード断片集: Winds
| [ << 専門的な記譜法 ] | [トップ][目次][インデックス][ ? ] | [ 入出力全般 >> ] | ||
| [ < バグパイプの定義 ] | [ 上へ : バグパイプ ] | [ 木管楽器 > ] | ||
バグパイプの例
以下の例は、有名なアメージング グレースをバグパイプ記譜法にしたものです。
\include "bagpipe.ly" \layout { indent = 0.0\cm \context { \Score \remove "Bar_number_engraver" } } \header { title = "Amazing Grace" meter = "Hymn" arranger = "Trad. arr." } { \hideKeySignature \time 3/4 \grg \partial 4 a8. d16 \slurd d2 \grg f8[ e32 d16.] \grg f2 \grg f8 e \thrwd d2 \grg b4 \grG a2 \grg a8. d16 \slurd d2 \grg f8[ e32 d16.] \grg f2 \grg e8. f16 \dblA A2 \grg A4 \grg A2 f8. A16 \grg A2 \hdblf f8[ e32 d16.] \grg f2 \grg f8 e \thrwd d2 \grg b4 \grG a2 \grg a8. d16 \slurd d2 \grg f8[ e32 d16.] \grg f2 e4 \thrwd d2. \slurd d2 \bar "|." }
![[image of music]](63/lily-9a87a298.png)
参照
コード断片集: Winds
| [ << 専門的な記譜法 ] | [トップ][目次][インデックス][ ? ] | [ 入出力全般 >> ] | ||
| [ < バグパイプの例 ] | [ 上へ : 管楽器 ] | [ 木管楽器のダイアグラム > ] | ||
2.6.3 木管楽器
このセクションでは木管楽器に特有の記譜法について説明します。
| 2.6.3.1 木管楽器のダイアグラム |
| [ << 専門的な記譜法 ] | [トップ][目次][インデックス][ ? ] | [ 入出力全般 >> ] | ||
| [ < 木管楽器 ] | [ 上へ : 木管楽器 ] | [ 和音記譜法 > ] | ||
2.6.3.1 木管楽器のダイアグラム
木管楽器のダイアグラムで特定の音符で使用する運指を示すことができ、以下の楽器のダイアグラムが利用可能です:
- ピッコロ
- フルート
- オーボエ
- クラリネット
- バス クラリネット
- サクソフォン
- バスーン
- コントラバスーン
木管楽器のダイアグラムはマークアップとして作成します:
c''1^\markup { \woodwind-diagram #'piccolo #'((lh . (gis)) (cc . (one three)) (rh . (ees))) }
![[image of music]](d4/lily-8e4748a6.png)
キーはオープン、途中まで閉じる、リング キーを閉じる、または完全に閉じることができます:
\textLengthOn c''1^\markup { \center-column { "1/4 閉じる" \woodwind-diagram #'flute #'((cc . (one1q)) (lh . ()) (rh . ())) } } c''1^\markup { \center-column { "1/2閉じる" \woodwind-diagram #'flute #'((cc . (one1h)) (lh . ()) (rh . ())) } } c''1^\markup { \center-column { "3/4閉じる" \woodwind-diagram #'flute #'((cc . (one3q)) (lh . ()) (rh . ())) } } c''1^\markup { \center-column { "リング キーを閉じる" \woodwind-diagram #'flute #'((cc . (oneR)) (lh . ()) (rh . ())) } } c''1^\markup { \center-column { "完全に閉じる" \woodwind-diagram #'flute #'((cc . (oneF two)) (lh . ()) (rh . ())) } }
![[image of music]](f1/lily-fc0aeda7.png)
トリルはグレーで示します:
c''1^\markup { \woodwind-diagram #'bass-clarinet #'((cc . (threeT four)) (lh . ()) (rh . (b fis))) }
![[image of music]](8e/lily-df4e747e.png)
様々なトリルを表示させることができます:
\textLengthOn c''1^\markup { \center-column { "1/4 閉じるとリング キーを閉じる" \woodwind-diagram #'flute #'((cc . (one1qTR)) (lh . ()) (rh . ())) } } c''1^\markup { \center-column { "リング キーを閉じると完全に閉じる" \woodwind-diagram #'flute #'((cc . (oneTR)) (lh . ()) (rh . ())) } } c''1^\markup { \center-column { "リング キーを閉じるとオープン" \woodwind-diagram #'flute #'((cc . (oneRT)) (lh . ()) (rh . ())) } } c''1^\markup { \center-column { "オープンと完全に閉じる" \woodwind-diagram #'flute #'((cc . (oneT)) (lh . ()) (rh . ())) } } c''1^\markup { \center-column { "1/4 閉じると3/4 閉じる" \woodwind-diagram #'flute #'((cc . (one1qT3q)) (lh . ()) (rh . ())) } }
![[image of music]](ef/lily-0bf67aea.png)
楽器に対して使用できるすべてのキーと設定のリストを表示させることができます。コンソールに表示させるには #(print-keys-verbose 'flute) を用い、ログ ファイルに表示させるには
#(print-keys-verbose 'flute (current-error-port)) を用います。楽譜出力に表示させることはできません。
新しいダイアグラムを作成することができますが、これには Scheme を使える必要があり、すべてのユーザができるわけではありません。ダイアグラムのパターンは ‘scm/define-woodwind-diagrams.scm’ と ‘scm/display-woodwind-diagrams.scm’ にあります。
定義済みコマンド
Selected Snippets
Woodwind diagrams listing
The following music shows all of the woodwind diagrams currently defined in LilyPond.
\layout { indent = 0 } \relative c' { \textLengthOn c1^ \markup { \center-column { 'tin-whistle " " \woodwind-diagram #'tin-whistle #'() } } c1^ \markup { \center-column { 'piccolo " " \woodwind-diagram #'piccolo #'() } } c1^ \markup { \center-column { 'flute " " \woodwind-diagram #'flute #'() } } c1^\markup { \center-column { 'oboe " " \woodwind-diagram #'oboe #'() } } c1^\markup { \center-column { 'clarinet " " \woodwind-diagram #'clarinet #'() } } c1^\markup { \center-column { 'bass-clarinet " " \woodwind-diagram #'bass-clarinet #'() } } c1^\markup { \center-column { 'saxophone " " \woodwind-diagram #'saxophone #'() } } c1^\markup { \center-column { 'bassoon " " \woodwind-diagram #'bassoon #'() } } c1^\markup { \center-column { 'contrabassoon " " \woodwind-diagram #'contrabassoon #'() } } }
![[image of music]](2a/lily-b7e5c2a2.png)
Graphical and text woodwind diagrams
In many cases, the keys other than the central column can be displayed by key name as well as by graphical means.
\relative c'' { \textLengthOn c1^\markup \woodwind-diagram #'piccolo #'((cc . (one three)) (lh . (gis)) (rh . (ees))) c^\markup \override #'(graphical . #f) { \woodwind-diagram #'piccolo #'((cc . (one three)) (lh . (gis)) (rh . (ees))) } }
![[image of music]](1b/lily-c0f84e09.png)
Changing the size of woodwind diagrams
The size and thickness of woodwind diagrams can be changed.
\relative c'' { \textLengthOn c1^\markup \woodwind-diagram #'piccolo #'() c^\markup \override #'(size . 1.5) { \woodwind-diagram #'piccolo #'() } c^\markup \override #'(thickness . 0.15) { \woodwind-diagram #'piccolo #'() } }
![[image of music]](db/lily-738c73d7.png)
Woodwind diagrams key lists
The snippet below produces a list of all possible keys and key settings
for woodwind diagrams as defined in
scm/define-woodwind-diagrams.scm. The list will be displayed in
the log file, but not in the music. If output to the console is
wanted, omit the (current-error-port) from the commands.
#(print-keys-verbose 'piccolo (current-error-port)) #(print-keys-verbose 'flute (current-error-port)) #(print-keys-verbose 'flute-b-extension (current-error-port)) #(print-keys-verbose 'tin-whistle (current-error-port)) #(print-keys-verbose 'oboe (current-error-port)) #(print-keys-verbose 'clarinet (current-error-port)) #(print-keys-verbose 'bass-clarinet (current-error-port)) #(print-keys-verbose 'low-bass-clarinet (current-error-port)) #(print-keys-verbose 'saxophone (current-error-port)) #(print-keys-verbose 'soprano-saxophone (current-error-port)) #(print-keys-verbose 'alto-saxophone (current-error-port)) #(print-keys-verbose 'tenor-saxophone (current-error-port)) #(print-keys-verbose 'baritone-saxophone (current-error-port)) #(print-keys-verbose 'bassoon (current-error-port)) #(print-keys-verbose 'contrabassoon (current-error-port)) \score {c''1}
![[image of music]](1f/lily-cb6c81c9.png)
参照
インストールされているファイル:
‘scm/define-woodwind-diagrams.scm’,
‘scm/display-woodwind-diagrams.scm’
コード断片集: Winds
内部リファレンス: TextScript, instrument-specific-markup-interface
| [ << 専門的な記譜法 ] | [トップ][目次][インデックス][ ? ] | [ 入出力全般 >> ] | ||
| [ < 木管楽器のダイアグラム ] | [ 上へ : 専門的な記譜法 ] | [ 和音モード > ] | ||
2.7 和音記譜法
![[image of music]](e5/lily-c3d24a08.png)
和音を通常の音符として入力したり、和音モードで入力したりすることができ、様々な従来のヨーロッパの和音命名規則を用いて表示することができます。和音ネームと通奏低音記譜を表示させることもできます。
| 2.7.1 和音モード | ||
| 2.7.2 和音を表示する | ||
| 2.7.3 通奏低音 |
| [ << 専門的な記譜法 ] | [トップ][目次][インデックス][ ? ] | [ 入出力全般 >> ] | ||
| [ < 和音記譜法 ] | [ 上へ : 和音記譜法 ] | [ 和音モードの概要 > ] | ||
2.7.1 和音モード
和音モードでは、和音のピッチではなく、和音構造の指示子を用いてコードを入力します。
| 和音モードの概要 | ||
| 一般的な和音 | ||
| 和音の拡張と変形 |
| [ << 専門的な記譜法 ] | [トップ][目次][インデックス][ ? ] | [ 入出力全般 >> ] | ||
| [ < 和音モード ] | [ 上へ : 和音モード ] | [ 一般的な和音 > ] | ||
和音モードの概要
和音を 和音の音符 で説明しているように、同時進行する音として入力することができます。
和音を “和音モード” で入力することもできます。 和音モードは、ピッチではなく、従来のヨーロッパ音楽での和音構造に焦点を当てた入力モードです。これは、コード ネームを使うことに慣れているユーザにとって、和音を記述するのに便利な機能です。他の入力モードについて更なる情報は、入力モード を参照してください。
\chordmode { c1 g a g c }
![[image of music]](22/lily-c1b7acde.png)
和音モードを用いて入力される和音は音楽要素であり、同時進行する音として入力される和音と同様に移調させることができます。\chordmode は絶対モードであり、\chordmode ブロックでは \relative は効果を持ちません。しかしながら、\chordmode での絶対ピッチは音符モードよりも
1 オクターブ高くなります。
一連の音楽の中で、和音モードと音符モードを切り替えることができます:
\relative { <c' e g>2 <g b d> \chordmode { c2 f } <c e g>2 <g' b d> \chordmode { f2 g } }
![[image of music]](07/lily-caef34d8.png)
参照
音楽用語集: chord
コード断片集: Chords
既知の問題と警告
あらかじめ定義されているアーティキュレーションと装飾の短縮形を和音モードで使うことはできません。アーティキュレーションと装飾 を参照してください。
一連の音楽の中で和音モードと音符モードが混じっていて、和音モードから始まる場合、音符モードは新たに Staff コンテキストを作成します:
\chordmode { c2 f } <c e g>2 <g' b d>
![[image of music]](73/lily-5a049494.png)
これを避けるには、staff コンテキストを明示的に作成します:
\new Staff { \chordmode { c2 f } <c e g>2 <g' b d> }
![[image of music]](53/lily-321e0b64.png)
| [ << 専門的な記譜法 ] | [トップ][目次][インデックス][ ? ] | [ 入出力全般 >> ] | ||
| [ < 和音モードの概要 ] | [ 上へ : 和音モード ] | [ 和音の拡張と変形 > ] | ||
一般的な和音
長三和音 (メジャー トライアド) を入力するには、根音とオプションで演奏時間を示します:
\chordmode { c2 f4 g }
![[image of music]](58/lily-1405c932.png)
短三和音、増三和音、それに減三和音
(マイナー、オーグメンテッド、ディミニッシュト トライアド)
は、演奏時間の後に : とクオリティー修飾子を配置することにより入力します:
\chordmode { c2:m f4:aug g:dim }
![[image of music]](aa/lily-fd49a43a.png)
七の和音 (セブンス コード) を作成することができます:
\chordmode { c1:7 c:m7 c:maj7 c:dim7 c:aug7 }
![[image of music]](30/lily-96e7b3d1.png)
以下に示す表は、三和音と七の和音に付けられるクオリティー修飾子を示しています。和音に付けくわえられる第 7 音は短 7 度またはフラットの 7 度で、基本となる七の和音は属七の和音となります。すべての変化は属七の和音からの変化です。修飾子の使い方についてのより完全な表は Common chord modifiers にあります。
| 修飾子 | 動作 | 例 |
| 無し | デフォルトの動作で、長三和音を作り出します。 |
|
| m, m7 | 短和音。この修飾子は第 3 音を下げます。 |
|
| dim, dim7 | 減和音。この修飾子は 3 度と 5 度 (と存在する場合は 7 度) の音を下げます。 |
|
| aug | 増和音。この修飾子は第 5 音を上げます。 |
|
| maj, maj7 | 長七和音。この修飾子は第 7 音を上げます。maj の後の 7 はオプションです。長三和音を作り出す時にこの修飾子は 使いません。 |
|
![[image of music]](cf/lily-e23673e4.png)
![[image of music]](1c/lily-77699c1f.png)
![[image of music]](a0/lily-c1d65773.png)
![[image of music]](37/lily-e96aa118.png)
![[image of music]](47/lily-3ee66bc6.png)
参照
記譜法リファレンス: Common chord modifiers, 和音の拡張と変形
コード断片集: Chords
既知の問題と警告
和音に付けるクオリティー修飾子は 1 つだけ – 通常は和音の最も高い音に対して – にしてください。複数のクオリティー修飾子を持つ和音は、エラーや警告無しで構文解析されますが、結果は予測できません。1 つのクオリティー修飾子では実現できない和音は、個々のピッチに分解してください – 和音の拡張と変形 で説明しています。
| [ << 専門的な記譜法 ] | [トップ][目次][インデックス][ ? ] | [ 入出力全般 >> ] | ||
| [ < 一般的な和音 ] | [ 上へ : 和音モード ] | [ 和音を表示する > ] | ||
和音の拡張と変形
和音モードで様々な複雑さの和音構造を作ることができます。修飾子文字列を使って和音を拡張したり、和音の音を追加 / 削除したり、和音の音を上げ / 下げしたり、低音を付け加えたり、転回を作り出したりすることができます。
: のすぐ後にくる数字は和音の拡張となります。和音は、根音から指定された数に達するまで 3 度毎に音を付け加えることによって構成されます。和音の拡張として付け加えられる第 7 音は短 7 度またはフラットの 7 度であることに注意してください。拡張で指定された音が 3 度毎の音ではない場合 (例えば 6)、拡張を超えない範囲で 3 度毎に音が付け加えられ、最後に拡張の音が付け加えられます。拡張で取り得る最大値は 13 です。それよりも大きな値は 13 と解釈されます。
\chordmode { c1:2 c:3 c:4 c:5 c1:6 c:7 c:8 c:9 c1:10 c:11 c:12 c:13 c1:14 }
![[image of music]](04/lily-c088ea0a.png)
c:5 と c はどちらも
C の長三和音を作り出すということに注意してください。
第 11 音が第 13 音と組み合わされると響きが良くないため、:13 和音から第 11 音は削除されます
(明示的に第 11 音が付け加えられない限りは)。
\chordmode { c1:13 c:13.11 c:m13 }
![[image of music]](50/lily-f3e86b65.png)
個々の音を和音に付けくわえることができます。追加は拡張の後にドット (.) を前置して記述します。和音に付けくわえられる第 7 音は、長 7 度ではなく、短 7 度またはフラットの 7 度です。
\chordmode { c1:3.5.6 c:3.7.8 c:3.6.13 }
![[image of music]](ac/lily-6a2190d2.png)
追加する音の高さは望みの高さにすることができます。
\chordmode { c4:3.5.15 c:3.5.20 c:3.5.25 c:3.5.30 }
![[image of music]](10/lily-69f63d44.png)
和音の音は、数字の後ろに + または- を置くことで変化させることができます。和音構造の一部として自動的に含まれる音を変化させるには、その音を追加して変化させます。
\chordmode { c1:7+ c:5+.3- c:3-.5-.7- }
![[image of music]](69/lily-5d4b87e4.png)
和音に音を追加できるだけでなく、^ を前置させた修飾子文字列で音を削除することができます。複数の音を削除する場合は、最初の ^ の後に削除する音を . で区切って記述します。
\chordmode { c1^3 c:7^5 c:9^3 c:9^3.5 c:13.11^3.7 }
![[image of music]](8c/lily-f46034c7.png)
修飾子 sus を修飾子文字列に付け加えることにより、サスペンド コードを作り出すことができます。これは和音から第 3 音を削除します。さらに sus の後に 2 または 4 を付け加えると、和音に第 2 音または第 4 音が追加されます。sus は ^3 と等価であり、sus4 は .4^3 と等価です。
\chordmode { c1:5 c:sus2 c:sus4 c:5.4 }
![[image of music]](d5/lily-a4544538.png)
転回 (根音ではないピッチを和音の下に配置します) と低音の追加は、和音の後に /pitch を記述することで指定できます。
\chordmode { c1 c/g c/f }
![[image of music]](f2/lily-6ffdb65a.png)
転回として音を移動させる代わりに、/+pitch を用いて和音に低音を付け加えることができます。
\chordmode { c1 c/g c/+g }
![[image of music]](68/lily-682ba2ca.png)
様々な標準和音を作り出すために使用される和音修飾子を Common chord modifiers で示しています。
参照
記譜法リファレンス: Common chord modifiers
コード断片集: Chords
既知の問題と警告
和音で各音を 1 度だけ使うことができます。以下の例では、最後の 5+ が解釈されるため、増和音が作り出されます。
\chordmode { c1:3.5.5-.5+ }
![[image of music]](f8/lily-e60d1645.png)
第二転回和音を作り出すには、低音を追加するしかありません。最初の転回 (2 つ目の和音) を第二転回和音にするには、和音の根音を変える必要があります。
\chordmode { c'1: c':/g e:6-3-^5 e:m6-^5 }
![[image of music]](3b/lily-5288cc4f.png)
| [ << 専門的な記譜法 ] | [トップ][目次][インデックス][ ? ] | [ 入出力全般 >> ] | ||
| [ < 和音の拡張と変形 ] | [ 上へ : 和音記譜法 ] | [ コード ネームを譜刻する > ] | ||
2.7.2 和音を表示する
譜に音符を表示させるという標準の表示に加えて、コード ネームを表示させることができます。
| コード ネームを譜刻する | ||
| コード ネームをカスタマイズする |
| [ << 専門的な記譜法 ] | [トップ][目次][インデックス][ ? ] | [ 入出力全般 >> ] | ||
| [ < 和音を表示する ] | [ 上へ : 和音を表示する ] | [ コード ネームをカスタマイズする > ] | ||
コード ネームを譜刻する
コード ネームは ChordNames コンテキストに譜刻されます:
\new ChordNames { \chordmode { c2 f4. g8 } }
![[image of music]](c4/lily-b5db8c1e.png)
和音は同時進行する音符としてか、和音モードを使用することで入力することができます。転回や低音の追加が無い限り入力モードに関係なく、和音と同じコード ネームが表示されます:
<< \new ChordNames { <c e g>2 <f bes c> <f c' e g>1 \chordmode { c2 f:sus4 c1:/f } } { <c e g>2 <f bes c> <f, c' e g>1 \chordmode { c2 f:sus4 c1:/f } } >>
![[image of music]](d3/lily-096cd35f.png)
ChordNames コンテキストに休符が渡されると、noChordSymbol マークアップが表示されます。
<< \new ChordNames \chordmode { c1 r1 g1 c1 } \chordmode { c1 r1 g1 c1 } >>
![[image of music]](cf/lily-d4f33f31.png)
\chords { ... } は \new ChordNames { \chordmode { ... } }
の短縮形です。
\chords { c2 f4.:m g8:maj7 }
![[image of music]](d7/lily-1ce8fbe9.png)
\new ChordNames { \chordmode { c2 f4.:m g8:maj7 } }
![[image of music]](fe/lily-7e655110.png)
Selected Snippets
Showing chords at changes
Chord names can be displayed only at the start of lines and when the chord changes.
harmonies = \chordmode { c1:m c:m \break c:m c:m d } << \new ChordNames { \set chordChanges = ##t \harmonies } \new Staff { \relative c' { \harmonies } } >>
![[image of music]](41/lily-0e76df5f.png)
Simple lead sheet
When put together, chord names, a melody, and lyrics form a lead sheet:
<< \chords { c2 g:sus4 f e } \relative c'' { a4 e c8 e r4 b2 c4( d) } \addlyrics { One day this shall be free __ } >>
参照
音楽用語集: chord
記譜法リファレンス: 音楽を並列に記述する
コード断片集: Chords
内部リファレンス: ChordNames, ChordName, Chord_name_engraver, Volta_engraver, Bar_engraver
既知の問題と警告
同時進行する音として和音を入力している場合、転回や低音の追加を含む和音のコード ネームは正しく表示されません。
| [ << 専門的な記譜法 ] | [トップ][目次][インデックス][ ? ] | [ 入出力全般 >> ] | ||
| [ < コード ネームを譜刻する ] | [ 上へ : 和音を表示する ] | [ 通奏低音 > ] | ||
コード ネームをカスタマイズする
和音の命名規則は 1 つではありません。流儀が異なれば、同じ和音に対して異なるコード ネームを使います。コード ネームで表示される記号にも違いがあります。コード ネームで表示される名前と記号をカスタマイズすることができます。
基本となるコード ネーム命名規則はジャズ音楽用のものです。これは Klaus Ignatzek によって提唱されたものです ( Literature list を参照してください)。コード ネーム命名規則を変更することができます。以下で説明する変更方法を用いてジャズ コード命名規則を改造することができます。Ignatzek のジャズ コードと変形コードを Chord name chart の表で示しています。
命名規則の変更に加えて、根音の音符名の言語を変更することができます。あらかじめ定義されているコマンド \germanChords,
\semiGermanChords, \italianChords
それに \frenchChords が言語を設定します。
これらのコマンドの効果を以下に示します:
![[image of music]](ab/lily-c693a5eb.png)
ドイツ歌集では短和音を接尾辞 m を伴わない小文字で記述する場合があります。これは chordNameLowercaseMinor プロパティを設定することで実現できます:
\chords { \set chordNameLowercaseMinor = ##t c2 d:m e:m f }
![[image of music]](b6/lily-891cf622.png)
既存の設定では望みの出力を得られない場合、コード ネームの表示を以下のプロパティを通じて調整することができます。
-
chordRootNamer -
通常、コード ネームは根音の文字にオプションの変化を付けて表示されます。この関数がピッチから文字に変換します。新しい関数をこのプロパティにセットすることで特殊な音符名 (例えば、B コードを表すドイツ語の ‘H’) を作り出すことができます。
-
majorSevenSymbol -
このプロパティは
chordRootNamerの出力に続けて長七和音を示すために使用されるマークアップ オブジェクトを保持します。あらかじめ定義されている選択肢はwhiteTriangleMarkupとblackTriangleMarkupです。 -
additionalPitchPrefix -
コード ネームが追加のピッチを保持している場合、追加ピッチの前にテキストを付けることができます。見た目が雑然となることを避けるため、デフォルトでは追加ピッチの前にテキストは付きません。しかしながら、追加ピッチが少数の場合はテキストを付けると効果的です。
\new ChordNames { <c e g d'> % add9 \set additionalPitchPrefix = #"add" <c e g d'> % add9 }![[image of music]](21/lily-7ba65d20.png)
-
chordNoteNamer -
コード ネームが根音以外の追加ピッチを保持している場合 (例えば追加の低音)、この関数が追加ピッチを譜刻するのにを用いられます。デフォルトでは、ピッチは
chordRootNamerを用いて譜刻されます。chordNoteNamerにカスタマイズした関数をセットすることで、この振る舞いを変えることができます。例えば、低音を小文字で譜刻させることができます。 -
chordNameSeparator -
通常、コード ネームはパート毎に小さなスペースで区切られます。
chordNameSeparatorを設定することにより、区切りをお望みのマークアップに変更することができます。これはコード ネームと低音名の間の区切りには影響を与えません – この区切りをカスタマイズする場合は、slashChordSeparatorを設定します。\chords { c4:7.9- c:7.9-/g \set chordNameSeparator = \markup { "/" } \break c4:7.9- c:7.9-/g }![[image of music]](57/lily-f5a5bd44.png)
-
slashChordSeparator -
和音に通常の根音とは異なる低音を持たせることができます。これは “転回” と呼ばれ、デフォルトの記譜法では主和音と低音符の間をシュラッシュで区切るためスラッシュ “スラッシュ コード” とも呼ばれます。
slashChordSeparatorのデフォルト値はスラッシュですが、お望みのマークアップに変更することができます。\chords { c4:7.9- c:7.9-/g \set slashChordSeparator = \markup { " over " } \break c4:7.9- c:7.9-/g }![[image of music]](d9/lily-d4fe0c86.png)
-
chordNameExceptions -
このプロパティはペアのリストです。各ペアの最初の要素は和音の中に存在する音を指定するピッチのセットです。次の要素は、最初の要素で指定された和音のコード ネームを作り出すために、
chordRootNamerの出力の後に記譜されるマークアップです。 -
minorChordModifier -
短和音は和音の根音の右側に接尾辞 ‘m’ を配置することによって記述されることが多いです。しかしながら、マイナス記号等の他の接尾辞を使う場合もあります。
\chords { c4:min f:min7 \set minorChordModifier = \markup { "-" } \break c4:min f:min7 }![[image of music]](93/lily-859d79c7.png)
-
chordPrefixSpacer -
通常、
minorChordModifierで指定される短和音の修飾子は和音の根音のすぐ右に譜刻されます。chordPrefixSpacerを設定することにより、根音と修飾子の間にスペースを置くことができます。根音が変化した場合、このスペースは配置されません。
定義済みコマンド
\whiteTriangleMarkup,
\blackTriangleMarkup,
\germanChords,
\semiGermanChords,
\italianChords,
\frenchChords
Selected Snippets
Chord name exceptions
The property chordNameExceptions can be used to store a list of
special notations for specific chords.
% modify maj9 and 6(add9) % Exception music is chords with markups chExceptionMusic = { <c e g b d'>1-\markup { \super "maj9" } <c e g a d'>1-\markup { \super "6(add9)" } } % Convert music to list and prepend to existing exceptions. chExceptions = #( append ( sequential-music-to-chord-exceptions chExceptionMusic #t) ignatzekExceptions) theMusic = \chordmode { g1:maj9 g1:6.9 \set chordNameExceptions = #chExceptions g1:maj9 g1:6.9 } \layout { ragged-right = ##t } << \context ChordNames \theMusic \context Voice \theMusic >>
![[image of music]](24/lily-41cb1cea.png)
chord name major7
The layout of the major 7 can be tuned with majorSevenSymbol.
\chords { c:7+ \set majorSevenSymbol = \markup { j7 } c:7+ }
![[image of music]](40/lily-acb5f777.png)
Adding bar lines to ChordNames context
To add bar line indications in the ChordNames context, add the
Bar_engraver.
\new ChordNames \with { \override BarLine.bar-extent = #'(-2 . 2) \consists "Bar_engraver" } \chordmode { f1:maj7 f:7 bes:7 }
![[image of music]](7d/lily-2571256b.png)
Volta below chords
By adding the Volta_engraver to the relevant staff, volte can be
put under chords.
\score { << \chords { c1 c1 } \new Staff \with { \consists "Volta_engraver" } { \repeat volta 2 { c'1 } \alternative { c' } } >> \layout { \context { \Score \remove "Volta_engraver" } } }
![[image of music]](16/lily-b8fde17e.png)
Changing chord separator
The separator between different parts of a chord name can be set to any markup.
\chords { c:7sus4 \set chordNameSeparator = \markup { \typewriter | } c:7sus4 }
![[image of music]](bd/lily-be8d06a4.png)
参照
記譜法リファレンス: Chord name chart, Common chord modifiers
楽譜譜刻の自動化についてのエッセー: Literature list
インストールされているファイル: ‘scm/chords-ignatzek.scm’, ‘scm/chord-entry.scm’, ‘ly/chord-modifier-init.ly’
コード断片集: Chords
既知の問題と警告
コード ネームは、和音に含まれるピッチと
\chordmode で入力される和音構造についての情報の両方から決定されます。和音の入力手段として同時進行するピッチを用いた場合、転回や低音により予期しないコード ネームとなります。
myChords = \relative c' { \chordmode { c1 c/g c/f } <c e g>1 <g c e> <f c' e g> } << \new ChordNames { \myChords } \new Staff { \myChords } >>
![[image of music]](15/lily-afc83bc7.png)
| [ << 専門的な記譜法 ] | [トップ][目次][インデックス][ ? ] | [ 入出力全般 >> ] | ||
| [ < コード ネームをカスタマイズする ] | [ 上へ : 和音記譜法 ] | [ 通奏低音の導入部 > ] | ||
2.7.3 通奏低音
![[image of music]](a6/lily-357ee839.png)
通奏低音を譜刻することができます。
| 通奏低音の導入部 | ||
| 通奏低音を入力する | ||
| 通奏低音を表示する |
| [ << 専門的な記譜法 ] | [トップ][目次][インデックス][ ? ] | [ 入出力全般 >> ] | ||
| [ < 通奏低音 ] | [ 上へ : 通奏低音 ] | [ 通奏低音を入力する > ] | ||
通奏低音の導入部
LilyPond は通奏低音 (figured bass – thorough bass や basso continuo とも呼ばれます) をサポートします:
<< \new Voice { \clef bass dis4 c d ais g fis} \new FiguredBass { \figuremode { < 6 >4 < 7\+ >8 < 6+ [_!] > < 6 >4 <6 5 [3+] > < _ >4 < 6 5/>4 } } >>
![[image of music]](f7/lily-44af4f1f.png)
通奏低音のサポートには 2 つのパートがあります:
1 つは入力モード \figuremode で、通奏低音の入力を受け入れます。もう 1 つはコンテキスト FiguredBass で、BassFigure オブジェクトの表示を扱います。Staff でも通奏低音を表示させることができます。
\figures{ ... } は
\new FiguredBass { \figuremode { ... } } の短縮記譜法です。
通奏低音のサポートの外見は和音サポートに似ていますが、もっとシンプルです。\figuremode モードは通奏低音を保持し、FiguredBass コンテキストははそれらを入力されたとおりに譜刻するだけです。ピッチへの変換は行いません。
参照
音楽用語集: figured bass
コード断片集: Chords
| [ << 専門的な記譜法 ] | [トップ][目次][インデックス][ ? ] | [ 入出力全般 >> ] | ||
| [ < 通奏低音の導入部 ] | [ 上へ : 通奏低音 ] | [ 通奏低音を表示する > ] | ||
通奏低音を入力する
\figuremode は入力モードを通奏低音モードに切り替えるのに用いられます。他の入力モードについての更なる情報は 入力モード で見つかります。
通奏低音モードでは、通奏低音のグループを < と > で囲みます。演奏時間は > の後に入力します。
\new FiguredBass { \figuremode { <6 4>2 } }
![[image of music]](8d/lily-22b84c96.png)
通奏低音にナチュラル記号を含む臨時記号を付け加えることができます:
\figures { <7! 6+ 4-> <5++> <3--> }
![[image of music]](d7/lily-c5a87ae1.png)
増音と減音を記述することができます:
\figures { <6\+ 5/> <7/> }
![[image of music]](a3/lily-8d95cb77.png)
通奏低音にバックスラッシュを付けることができます ( 通常、6 度上げるのに用いられます):
\figures { <6> <6\\> }
![[image of music]](9b/lily-c1431919.png)
通奏低音に垂直方向のスペースや囲みを含ませることができます:
\figures { <[12 _!] 8 [6 4]> }
![[image of music]](3a/lily-426e6f45.png)
通奏低音として任意のテキスト マークアップを挿入することができます:
\figures { <\markup { \tiny \number 6 \super (1) } 5> }
![[image of music]](29/lily-4b815172.png)
継続線で通奏低音の繰り返しを示すことができます:
<< { \clef bass e4 d c b, e4 d c b, } \figures { \bassFigureExtendersOn <6 4>4 <6 3> <7 3> <7 3> \bassFigureExtendersOff <6 4>4 <6 3> <7 3> <7 3> } >>
![[image of music]](d2/lily-38cc9d03.png)
以下の例のように、継続線は明示的に停止されない限り連続する通奏低音に置き換わります。
<< \figures { \bassFigureExtendersOn <6 4>4 <6 4> <6\! 4\!> <6 4> } { \clef bass d4 d c c } >>
![[image of music]](a0/lily-d68a4943.png)
以下の表は利用可能な通奏低音の修飾子を要約しています。
| 修飾子 | 用途 | 例 |
| +, -, ! | 臨時記号 |
|
| \+, / | 増音と減音 |
|
| \\ | 音を 6 度上げる |
|
| \! | 継続線を終わらせる |
|
![[image of music]](b7/lily-a87c87da.png)
![[image of music]](70/lily-23dafb8a.png)
![[image of music]](4e/lily-1f72288f.png)
![[image of music]](35/lily-3cf1f401.png)
定義済みコマンド
\bassFigureExtendersOn,
\bassFigureExtendersOff
Selected Snippets
Changing the positions of figured bass alterations
Accidentals and plus signs can appear before or after the numbers,
depending on the figuredBassAlterationDirection and
figuredBassPlusDirection properties.
\figures { <6\+> <5+> <6 4-> r \set figuredBassAlterationDirection = #RIGHT <6\+> <5+> <6 4-> r \set figuredBassPlusDirection = #RIGHT <6\+> <5+> <6 4-> r \set figuredBassAlterationDirection = #LEFT <6\+> <5+> <6 4-> r }
![[image of music]](aa/lily-7f50a6cb.png)
参照
コード断片集: Chords
内部リファレンス: BassFigure, BassFigureAlignment, BassFigureLine, BassFigureBracket, BassFigureContinuation, FiguredBass
| [ << 専門的な記譜法 ] | [トップ][目次][インデックス][ ? ] | [ 入出力全般 >> ] | ||
| [ < 通奏低音を入力する ] | [ 上へ : 通奏低音 ] | [ 現代音楽 > ] | ||
通奏低音を表示する
FiguredBass コンテキストを用いて通奏低音を表示させることができます。たいていの譜コンテキストでも表示させることができます。
FiguredBass コンテキストに表示させる場合、通奏低音の垂直方向の位置は譜上にある音符の位置とは無関係です。
<< \relative { c''4 c'8 r8 c,4 c' } \new FiguredBass { \figuremode { <4>4 <10 6>8 s8 <6 4>4 <6 4> } } >>
![[image of music]](77/lily-5a058139.png)
上記の例では、余分な (空の) 譜が作成されるのを避けるために、FiguredBass コンテキストを明示的に作成する必要があります。
通奏低音を直接 Staff コンテキストに付け加えることもできます。この場合、通奏低音の垂直方向の位置は自動的に調節されます。
<< \new Staff = myStaff \figuremode { <4>4 <10 6>8 s8 <6 4>4 <6 4> } %% Put notes on same Staff as figures \context Staff = myStaff { \clef bass c4 c'8 r8 c4 c' } >>
![[image of music]](42/lily-dfbb3da7.png)
通奏低音を Staff コンテキストに追加した場合、譜の上にも下にも表示される可能性があります。
<< \new Staff = myStaff \figuremode { <4>4 <10 6>8 s8 \bassFigureStaffAlignmentDown <6 4>4 <6 4> } %% Put notes on same Staff as figures \context Staff = myStaff { \clef bass c4 c'8 r8 c4 c' } >>
![[image of music]](a1/lily-8e773ca2.png)
定義済みコマンド
\bassFigureStaffAlignmentDown,
\bassFigureStaffAlignmentUp,
\bassFigureStaffAlignmentNeutral
参照
コード断片集: Chords
内部リファレンス: BassFigure, BassFigureAlignment, BassFigureLine, BassFigureBracket, BassFigureContinuation, FiguredBass
既知の問題と警告
継続線が正しく機能することを保証するために、通奏低音のリズムをバス パートに合わせた方が安全です。
<< { \clef bass \repeat unfold 4 { f16. g32 } f8. es16 d8 es } \figures { \bassFigureExtendersOn % バスと同じリズムなので、継続線は正しく機能します \repeat unfold 4 { <6 4->16. <6 4->32 } <5>8. r16 <6>8 <6\! 5-> } >> << { \clef bass \repeat unfold 4 { f16. g32 } f8. es16 d8 es } \figures { \bassFigureExtendersOn % タイミングは同じですが、継続線は正しく機能しません <6 4->4 <6 4->4 <5>8. r16 <6>8 <6\! 5-> } >>
![[image of music]](7a/lily-51cefb79.png)
| [ << 専門的な記譜法 ] | [トップ][目次][インデックス][ ? ] | [ 入出力全般 >> ] | ||
| [ < 通奏低音を表示する ] | [ 上へ : 専門的な記譜法 ] | [ 現代音楽でのピッチと調和音 > ] | ||
2.8 現代音楽
20 世紀の始めから、作曲のスタイルとテクニックは大幅に拡張されました。新しい調和音とリズムの開発、ピッチ スペクトルの拡張、広範囲な楽器技術の開発が並行して進展し、音楽記譜法も拡張されました。このセクションの目的は、これらの新しい記譜テクニックに関するリファレンスと情報を提供することです。
| 2.8.1 現代音楽でのピッチと調和音 | ||
| 2.8.2 現代音楽のリズムへのアプローチ | ||
| 2.8.3 グラフィカル記譜法 | ||
| 2.8.4 現代音楽の楽譜作成技術 | ||
| 2.8.5 新しい楽器技術 | ||
| 2.8.6 現代音楽に関する本と楽譜 |
| [ << 専門的な記譜法 ] | [トップ][目次][インデックス][ ? ] | [ 入出力全般 >> ] | ||
| [ < 現代音楽 ] | [ 上へ : 現代音楽 ] | [ 現代音楽でのピッチと調和音のためのリファレンス > ] | ||
2.8.1 現代音楽でのピッチと調和音
このセクションでは、現代音楽でのピッチと調和音の記譜に関係する問題をハイライトします。
| 現代音楽でのピッチと調和音のためのリファレンス | ||
| 微分音記譜法 | ||
| 現代音楽の調号と和声 |
| [ << 専門的な記譜法 ] | [トップ][目次][インデックス][ ? ] | [ 入出力全般 >> ] | ||
| [ < 現代音楽でのピッチと調和音 ] | [ 上へ : 現代音楽でのピッチと調和音 ] | [ 微分音記譜法 > ] | ||
現代音楽でのピッチと調和音のためのリファレンス
| [ << 専門的な記譜法 ] | [トップ][目次][インデックス][ ? ] | [ 入出力全般 >> ] | ||
| [ < 現代音楽でのピッチと調和音のためのリファレンス ] | [ 上へ : 現代音楽でのピッチと調和音 ] | [ 現代音楽の調号と和声 > ] | ||
微分音記譜法
| [ << 専門的な記譜法 ] | [トップ][目次][インデックス][ ? ] | [ 入出力全般 >> ] | ||
| [ < 微分音記譜法 ] | [ 上へ : 現代音楽でのピッチと調和音 ] | [ 現代音楽のリズムへのアプローチ > ] | ||
現代音楽の調号と和声
| [ << 専門的な記譜法 ] | [トップ][目次][インデックス][ ? ] | [ 入出力全般 >> ] | ||
| [ < 現代音楽の調号と和声 ] | [ 上へ : 現代音楽 ] | [ 現代音楽のリズムへのアプローチのためのリファレンス > ] | ||
2.8.2 現代音楽のリズムへのアプローチ
このセクションでは、現代音楽のリズムの記譜法に関係する問題をハイライトします。
| 現代音楽のリズムへのアプローチのためのリファレンス | ||
| 現代音楽の連符 | ||
| 現代音楽の拍子 | ||
| 多拍子記譜法の拡張 | ||
| 多拍子記譜法の連桁 | ||
| 多拍子記譜法の小節線 |
| [ << 専門的な記譜法 ] | [トップ][目次][インデックス][ ? ] | [ 入出力全般 >> ] | ||
| [ < 現代音楽のリズムへのアプローチ ] | [ 上へ : 現代音楽のリズムへのアプローチ ] | [ 現代音楽の連符 > ] | ||
現代音楽のリズムへのアプローチのためのリファレンス
- 複合拍子は 拍子 を参照してください。
- 基本的な多拍子記譜法 多拍子記譜法 を参照してください。
- 羽状の連桁は 羽状の連桁 を参照してください。
- Mensurstriche 小節線 (譜の間だけの小節線) は 譜をグループ化する を参照してください。
| [ << 専門的な記譜法 ] | [トップ][目次][インデックス][ ? ] | [ 入出力全般 >> ] | ||
| [ < 現代音楽のリズムへのアプローチのためのリファレンス ] | [ 上へ : 現代音楽のリズムへのアプローチ ] | [ 現代音楽の拍子 > ] | ||
現代音楽の連符
| [ << 専門的な記譜法 ] | [トップ][目次][インデックス][ ? ] | [ 入出力全般 >> ] | ||
| [ < 現代音楽の連符 ] | [ 上へ : 現代音楽のリズムへのアプローチ ] | [ 多拍子記譜法の拡張 > ] | ||
現代音楽の拍子
| [ << 専門的な記譜法 ] | [トップ][目次][インデックス][ ? ] | [ 入出力全般 >> ] | ||
| [ < 現代音楽の拍子 ] | [ 上へ : 現代音楽のリズムへのアプローチ ] | [ 多拍子記譜法の連桁 > ] | ||
多拍子記譜法の拡張
| [ << 専門的な記譜法 ] | [トップ][目次][インデックス][ ? ] | [ 入出力全般 >> ] | ||
| [ < 多拍子記譜法の拡張 ] | [ 上へ : 現代音楽のリズムへのアプローチ ] | [ 多拍子記譜法の小節線 > ] | ||
多拍子記譜法の連桁
| [ << 専門的な記譜法 ] | [トップ][目次][インデックス][ ? ] | [ 入出力全般 >> ] | ||
| [ < 多拍子記譜法の連桁 ] | [ 上へ : 現代音楽のリズムへのアプローチ ] | [ グラフィカル記譜法 > ] | ||
多拍子記譜法の小節線
| [ << 専門的な記譜法 ] | [トップ][目次][インデックス][ ? ] | [ 入出力全般 >> ] | ||
| [ < 多拍子記譜法の小節線 ] | [ 上へ : 現代音楽 ] | [ 現代音楽の楽譜作成技術 > ] | ||
2.8.3 グラフィカル記譜法
| [ << 専門的な記譜法 ] | [トップ][目次][インデックス][ ? ] | [ 入出力全般 >> ] | ||
| [ < グラフィカル記譜法 ] | [ 上へ : 現代音楽 ] | [ 新しい楽器技術 > ] | ||
2.8.4 現代音楽の楽譜作成技術
| [ << 専門的な記譜法 ] | [トップ][目次][インデックス][ ? ] | [ 入出力全般 >> ] | ||
| [ < 現代音楽の楽譜作成技術 ] | [ 上へ : 現代音楽 ] | [ 現代音楽に関する本と楽譜 > ] | ||
2.8.5 新しい楽器技術
| [ << 専門的な記譜法 ] | [トップ][目次][インデックス][ ? ] | [ 入出力全般 >> ] | ||
| [ < 新しい楽器技術 ] | [ 上へ : 現代音楽 ] | [ 現代音楽記譜法についての本と記事 > ] | ||
2.8.6 現代音楽に関する本と楽譜
このセクションでは現代音楽記譜法を学ぶ際に有用な本、楽譜例、その他の情報源を提示します。
| 現代音楽記譜法についての本と記事 | ||
| 楽譜例 |
| [ << 専門的な記譜法 ] | [トップ][目次][インデックス][ ? ] | [ 入出力全般 >> ] | ||
| [ < 現代音楽に関する本と楽譜 ] | [ 上へ : 現代音楽に関する本と楽譜 ] | [ 楽譜例 > ] | ||
現代音楽記譜法についての本と記事
- Music Notation in the Twentieth Century: A Practical Guidebook by Kurt Stone [W. W. Norton, 1980]
- Music Notation: A Manual of Modern Practice by Gardner Read [Taplinger, 1979]
- Instrumentation and Orchestration by Alfred Blatter [Schirmer, 2nd ed. 1997]
| [ << 専門的な記譜法 ] | [トップ][目次][インデックス][ ? ] | [ 入出力全般 >> ] | ||
| [ < 現代音楽記譜法についての本と記事 ] | [ 上へ : 現代音楽に関する本と楽譜 ] | [ Ancient notation > ] | ||
楽譜例
| [ << 専門的な記譜法 ] | [トップ][目次][インデックス][ ? ] | [ 入出力全般 >> ] | ||
| [ < 楽譜例 ] | [ 上へ : 専門的な記譜法 ] | [ Overview of the supported styles > ] | ||
2.9 Ancient notation
![[image of music]](1b/lily-75c2d64e.png)
Support for ancient notation includes features for mensural notation, Gregorian chant notation, and Kievan square notation. These features can be accessed either by modifying style properties of graphical objects such as note heads and rests, or by using one of the pre-defined contexts for these styles.
Many graphical objects, such as note heads and flags, accidentals,
time signatures, and rests, provide a style property, which
can be changed to emulate several different styles of ancient
notation. See
- Mensural note heads,
- Mensural accidentals and key signatures,
- Mensural rests,
- Mensural clefs,
- Gregorian clefs,
- Mensural flags,
- Mensural time signatures.
Some notational concepts are introduced specifically for ancient notation,
参照
Music Glossary: custos, ligature, mensural notation.
Notation Reference: Mensural note heads, Mensural accidentals and key signatures, Mensural rests, Gregorian clefs, Mensural flags, Mensural time signatures, Custodes, Divisiones, Ligatures.
| [ << 専門的な記譜法 ] | [トップ][目次][インデックス][ ? ] | [ 入出力全般 >> ] | ||
| [ < Ancient notation ] | [ 上へ : Ancient notation ] | [ Ancient notation---common features > ] | ||
2.9.1 Overview of the supported styles
Three styles are available for typesetting Gregorian chant:
- Editio Vaticana is a complete style for Gregorian chant, following the appearance of the Solesmes editions, the official chant books of the Vatican since 1904. LilyPond has support for all the notational signs used in this style, including ligatures, custodes, and special signs such as the quilisma and the oriscus.
- The Editio Medicaea style offers certain features used in the Medicaea (or Ratisbona) editions which were used prior to the Solesmes editions. The most significant differences from the Vaticana style are the clefs, which have downward-slanted strokes, and the note heads, which are square and regular.
- The Hufnagel (“horseshoe nail”) or Gothic style mimics the writing style in chant manuscripts from Germany and Central Europe during the middle ages. It is named after the basic note shape (the virga), which looks like a small nail.
Three styles emulate the appearance of late-medieval and renaissance manuscripts and prints of mensural music:
- The Mensural style most closely resembles the writing style used in late-medieval and early renaissance manuscripts, with its small and narrow, diamond-shaped note heads and its rests which approach a hand-drawn style.
- The Neomensural style is a modernized and stylized version of the former: the note heads are broader and the rests are made up of straight lines. This style is particularly suited, e.g., for incipits of transcribed pieces of mensural music.
- The Petrucci style is named after Ottaviano Petrucci (1466-1539), the first printer to use movable type for music (in his Harmonice musices odhecaton, 1501). The style uses larger note heads than the other mensural styles.
Baroque and Classical are not complete styles but differ from the default style only in some details: certain note heads (Baroque) and the quarter rest (Classical).
Only the mensural style has alternatives for all aspects of the notation. Thus, there are no rests or flags in the Gregorian styles, since these signs are not used in plainchant notation, and the Petrucci style has no flags or accidentals of its own.
Each element of the notation can be changed independently of the others, so that one can use mensural flags, petrucci note heads, classical rests and vaticana clefs in the same piece, if one wishes.
参照
Music Glossary: mensural notation, flag.
| [ << 専門的な記譜法 ] | [トップ][目次][インデックス][ ? ] | [ 入出力全般 >> ] | ||
| [ < Overview of the supported styles ] | [ 上へ : Ancient notation ] | [ Pre-defined contexts > ] | ||
2.9.2 Ancient notation—common features
| Pre-defined contexts | ||
| Ligatures | ||
| Custodes |
| [ << 専門的な記譜法 ] | [トップ][目次][インデックス][ ? ] | [ 入出力全般 >> ] | ||
| [ < Ancient notation---common features ] | [ 上へ : Ancient notation---common features ] | [ Ligatures > ] | ||
Pre-defined contexts
For Gregorian chant and mensural notation, there are pre-defined
voice and staff contexts available, which set all the various
notation signs to values suitable for these styles. If one is
satisfied with these defaults, one can proceed directly with note
entry without worrying about the details on how to customize a
context. See one of the pre-defined contexts
VaticanaVoice, VaticanaStaff, MensuralVoice,
and MensuralStaff. See further
参照
Music Glossary: mensural notation.
Notation Reference: Gregorian chant contexts, Mensural contexts.
| [ << 専門的な記譜法 ] | [トップ][目次][インデックス][ ? ] | [ 入出力全般 >> ] | ||
| [ < Pre-defined contexts ] | [ 上へ : Ancient notation---common features ] | [ Custodes > ] | ||
Ligatures
A ligature is a graphical symbol that represents at least two distinct notes. Ligatures originally appeared in the manuscripts of Gregorian chant notation to denote ascending or descending sequences of notes on the same syllable. They are also used in mensural notation.
Ligatures are entered by enclosing them in \[ and
\]. Some ligature styles may need additional input syntax
specific for this particular type of ligature. By default, the
LigatureBracket engraver just puts a square bracket
above the ligature.
\relative { \[ g' c, a' f d' \] a g f \[ e f a g \] }
![[image of music]](c7/lily-6852500f.png)
Two other ligature styles are available: the Vaticana for
Gregorian chant, and the Mensural for mensural music (only white
mensural ligatures are supported for mensural music, and with
certain limitations). To use any of these styles, the default
Ligature_bracket_engraver has to be replaced with one of the
specialized ligature engravers in the Voice context,
as explained in White mensural ligatures and
Gregorian square neume ligatures.
参照
Music Glossary: ligature.
Notation Reference: White mensural ligatures, Gregorian square neume ligatures.
既知の問題と警告
Ligatures need special spacing that has not yet been implemented. As a result, there is too much space between ligatures most of the time, and line breaking often is unsatisfactory. Also, lyrics do not correctly align with ligatures.
Accidentals must not be printed within a ligature, but instead need to be collected and printed in front of it.
The syntax still uses the deprecated infix style
\[ music expr \]. For consistency reasons, it will eventually
be changed to postfix style note\[ … note\].
| [ << 専門的な記譜法 ] | [トップ][目次][インデックス][ ? ] | [ 入出力全般 >> ] | ||
| [ < Ligatures ] | [ 上へ : Ancient notation---common features ] | [ Typesetting mensural music > ] | ||
Custodes
A custos (plural: custodes; Latin word for “guard”) is a symbol that appears at the end of a staff. It anticipates the pitch of the first note of the following line, thus helping the performer to manage line breaks during performance.
Custodes were frequently used in music notation until the seventeenth century. Nowadays, they have survived only in a few particular forms of musical notation such as contemporary editions of Gregorian chant like the Editio Vaticana. There are different custos glyphs used in different flavors of notational style.
For typesetting custodes, just put a Custos_engraver into the
Staff context when declaring the \layout block,
and change the style of the custos with an \override if
desired, as shown in the following example:
![[image of music]](a3/lily-228ec2c3.png)
The custos glyph is selected by the style property. The styles
supported are vaticana, medicaea, hufnagel, and
mensural. They are demonstrated in the following fragment.
![[image of music]](b0/lily-4f9e0486.png)
参照
Music Glossary: custos.
Snippets: Ancient notation.
Internals Reference: Custos.
| [ << 専門的な記譜法 ] | [トップ][目次][インデックス][ ? ] | [ 入出力全般 >> ] | ||
| [ < Custodes ] | [ 上へ : Ancient notation ] | [ Mensural contexts > ] | ||
2.9.3 Typesetting mensural music
| [ << 専門的な記譜法 ] | [トップ][目次][インデックス][ ? ] | [ 入出力全般 >> ] | ||
| [ < Typesetting mensural music ] | [ 上へ : Typesetting mensural music ] | [ Mensural clefs > ] | ||
Mensural contexts
The predefined MensuralVoice and MensuralStaff
contexts can be used to engrave a piece in mensural style. These
contexts initialize all relevant context properties and grob
properties to proper values, so you can immediately go ahead
entering the chant, as the following excerpt demonstrates:
\score { << \new MensuralVoice = "discantus" \relative { \hide Score.BarNumber { c''1\melisma bes a g\melismaEnd f\breve \[ f1\melisma a c\breve d\melismaEnd \] c\longa c\breve\melisma a1 g1\melismaEnd fis\longa^\signumcongruentiae } } \new Lyrics \lyricsto "discantus" { San -- ctus, San -- ctus, San -- ctus } >> }
![[image of music]](f1/lily-5fe50cc6.png)
参照
Music Glossary: mensural notation.
| [ << 専門的な記譜法 ] | [トップ][目次][インデックス][ ? ] | [ 入出力全般 >> ] | ||
| [ < Mensural contexts ] | [ 上へ : Typesetting mensural music ] | [ Mensural time signatures > ] | ||
Mensural clefs
Mensural clefs are supported using the \clef command. Some of
the clefs use the same glyph, but differ only with respect to the line
they are printed on. In such cases, a trailing number in the name is
used to enumerate these clefs, numbered from the lowest to the highest
line.
\override NoteHead.style = #'vaticana.punctum \clef "vaticana-do1" c'1
![[image of music]](e4/lily-0eb41fad.png)
\override NoteHead.style = #'medicaea.punctum \clef "medicaea-do3" c'1
![[image of music]](08/lily-4ea9e817.png)
\override NoteHead.style = #'hufnagel.punctum \clef "hufnagel-fa2" c'1
![[image of music]](d9/lily-08fc9b69.png)
\override NoteHead.style = #'neomensural \clef "neomensural-c4" c'1
![[image of music]](ef/lily-5191c2e3.png)
It is possible to manually force a clef glyph to be typeset on an arbitrary line, as described in 音部記号. For the complete range of possible clefs see Clef styles.
参照
Music Glossary: mensural notation, clef.
Notation Reference: Gregorian clefs, 音部記号.
Installed Files: ‘scm/parser-clef.scm’.
Snippets: Pitches.
Internals Reference: Clef_engraver, Clef, ClefModifier, clef-interface.
既知の問題と警告
The Mensural g clef is mapped to the Petrucci g clef.
| [ << 専門的な記譜法 ] | [トップ][目次][インデックス][ ? ] | [ 入出力全般 >> ] | ||
| [ < Mensural clefs ] | [ 上へ : Typesetting mensural music ] | [ Mensural note heads > ] | ||
Mensural time signatures
There is limited support for mensuration signs (which are similar to,
but not exactly the same as time signatures). The glyphs are hard-wired
to particular time fractions. In other words, to get a particular mensuration sign with the \time n/m command, n and
m have to be chosen according to the following table
![[image of music]](c4/lily-39e90536.png)
Use the style property of grob TimeSignature
to select ancient time signatures. Supported styles are
neomensural and mensural. The above table uses the
neomensural style. The following examples show the
differences in style:
![[image of music]](69/lily-c441899b.png)
拍子, gives a general introduction to the use of time signatures.
参照
Music Glossary: mensural notation.
Notation Reference: 拍子.
既知の問題と警告
Ratios of note durations cannot change with the time signature, as those are not constant. For example, the ratio of 1 breve = 3 semibreves (tempus perfectum) can be made by hand, by setting
breveTP = #(ly:make-duration -1 0 3/2)
…
{ c\breveTP f1 }
This sets breveTP to 3/2 times 2 = 3 times a whole note.
The mensural68alt and neomensural68alt symbols
(alternate symbols for 6/8) are not addressable with \time.
Use \markup {\musicglyph #"timesig.mensural68alt" } instead.
| [ << 専門的な記譜法 ] | [トップ][目次][インデックス][ ? ] | [ 入出力全般 >> ] | ||
| [ < Mensural time signatures ] | [ 上へ : Typesetting mensural music ] | [ Mensural flags > ] | ||
Mensural note heads
For ancient notation, a note head style other than the
default style may be chosen. This is accomplished by setting
the style property of the NoteHead object to
baroque, neomensural, mensural,
petrucci, blackpetrucci or semipetrucci.
The baroque style differs from the default style by:
- Providing a
maximanote head, and - Using a square shape for
\brevenote heads.
The neomensural, mensural, and petrucci styles
differ from the baroque style by:
- Using rhomboidal heads for semibreves and all smaller durations, and
- Centering the stems on the note heads.
The blackpetrucci style produces note heads usable in black
mensural notation or coloratio sections in white mensural notation.
Because note head style does not influence flag count, in
this style a semiminima should be notated as a8*2, not
a4, otherwise it will look like a minima.
The multiplier can be different if coloratio is used, e.g., to notate
triplets.
Use semipetrucci style to draw half-colored
note heads (breves, longas and maximas).
The following example demonstrates the petrucci style:
\set Score.skipBars = ##t \autoBeamOff \override NoteHead.style = #'petrucci a'\maxima a'\longa a'\breve a'1 a'2 a'4 a'8 a'16 a' \override NoteHead.style = #'semipetrucci a'\breve*5/6 \override NoteHead.style = #'blackpetrucci a'8*4/3 a' \override NoteHead.style = #'petrucci a'\longa
![[image of music]](aa/lily-c2be21b1.png)
Note head styles, gives an overview of all available note head styles.
参照
Music Glossary: mensural notation, note head.
Notation Reference: Note head styles.
| [ << 専門的な記譜法 ] | [トップ][目次][インデックス][ ? ] | [ 入出力全般 >> ] | ||
| [ < Mensural note heads ] | [ 上へ : Typesetting mensural music ] | [ Mensural rests > ] | ||
Mensural flags
Use the flag-style property of grob Stem to
select ancient flags. Besides the default flag style,
only the mensural style is supported.
\relative c' { \override Flag.style = #'mensural \override Stem.thickness = #1.0 \override NoteHead.style = #'mensural \autoBeamOff c8 d e f c16 d e f c32 d e f s8 c'8 d e f c16 d e f c32 d e f }
![[image of music]](cd/lily-e1dd7d20.png)
Note that the innermost flare of each mensural flag is vertically aligned with a staff line.
There is no particular flag style for neo-mensural or Petrucci notation. There are no flags in Gregorian chant notation.
参照
Music Glossary: mensural notation, flag.
既知の問題と警告
Vertically aligning each flag with a staff line assumes that stems always end either exactly on or exactly in the middle of two staff lines. This may not always be true when using advanced layout features of classical notation (which however are typically out of scope for mensural notation).
| [ << 専門的な記譜法 ] | [トップ][目次][インデックス][ ? ] | [ 入出力全般 >> ] | ||
| [ < Mensural flags ] | [ 上へ : Typesetting mensural music ] | [ Mensural accidentals and key signatures > ] | ||
Mensural rests
Use the style property of grob Rest to select
ancient rests. Supported ancient styles are
neomensural, and mensural.
The following example demonstrates these styles:
\set Score.skipBars = ##t \override Rest.style = #'mensural r\longa^"mensural" r\breve r1 r2 r4 r8 r16 s \break \override Rest.style = #'neomensural r\longa^"neomensural" r\breve r1 r2 r4 r8 r16
![[image of music]](b6/lily-1064f981.png)
There are no 32nd and 64th rests specifically for the mensural or neo-mensural styles. Rests from the default style are used.
参照
Music Glossary: mensural notation.
Notation Reference: 休符.
Snippets: Ancient notation.
既知の問題と警告
The glyph for the maxima rest in mensural style is actually a perfect longa rest; use two (or three) longa rests to print a maxima rest. Longa rests are not grouped automatically, so have to be done manually by using pitched rests.
| [ << 専門的な記譜法 ] | [トップ][目次][インデックス][ ? ] | [ 入出力全般 >> ] | ||
| [ < Mensural rests ] | [ 上へ : Typesetting mensural music ] | [ Annotational accidentals (musica ficta) > ] | ||
Mensural accidentals and key signatures
The mensural style provides a sharp and a flat sign
different from the default style. Mensural notation rarely used a natural
sign: instead the appropriate sharp or flat is used. For example, a B
natural in the key of F major would be indicated with a sharp. However,
if specifically called for, the natural sign is taken from the vaticana
style.
![[image of music]](00/lily-bd3d4124.png)
The style for accidentals and key signatures is controlled by the
glyph-name-alist property of the grobs Accidental and
KeySignature, respectively; e.g.:
\override Staff.Accidental.glyph-name-alist = #alteration-mensural-glyph-name-alist
参照
Music Glossary: mensural notation, Pitch names, accidental, key signature.
Notation Reference: ピッチ, 臨時記号, 自動臨時記号, 調号.
Internals Reference: KeySignature.
| [ << 専門的な記譜法 ] | [トップ][目次][インデックス][ ? ] | [ 入出力全般 >> ] | ||
| [ < Mensural accidentals and key signatures ] | [ 上へ : Typesetting mensural music ] | [ White mensural ligatures > ] | ||
Annotational accidentals (musica ficta)
In European music from before about 1600, singers were expected to chromatically alter notes at their own initiative according to certain rules. This is called musica ficta. In modern transcriptions, these accidentals are usually printed over the note.
Support for such suggested accidentals is included, and can be
switched on by setting suggestAccidentals to true.
\relative {
fis' gis
\set suggestAccidentals = ##t
ais bis
}
![[image of music]](9d/lily-80989b26.png)
This will treat every subsequent accidental as
musica ficta until it is unset with
\set suggestAccidentals = ##f. A more practical way is to
use \once \set suggestAccidentals = ##t, which can even be
defined as a convenient shorthand:
ficta = { \once \set suggestAccidentals = ##t } \score { \relative \new MensuralVoice { \once \set suggestAccidentals = ##t bes'4 a2 g2 \ficta fis8 \ficta e! fis2 g1 } }
![[image of music]](d1/lily-08073f32.png)
参照
Internals Reference: Accidental_engraver, AccidentalSuggestion.
| [ << 専門的な記譜法 ] | [トップ][目次][インデックス][ ? ] | [ 入出力全般 >> ] | ||
| [ < Annotational accidentals (musica ficta) ] | [ 上へ : Typesetting mensural music ] | [ Typesetting Gregorian chant > ] | ||
White mensural ligatures
There is limited support for white mensural ligatures.
To engrave white mensural ligatures, in the layout block, replace
the Ligature_bracket_engraver with the
Mensural_ligature_engraver in the Voice
context:
\layout {
\context {
\Voice
\remove "Ligature_bracket_engraver"
\consists "Mensural_ligature_engraver"
}
}
There is no additional input language to describe the shape of a white mensural ligature. The shape is rather determined solely from the pitch and duration of the enclosed notes. While this approach may take a new user a while to get accustomed to, it has the great advantage that the full musical information of the ligature is known internally. This is not only required for correct MIDI output, but also allows for automatic transcription of the ligatures.
At certain places two consecutive notes can be represented either as
two squares or as an oblique parallelogram (flexa shape). In such
cases the default is the two squares, but a flexa can be required by
setting the ligature-flexa property of the second note
head. The length of a flexa can be set by the note head property
flexa-width.
For example,
\score { \relative { \set Score.timing = ##f \set Score.defaultBarType = "-" \override NoteHead.style = #'petrucci \override Staff.TimeSignature.style = #'mensural \clef "petrucci-g" \[ c''\maxima g \] \[ d'\longa \override NoteHead.ligature-flexa = ##t \once \override NoteHead.flexa-width = #3.2 c\breve f e d \] \[ c\maxima d\longa \] \[ e1 a, g\breve \] } \layout { \context { \Voice \remove "Ligature_bracket_engraver" \consists "Mensural_ligature_engraver" } } }
![[image of music]](02/lily-b9d20951.png)
Without replacing Ligature_bracket_engraver with
Mensural_ligature_engraver, the same music looks as follows:
![[image of music]](ff/lily-83b4b50d.png)
参照
Music Glossary: ligature.
Notation Reference: Gregorian square neume ligatures, Ligatures.
既知の問題と警告
Horizontal spacing of ligatures may be poor. Accidentals may collide with previous notes.
| [ << 専門的な記譜法 ] | [トップ][目次][インデックス][ ? ] | [ 入出力全般 >> ] | ||
| [ < White mensural ligatures ] | [ 上へ : Ancient notation ] | [ Gregorian chant contexts > ] | ||
2.9.4 Typesetting Gregorian chant
| Gregorian chant contexts | ||
| Gregorian clefs | ||
| Gregorian accidentals and key signatures | ||
| Divisiones | ||
| Gregorian articulation signs | ||
| Augmentum dots (morae) | ||
| Gregorian square neume ligatures |
When typesetting a piece in Gregorian chant notation, the
Vaticana_ligature_engraver automatically selects the
proper note heads, so there is no need to explicitly set the note
head style. Still, the note head style can be set, e.g., to
vaticana_punctum to produce punctum neumes. Similarly, the
Mensural_ligature_engraver automatically assembles
mensural ligatures.
参照
Music Glossary: ligature.
Notation Reference: White mensural ligatures, Ligatures.
| [ << 専門的な記譜法 ] | [トップ][目次][インデックス][ ? ] | [ 入出力全般 >> ] | ||
| [ < Typesetting Gregorian chant ] | [ 上へ : Typesetting Gregorian chant ] | [ Gregorian clefs > ] | ||
Gregorian chant contexts
The predefined VaticanaVoice and
VaticanaStaff can be used to engrave a piece of
Gregorian chant in the style of the Editio Vaticana. These contexts
initialize all relevant context properties and grob properties to
proper values, so you can immediately go ahead entering the chant, as
the following excerpt demonstrates:
\include "gregorian.ly" \score { << \new VaticanaVoice = "cantus" { \[ c'\melisma c' \flexa a \] \[ a \flexa \deminutum g\melismaEnd \] f \divisioMinima \[ f\melisma \pes a c' c' \pes d'\melismaEnd \] c' \divisioMinima \break \[ c'\melisma c' \flexa a \] \[ a \flexa \deminutum g\melismaEnd \] f \divisioMinima } \new Lyrics \lyricsto "cantus" { San- ctus, San- ctus, San- ctus } >> }
![[image of music]](ce/lily-90080594.png)
| [ << 専門的な記譜法 ] | [トップ][目次][インデックス][ ? ] | [ 入出力全般 >> ] | ||
| [ < Gregorian chant contexts ] | [ 上へ : Typesetting Gregorian chant ] | [ Gregorian accidentals and key signatures > ] | ||
Gregorian clefs
The following table shows all Gregorian clefs that are supported via
the \clef command. Some of the clefs use the same glyph,
but differ only with respect to the line they are printed on. In
such cases, a trailing number in the name is used to enumerate
these clefs, numbered from the lowest to the highest line. Still,
you can manually force a clef glyph to be typeset on an arbitrary
line, as described in 音部記号. The note printed to the right
side of each clef in the example column denotes the c' with
respect to that clef.
| Description | Supported Clefs | Example |
| Editio Vaticana style do clef | vaticana-do1, vaticana-do2,vaticana-do3 |
|
| Editio Vaticana style fa clef | vaticana-fa1, vaticana-fa2 |
|
| Editio Medicaea style do clef | medicaea-do1, medicaea-do2,medicaea-do3 |
|
| Editio Medicaea style fa clef | medicaea-fa1, medicaea-fa2 |
|
| hufnagel style do clef | hufnagel-do1, hufnagel-do2,hufnagel-do3 |
|
| hufnagel style fa clef | hufnagel-fa1, hufnagel-fa2 |
|
| hufnagel style combined do/fa clef | hufnagel-do-fa |
|
![[image of music]](8b/lily-6679867a.png)
![[image of music]](d3/lily-f95813e2.png)
![[image of music]](a6/lily-5f98847a.png)
![[image of music]](ce/lily-1d75a506.png)
![[image of music]](eb/lily-bfba1cc1.png)
![[image of music]](9c/lily-814bf5e1.png)
![[image of music]](93/lily-c425d7da.png)
参照
Music Glossary: clef.
Notation Reference: 音部記号.
| [ << 専門的な記譜法 ] | [トップ][目次][インデックス][ ? ] | [ 入出力全般 >> ] | ||
| [ < Gregorian clefs ] | [ 上へ : Typesetting Gregorian chant ] | [ Divisiones > ] | ||
Gregorian accidentals and key signatures
Accidentals for the three different Gregorian styles are available:
![[image of music]](f6/lily-dcc94c3c.png)
As shown, not all accidentals are supported by each style. When trying to access an unsupported accidental, LilyPond will switch to a different style.
The style for accidentals and key signatures is controlled by the
glyph-name-alist property of the grobs Accidental and
KeySignature, respectively; e.g.:
\override Staff.Accidental.glyph-name-alist = #alteration-mensural-glyph-name-alist
参照
Music Glossary: accidental, key signature.
Notation Reference: ピッチ, 臨時記号, 自動臨時記号, 調号.
Internals Reference: KeySignature.
| [ << 専門的な記譜法 ] | [トップ][目次][インデックス][ ? ] | [ 入出力全般 >> ] | ||
| [ < Gregorian accidentals and key signatures ] | [ 上へ : Typesetting Gregorian chant ] | [ Gregorian articulation signs > ] | ||
Divisiones
There are no rests in Gregorian chant notation; instead, it uses Divisiones.
A divisio (plural: divisiones; Latin word for ‘division’) is a staff context symbol that is used to indicate the phrase and section structure of Gregorian music. The musical meaning of divisio minima, divisio maior, and divisio maxima can be characterized as short, medium, and long pause, somewhat like the breath marks from ブレス記号. The finalis sign not only marks the end of a chant, but is also frequently used within a single antiphonal/responsorial chant to mark the end of each section.
To use divisiones, include the file ‘gregorian.ly’. It
contains definitions that you can apply by just inserting
\divisioMinima, \divisioMaior, \divisioMaxima,
and \finalis at proper places in the input. Some editions use
virgula or caesura instead of divisio minima.
Therefore, ‘gregorian.ly’ also defines \virgula and
\caesura
![[image of music]](77/lily-8c1dd89c.png)
定義済みコマンド
\virgula,
\caesura,
\divisioMinima,
\divisioMaior,
\divisioMaxima,
\finalis.
参照
Music Glossary: caesura, divisio.
Notation Reference: ブレス記号.
Installed Files: ‘ly/gregorian.ly’.
| [ << 専門的な記譜法 ] | [トップ][目次][インデックス][ ? ] | [ 入出力全般 >> ] | ||
| [ < Divisiones ] | [ 上へ : Typesetting Gregorian chant ] | [ Augmentum dots (morae) > ] | ||
Gregorian articulation signs
In addition to the standard articulation signs described in section アーティキュレーションと装飾, articulation signs specifically designed for use with notation in Editio Vaticana style are provided.
\include "gregorian.ly" \score { \new VaticanaVoice { \override TextScript.font-family = #'typewriter \override TextScript.font-shape = #'upright \override Script.padding = #-0.1 a\ictus_"ictus " \bar "" \break a\circulus_"circulus " \bar "" \break a\semicirculus_"semicirculus " \bar "" \break a\accentus_"accentus " \bar "" \break \[ a_"episema" \episemInitium \pes b \flexa a b \episemFinis \flexa a \] } }
![[image of music]](03/lily-17c7f5ae.png)
参照
Notation Reference: アーティキュレーションと装飾.
Snippets: Ancient notation.
Internals Reference: Episema, EpisemaEvent, Episema_engraver, Script, ScriptEvent, Script_engraver.
既知の問題と警告
Some articulations are vertically placed too closely to the corresponding note heads.
| [ << 専門的な記譜法 ] | [トップ][目次][インデックス][ ? ] | [ 入出力全般 >> ] | ||
| [ < Gregorian articulation signs ] | [ 上へ : Typesetting Gregorian chant ] | [ Gregorian square neume ligatures > ] | ||
Augmentum dots (morae)
Augmentum dots, also called morae, are added with the music
function \augmentum. Note that \augmentum is
implemented as a unary music function rather than as head prefix. It
applies to the immediately following music expression only. That is,
\augmentum \virga c will have no visible effect. Instead, say
\virga \augmentum c or \augmentum {\virga c}. Also
note that you can say \augmentum {a g} as a shortcut for
\augmentum a \augmentum g.
\include "gregorian.ly" \score { \new VaticanaVoice { \[ \augmentum a \flexa \augmentum g \] \augmentum g } }
![[image of music]](59/lily-9fde686a.png)
参照
Notation Reference: ブレス記号.
Internals Reference: BreathingSign.
Snippets: Ancient notation.
| [ << 専門的な記譜法 ] | [トップ][目次][インデックス][ ? ] | [ 入出力全般 >> ] | ||
| [ < Augmentum dots (morae) ] | [ 上へ : Typesetting Gregorian chant ] | [ Typesetting Kievan square notation > ] | ||
Gregorian square neume ligatures
There is limited support for Gregorian square neumes notation (following the style of the Editio Vaticana). Core ligatures can already be typeset, but essential issues for serious typesetting are still lacking, such as (among others) horizontal alignment of multiple ligatures, lyrics alignment, and proper handling of accidentals.
The support for Gregorian neumes is enabled by \includeing
‘gregorian.ly’ at the beginning of the file. This makes available
a number of extra commands to produce the neume symbols used in
plainchant notation.
Note heads can be modified and/or joined.
- The shape of
the note head can be modified by prefixing the note name
with any of the following commands:
\virga,\stropha,\inclinatum,\auctum,\descendens,\ascendens,\oriscus,\quilisma,\deminutum,\cavum,\linea. - Ligatures, properly speaking (i.e., notes joined together), are
produced by placing one of the joining commands
\pesor\flexa, for upwards and downwards movement, respectively, between the notes to be joined.
A note name without any qualifiers will produce a punctum.
All other neumes, including the single-note neumes with a
different shape such as the virga, are in principle
considered as ligatures and should therefore be placed
between \[…\].
Single-note neumes:
- The punctum is the basic note shape (in the
Vaticana style: a square with some curvation for
typographical finesse). In addition to the regular
punctum, there is also the oblique punctum
inclinatum, produced with the prefix
\inclinatum. The regular punctum can be modified with\cavum, which produces a hollow note, and\linea, which draws vertical lines on either side of the note. - The virga has a descending stem on the right side. It is
produced by the modifier
\virga.
Ligatures
Unlike most other neumes notation systems, the typographical
appearance of ligatures is not directly dictated by the input
commands, but follows certain conventions dependent on musical
meaning. For example, a three-note ligature with the musical shape
low-high-low, such as \[ a \pes b \flexa g \], produces a
Torculus consisting of three Punctum heads, while the shape
high-low-high, such as \[ a \flexa g \pes b \], produces a
Porrectus with a curved flexa shape and only a single Punctum
head. There is no command to explicitly typeset the curved flexa
shape; the decision of when to typeset a curved flexa shape is
based on the musical input. The idea of this approach is to
separate the musical aspects of the input from the notation style
of the output. This way, the same input can be reused to typeset
the same music in a different style of Gregorian chant notation.
Liquescent neumes
Another main category of notes in Gregorian chant is the so-called liquescent neumes. They are used under certain circumstances at the end of a syllable which ends in a ‘liquescent’ letter, i.e., the sounding consonants that can hold a tone (the nasals, l, r, v, j, and their diphthong equivalents). Thus, the liquescent neumes are never used alone (although some of them can be produced), and they always fall at the end of a ligature.
Liquescent neumes are represented graphically in two different,
more or less interchangeable ways: with a smaller note or by
‘twisting’ the main note upwards or downwards. The first is
produced by making a regular pes or flexa and
modifying the shape of the second note:
\[ a \pes \deminutum b \] , the second by modifying the shape
of a single-note neume with \auctum and one of the direction
markers \descendens or \ascendens, e.g.,
\[ \auctum \descendens a \] .
Special signs
A third category of signs is made up of a small number of signs
with a special meaning (which, incidentally, in most cases is only
vaguely known): the quilisma, the oriscus, and the
strophicus. These are all produced by prefixing a note name
with the corresponding modifier, \quilisma,
\oriscus, or \stropha.
Virtually, within the ligature delimiters \[ and \],
any number of heads may be accumulated to form a single ligature,
and head prefixes like \pes, \flexa, \virga,
\inclinatum, etc., may be mixed in as desired. The use of
the set of rules that underlies the construction of the ligatures
in the above table is accordingly extrapolated. This way,
infinitely many different ligatures can be created.
Note that the use of these signs in the music itself follows certain rules, which are not checked by LilyPond. E.g., the quilisma is always the middle note of an ascending ligature, and usually falls on a half-tone step, but it is perfectly possible, although incorrect, to make a single-note quilisma.
In addition to the note signs, ‘gregorian.ly’ also defines the
commands \versus, \responsum, \ij,
\iij, \IJ, and \IIJ, that will produce the
corresponding characters, e.g., for use in lyrics, as section
markers, etc. These commands use special Unicode characters and
will only work if a font is used which supports them.
The following table shows a limited, but still representative pool
of Gregorian ligatures, together with the code fragments that
produce the ligatures. The table is based on the extended neumes
table of the 2nd volume of the Antiphonale Romanum
(Liber Hymnarius), published 1983 by the monks of Solesmes.
The first column gives the name of the ligature, with the main form in
boldface and the liquescent forms in italics. The third column
shows the code fragment that produces this ligature, using
g, a, and b as example pitches.
Single-note neums
| Basic and Liquescent forms | Output | LilyPond code |
| Punctum |
| \[ b \] |
| \[ \cavum b \] | |
| \[ \linea b \] | |
| Punctum Auctum Ascendens |
| \[ \auctum \ascendens b \] |
| Punctum Auctum Descendens |
| \[ \auctum \descendens b \] |
| Punctum inclinatum |
| \[ \inclinatum b \] |
| Punctum Inclinatum Auctum |
| \[ \inclinatum \auctum b \] |
| Punctum Inclinatum Parvum |
| \[ \inclinatum \deminutum b \] |
| Virga |
|
![[image of music]](a1/lily-2006a730.png)
![[image of music]](83/lily-6cac59ec.png)
![[image of music]](42/lily-15b142fb.png)
![[image of music]](11/lily-293d96bb.png)
![[image of music]](08/lily-7744de0f.png)
![[image of music]](6f/lily-828047ad.png)
![[image of music]](5a/lily-7d5de672.png)
![[image of music]](65/lily-eb5d0cd0.png)
![[image of music]](46/lily-b9191bde.png)
Two-note ligatures
| Clivis vel Flexa |
| \[ b \flexa g \] |
| Clivis Aucta Descendens |
| \[ b \flexa \auctum \descendens g \] |
| Clivis Aucta Ascendens |
| \[ b \flexa \auctum \ascendens g \] |
| Cephalicus |
| \[ b \flexa \deminutum g \] |
| Podatus/Pes |
| \[ g \pes b \] |
| Pes Auctus Descendens |
| \[ g \pes \auctum \descendens b \] |
| Pes Auctus Ascendens |
| \[ g \pes \auctum \ascendens b \] |
| Epiphonus |
| \[ g \pes \deminutum b \] |
| Pes Initio Debilis |
| \[ \deminutum g \pes b \] |
| Pes Auctus Descendens Initio Debilis |
| \[ \deminutum g \pes \auctum \descendens b \] |
![[image of music]](4f/lily-98bc8f08.png)
![[image of music]](23/lily-2ed9ea8b.png)
![[image of music]](4d/lily-da839988.png)
![[image of music]](4a/lily-78296d91.png)
![[image of music]](f8/lily-b827d78d.png)
![[image of music]](6a/lily-b7d94405.png)
![[image of music]](d3/lily-326205c1.png)
![[image of music]](a1/lily-4c05374f.png)
![[image of music]](e0/lily-58952e3a.png)
![[image of music]](a9/lily-7c5d7e5c.png)
Multi-note ligatures
| Torculus |
| \[ a \pes b \flexa g \] |
| Torculus Auctus Descendens |
| \[ a \pes b \flexa \auctum \descendens g \] |
| Torculus Deminutus |
| \[ a \pes b \flexa \deminutum g \] |
| Torculus Initio Debilis |
| \[ \deminutum a \pes b \flexa g \] |
| Torculus Auctus Descendens Initio Debilis |
| \[ \deminutum a \pes b \flexa \auctum \descendens g \] |
| Torculus Deminutus Initio Debilis |
| \[ \deminutum a \pes b \flexa \deminutum g \] |
| Porrectus |
| \[ a \flexa g \pes b \] |
| Porrectus Auctus Descendens |
| \[ a \flexa g \pes \auctum \descendens b \] |
| Porrectus Deminutus |
| \[ a \flexa g \pes \deminutum b \] |
| Climacus |
| \[ \virga b \inclinatum a \inclinatum g \] |
| Climacus Auctus |
| \[ \virga b \inclinatum a \inclinatum \auctum g \] |
| Climacus Deminutus |
| \[ \virga b \inclinatum a \inclinatum \deminutum g \] |
| Scandicus |
| \[ g \pes a \virga b \] |
| Scandicus Auctus Descendens |
| \[ g \pes a \pes \auctum \descendens b \] |
| Scandicus Deminutus |
| \[ g \pes a \pes \deminutum b \] |
![[image of music]](e5/lily-1b1d0418.png)
![[image of music]](04/lily-58ada1e6.png)
![[image of music]](2f/lily-ee2af000.png)
![[image of music]](74/lily-2daa03ef.png)
![[image of music]](d3/lily-27d483d7.png)
![[image of music]](f2/lily-6d26eb93.png)
![[image of music]](c7/lily-6c9f6acc.png)
![[image of music]](ce/lily-bbc36836.png)
![[image of music]](e5/lily-9f80801a.png)
![[image of music]](5f/lily-42271833.png)
![[image of music]](62/lily-1785e223.png)
![[image of music]](60/lily-bf89ec77.png)
![[image of music]](a3/lily-6fc5d2cf.png)
![[image of music]](01/lily-afd00344.png)
![[image of music]](1e/lily-d4c06de7.png)
Special Signs
| Quilisma |
| \[ g \pes \quilisma a \pes b \] |
| Quilisma Pes Auctus Descendens |
| \[ \quilisma g \pes \auctum \descendens b \] |
| Oriscus |
| \[ \oriscus b \] |
| Pes Quassus |
| \[ \oriscus g \pes \virga b \] |
| Pes Quassus Auctus Descendens |
| \[ \oriscus g \pes \auctum \descendens b \] |
| Salicus |
| \[ g \oriscus a \pes \virga b \] |
| Salicus Auctus Descendens |
| \[ g \oriscus a \pes \auctum \descendens b \] |
| (Apo)stropha |
| \[ \stropha b \] |
| Stropha Aucta |
| \[ \stropha \auctum b \] |
| Bistropha |
| \[ \stropha b \stropha b \] |
| Tristropha |
| \[ \stropha b \stropha b \stropha b \] |
| Trigonus |
| \[ \stropha b \stropha b \stropha a \] |
![[image of music]](93/lily-51cd601d.png)
![[image of music]](8f/lily-99e5ae73.png)
![[image of music]](51/lily-3d40e2c5.png)
![[image of music]](9e/lily-d0836f1f.png)
![[image of music]](d0/lily-dc7fc27e.png)
![[image of music]](79/lily-ca7cc146.png)
![[image of music]](2c/lily-9ffc9721.png)
![[image of music]](ac/lily-44443636.png)
![[image of music]](48/lily-029ac829.png)
![[image of music]](f0/lily-1498b417.png)
![[image of music]](2e/lily-3253db65.png)
![[image of music]](83/lily-b26d9b92.png)
定義済みコマンド
The following head prefixes are supported:
\virga,
\stropha,
\inclinatum,
\auctum,
\descendens,
\ascendens,
\oriscus,
\quilisma,
\deminutum,
\cavum,
\linea.
Head prefixes can be accumulated, though restrictions apply. For
example, either \descendens or \ascendens can be applied
to a head, but not both to the same head.
Two adjacent heads can be tied together with the \pes and
\flexa infix commands for a rising and falling line of melody,
respectively.
Use the unary music function \augmentum to add augmentum dots.
参照
Music Glossary: ligature.
Notation Reference: Gregorian square neume ligatures, White mensural ligatures, Ligatures.
既知の問題と警告
When an \augmentum dot appears at the end of the last staff
within a ligature, it is sometimes vertically placed wrong. As a
workaround, add an additional skip note (e.g., s8) as last note
of the staff.
\augmentum should be implemented as a head prefix rather than a
unary music function, such that \augmentum can be intermixed
with head prefixes in arbitrary order.
| [ << 専門的な記譜法 ] | [トップ][目次][インデックス][ ? ] | [ 入出力全般 >> ] | ||
| [ < Gregorian square neume ligatures ] | [ 上へ : Ancient notation ] | [ Kievan contexts > ] | ||
2.9.5 Typesetting Kievan square notation
| Kievan contexts | ||
| Kievan clefs | ||
| Kievan notes | ||
| Kievan accidentals | ||
| Kievan bar line | ||
| Kievan melismata |
| [ << 専門的な記譜法 ] | [トップ][目次][インデックス][ ? ] | [ 入出力全般 >> ] | ||
| [ < Typesetting Kievan square notation ] | [ 上へ : Typesetting Kievan square notation ] | [ Kievan clefs > ] | ||
Kievan contexts
As with Mensural and Gregorian notation, the predefined
KievanVoice and KievanStaff contexts can be used
to engrave a piece in square notation. These contexts initialize
all relevant context properties and grob properties to proper
values, so you can immediately go ahead entering the chant:
% Font settings for Cyrillic \paper { #(define fonts (set-global-fonts #:roman "Linux Libertine O,serif" )) } \score { << \new KievanVoice = "melody" \relative c' { \cadenzaOn c4 c c c c2 b\longa \bar "k" } \new Lyrics \lyricsto "melody" { Го -- спо -- ди по -- ми -- луй. } >> }
![[image of music]](a5/lily-46a3999e.png)
参照
Music Glossary: kievan notation.
既知の問題と警告
LilyPond supports Kievan notation of the Synodal style, as used in the corpus of chantbooks printed by the Russian Holy Synod in the 1910’s and recently reprinted by the Moscow Patriarchate Publishing House. LilyPond does not support the older (less common) forms of Kievan notation that were used in Galicia to notate Rusyn plainchant.
| [ << 専門的な記譜法 ] | [トップ][目次][インデックス][ ? ] | [ 入出力全般 >> ] | ||
| [ < Kievan contexts ] | [ 上へ : Typesetting Kievan square notation ] | [ Kievan notes > ] | ||
Kievan clefs
There is only one clef used in Kievan notation (the Tse-fa-ut Clef).
It is used to indicate the position of c:
\clef "kievan-do" \kievanOn c'
![[image of music]](07/lily-ee75b03b.png)
参照
Music Glossary: kievan notation, clef.
Notation Reference: 音部記号.
| [ << 専門的な記譜法 ] | [トップ][目次][インデックス][ ? ] | [ 入出力全般 >> ] | ||
| [ < Kievan clefs ] | [ 上へ : Typesetting Kievan square notation ] | [ Kievan accidentals > ] | ||
Kievan notes
For Kievan square notation, the appropriate note head style needs
to be chosen and the flags and stems need to be turned off.
This is accomplished by calling the \kievanOn function,
which sets the appropriate properties of the note head, stems,
and flags. Once Kievan note heads are not needed, these
properties can be reverted by calling the \kievanOff
function.
The Kievan final note, which usually comes at the end of a piece
of music, may be selected by setting the duration to
\longa. The Kievan recitative mark, used to indicate
the chanting of several syllables on one note, may be selected by
setting the duration to \breve. The following example
demonstrates the various Kievan note heads:
\autoBeamOff \cadenzaOn \kievanOn b'1 b'2 b'4 b'8 b'\breve b'\longa \kievanOff b'2
![[image of music]](8e/lily-a901dabc.png)
参照
Music Glossary: kievan notation, note head.
Notation Reference: Note head styles.
既知の問題と警告
LilyPond automatically determines if the stem up or stem down
form of a note is drawn. When setting chant in square notation,
however, it is customary to have the stems point in the same
direction within a single melisma. This can be done manually by
setting the direction property of the Stem object.
| [ << 専門的な記譜法 ] | [トップ][目次][インデックス][ ? ] | [ 入出力全般 >> ] | ||
| [ < Kievan notes ] | [ 上へ : Typesetting Kievan square notation ] | [ Kievan bar line > ] | ||
Kievan accidentals
The kievan style for accidentals is selected with the
glyph-name-alist property of the grob Accidental.
The kievan style provides a sharp and a flat sign
different from the default style. There is no natural sign
in Kievan notation. The sharp sign is not used in Synodal music
but may occur in earlier manuscripts. It has been included
primarily for the sake of compatibility.
\clef "kievan-do" \override Accidental.glyph-name-alist = #alteration-kievan-glyph-name-alist bes' dis'
![[image of music]](ec/lily-fc1561ca.png)
参照
Music Glossary: kievan notation, accidental.
Notation Reference: 臨時記号, 自動臨時記号, The Emmentaler font
| [ << 専門的な記譜法 ] | [トップ][目次][インデックス][ ? ] | [ 入出力全般 >> ] | ||
| [ < Kievan accidentals ] | [ 上へ : Typesetting Kievan square notation ] | [ Kievan melismata > ] | ||
Kievan bar line
A decorative figure is commonly placed at the end of a piece of
Kievan notation, which may be called the Kievan final bar line.
It can be invoked as \bar "k".
\kievanOn \clef "kievan-do" c' \bar "k"
![[image of music]](98/lily-deb8719f.png)
参照
Notation Reference: 小節, The Emmentaler font
| [ << 専門的な記譜法 ] | [トップ][目次][インデックス][ ? ] | [ 入出力全般 >> ] | ||
| [ < Kievan bar line ] | [ 上へ : Typesetting Kievan square notation ] | [ Working with ancient music---scenarios and solutions > ] | ||
Kievan melismata
Notes within a Kievan melisma are usually placed close to each other
and the melismata separated by whitespace. This is done to allow
the chanter to quickly identify the melodic structures of Znamenny
chant. In LilyPond, melismata are treated as ligatures and the
spacing is implemented by the Kievan_ligature_engraver.
When the KievanVoice and KievanStaff contexts are used,
the Kievan_ligature_engraver is enabled by default. In other
contexts, it can be invoked by replacing the Ligature_bracket_engraver
with the Kievan_ligature_engraver in the layout block:
\layout {
\context {
\Voice
\remove "Ligature_bracket_engraver"
\consists "Kievan_ligature_engraver"
}
}
The spacing between the notes within a Kievan ligature can be controlled
by setting the padding property of the KievanLigature.
The following example demonstrates the use of Kievan ligatures:
% Font settings for Cyrillic \paper { #(define fonts (set-global-fonts #:roman "Linux Libertine O,serif" )) } \score { << \new KievanVoice = "melody" \relative c' { \cadenzaOn e2 \[ e4( d4 ) \] \[ c4( d e d ) \] e1 \bar "k" } \new Lyrics \lyricsto "melody" { Га -- врі -- и -- лу } >> }
![[image of music]](4e/lily-1adf7437.png)
参照
Music Glossary: ligature.
Notation Reference: White mensural ligatures, Gregorian square neume ligatures, Ligatures.
既知の問題と警告
Horizontal spacing of ligatures is poor.
| [ << 専門的な記譜法 ] | [トップ][目次][インデックス][ ? ] | [ 入出力全般 >> ] | ||
| [ < Kievan melismata ] | [ 上へ : Ancient notation ] | [ Incipits > ] | ||
2.9.6 Working with ancient music—scenarios and solutions
| Incipits | ||
| Mensurstriche layout | ||
| Transcribing Gregorian chant | ||
| Ancient and modern from one source | ||
| Editorial markings |
Working with ancient music frequently involves particular tasks which differ considerably from the modern notation for which LilyPond is designed. In the rest of this section, a number of typical scenarios are outlined, with suggestions of solutions. These involve:
- how to make incipits (i.e., prefatory material to indicate what the original has looked like) to modern transcriptions of mensural music;
- how to achieve the Mensurstriche layout frequently used for modern transcriptions of polyphonic music;
- how to transcribe Gregorian chant in modern notation;
- how to generate both ancient and modern notation from the same source.
| [ << 専門的な記譜法 ] | [トップ][目次][インデックス][ ? ] | [ 入出力全般 >> ] | ||
| [ < Working with ancient music---scenarios and solutions ] | [ 上へ : Working with ancient music---scenarios and solutions ] | [ Mensurstriche layout > ] | ||
Incipits
It is customary when transcribing mensural music into modern notation to place
an indication of how the initial rests and note or notes of the original version
appeared - including the original clefs. This is called an incipit. The
\incipit command uses the indent of the main staff to set the
width occupied by the incipit, and incipit-width to set the width of the
incipit staff.
\score { \new Staff << \new Voice = Tenor { \set Staff.instrumentName = #"Tenor" \override Staff.InstrumentName.self-alignment-X = #RIGHT \incipit { \clef "mensural-c4" \key f \major r\breve r1 c'1 } \clef "treble_8" \key f \major R1 r2 c'2 | a4. c'8 } \new Lyrics \lyricsto Tenor { Cyn -- thia your } >> \layout { indent = 5\cm incipit-width = 3\cm } }
![[image of music]](60/lily-5771c2b3.png)
既知の問題と警告
Note that instrumentName must be set in the music for the incipit to be
produced. If no instrument name is required then use
\set Staff.instrumentName = #"".
| [ << 専門的な記譜法 ] | [トップ][目次][インデックス][ ? ] | [ 入出力全般 >> ] | ||
| [ < Incipits ] | [ 上へ : Working with ancient music---scenarios and solutions ] | [ Transcribing Gregorian chant > ] | ||
Mensurstriche layout
Mensurstriche (‘mensuration lines’) is the accepted term for bar lines that are drawn between the staves of a system but not through the staves themselves. It is a common way to preserve the rhythmic appearance of the original, i.e., not having to break syncopated notes at bar lines, while still providing the orientation aids that bar lines give.
The mensurstriche-layout where the bar lines do not show on the staves
but between staves can be achieved with a StaffGroup instead of
a ChoirStaff. The bar line on staves is blanked out using
\hide.
global = { \hide Staff.BarLine s1 s % the final bar line is not interrupted \undo \hide Staff.BarLine \bar "|." } \new StaffGroup \relative c'' { << \new Staff { << \global { c1 c } >> } \new Staff { << \global { c c } >> } >> }
| [ << 専門的な記譜法 ] | [トップ][目次][インデックス][ ? ] | [ 入出力全般 >> ] | ||
| [ < Mensurstriche layout ] | [ 上へ : Working with ancient music---scenarios and solutions ] | [ Ancient and modern from one source > ] | ||
Transcribing Gregorian chant
Gregorian chant can be transcribed into modern notation with a number of simple tweaks.
Stems. Stems can be left out altogether by \remove-ing
the Stem_engraver from the Voice context:
\layout {
…
\context {
\Voice
\remove "Stem_engraver"
}
}
Timing. For unmetered chant, there are several alternatives.
The Time_signature_engraver can be removed from the Staff context without any negative side effects. The alternative, to make it transparent, will leave an empty space in the score, since the invisible signature will still take up space.
In many cases, \set Score.timing = ##f will give good
results. Another alternative is to use \cadenzaOn and
\cadenzaOff.
To remove the bar lines, the radical approach is to \remove
the Bar_engraver from the Staff context. Again, one may want to
use \hide BarLine instead, if an
occasional barline is wanted.
A common type of transcription is recitativic chant where the repeated notes are indicated with a single breve. The text to the recitation tone can be dealt with in two different ways: either set as a single, left-aligned syllable:
\include "gregorian.ly"
chant = \relative {
\clef "G_8"
c'\breve c4 b4 a c2 c4 \divisioMaior
c\breve c4 c f, f \finalis
}
verba = \lyricmode {
\once \override LyricText.self-alignment-X = #-1
"Noctem quietam et" fi -- nem per -- fec -- tum
\once \override LyricText.self-alignment-X = #-1
"concedat nobis Dominus" om -- ni -- po -- tens.
}
\score {
\new Staff <<
\new Voice = "melody" \chant
\new Lyrics = "one" \lyricsto melody \verba
>>
\layout {
\context {
\Staff
\remove "Time_signature_engraver"
\remove "Bar_engraver"
}
\context {
\Voice
\remove "Stem_engraver"
}
}
}
![[image of music]](58/lily-fabb2ae1.png)
This works fine, as long as the text doesn’t span a line break. If that is the case, an alternative is to add hidden notes to the score, as below.
In some transcription styles, stems are used
occasionally, for example to indicate the transition from a
single-tone recitative to a fixed melodic gesture. In these cases,
one can use either \hide Stem or
\override Stem.length = #0 instead of \remove-ing
the Stem_engraver and restore the stem
when needed with the corresponding \undo \hide Stem.
\include "gregorian.ly"
chant = \relative {
\clef "G_8"
\set Score.timing = ##f
\hide Stem
c'\breve \hide NoteHead c c c c c
\undo \hide NoteHead
\undo \hide Stem \stemUp c4 b4 a
\hide Stem c2 c4 \divisioMaior
c\breve \hide NoteHead c c c c c c c
\undo \hide NoteHead c4 c f, f \finalis
}
verba = \lyricmode {
No -- ctem qui -- e -- tam et fi -- nem per -- fec -- tum
con -- ce -- dat no -- bis Do -- mi -- nus om -- ni -- po -- tens.
}
\score {
\new Staff <<
\new Voice = "melody" \chant
\new Lyrics \lyricsto "melody" \verba
>>
\layout {
\context {
\Staff
\remove "Time_signature_engraver"
\hide BarLine
}
}
}
![[image of music]](55/lily-4d6d918c.png)
Another common situation is transcription of neumatic or
melismatic chants, i.e., chants with a varying number of notes
to each syllable. In this case, one would want to set the
syllable groups clearly apart, usually also the subdivisions of a
longer melisma. One way to achieve this is to use a fixed
\time, e.g., 1/4, and let each syllable or note group fill
one of these measures, with the help of tuplets or shorter
durations. If the bar lines and all other rhythmical indications
are made transparent, and the space around the bar lines is
increased, this will give a fairly good representation in modern
notation of the original.
To avoid that syllables of different width (such as “-ri” and
“-rum”) spread the syllable note groups unevenly apart, the
'X-extent property of the LyricText object may be
set to a fixed value. Another, more cumbersome way would be to
add the syllables as \markup elements. If further
adjustments are necessary, this can be easily done with
s ‘notes’.
spiritus = \relative { \time 1/4 \override Lyrics.LyricText.X-extent = #'(0 . 3) d'4 \tuplet 3/2 { f8 a g } g a a4 g f8 e d4 f8 g g8 d f g a g f4 g8 a a4 s \tuplet 3/2 { g8 f d } e f g a g4 } spirLyr = \lyricmode { Spi -- ri -- _ _ tus _ Do -- mi -- ni _ re -- ple -- _ vit _ or -- _ bem _ ter -- ra -- _ rum, al -- _ _ le -- _ lu -- _ ia. } \score { \new Staff << \new Voice = "chant" \spiritus \new Lyrics = "one" \lyricsto "chant" \spirLyr >> \layout { \context { \Staff \remove "Time_signature_engraver" \override BarLine.X-extent = #'(-1 . 1) \hide Stem \hide Beam \hide BarLine \hide TupletNumber } } }
![[image of music]](0e/lily-9b86e185.png)
| [ << 専門的な記譜法 ] | [トップ][目次][インデックス][ ? ] | [ 入出力全般 >> ] | ||
| [ < Transcribing Gregorian chant ] | [ 上へ : Working with ancient music---scenarios and solutions ] | [ Editorial markings > ] | ||
Ancient and modern from one source
Using tags to produce mensural and modern music from the same source
By using tags, it’s possible to use the same music to produce both
mensural and modern music. In this snippet, a function menrest
is introduced, allowing mensural rests to be pitched as in the
original, but with modern rests in the standard staff position. Tags
are used to produce different types of bar line at the end of the
music, but tags can also be used where other differences are needed:
for example using “whole measure rests” (R1, R\breve etc.) in
modern music, but normal rests (r1, r\breve, etc.) in the mensural
version. Note that converting mensural music to its modern equivalent
is usually referred to as transcription.
menrest = #(define-music-function (note) (ly:music?) #{ \tag #'mens $(make-music 'RestEvent note) \tag #'mod $(make-music 'RestEvent note 'pitch '()) #}) MensStyle = { \autoBeamOff \override NoteHead.style = #'petrucci \override Score.BarNumber.transparent = ##t \override Stem.neutral-direction = #up } finalis = { \once \override BreathingSign.stencil = #ly:breathing-sign::finalis \once \override BreathingSign.Y-offset = #0 \once \override BreathingSign.minimum-X-extent = #'(-1.0 . 0.0) \once \override BreathingSign.minimum-Y-extent = #'(-2.5 . 2.5) \breathe } Music = \relative c'' { \set Score.tempoHideNote = ##t \key f \major \time 4/4 g1 d'2 \menrest bes4 bes2 a2 r4 g4 fis2. \tag #'mens { \finalis } \tag #'mod { \bar "||" } } MenLyr = \lyricmode { So farre, deere life, deare life } ModLyr = \lyricmode { So far, dear life, dear life } \score { \keepWithTag #'mens { << \new MensuralStaff { \new MensuralVoice = Cantus \clef "mensural-c1" \MensStyle \Music } \new Lyrics \lyricsto Cantus \MenLyr >> } } \score { \keepWithTag #'mod { \new ChoirStaff << \new Staff { \new Voice = Sop \with { \remove "Note_heads_engraver" \consists "Completion_heads_engraver" \remove "Rest_engraver" \consists "Completion_rest_engraver" } { \shiftDurations #1 #0 { \autoBeamOff \Music } } } \new Lyrics \lyricsto Sop \ModLyr >> } }
![[image of music]](2a/lily-3a4d0425.png)
| [ << 専門的な記譜法 ] | [トップ][目次][インデックス][ ? ] | [ 入出力全般 >> ] | ||
| [ < Ancient and modern from one source ] | [ 上へ : Working with ancient music---scenarios and solutions ] | [ 世界の音楽 > ] | ||
Editorial markings
| [ << 専門的な記譜法 ] | [トップ][目次][インデックス][ ? ] | [ 入出力全般 >> ] | ||
| [ < Editorial markings ] | [ 上へ : 専門的な記譜法 ] | [ 非西洋音楽の一般的な記譜法 > ] | ||
2.10 世界の音楽
このセクションの目的は、西洋音楽の慣習とは異なる音楽に関する記譜の問題をハイライトすることです。
| 2.10.1 非西洋音楽の一般的な記譜法 | ||
| 2.10.2 アラブ音楽 | ||
| 2.10.3 トルコの伝統音楽 |
| [ << 専門的な記譜法 ] | [トップ][目次][インデックス][ ? ] | [ 入出力全般 >> ] | ||
| [ < 世界の音楽 ] | [ 上へ : 世界の音楽 ] | [ 記譜法とチューニング システムを拡張する > ] | ||
2.10.1 非西洋音楽の一般的な記譜法
このセクションでは、西洋のクラシック音楽の様式には属さない楽譜を入力し、譜刻する方法を説明します。
| 記譜法とチューニング システムを拡張する |
| [ << 専門的な記譜法 ] | [トップ][目次][インデックス][ ? ] | [ 入出力全般 >> ] | ||
| [ < 非西洋音楽の一般的な記譜法 ] | [ 上へ : 非西洋音楽の一般的な記譜法 ] | [ アラブ音楽 > ] | ||
記譜法とチューニング システムを拡張する
標準的なクラシック音楽の記譜法 (Common Practice Period – 16-19世紀のヨーロッパ音楽 – の記譜法) は全ての種類の音楽で使われるもので、西洋の ‘クラシック’ 音楽に限定されるものではありません。この記譜法は ピッチを記述する で説明されていて、様々な音符名が 他の言語での音符名 で説明されています。
しかしながら、非西洋音楽の多く (それに西洋のフォーク ミュージックと伝統音楽のいくつか) は、異なるあるいは拡張されたチューニングシステムを採用していて、標準的なクラシック音楽の記譜法とは容易に適合しません。
ピッチの違いを潜在させながら、標準の記譜法を用いる場合もあります。例えば、アラブ音楽 は、標準の半音 (訳者: シャープとフラット) と四分音 (訳者: シャープとフラットの半分) を用いて、精密なピッチの変化をコンテキストに決定させながら記譜します。一般的にはイタリアの音符名が使われますが、初期ファイル ‘arabic.ly’ は、標準の記譜法を拡張するアラブ音楽に適したマクロと定義のセットを提供します。詳細は、アラブ音楽 を参照してください。
他のタイプの音楽は、拡張されたあるいは固有の記譜法を必要とします。例えば、トルコの伝統音楽 やオスマントルコの音楽は、全音の 1/9 をベースとする音程を持つ マカーム と呼ばれる旋律様式を採用しています。標準の西洋音楽の音符を使いますが、ファイル ‘makam.ly’ で定義されているトルコ音楽に固有の特殊な臨時記号が用いられます。トルコの伝統音楽とマカームについての詳細は トルコの伝統音楽 を参照してください。
‘arabic.ly’ や ‘makam.ly’ 等の初期ファイルの保存場所については、 その他の情報源 を参照してください。
Selected Snippets
Makam example
Makam is a type of melody from Turkey using 1/9th-tone microtonal alterations. Consult the initialization file ‘ly/makam.ly’ for details of pitch names and alterations.
% Initialize makam settings \include "makam.ly" \relative c' { \set Staff.keyAlterations = #`((6 . ,(- KOMA)) (3 . ,BAKIYE)) c4 cc db fk gbm4 gfc gfb efk fk4 db cc c }
![[image of music]](30/lily-34addfe5.png)
参照
音楽用語集: Common Practice Period, makamlar
学習マニュアル: その他の情報源
記譜法リファレンス: ピッチを記述する, 他の言語での音符名, アラブ音楽, トルコの伝統音楽
| [ << 専門的な記譜法 ] | [トップ][目次][インデックス][ ? ] | [ 入出力全般 >> ] | ||
| [ < 記譜法とチューニング システムを拡張する ] | [ 上へ : 世界の音楽 ] | [ アラブ音楽のためのリファレンス > ] | ||
2.10.2 アラブ音楽
このセクションでは、アラブ音楽の記譜に関する問題をハイライトします。
| アラブ音楽のためのリファレンス | ||
| アラブ音楽での音符名 | ||
| アラブ音楽での調号 | ||
| アラブ音楽での拍子 | ||
| アラブ音楽の例 | ||
| アラブ音楽のための更なる知識 |
| [ << 専門的な記譜法 ] | [トップ][目次][インデックス][ ? ] | [ 入出力全般 >> ] | ||
| [ < アラブ音楽 ] | [ 上へ : アラブ音楽 ] | [ アラブ音楽での音符名 > ] | ||
アラブ音楽のためのリファレンス
アラブ音楽は主に口伝えで伝えられてきました。音楽を記述するときは、演奏者が多くを即興することを前提としたスケッチ形式で記されます。アラブ音楽を伝え、保護するために、いくつかのバリエーションを持つ西洋音楽記譜法を採用することが増えています。
和音の記述や独立したパートのような西洋音楽記譜法の要素のいくつかは、伝統的なアラブ音楽を記譜するのに必要としません。しかしながら、それとは異なる問題があります。例えば、西洋音楽で用いられる半音と全音に加えて、半音や全音の間にある中間音程を示す必要があります。さらに、多くのマカーム (旋法) – アラブ音楽のパート – を示す必要があります。
一般的に、アラブ音楽の記譜法は微分音要素を正確に示そうとはしません。
アラブ音楽に関係する問題のいくつかは他の場所でカバーされています:
- 音符名と臨時記号 (四分音を含む) を用意する方法は、非西洋音楽の一般的な記譜法 で説明しています。
- 追加の調号を用意する方法は、調号 で説明しています。
- 複雑な拍子は、手動連桁 で説明されているように、音符を手動でグループ化することを必要とするかもしれません。
- 自由なリズムの即興 – タクシーム – は、無韻律の音楽 で説明されているように小節線を省略します。
参照
記譜法リファレンス: 非西洋音楽の一般的な記譜法, 調号, 手動連桁
コード断片集: World music
| [ << 専門的な記譜法 ] | [トップ][目次][インデックス][ ? ] | [ 入出力全般 >> ] | ||
| [ < アラブ音楽のためのリファレンス ] | [ 上へ : アラブ音楽 ] | [ アラブ音楽での調号 > ] | ||
アラブ音楽での音符名
伝統的なアラブ音楽の音符名は非常に長く、音楽を記述するという目的には適さないため、使いません。アラブ音楽の教育では英語の音符名は馴染まれておらず、イタリア語あるいはソルフェージュ音符名 (do, re, mi, fa, sol, la, si) が用いられます。修飾子 (臨時記号) も用いられます。イタリア語の音符名と臨時記号は、他の言語での音符名 で説明しています。非西洋音楽の記譜に標準的なクラシック音楽の記譜法を用いる方法は、非西洋音楽の一般的な記譜法 で説明しています。
例えば、アラブ音楽の マカーム ラースト を記譜することができます:
\include "arabic.ly" \relative { do' re misb fa sol la sisb do sisb la sol fa misb re do }
![[image of music]](71/lily-af340177.png)
半フラットの記号は、アラブ音楽の記譜法で用いられる記号と一致しません。特殊なアラブ音楽の半フラット記号を用いることが重要である場合は、半フラットの音符の前に ‘arabic.ly’ で定義されている \dwn を配置します。この方法では、調号の中の半フラット記号の見た目を変えることはできません。
\include "arabic.ly" \relative { \set Staff.extraNatural = ##f dod' dob dosd \dwn dob dobsb dodsd do do }
![[image of music]](d5/lily-875cf668.png)
参照
記譜法リファレンス: 他の言語での音符名, 非西洋音楽の一般的な記譜法
コード断片集: World music
| [ << 専門的な記譜法 ] | [トップ][目次][インデックス][ ? ] | [ 入出力全般 >> ] | ||
| [ < アラブ音楽での音符名 ] | [ 上へ : アラブ音楽 ] | [ アラブ音楽での拍子 > ] | ||
アラブ音楽での調号
マイナーとメジャーの調号に加えて、以下の調号が ‘arabic.ly’ で定義されています: bayati, rast, sikah, iraq, それに kurd です。これらの調号は、一般的に用いられる多くのマカームではなく、少数のマカームを定義します。
一般的に、マカームはそのマカーム グループあるいは隣のグループの調号を使用し、楽曲全体にさまざまな臨時記号が付けられます。
例として、マカーム muhayer の調号を示します:
\key re \bayati
ここで、re が muhayer マカームの終止音であり、bayati がそのグループでの基本となるマカームの名前です。
調号がグループを表していますが、一般にタイトルはより具体的なマカームを示します。そのため、上記の例ではマカーム muhayer の名前がタイトルとして表示されます。
以下の表で示すように同じ bayati グループに属する他のマカーム (bayati, hussaini, saba, それに ushaq) も同じ方法で示すことができます。それらがその bayati グループのすべてのバリエーションです。それらは基本的な特質は変わらない兄弟関係にあり、基本となるマカーム (この場合は bayati) とは上方のテトラコードが異なっていたり、詳細の一部分が異なっています。
同じグループの他のマカーム (nawa) は bayati を移調したもので、表では移調をマカームの後ろに括弧書きで、基本となるマカームからの移調として記載しています。アラブ音楽のマカームの移調は、アラブ音楽の楽器の性質により、制限されています。nawa は以下のように示すことができます:
\key sol \bayati
アラブ音楽では、bayati のような用語が複数の意味を持ちます – マカーム グループを示し、そのグループで最も重要なマカームであり、基本となるマカームでもあります。
ここで、一般的なマカームの調号をマッピングしたグループを示します:
| マカーム グループ | 調 | 終止音 | グループの他のマカーム (終止音) |
|---|---|---|---|
| ajam | major | sib | jaharka (fa) |
| bayati | bayati | re | hussaini, muhayer, saba, ushaq, nawa (sol) |
| hijaz | kurd | re | shahnaz, shad arban (sol), hijazkar (do) |
| iraq | iraq | sisb | - |
| kurd | kurd | re | hijazkar kurd (do) |
| nahawand | minor | do | busalik (re), farah faza (sol) |
| nakriz | minor | do | nawa athar, hisar (re) |
| rast | rast | do | mahur, yakah (sol) |
| sikah | sikah | misb | huzam |
Selected Snippets
Non-traditional key signatures
The commonly used \key command sets the keyAlterations
property, in the Staff context.
To create non-standard key signatures, set this property directly. The format of this command is a list:
\set Staff.keyAlterations = #`(((octave . step) . alter) ((octave
. step) . alter) ...) where, for each element in the list,
octave specifies the octave (0 being the octave from middle C to
the B above), step specifies the note within the octave (0 means
C and 6 means B), and alter is ,SHARP ,FLAT ,DOUBLE-SHARP
etc. (Note the leading comma.)
Alternatively, for each item in the list, using the more concise format
(step . alter) specifies that the same alteration should hold in
all octaves.
For microtonal scales where a “sharp” is not 100 cents, alter
refers to the alteration as a proportion of a 200-cent whole tone.
Here is an example of a possible key signature for generating a whole-tone scale:
\relative { \set Staff.keyAlterations = #`((6 . ,FLAT) (5 . ,FLAT) (3 . ,SHARP)) c'4 d e fis aes4 bes c2 }
参照
音楽用語集: maqam, bayati, rast, sikah, iraq, kurd
記譜法リファレンス: 調号
学習マニュアル: 臨時記号と調号
内部リファレンス: KeySignature
コード断片集: World music, Pitches
| [ << 専門的な記譜法 ] | [トップ][目次][インデックス][ ? ] | [ 入出力全般 >> ] | ||
| [ < アラブ音楽での調号 ] | [ 上へ : アラブ音楽 ] | [ アラブ音楽の例 > ] | ||
アラブ音楽での拍子
アラブ音楽とトルコ音楽の伝統的な形式 – セマーイー (Semai) など – は 10/8 のような通常とは異なる拍子を使います。このことは、音符の自動グループ化は拍で音符をグループ化する既存の楽譜とは大きく異なり、自動連桁機能の調節で対応することが困難ということを意味します。代替手段として、自動連桁機能を off にして、手動で音符に連桁を付けることになります。既存の楽譜に合わせることが必要でない場合であっても、自動連桁機能の振る舞いを調整し、複合拍子を用いることが望ましいかもしれません。
Selected Snippets
Arabic improvisation
For improvisations or taqasim which are temporarily free, the time
signature can be omitted and \cadenzaOn can be used. Adjusting
the accidental style might be required, since the absence of bar lines
will cause the accidental to be marked only once. Here is an example
of what could be the start of a hijaz improvisation:
\include "arabic.ly" \relative sol' { \key re \kurd \accidentalStyle forget \cadenzaOn sol4 sol sol sol fad mib sol1 fad8 mib re4. r8 mib1 fad sol }
![[image of music]](30/lily-c05a714e.png)
参照
記譜法リファレンス: 手動連桁, 自動連桁, 無韻律の音楽, 自動臨時記号, 自動連桁の振る舞いを設定する, 拍子
コード断片集: World music
| [ << 専門的な記譜法 ] | [トップ][目次][インデックス][ ? ] | [ 入出力全般 >> ] | ||
| [ < アラブ音楽での拍子 ] | [ 上へ : アラブ音楽 ] | [ アラブ音楽のための更なる知識 > ] | ||
アラブ音楽の例
ここで、トルコの セマーイー (Semai) の始めの部分を使ったテンプレートを挙げます。アラブ音楽教育では、セマーイー はアラブ音楽の記譜の特色のいくつか – このセクションで説明した中間的な音程や通常では使用しない旋法等 – を説明するためにお馴染みのものです。
\include "arabic.ly" \score { \relative { \set Staff.extraNatural = ##f \set Staff.autoBeaming = ##f \key re \bayati \time 10/8 re'4 re'8 re16 [misb re do] sisb [la sisb do] re4 r8 re16 [misb do re] sisb [do] la [sisb sol8] la [sisb] do [re] misb fa4 fa16 [misb] misb8. [re16] re8 [misb] re [do] sisb do4 sisb8 misb16 [re do sisb] la [do sisb la] la4 r8 } \header { title = "Semai Muhayer" composer = "Jamil Bek" } }
![[image of music]](0a/lily-8489f58e.png)
参照
コード断片集: World music
| [ << 専門的な記譜法 ] | [トップ][目次][インデックス][ ? ] | [ 入出力全般 >> ] | ||
| [ < アラブ音楽の例 ] | [ 上へ : アラブ音楽 ] | [ トルコの伝統音楽 > ] | ||
アラブ音楽のための更なる知識
-
Habib Hassan Touma 著 The music of the Arabs [Amadeus Press, 1996]
にはマカームについての説明と、それらのグループ化手法についての説明があります。
マカームについて説明している様々な Web サイトもあり、それらの中には音源による例を提供しているものもあります:
マカームのグループ化手法の詳細にはいくつかのバリエーションがありますが、マカームをグループ化する基準 – 下方のテトラ コードの共通性や移調に関連付けられます – は一致しています。
-
特定のマカームに対してどのように調号を指定するかについては、一貫していません
– 同じテキスト内でさえも一貫していないことがあります。しかしながら、マカーム毎に調号を指定するのではなく、グループ毎に調号を指定するのが一般的です。
以下の著者による ウード (アラブ音楽のリュート) の教本には、主なトルコ音楽とアラブ音楽の作曲についての説明があります。
- Charbel Rouhana
- George Farah
- Ibrahim Ali Darwish Al-masri
| [ << 専門的な記譜法 ] | [トップ][目次][インデックス][ ? ] | [ 入出力全般 >> ] | ||
| [ < アラブ音楽のための更なる知識 ] | [ 上へ : 世界の音楽 ] | [ トルコの伝統音楽のためのリファレンス > ] | ||
2.10.3 トルコの伝統音楽
このセクションではトルコの伝統音楽記譜に関係する問題をハイライトします。
| トルコの伝統音楽のためのリファレンス | ||
| トルコ音楽の音符名 |
| [ << 専門的な記譜法 ] | [トップ][目次][インデックス][ ? ] | [ 入出力全般 >> ] | ||
| [ < トルコの伝統音楽 ] | [ 上へ : トルコの伝統音楽 ] | [ トルコ音楽の音符名 > ] | ||
トルコの伝統音楽のためのリファレンス
トルコの伝統音楽はオスマン帝国時代 – ヨーロッパでクラシック音楽が開発されたのとほぼ同時期 – に発展し、 それ自体の作曲形式、理論それに演奏スタイルを持つ、活発で西洋音楽とは別個の流儀を持つ音楽として 20 世紀そして 21 世紀へと受け継がれてきました。際立った特徴の 1 つは全音階を 9 等分した ‘コンマ’ をベースとする微分音を使用することであり、微分音から マカーム (makam、複数形は makamlar) と呼ばれる旋律形式が構築されます。
トルコの伝統音楽に関する問題のいくつかは他の場所でカバーされています:
- 特殊な音符名と臨時記号について、非西洋音楽の一般的な記譜法 で説明しています。
| [ << 専門的な記譜法 ] | [トップ][目次][インデックス][ ? ] | [ 入出力全般 >> ] | ||
| [ < トルコの伝統音楽のためのリファレンス ] | [ 上へ : トルコの伝統音楽 ] | [ 入出力全般 > ] | ||
トルコ音楽の音符名
トルコの伝統音楽におけるピッチは固有の名前を持ちます。全音階の 1/9 をベースとしているため、西洋音楽の音階と旋法とは全く異なる音程のセットを採用しています: koma (全音階の 1/9), eksik bakiye (3/9), bakiye (4/9), kücük mücenneb (5/9), büyük mücenneb (8/9), tanîni (全音階) それに artık ikili (12/9 または 13/9) です。
現代の記譜法の観点から見ると、西洋音楽標準の譜の音符 (ド、レ、ミ …) に音符を全音階の 1/9, 4/9, 5/9, 8/9 上げ下げする特殊な臨時記号を組み合わせて使うと便利です。これらの臨時記号はファイル ‘makam.ly’ で定義されています。
以下の表は下記をリストアップしています:
- 特殊な臨時記号の名前
- 音符に後ろに付ける臨時記号の接尾辞
- 全音階の分数で表すピッチの変化量
臨時記号名
接尾辞
ピッチの変化量
büyük mücenneb (シャープ)
-bm
+8/9
kücük mücenneb (シャープ)
-k
+5/9
bakiye (シャープ)
-b
+4/9
koma (シャープ)
-c
+1/9
koma (フラット)
-fc
-1/9
bakiye (フラット)
-fb
-4/9
kücük mücenneb (フラット)
-fk
-5/9
büyük mücenneb (フラット)
-fbm
-8/9
非西洋音楽の記譜法についてのもっと一般的な説明は、非西洋音楽の一般的な記譜法 を参照してください。
参照
記譜法リファレンス: 非西洋音楽の一般的な記譜法
| [ << 専門的な記譜法 ] | [トップ][目次][インデックス][ ? ] | [ スペースの問題 >> ] | ||
| [ < トルコ音楽の音符名 ] | [ 上へ : Top ] | [ 入力の構造 > ] | ||
3. 入出力全般
このセクションでは、特定の記譜法ではなく、LilyPond の一般的な入出力の問題について扱います。
| 3.1 入力の構造 | ||
| 3.2 タイトルとヘッダ | ||
| 3.3 入力ファイルに取り組む | ||
| 3.4 出力を制御する | ||
| 3.5 MIDI 出力 | ||
| 3.6 音楽情報を抽出する |
| [ << 入出力全般 ] | [トップ][目次][インデックス][ ? ] | [ スペースの問題 >> ] | ||
| [ < 入出力全般 ] | [ 上へ : 入出力全般 ] | [ score の構造 > ] | ||
3.1 入力の構造
LilyPond の入力の主となるフォーマットはテキスト ファイルです。習慣として、それらのファイルの最後には ‘.ly’ を付けます。
| 3.1.1 score の構造 | ||
| 3.1.2 book の中にある複数の score | ||
| 3.1.3 1 つの入力ファイルから複数の出力ファイルを生成する | ||
| 3.1.4 出力ファイル名 | ||
| 3.1.5 ファイル構造 |
| [ << 入出力全般 ] | [トップ][目次][インデックス][ ? ] | [ スペースの問題 >> ] | ||
| [ < 入力の構造 ] | [ 上へ : 入力の構造 ] | [ book の中にある複数の score > ] | ||
3.1.1 score の構造
\score ブロックは、波括弧で囲まれた単一の音楽表記を含んでいなければなりません:
\score {
...
}
Note: score ブロックの中には、最上位の音楽表記が 1 つだけ 存在していなければならず、その音楽表記は波括弧で囲まれていなければなりません。
この単一の音楽表記は任意のサイズになり得ます。そして、それは他の音楽表記を保持して任意の複雑さを持ち得ます。以下の例はすべて音楽表記です:
{ c'4 c' c' c' }
{ { c'4 c' c' c' } { d'4 d' d' d' } }
![[image of music]](59/lily-951186e7.png)
<< \new Staff { c'4 c' c' c' } \new Staff { d'4 d' d' d' } >>
![[image of music]](b9/lily-e09456d1.png)
{
\new GrandStaff <<
\new StaffGroup <<
\new Staff { \flute }
\new Staff { \oboe }
>>
\new StaffGroup <<
\new Staff { \violinI }
\new Staff { \violinII }
>>
>>
}
この一般規則の例外の 1 つにコメントがあります。(他の例外は、ファイル構造 を参照してください。)単一行コメントと複数行コメント (%{ .. %} で囲まれます) はどちらも入力ファイルの任意の場所に配置することができます。コメントは \score ブロックの内側あるいは外側に配置することができ、\score ブロックの中にある単一の音楽表記の内側あるいは外側に配置することができます。
たとえ \score ブロックだけを保持しているファイルであっても、暗黙的に \book ブロックで囲まれるということを覚えておいてください。ソース ファイルの中にある \book は少なくとも 1 つの出力ファイルを作り出し、デフォルトでは出力ファイル名は入力ファイル名から派生します。‘fandangoforelephants.ly’ は ‘fandangoforelephants.pdf’ を作り出します。
(\book ブロックについての詳細は、book の中にある複数の score、1 つの入力ファイルから複数の出力ファイルを生成する、ファイル構造 を参照してください。)
参照
学習マニュアル: Working on input files, Music expressions explained, Score is a (single) compound musical expression
| [ << 入出力全般 ] | [トップ][目次][インデックス][ ? ] | [ スペースの問題 >> ] | ||
| [ < score の構造 ] | [ 上へ : 入力の構造 ] | [ 1 つの入力ファイルから複数の出力ファイルを生成する > ] | ||
3.1.2 book の中にある複数の score
ドキュメントは複数の楽曲とテキストを含むことができます。そのようなドキュメントの例には練習曲集や、複数の楽章を持つオーケストラのパート譜があります。楽章はそれぞれ \score ブロックで入力され、
\score {
..music..
}
テキストは \markup ブロックで入力されます。
\markup {
..text..
}
同じ ‘.ly’ ファイルの中にあるすべての楽章とテキストは、通常、単一の出力ファイルとして譜刻されます。
\score {
..
}
\markup {
..
}
\score {
..
}
重要な例外として lilypond-book ドキュメントがあります。lilypond-book ドキュメントでは、明示的に \book ブロックを追加する必要があります。さもなければ、最初の \score あるいは \markup だけが出力に表示されます。
音楽の各節のヘッダはその節の \score ブロックの中に置くことができます。そのヘッダからの piece 名がそれぞれの楽章の前に譜刻されます。book 全体のタイトルは \book の中に置くことができます。しかしながら、\book が存在しない場合は、\header を入力ファイルの先頭に挿入します。
\header {
title = "Eight miniatures"
composer = "Igor Stravinsky"
}
\score {
…
\header { piece = "Romanze" }
}
\markup {
..text of second verse..
}
\markup {
..text of third verse..
}
\score {
…
\header { piece = "Menuetto" }
}
\bookpart ブロックを用いて、
複数の楽曲を book のパートとしてグループ化することができます。
book パートは改ページで区切られ、book 自体と同様に
\header ブロックによりタイトルを持つことができます。
\bookpart {
\header {
title = "Book title"
subtitle = "First part"
}
\score { … }
…
}
\bookpart {
\header {
subtitle = "Second part"
}
\score { … }
…
}
| [ << 入出力全般 ] | [トップ][目次][インデックス][ ? ] | [ スペースの問題 >> ] | ||
| [ < book の中にある複数の score ] | [ 上へ : 入力の構造 ] | [ 出力ファイル名 > ] | ||
3.1.3 1 つの入力ファイルから複数の出力ファイルを生成する
1 つの ‘.ly’ ファイルから複数の出力ファイルを得たいのであれば、‘.ly’ ファイルに複数の \book ブロックを記述します。各 \book ブロックが個々に出力ファイルになります。入力ファイルで \book ブロックを記述しなければ、LilyPond は暗黙的にファイル全体を単一の \book として扱います。ファイル構造 を参照してください。
単一のソース ファイルから複数のファイルを作り出す時、LilyPond は、\book ブロックが作り出す出力ファイルが同じ入力ファイル内にある他の \book ブロックが作り出した出力ファイルを上書きしないことを保証します。
入力ファイルから派生するデフォルトの出力ファイル名に
\book 毎の接尾辞を付け加えることによって上書きされないことを保証します。
出力が上書きされないよう、デフォルトでは出力ファイル名にバージョン番号の接尾辞を付け加えます。ソース ファイル ‘eightminiatures.ly’ 内の以下の記述
\book {
\score { … }
\layout { … }
}
\book {
\score { … }
\layout { … }
}
\book {
\score { … }
\layout { … }
}
は、下記の出力ファイルを作り出します。
- ‘eightminiatures.pdf’,
- ‘eightminiatures-1.pdf’ and
- ‘eightminiatures-2.pdf’.
| [ << 入出力全般 ] | [トップ][目次][インデックス][ ? ] | [ スペースの問題 >> ] | ||
| [ < 1 つの入力ファイルから複数の出力ファイルを生成する ] | [ 上へ : 入力の構造 ] | [ ファイル構造 > ] | ||
3.1.4 出力ファイル名
LilyPond は、出力ファイルを作り出す時に出力ファイル名を制御するための様々な機能を提供します。
前のセクションでは、LilyPond がどのように単一のソース ファイルから作り出される複数の出力ファイルが上書きされることを防ぐかを見てきました。\book ブロック毎の出力ファイル名に付け加えられる接尾辞を指定することもできます。各 \book ブロックの内部に \bookOutputSuffix 宣言を記述することにより、例えば
‘eightminiatures-Romanze.pdf’, ‘eightminiatures-Menuetto.pdf’
それに ‘eightminiatures-Nocturne.pdf’ といった名前の出力ファイルを作り出すことができます。
\book {
\bookOutputSuffix "Romanze"
\score { … }
\layout { … }
}
\book {
\bookOutputSuffix "Menuetto"
\score { … }
\layout { … }
}
\book {
\bookOutputSuffix "Nocturne"
\score { … }
\layout { … }
}
\bookOutputName 宣言を用いることにより、\book ブロックに入力ファイル名とは異なる出力ファイル名を指定することもできます。
\book {
\bookOutputName "Romanze"
\score { … }
\layout { … }
}
\book {
\bookOutputName "Menuetto"
\score { … }
\layout { … }
}
\book {
\bookOutputName "Nocturne"
\score { … }
\layout { … }
}
上記のファイルは下記の出力ファイルを作り出します:
- ‘Romanze.pdf’
- ‘Menuetto.pdf’
- ‘Nocturne.pdf’
| [ << 入出力全般 ] | [トップ][目次][インデックス][ ? ] | [ スペースの問題 >> ] | ||
| [ < 出力ファイル名 ] | [ 上へ : 入力の構造 ] | [ タイトルとヘッダ > ] | ||
3.1.5 ファイル構造
‘.ly’ ファイルは最上位の表記を任意の数だけ保持することができます – ここで、最上位の表記とは以下の中の 1 つです:
-
\paper,\midi,\layoutなどの出力定義。最上位にある出力定義はブック全体のデフォルト設定を変更します。最上位に同じタイプの出力定義が複数ある場合は組み合わされますが、衝突した場合は後ろの方にある出力定義が優先されます。出力定義が\layoutブロックにどのような影響を与えるかの詳細は\layoutブロック を参照してください。 -
#(set-default-paper-size "a7" 'landscape)や#(ly:set-option 'point-and-click #f)などの Scheme 表記。 -
\headerブロック。これはグローバル ヘッダ ブロックになります。このブロックは、作曲者、曲名などのブック全体の設定定義を保持します。 -
\scoreブロック。この score は他の最上位の score とともに単一の\bookにまとめられます。この振る舞いは、変数toplevel-score-handlerを最上位の階層で設定することによって、変更することができます。デフォルトのハンドラは初期化ファイル ‘../scm/lily.scm’ で定義されています。 -
\bookブロックは複数の楽章 (すなわち、複数の\scoreブロック) を論理的に 1 つのドキュメントにまとめます。複数の\scoreが存在する場合、それぞれの\bookブロックに対して 1 つずつ出力ファイルが作成され、それぞれの出力ファイルの中では該当するすべての楽章が連結されます。‘.ly’ ファイルの中で明示的に\bookブロックを指定する必要があるケースはただ 1 つ、単一の入力ファイルから複数の出力ファイルを作成することを望む場合です。例外の 1 つに lilypond-book ドキュメントがあります – そこでは、同じ例の中に複数の\socreあるいは\markupを配置したければ、明示的に\bookブロックを追加する必要があります。この振る舞いは、変数toplevel-score-handlerを最上位の階層で設定することによって、変更することができます。デフォルトのハンドラは初期化ファイル ‘../scm/lily.scm’ で定義されています。 -
\bookpartブロック。改ページを簡単にするため、あるいは異なるパートで別々の\paper設定を使用するために、book は –\bookpartを用いて – いくつかのパートに分割される可能性があります。 -
以下のような複合音楽表記:
{ c'4 d' e'2 }これは楽節を
\scoreに付け加え、その楽節を他のすべての最上位\scoreや音楽表記とともに単一のブックにフォーマットにします。言い換えると、上記の音楽表記だけを保持しているファイルは以下のように翻訳されます:\book { \score { \new Staff { \new Voice { { c'4 d' e'2 } } } \layout { } } \paper { } \header { } }この振る舞いは、変数
toplevel-score-handlerを最上位の階層で設定することによって、変更することができます。デフォルトのハンドラは初期化ファイル ‘../scm/lily.scm’ で定義されています。 -
マークアップ テキスト。例として以下の歌詞を挙げます:
\markup { 2. The first line verse two. }マークアップ テキストは、それが出現した場所で、score あるいは音楽表記の上、間、あるいは下に描かれます。
-
以下のような変数:
foo = { c4 d e d }これは後で使用することができます。使用するには、入力ファイルの中で
\fooと入力します。変数の名前はアルファベットだけで構成すべきです。数字、アンダスコアあるいはダッシュを使うことができません。
以下の例は最上位の階層で入力される可能性がある 3 つのものを示しています:
\layout {
% Don't justify the output
ragged-right = ##t
}
\header {
title = "Do-re-mi"
}
{ c'4 d' e2 }
ファイルの任意の場所で、以下の編集指示のいずれかが入力される可能性があります:
-
\version -
\include -
\sourcefilename -
\sourcefileline -
%記号で始まる単一行コメント。 -
%{ .. %}で囲まれる複数行コメント。
通常、入力の要素間にある空白は無視され、可読性を良くするために自由に削除あるいは追加することができます。しかしながら、以下の状況ではエラーを避けるために空白を挿入する必要があります:
- 波括弧の前後。
- コマンドあるいは変数 – すなわち、
\記号で始まる要素 – の後。 - Scheme 表記として解釈される要素
– すなわち、
#記号で始まる要素 – の後。 - Scheme 表記要素を区切る空白。
-
lyricmodeモードの\overrideと\setコマンドの中にある単語を区切る空白。特に、\override Score.LyricText.font-size = #5のように、コマンドの中のドットとイコール記号の前後、コマンド全体の前後に空白を挿入することを忘れないで下さい。
参照
学習マニュアル: How LilyPond input files work
記譜法リファレンス:
\layout ブロック
| [ << 入出力全般 ] | [トップ][目次][インデックス][ ? ] | [ スペースの問題 >> ] | ||
| [ < ファイル構造 ] | [ 上へ : 入出力全般 ] | [ タイトル、ヘッダ、フッタを作成する > ] | ||
3.2 タイトルとヘッダ
ほとんどすべての楽譜にはタイトルと作曲者名が含まれます。楽譜の中にはさらに多くの情報を含むものもあります。
| 3.2.1 タイトル、ヘッダ、フッタを作成する | ||
| 3.2.2 カスタム ヘッダ、フッタ、タイトル | ||
| 3.2.3 脚注を作成する | ||
| 3.2.4 ページ番号の参照 | ||
| 3.2.5 目次 |
| [ << 入出力全般 ] | [トップ][目次][インデックス][ ? ] | [ スペースの問題 >> ] | ||
| [ < タイトルとヘッダ ] | [ 上へ : タイトルとヘッダ ] | [ タイトル ブロックの説明 > ] | ||
3.2.1 タイトル、ヘッダ、フッタを作成する
| タイトル ブロックの説明 | ||
| book と score のタイトル ブロックのデフォルト レイアウト | ||
| ヘッダとフッタのデフォルト レウアウト |
| [ << 入出力全般 ] | [トップ][目次][インデックス][ ? ] | [ スペースの問題 >> ] | ||
| [ < タイトル、ヘッダ、フッタを作成する ] | [ 上へ : タイトル、ヘッダ、フッタを作成する ] | [ book と score のタイトル ブロックのデフォルト レイアウト > ] | ||
タイトル ブロックの説明
タイトル ブロックには 2 つのタイプがあります:
book の最初の \score の上に表示されるメインのタイトル ブロックと、各 \score ブロック内に表示される個々のタイトル ブロックです。両タイプのテキスト フィールドは \header ブロックを用いて挿入します。
book が単一の score しか持たない場合、\header ブロックを配置する場所は \score ブロックの内側でも外側でも構いません。
Note: \score ブロックの内側に \header ブロックを追加する場合、\header ブロックの前に音楽表記を配置する必要があります。
\header { title = "SUITE I." composer = "J. S. Bach." } \score { \new Staff \relative { \clef bass \key g \major \repeat unfold 2 { g,16( d' b') a b d, b' d, } | \repeat unfold 2 { g,16( e' c') b c e, c' e, } | } \header { piece = "Prélude." } } \score { \new Staff \relative { \clef bass \key g \major \partial 16 b16 | <g, d' b'~>4 b'16 a( g fis) g( d e fis) g( a b c) | d16( b g fis) g( e d c) b(c d e) fis( g a b) | } \header { piece = "Allemande." } }
![[image of music]](12/lily-9b1c0743.png)
book のメイン タイトル ブロックのテキスト フィールドはすべての \score
ブロックに表示させることができ、手動で表示を抑制することもできます:
\book { \paper { print-all-headers = ##t } \header { title = "DAS WOHLTEMPERIRTE CLAVIER" subtitle = "TEIL I" % この book では tagline を表示しません tagline = ##f } \markup { \vspace #1 } \score { \new PianoStaff << \new Staff { s1 } \new Staff { \clef "bass" s1 } >> \header { title = "PRAELUDIUM I" opus = "BWV 846" % この score では subtitle を表示しません subtitle = ##f } } \score { \new PianoStaff << \new Staff { s1 } \new Staff { \clef "bass" s1 } >> \header { title = "FUGA I" subsubtitle = "A 4 VOCI" opus = "BWV 846" % この score では subtitle を表示しません subtitle = ##f } } }
![[image of music]](c6/lily-11978d55.png)
参照
記譜法リファレンス: ファイル構造, タイトル ブロックのカスタム レイアウト
| [ << 入出力全般 ] | [トップ][目次][インデックス][ ? ] | [ スペースの問題 >> ] | ||
| [ < タイトル ブロックの説明 ] | [ 上へ : タイトル、ヘッダ、フッタを作成する ] | [ ヘッダとフッタのデフォルト レウアウト > ] | ||
book と score のタイトル ブロックのデフォルト レイアウト
タイトル ブロックのレイアウトとフォーマットは 2 つの \paper
変数によって制御されます。メインの \header タイトル ブロックのための bookTitleMarkup と、\score 内部の個々の \header ブロックのための
scoreTitleMarkup です。
以下の例は \header のすべての変数の使用例です:
\book { \header { % 以下のフィールドは中央揃えされます。 dedication = "Dedication" title = "Title" subtitle = "Subtitle" subsubtitle = "Subsubtitle" % 以下のフィールドは 1 行に配置されます % フィールド "instrument" は 2 ページ以降にも表示されます instrument = \markup \with-color #green "Instrument" poet = "Poet" composer = "Composer" % 以下のフィールドは同一行の両端に配置されます meter = "Meter" arranger = "Arranger" % 以下のフィールドは最下段の中央に配置されます tagline = "tagline goes at the bottom of the last page" copyright = "copyright goes at the bottom of the first page" } \score { { s1 } \header { % 以下のフィールドは同一行の両端に配置されます piece = "Piece 1" opus = "Opus 1" } } \score { { s1 } \header { % 以下のフィールドは同一行の両端に配置されます piece = "Piece 2 on the same page" opus = "Opus 2" } } \pageBreak \score { { s1 } \header { % 以下のフィールドは同一行の両端に配置されます piece = "Piece 3 on a new page" opus = "Opus 3" } } }
![[image of music]](af/lily-9b0fd01a.png)
以下に注意してください:
- 楽器名は各ページに繰り返し表示されます。
-
紙面変数
print-all-headersに##fがセットされている場合 (デフォルトの設定です)、\scoreにはpieceとopusだけが表示されます。 -
\headerブロックでセットされなかったテキスト フィールドには\nullマークアップがセットされ、スペースを無駄にしません。 -
デフォルト設定では、
scoreTitleMarkupはpieceテキスト フィールドとopusテキスト フィールドを同一行の両端に配置します。
デフォルトのレイアウトを変更するには タイトル ブロックのカスタム レイアウト を参照してください。
最上位の \header ブロックのタイトルを最初のページに配置して、\score ブロックで定義される楽譜を次のページから始めるするには、\score ブロックの中にある \header ブロック内でbreakbefore 変数を使用します。
\book {
\header {
title = "This is my Title"
subtitle = "This is my Subtitle"
copyright = "This is the bottom of the first page"
}
\score {
\repeat unfold 4 { e'' e'' e'' e'' }
\header {
piece = "This is the Music"
breakbefore = ##t
}
}
}
![[image of music]](08/lily-8a682fdb.png)
参照
学習マニュアル: How LilyPond input files work
記譜法リファレンス: タイトル ブロックのカスタム レイアウト, ファイル構造
インストールされているファイル: ‘ly/titling-init.ly’
| [ << 入出力全般 ] | [トップ][目次][インデックス][ ? ] | [ スペースの問題 >> ] | ||
| [ < book と score のタイトル ブロックのデフォルト レイアウト ] | [ 上へ : タイトル、ヘッダ、フッタを作成する ] | [ カスタム ヘッダ、フッタ、タイトル > ] | ||
ヘッダとフッタのデフォルト レウアウト
ヘッダ と フッタ は、book のテキストとは別の、ページの最初と最後に表示されるテキスト行です。ヘッダとフッタは以下の \paper 変数によって制御されます:
-
oddHeaderMarkup -
evenHeaderMarkup -
oddFooterMarkup -
evenFooterMarkup
これらのマークアップ変数は、最上位の \header ブロック
(これは book のすべての score に適用されます) から、テキスト フィールドのみにアクセスすることができ、‘ly/titling-init.ly’ で定義されています。デフォルトでは以下のようになっています:
- ページ番号は、2 ページ目から、ページ最上段の左端 (偶数ページの場合) または右端 (奇数ページの場合) に自動的に配置されます。
-
instrumentテキスト フィールドは、2 ページ目から、各ページの中央に配置されます。 -
copyrightテキストは最初のページの最下段中央に配置されます。 -
taglineは最後のページの最下段中央に配置されます。1 ページしかない場合はcopyrightの下に配置されます。
![[image of music]](05/lily-818bc09e.png)
最上位の \header ブロックの中に tagline を追加することで、デフォルトのタグラインを変更することができます。
\book {
\header {
tagline = "... music notation for Everyone"
}
\score {
\relative {
c'4 d e f
}
}
}
![[image of music]](5b/lily-ec040e1c.png)
タグラインを削除するには、tagline に ##f をセットします。
| [ << 入出力全般 ] | [トップ][目次][インデックス][ ? ] | [ スペースの問題 >> ] | ||
| [ < ヘッダとフッタのデフォルト レウアウト ] | [ 上へ : タイトルとヘッダ ] | [ タイトル ブロックのカスタム テキスト フォーマット > ] | ||
3.2.2 カスタム ヘッダ、フッタ、タイトル
| タイトル ブロックのカスタム テキスト フォーマット | ||
| タイトル ブロックのカスタム レイアウト | ||
| ヘッダとフッタのカスタム レイアウト |
| [ << 入出力全般 ] | [トップ][目次][インデックス][ ? ] | [ スペースの問題 >> ] | ||
| [ < カスタム ヘッダ、フッタ、タイトル ] | [ 上へ : カスタム ヘッダ、フッタ、タイトル ] | [ タイトル ブロックのカスタム レイアウト > ] | ||
タイトル ブロックのカスタム テキスト フォーマット
標準の \markup コマンドを使って \header ブロックの中にあるヘッダ、フッタ、それにタイトル テキストをカスタマイズすることができます。
\score { { s1 } \header { piece = \markup { \fontsize #4 \bold "PRAELUDIUM I" } subtitle = \markup { \italic "(Excerpt)" } } }
![[image of music]](5b/lily-a4795487.png)
参照
記譜法リファレンス: テキストをフォーマットする
| [ << 入出力全般 ] | [トップ][目次][インデックス][ ? ] | [ スペースの問題 >> ] | ||
| [ < タイトル ブロックのカスタム テキスト フォーマット ] | [ 上へ : カスタム ヘッダ、フッタ、タイトル ] | [ ヘッダとフッタのカスタム レイアウト > ] | ||
タイトル ブロックのカスタム レイアウト
\header ブロックの中に \markup コマンドを配置することにより、シンプルなテキストをフォーマットすることができます。しかしながら、タイトルの配置を精密に制御することはできません。テキスト フィールドの配置をカスタマイズするには、以下の \paper
変数のどちらか、あるいは両方を変更します:
-
bookTitleMarkup -
scoreTitleMarkup
これらの \markup のデフォルト値を用いた場合のタイトルの配置は
book と score のタイトル ブロックのデフォルト レイアウト の中にある例で示しています。
‘ly/titling-init.ly’ で定義されている scoreTitleMarkup
のデフォルト設定は以下のとおりです:
scoreTitleMarkup = \markup { \column {
\on-the-fly #print-all-headers { \bookTitleMarkup \hspace #1 }
\fill-line {
\fromproperty #'header:piece
\fromproperty #'header:opus
}
}
}
これは、piece テキスト フィールドと opus テキスト フィールドを同一行の両端に配置します:
\score { { s1 } \header { piece = "PRAELUDIUM I" opus = "BWV 846" } }
![[image of music]](74/lily-0588667e.png)
以下の例では、scoreTitleMarkup を再定義することにより、piece テキスト フィールドを中央に配置して、フォントを大きく、太字にしています。
\book { \paper { indent = 0\mm scoreTitleMarkup = \markup { \fill-line { \null \fontsize #4 \bold \fromproperty #'header:piece \fromproperty #'header:opus } } } \header { tagline = ##f } \score { { s1 } \header { piece = "PRAELUDIUM I" opus = "BWV 846" } } }
![[image of music]](1b/lily-7bbe6c59.png)
print-all-headers を \paper ブロックの中に配置することにより、メイン タイトル ブロックのテキスト フィールドを個々の score タイトル ブロックに表示させることができます。この方法の欠点は、個々の \score ブロックで、最上位の \header ブロックだけに表示させるテキスト フィールドを手動で抑制する必要があることです。タイトル ブロックの説明 を参照してください。
この欠点を回避するには、個々の \score ブロックに表示させたいテキスト フィールドを scoreTitleMarkup 定義に追加します。以下の例では、composer テキスト フィールド
(通常、これは bookTitleMarkup に関連付けされています)
を scoreTitleMarkup に追加することにより、各 score は異なる作曲者を表示しています:
\book { \paper { indent = 0\mm scoreTitleMarkup = \markup { \fill-line { \null \fontsize #4 \bold \fromproperty #'header:piece \fromproperty #'header:composer } } } \header { tagline = ##f } \score { { s1 } \header { piece = "MENUET" composer = "Christian Petzold" } } \score { { s1 } \header { piece = "RONDEAU" composer = "François Couperin" } } }
![[image of music]](42/lily-559cc38a.png)
あなた自身のカスタム テキスト フィールドを作成して、それをマークアップ定義で参照することもできます。
\book { \paper { indent = 0\mm scoreTitleMarkup = \markup { \fill-line { \null \override #`(direction . ,UP) { \dir-column { \center-align \fontsize #-1 \bold \fromproperty #'header:mycustomtext %% User-defined field \center-align \fontsize #4 \bold \fromproperty #'header:piece } } \fromproperty #'header:opus } } } \header { tagline = ##f } \score { { s1 } \header { piece = "FUGA I" mycustomtext = "A 4 VOCI" %% User-defined field opus = "BWV 846" } } }
![[image of music]](28/lily-f1daf42f.png)
参照
記譜法リファレンス: タイトル ブロックの説明
| [ << 入出力全般 ] | [トップ][目次][インデックス][ ? ] | [ スペースの問題 >> ] | ||
| [ < タイトル ブロックのカスタム レイアウト ] | [ 上へ : カスタム ヘッダ、フッタ、タイトル ] | [ 脚注を作成する > ] | ||
ヘッダとフッタのカスタム レイアウト
\header ブロックの中に \markup コマンドを配置することにより、シンプルなテキストをフォーマットすることができます。しかしながら、ヘッダとフッタの配置を精密に制御することはできません。テキスト フィールドの配置をカスタマイズするために、以下の \paper 変数のいずれか、あるいはいくつかを使用します:
-
oddHeaderMarkup -
evenHeaderMarkup -
oddFooterMarkup -
evenFooterMarkup
\markup コマンド \on-the-fly を用いて、\paper
ブロック内部で定義されたヘッダ テキストとフッタ テキストに条件付でマークアップを追加することができます。以下の構文を用います:
variable = \markup {
...
\on-the-fly #procedure markup
...
}
procedure は、それを保持している \markdup コマンドが評価される度に呼び出されます。procedure はある特定の条件をテストして、条件が真である場合にのみmarkup 引数を解釈します (つまり、表示します)。
様々な条件をテストするためのプロシージャがあらかじめ用意されています:
Procedure name
Condition tested
print-page-number-check-first
このページ番号は表示されるか?
create-page-number-stencil
’print-page-numbers は真か?
print-all-headers
’print-all-headers は真か?
first-page
ブックの最初のページか?
(on-page nmbr)
ページ番号 = nmbr か?
last-page
ブックの最後のページか?
not-first-page
ブックの最初ではないページか?
part-first-page
ブック パートの最初のページか?
part-last-page
ブック パートの最後のページか?
not-single-page
ブック パートのページ数 > 1 か?
以下の例では、ページ番号を各ページの最下段中央に配置しています。まず、oddHeaderMarkup と evenHeaderMarkup に
null を定義することにより、デフォルト設定を削除します。次に、oddFooterMarkup に中央に配置されたページ番号を再定義します。最後に、evenFooterMarkup に oddFooterMarkup を定義することにより、同じレイアウトにします:
\book { \paper { print-page-number = ##t print-first-page-number = ##t oddHeaderMarkup = \markup \null evenHeaderMarkup = \markup \null oddFooterMarkup = \markup { \fill-line { \on-the-fly #print-page-number-check-first \fromproperty #'page:page-number-string } } evenFooterMarkup = \oddFooterMarkup } \score { \new Staff { s1 \break s1 \break s1 } } }
![[image of music]](ca/lily-a397e0d2.png)
複数の \on-the-fly 条件を ‘and’ 演算子で組み合わせることができます。例えば、
\on-the-fly #first-page
\on-the-fly #last-page
{ \markup ... \fromproperty #'header: ... }
これは、出力が単一のページかどうかを判断します。
参照
記譜法リファレンス: タイトル ブロックの説明, book と score のタイトル ブロックのデフォルト レイアウト
インストールされているファイル: ‘../ly/titling-init.ly’
| [ << 入出力全般 ] | [トップ][目次][インデックス][ ? ] | [ スペースの問題 >> ] | ||
| [ < ヘッダとフッタのカスタム レイアウト ] | [ 上へ : タイトルとヘッダ ] | [ 脚注の概要 > ] | ||
3.2.3 脚注を作成する
作成できる脚注には 2 つのタイプがあります。自動脚注と手動脚注です。
| 脚注の概要 | ||
| 自動脚注 | ||
| 手動脚注 |
| [ << 入出力全般 ] | [トップ][目次][インデックス][ ? ] | [ スペースの問題 >> ] | ||
| [ < 脚注を作成する ] | [ 上へ : 脚注を作成する ] | [ 自動脚注 > ] | ||
脚注の概要
自動脚注は繰り上がっていくページ番号を作り出し、手動脚注はページ番号をカスタマイズすることができます。通常、脚注は \tweak のように適用されるので、多くの音楽要素やポスト-イベントによって作成されるグラフィカル オブジェクト上に直接配置することができます。これがうまくいかない場合 (小節線や拍の変更のように、プロパティの変更の結果として作り出されるグラフィカル オブジェクトの場合)、脚注を独立した音楽イベントとして入力することである特定のタイミングにある指定したタイプのすべてのグラフィカルに影響を与えることもできます。
脚注コマンドの完全な形式は以下のようなものです:
\footnote mark offset grob-name footnote music
要素は以下の通りです:
- mark
これは脚注を指定するマークアップや文字列で、参照ポイントとページ下の脚注自体を指すマークになります。これは省略することができ (
\defaultで置き換えられます)、省略した場合は連続した数字が生成されます。- offset
脚注マークを配置する参照ポイントからの X と Y オフセットを指定する ‘#(2 . 1)’ のような数字のペアです。
- grob-name
脚注マークを付けるグラフィカル オブジェクトのタイプを指定します (例えば ‘#'Flag’ です)。これが指定された場合、対応するグラフィカル オブジェクトが参照される music 自体にあるものでなくても、そこから作成されたものであれば参照ポイントになります。これは省略するができ (
\defaultで置き換えられます)、その場合は直接作成されたグラフィカル オブジェクトだけに脚注が付けられます。- footnote
このマークアップあるいは文字列はページ下の脚注テキストになります。
- music
これは脚注を付ける要素 – 音楽イベント、和音構成要素、あるいはポスト-イベントです。これを省略することはできませんが、
\defaultで置き換えることで脚注をある特定の音楽表記ではなく音楽タイミングに付けることができます。\defaultを用いた場合、影響を与えるグラフィカル オブジェクトのタイプを指定する grob-name 引数を指定する必要があります。
\tweak と同様に、\footnote をポスト-イベントやアーティキュレーションに適用する場合、それ自体の前に - を配置して、構文解析の結果を前にある音符や休符にくっつけさせる必要があります。
| [ << 入出力全般 ] | [トップ][目次][インデックス][ ? ] | [ スペースの問題 >> ] | ||
| [ < 脚注の概要 ] | [ 上へ : 脚注を作成する ] | [ 手動脚注 > ] | ||
自動脚注
自動脚注は 4 つの引数を取ります: 脚注マークの位置 ‘(x . y)’、脚注を付ける レイアウト オブジェクト を指定するオプションの grob-name、ページ下の脚注に表示される footnote マークアップ、それに脚注を付ける music です。
\book { \header { tagline = ##f } \relative c' { \footnote #'(0.5 . -2) \markup { The first note } a'4 b8 \single\footnote #'(0.5 . 1) \markup { The third note } Flag e\noBeam c4 d4 } }
![[image of music]](fb/lily-d410750b.png)
和音の音符でも難しいことはありません:
\book { \header { tagline = ##f } \relative c' { < \footnote #'(1 . -1.25) "これは C です" c \footnote #'(2 . -0.25) \markup { \italic "E-flat です" } es \footnote #'(2 . 3) \markup { \bold "これは G です" } g >1 } }
![[image of music]](bf/lily-75ffa06c.png)
Note: 脚注の垂直方向の位置が同じになる場合、下方向に並べられます。高い位置にある脚注は、リストでも上に来ます。
ここで、グラフィカル オブジェクト動脚注を付ける例をいくつか挙げ、さらに脚注とタグラインやコピーライトとの位置関係を示します。
\book { \header { copyright = \markup { "Copyright 1970" } } \relative { a'4-\footnote #'(-3 . 0) \markup { \bold Forte } \f -\footnote #'(0 . 1.5) \markup { スラー } ( b8)-\footnote #'(0 . -2) \markup { 連桁 } [ e] \single\footnote #'(1 . -1) \markup { \teeny { これは符幹です } } Stem c4 \single\footnote #'(0 . 0.5) \markup \italic { 忠告の臨時記号 } AccidentalCautionary \footnote #'(1 . 1) "音符自体" dis?4-\footnote #'(0.5 . -0.5) \markup \italic { スロー ダウン } _"rit." } }
![[image of music]](8b/lily-125a1544.png)
最上位の \markup に脚注を付ける場合、\auto-footnote コマンドを使う必要があります:
\book { \header { tagline = ##f } \markup { \auto-footnote "A simple tune" \italic "By me" } \relative { a'4 b8 e c4 d } }
![[image of music]](07/lily-3b87c9f3.png)
| [ << 入出力全般 ] | [トップ][目次][インデックス][ ? ] | [ スペースの問題 >> ] | ||
| [ < 自動脚注 ] | [ 上へ : 脚注を作成する ] | [ ページ番号の参照 > ] | ||
手動脚注
手動で付ける脚注は追加で最初の引数として参照マークとなる mark を取ります。自動的に生成される脚注マークとは対照的に、ページ下の footnote マークアップの前には表示されません: 見た目のつながりはユーザ自身で作成する必要があります。LilyPond は対応するマークアップを同じページの下に表示するだけです。
上記のことを除けば、手動脚注は自動的に付番される脚注と同じです。
\book { \header { tagline = ##f } \relative c' { \footnote "1" #'(0.5 . -2) \markup { \italic "1. 最初の音符" } a'4 b8 \footnote \markup { \bold "2" } #'(0.5 . 1) "2. 2 番目の音符" e c4 d-\footnote "3" #'(0.5 . -1) "3. ピアノ" \p } }
![[image of music]](9a/lily-6d7109cc.png)
和音に手動脚注を付ける場合、以下のようにします:
\book { \header { tagline = ##f } \relative c' { < \footnote "1" #'(1 . -1.25) "1. C" c \footnote \markup { \bold "b" } #'(2 . -0.25) "b. E-フラット" es \footnote "3" #'(2 . 3) \markup { \italic "iii. G" } g >1 } }
![[image of music]](b8/lily-61fecd18.png)
Note: 脚注の垂直方向の位置が同じになる場合、下方向に並べられます。高い位置にある脚注は、リストでも上に来ます。
ここで、グラフィカル オブジェクトに手動脚注を付ける例をいくつか挙げ、脚注とタグラインやコピーライトとの位置関係を示します。
\book { \header { tagline = ##f } \relative { a'4-\footnote \markup { \teeny 1 } #'(-3 . 0) \markup { 1. \bold フォルテ } \f -\footnote \markup { \teeny b } #'(0 . 1.5) \markup { b. スラー } ( b8)-\footnote \markup { \teeny 3 } #'(0 . -2) \markup { 3. 連桁 } [ e] \single\footnote \markup { 4 } #'(1 . -1) \markup { \bold 4. { これは符幹です } } Stem c4 \single\footnote \markup \concat \teeny { "sharp (v)" } #'(0 . 0.5) \markup \italic { v. 忠告の臨時記号 } AccidentalCautionary dis?4-\footnote \markup \concat \teeny { "a" } #'(0.5 . -0.5) \markup \italic { a. スローダウン } _"rit." \footnote \markup { \teeny \musicglyph #"rests.4" } #'(1.5 . -0.25) \markup { \null } \breathe } }
![[image of music]](37/lily-3c90dda4.png)
最上位の \markup に脚注を付ける場合、下記のようにします:
\book { \header { tagline = ##f } \markup { "A simple tune" \footnote "*" \italic "* By me" } \relative { a'4 b8 e c4 d4 } }
![[image of music]](91/lily-17a327c6.png)
参照
学習マニュアル: Objects and interfaces
記譜法リファレンス: バルーン ヘルプ, ページ レイアウト, テキスト マーク, テキスト スクリプト, タイトルとヘッダ
内部リファレンス: FootnoteEvent, FootnoteItem, FootnoteSpanner, Footnote_engraver
既知の問題と警告
同じページにある複数の脚注は上下にしか配置できません。ある脚注が他の脚注の上に配置され、同じ行に配置することはできません。MultiMeasureRests に脚注を付けることはできず、Staff、\markup オブジェクト、それに他の footnote と衝突する可能性があります。手動の footnote コマンドを使う場合、containing footnote-auto-number = ##f を保持している
\paper ブロックが必要です。
| [ << 入出力全般 ] | [トップ][目次][インデックス][ ? ] | [ スペースの問題 >> ] | ||
| [ < 手動脚注 ] | [ 上へ : タイトルとヘッダ ] | [ 目次 > ] | ||
3.2.4 ページ番号の参照
\label コマンドを用いて、楽譜のある特定の場所
– 楽譜の最上位あるいは内部 –
に印をつけることができます。このラベルをマークアップの中で参照することできます。ラベルを付けられた場所のページ番号を取得するには、\page-ref マークアップ コマンドを使います。
\header { tagline = ##f }
\book {
\label #'firstScore
\score {
{
c'1
\pageBreak \mark A \label #'markA
c'1
}
}
\markup { The first score begins on page \page-ref #'firstScore "0" "?" }
\markup { Mark A is on page \page-ref #'markA "0" "?" }
}
![[image of music]](08/lily-6648893d.png)
\page-ref マークアップ コマンドは 3 つの引数をとります:
- ラベル。これは Scheme シンボルです – 例:
#'firstScore。 - マークアップ。これはマークアップの大きさを推定するためのゲージです。
- マークアップ。これは、ラベルが不明な場合にページ番号として用いられます。
ゲージが必要な理由は、マークアップが解釈されているときに改ページはまだ行われておらず、ページ番号はまだわからないからです。この問題を回避するために、実際のマークアップ解釈はもっと後に延期されます。しかしながら、マークアップの大きさは事前に判明している必要があるため、ゲージを使ってマークアップの大きさを決定します。book のページ数が 10 から 99 までの範囲であるのなら、ゲージを "00" – つまり、2 桁の数 – にします。
定義済みコマンド
| [ << 入出力全般 ] | [トップ][目次][インデックス][ ? ] | [ スペースの問題 >> ] | ||
| [ < ページ番号の参照 ] | [ 上へ : タイトルとヘッダ ] | [ 入力ファイルに取り組む > ] | ||
3.2.5 目次
目次は \markuplist \table-of-contents コマンドを用いて挿入します。目次に表示すべき要素は \tocItem コマンドで挿入されます
– このコマンドは最上位あるいは音楽表記の内部で使用します。
\markuplist \table-of-contents
\pageBreak
\tocItem \markup "First score"
\score {
{
c'4 % ...
\tocItem \markup "Some particular point in the first score"
d'4 % ...
}
}
\tocItem \markup "Second score"
\score {
{
e'4 % ...
}
}
目次を構成するために使用するマークアップは
\paper ブロックの中で定義します。デフォルトのマークアップは、目次のタイトルを構成する tocTitleMarkup と、目次の要素 – 要素のタイトルとページ番号 – を構成する
tocItemMarkup です。これらの変数はユーザによって変更することができます:
\paper {
%% 目次タイトルをフランス語に翻訳します:
tocTitleMarkup = \markup \huge \column {
\fill-line { \null "Table des matières" \null }
\hspace #1
}
%% より大きなフォント サイズを使用します
tocItemMarkup = \markup \large \fill-line {
\fromproperty #'toc:text \fromproperty #'toc:page
}
}
tocItemMarkup 定義の中で目次要素のテキストとページ番号を参照する方法に注目してください。
より手の込んだ目次を構築するために新しいコマンドとマークアップを定義することもできます:
- まず、
\paperブロックの中で新しいマークアップ変数を定義します - それから、このマークアップ変数を用いて、目次要素を付け加えるための音楽関数を定義します。
以下の例では、オペラの目次の中で幕の名前を挿入するために新しい様式を定義しています:
\paper {
tocActMarkup = \markup \large \column {
\hspace #1
\fill-line { \null \italic \fromproperty #'toc:text \null }
\hspace #1
}
}
tocAct =
#(define-music-function (text) (markup?)
(add-toc-item! 'tocActMarkup text))
![[image of music]](93/lily-133ea200.png)
要素とページ番号の間をドットで埋めることができます:
\header { tagline = ##f }
\paper {
tocItemMarkup = \tocItemWithDotsMarkup
}
\book {
\markuplist \table-of-contents
\tocItem \markup { Allegro }
\tocItem \markup { Largo }
\markup \null
}
![[image of music]](5e/lily-19aec61e.png)
参照
インストールされているファイル: ‘ly/toc-init.ly’
定義済みコマンド
| [ << 入出力全般 ] | [トップ][目次][インデックス][ ? ] | [ スペースの問題 >> ] | ||
| [ < 目次 ] | [ 上へ : 入出力全般 ] | [ LilyPond ファイルをインクルードする > ] | ||
3.3 入力ファイルに取り組む
| 3.3.1 LilyPond ファイルをインクルードする | ||
| 3.3.2 1 つのソースから異なる版を生成する | ||
| 3.3.3 特殊文字 |
| [ << 入出力全般 ] | [トップ][目次][インデックス][ ? ] | [ スペースの問題 >> ] | ||
| [ < 入力ファイルに取り組む ] | [ 上へ : 入力ファイルに取り組む ] | [ 1 つのソースから異なる版を生成する > ] | ||
3.3.1 LilyPond ファイルをインクルードする
大きなプロジェクトは別々のファイルに分割することができます。他のファイルを参照するには、以下のようにします:
\include "otherfile.ly"
\include "otherfile.ly" という行は、‘otherfile.ly’ の内容をカレント ファイルの \include
がある場所に貼り付けるのと等価です。例えば、大きなプロジェクトでは、個々の楽器パートを別々のファイルで記述し、個々の楽器ファイルをまとめる “総譜” ファイルを作成することができます。通常、インクルードされるファイルはいくつかの変数を定義し、それらの変数は総譜ファイルの中で使用されます。インクルードされるファイルの中でタグ付きセクションにマークを付けて、それを楽譜の他の場所で使うことができます
– 1 つのソースから異なる版を生成する を参照してください。
カレントのワーキング ディレクトリの中にあるファイルは
\include コマンドに後にファイル名を指定するだけで参照することができます。他の場所にあるファイルはフル パス参照か相対パス参照
(ディレクトリ区切りとして、UNIX ではスラッシュ / を使用しますが、DOS/Windows ではバックスラッシュ \ を使用します) によって参照することができます。例えば、‘stuff.ly’ がカレントのワーキング ディレクトリよりも
1 つ上のディレクトリの中にある場合、以下のようにインクルードします:
\include "../stuff.ly"
あるいは、インクルードされるオーケストラのすべてのパート ファイルが、カレント ディレクトリ内部の ‘parts’ というサブディレクトリの中に配置されている場合、以下のようにインクルードします:
\include "parts/VI.ly" \include "parts/VII.ly" ... etc
インクルードされるファイルも \include 文を持つことができます。それら第 2 レベルの \include 文はそのファイルがメイン ファイルに組み込まれるまで解釈されません。そのため、第 2 レベルの \include 文で指定するファイル名はすべてメイン ファイルを保持しているディレクトリからの相対参照で指定しなければなりません
– インクルード ファイルを保持しているディレクトリからではありません。しかしながら、この振る舞いは、オプション ‘-drelative-includes’ をコマンド ラインで渡すことによって
(あるいは、メイン入力ファイルの先頭に
#(ly:set-option 'relative-includes #t) を付け加えることによって)
変更することができます。relative-includes をセットすることで、各 \include コマンドのパスはそのコマンドを保持しているファイルからの相対参照になります。この振る舞いを使用することが推奨されていて、lilypond の将来のバージョンではこの振る舞いがデフォルトになります。
コマンド ラインから LilyPond を呼び出すときにオプションとして指定したサーチ パスに含まれるディレクトリからファイルをインクルードすることもできます。サーチ パスを指定した場合、インクルードされるファイルはファイル名だけで指定されます。例えば、サーチ パスで指定する ‘parts’ というサブディレクトリの中にあるファイルをインクルードする ‘main.ly’ をコンパイルするには、‘main.ly’ を保持しているディレクトリに cd して、以下を入力します:
lilypond --include=parts main.ly
‘main.ly’ の中には以下を記述しておきます:
\include "VI.ly" \include "VII.ly" ... etc
いくつもの楽譜でインクルードされるファイルは
LilyPond ディレクトリ ‘../ly’ の中に置くことになるかもしれません
(このディレクトリが存在する場所はインストールの仕方に依存します
–
Other sources of information を参照してください)。このディレクトリの中にあるファイルは、\include 文でファイル名を指定するだけでインクルードすることができます。この方法で ‘english.ly’ のような言語依存のファイルをインクルードしています。
LilyPond は、実行開始時に、デフォルトでいくつかのファイルをインクルードします。このインクルードはユーザには明らかにされませんが、コマンド ラインから lilypond --verbose を実行することによってインクルードされるファイルを明らかにすることができます。--verbose オプションは、他の多くの情報とともに、LilyPond が使用するパスとファイルのリストを表示します。また、デフォルトでインクルードされるファイルのうち、より重要なファイルについて
Other sources of information
で議論されています。これらのファイルを編集することができますが、これらのファイルに加えられた変更は新しいバージョンの LilyPond をインストールすると失われます。
\include を使用している簡単な例がいくつか
Scores and parts で示されています。
参照
学習マニュアル: Other sources of information, Scores and parts
既知の問題と警告
インクルードされるファイルに LilyPond のインストール ファイルと同じ名前が与えられている場合、LilyPond のインストール ファイルが優先されます。
| [ << 入出力全般 ] | [トップ][目次][インデックス][ ? ] | [ スペースの問題 >> ] | ||
| [ < LilyPond ファイルをインクルードする ] | [ 上へ : 入力ファイルに取り組む ] | [ 変数を使用する > ] | ||
3.3.2 1 つのソースから異なる版を生成する
同じ音楽ソースから異なるバージョンの楽譜を容易に生成できるようにするために、いくつかの方法が用意されています。長い音楽や注記のセクションをさまざまなやり方で組み合わせる場合には、おそらく変数が最も役に立つでしょう。差し替え用の短い音楽セクションの中から 1 つを選択する場合にはタグが役に立ち、楽曲の一部をいろいろな箇所で組み合わせることもできます。
どのような方法をとるにしても、楽譜構造から音楽表記を分離しておくと、音楽表記に手を触れずに楽譜構造を変更することが簡単に行えます。
| 変数を使用する | ||
| タグを使用する | ||
| グローバル設定を使用する |
| [ << 入出力全般 ] | [トップ][目次][インデックス][ ? ] | [ スペースの問題 >> ] | ||
| [ < 1 つのソースから異なる版を生成する ] | [ 上へ : 1 つのソースから異なる版を生成する ] | [ タグを使用する > ] | ||
変数を使用する
音楽のセクションが変数の中で定義されている場合、そのセクションを楽譜の異なる部分で再利用することができます – Organizing pieces with variables を参照してください。例えば、アカペラ のボーカル譜はリハーサル目的ですべてのパートをまとめたピアノ譜を持つことがよくあります。これは声楽全般で言えることです。その場合、音楽を入力する必要があるのは 1 回だけです。2 つの変数からの音楽を 1 つの譜に組み込むことができます – 自動パート結合 を参照してください。ここに例を挙げます:
sopranoMusic = \relative { a'4 b c b8( a) } altoMusic = \relative { e'4 e e f } tenorMusic = \relative { c'4 b e d8( c) } bassMusic = \relative { a4 gis a d, } allLyrics = \lyricmode {King of glo -- ry } << \new Staff = "Soprano" \sopranoMusic \new Lyrics \allLyrics \new Staff = "Alto" \altoMusic \new Lyrics \allLyrics \new Staff = "Tenor" { \clef "treble_8" \tenorMusic } \new Lyrics \allLyrics \new Staff = "Bass" { \clef "bass" \bassMusic } \new Lyrics \allLyrics \new PianoStaff << \new Staff = "RH" { \set Staff.printPartCombineTexts = ##f \partcombine \sopranoMusic \altoMusic } \new Staff = "LH" { \set Staff.printPartCombineTexts = ##f \clef "bass" \partcombine \tenorMusic \bassMusic } >> >>
![[image of music]](ef/lily-c86b794c.png)
音楽表記には変更を加えずに、楽譜構造の文を変えるだけで、ボーカル パートだけあるいはピアノ パートだけの楽譜を作り出すことができます。
長い楽譜では、変数定義をそれぞれ別々のファイルの中に置いて、それらのファイルをインクルードすることになるかもしれません – LilyPond ファイルをインクルードする を参照してください。
| [ << 入出力全般 ] | [トップ][目次][インデックス][ ? ] | [ スペースの問題 >> ] | ||
| [ < 変数を使用する ] | [ 上へ : 1 つのソースから異なる版を生成する ] | [ グローバル設定を使用する > ] | ||
タグを使用する
\tag #'partA コマンドは音楽表記に
partA という名前を付けます。この方法でタグを付けられた表記は、後で \keepWithTag #'name と
\removeWithTag #'name のどちらかを用いて、名前によって選択あるいは排除することができます。タグの付いた音楽にそのようなフィルタを適用した結果は以下のようになります:
| フィルタ | 結果 |
|---|---|
\keepWithTag #'name が前に付くタグ付きの音楽 | タグの付いていない音楽と name というタグの付いた音楽がインクルードされます。他のタグ名を持つタグ付き音楽は排除されます。 |
\removeWithTag #'name が前に付くタグ付きの音楽 | タグの付いていない音楽と name 以外のタグを持つ音楽がインクルードされます。name というタグの付いた音楽は排除されます。 |
\keepWithTag と \removeWithTag のどちらも前に付かないタグ付きの音楽 | タグの付いた音楽とタグの付いていない音楽すべてがインクルードされます。 |
\tag、\keepWithTag それに \removeWithTag コマンドの引数はシンボル (#'score や #'part など) とその後に続けて音楽表記であるべきです。
以下の例では、楽曲を 2 つのバージョンで示しています。1 つはトリルを通常の記譜法で示していて、もう 1 つはトリルを明示的に展開しています:
music = \relative { g'8. c32 d \tag #'trills {d8.\trill } \tag #'expand {\repeat unfold 3 {e32 d} } c32 d } \score { \keepWithTag #'trills \music } \score { \keepWithTag #'expand \music }
![[image of music]](77/lily-c3ab160a.png)
\keepWithTag を使う代わりに、音楽セクションを排除する方が楽な場合もあります:
music = \relative { g'8. c32 d \tag #'trills {d8.\trill } \tag #'expand {\repeat unfold 3 {e32 d} } c32 d } \score { \removeWithTag #'expand \music } \score { \removeWithTag #'trills \music }
![[image of music]](f6/lily-3091fb42.png)
タグ フィルタリングはアーティキュレーション、テキストなどにも適用することができます。フィルタリングを行うにはアーティキュレーションの前に
-\tag #'your-tag
を置きます。例えば、以下は条件付の運指指示を持つ音符と条件付注記を持つ音符を定義しています:
c1-\tag #'finger ^4 c1-\tag #'warn ^"Watch!"
複数の \tag エントリで、表記に複数のタグを付ける場合もあります:
music = \relative c'' { \tag #'a \tag #'both { a4 a a a } \tag #'b \tag #'both { b4 b b b } } << \keepWithTag #'a \music \keepWithTag #'b \music \keepWithTag #'both \music >>
![[image of music]](46/lily-cfd21f58.png)
単一の音楽表記に複数の \removeWithTag フィルタを適用することによって、いくつかの異なる名前のタグが付いたセクションを排除することができます:
music = \relative c'' { \tag #'A { a4 a a a } \tag #'B { b4 b b b } \tag #'C { c4 c c c } \tag #'D { d4 d d d } } { \removeWithTag #'B \removeWithTag #'C \music }
![[image of music]](61/lily-6ee0fcfa.png)
単一の音楽表記に複数の \keepWithTag フィルタを適用すると、タグ付きセクションは すべて 排除されます。なぜなら、最初のフィルタはあるタグ名以外を持つセクションを排除し、2 番目のフィルタがそのタグ名を持つセクションを排除するからです。
既存の音楽表記のある特定の場所にいくつか音を組み込みたいことがあります。\pushToTag と \appendToTag を使って、既存の音楽構造の 要素 の前または後に素材を追加することができます。すべての音楽構造が 要素 を持つわけではありませんが、連続するか同時進行する音楽構造はまず間違いなく 要素 を持ちます:
test = { \tag #'here { \tag #'here <<c''>> } } { \pushToTag #'here c' \pushToTag #'here e' \pushToTag #'here g' \test \appendToTag #'here c' \appendToTag #'here e' \appendToTag #'here g' \test }
![[image of music]](ae/lily-29bf0c21.png)
どちらのコマンドもタグ、組み込む素材、それにタグ付けされた音楽表記を
取り、タグが出現するたびに素材を組み込みます。これらのコマンドは変更するものを全てコピーするので、オリジナルの \test が元の意味を保持し続けることを保証します。
参照
学習マニュアル: Organizing pieces with variables
記譜法リファレンス: 自動パート結合, LilyPond ファイルをインクルードする
| [ << 入出力全般 ] | [トップ][目次][インデックス][ ? ] | [ スペースの問題 >> ] | ||
| [ < タグを使用する ] | [ 上へ : 1 つのソースから異なる版を生成する ] | [ 特殊文字 > ] | ||
グローバル設定を使用する
別のファイルからグローバル設定をインクルードすることができます:
lilypond -dinclude-settings=MY_SETTINGS.ly MY_SCORE.ly
ページ サイズ、フォント、書体などのような設定のグループを別々のファイルに保存することができます。こうすることにより、適当な設定ファイルを指定するだけで、同じ楽譜から異なる版を作り出すことができます。
このテクニックはスタイル シートでも使えます。 Style sheets を参照してください。
参照
学習マニュアル: Organizing pieces with variables, Style sheets
記譜法リファレンス: LilyPond ファイルをインクルードする
| [ << 入出力全般 ] | [トップ][目次][インデックス][ ? ] | [ スペースの問題 >> ] | ||
| [ < グローバル設定を使用する ] | [ 上へ : 入力ファイルに取り組む ] | [ テキスト エンコーディング > ] | ||
3.3.3 特殊文字
| テキスト エンコーディング | ||
| Unicode | ||
| ASCII エイリアス |
| [ << 入出力全般 ] | [トップ][目次][インデックス][ ? ] | [ スペースの問題 >> ] | ||
| [ < 特殊文字 ] | [ 上へ : 特殊文字 ] | [ Unicode > ] | ||
テキスト エンコーディング
LilyPond は Unicode 協会と ISO/IEC 10646 によって定義された文字レパートリを使用します。この文字レパートリは、ほとんどすべての現代言語と他の多くの言語で使用される文字セットに対して、固有の名前とコード位置を定義しています。Unicode はいくつかの異なるエンコーディングを用いて実装することができます。LilyPond は UTF-8 エンコーディング (UTF は Unicode Transformation Format を意味します) を使用します – UTF-8 はすべての共通ラテン文字を 1 バイトで表し、他の文字を可変バイト長形式 (最大 4 ビット) で表します。
文字の実際の見た目は利用可能なある特定のフォントの中にあるグリフ (図柄) によって決定されます – フォントはグリフを指す Unicode コードのサブセット (部分集合) の写像を定義しています。LilyPond は多言語テキストを、Pango ライブラリを用いて、レイアウトして描画します。
LilyPond は入力のエンコーディング変換をまったく行いません。これは非 ASCII 文字を含むすべてのテキスト – タイトル、歌詞テキストあるいは演奏指示 – を UTF-8 でエンコードして入力する必要があるということを意味します。そのようなテキストを入力する最も容易な方法は Unicode を認識するエディタを用いて、ファイルを UTF-8 で保存することです。人気のある現代的なエディタのほとんどが UTF-8 をサポートします – 例えば、vim, Emacs, jEdit, GEdit です。NT より後の MS Windows システムはすべてネイティブ キャラクタ エンコーディングとして Unicode を使用します。そのため、Notepad でさえ UTF-8 フォーマットのファイルを編集して保存することができます。Windows 用のもっと機能的なエディタに BabelPad があります。
非 ASCII 文字を保持している LilyPond 入力ファイルが UTF-8 フォーマットで保存されていない場合、エラー メッセージ
FT_Get_Glyph_Name () error: invalid argument
が表示されます。
ここでキリル文字、ヘブライ文字、ポルトガル語のテキストを表示する例を挙げます:
![[image of music]](7e/lily-a6da81d3.png)
| [ << 入出力全般 ] | [トップ][目次][インデックス][ ? ] | [ スペースの問題 >> ] | ||
| [ < テキスト エンコーディング ] | [ 上へ : 特殊文字 ] | [ ASCII エイリアス > ] | ||
Unicode
単一の文字 – その文字に対する Unicode コード ポイントを知っているが、使用しているエディタではその文字を使用できない – を入力するには、\markup ブロック内部で \char ##xhhhh あるいは
\char ##dddd を使用します
– ここで hhhh はその文字に対する 16 進コードであり、dddd はそれに対応する 10 進数値です。先頭の 0 は省略可能ですが、16 進表記では 4 文字で指定する方法が一般的です。(\char の後に UTF-8 エンコーディングのコード ポイントを使うべきではありません。なぜなら、UTF-8 エンコーディングはバイト数を表すための余分なビットを保持しているからです。)
任意の文字に対する 16 進のコード ポイントを調べるための、Unicode コード表と文字名インデックスは Unicode コンソーシアム Web サイト
http://www.unicode.org/ にあります。
例えば、\char ##x03BE と \char #958 はどちらも
Unicode U+03BE の文字を入力します
– この文字は Unicode 名 “Greek Small Letter Xi”
(ギリシャ小文字クシー) です。
この方法で任意の Unicode コード ポイントを入力することができます。すべての特殊文字がこの方法で入力されている場合、入力ファイルを UTF-8 フォーマットで保存する必要はありません。もちろん、入力された文字を保持しているフォントがすべてインストールされていて、LilyPond で利用可能になっている必要があります。
以下の例は UTF-8 コード化された文字を 4 箇所 – リハーサル記号の中、アーティキュレーション テキストとして、歌詞の中、楽譜の下にある独立したテキストの中 – で使用しています:
\score { \relative { c''1 \mark \markup { \char ##x03EE } c1_\markup { \tiny { \char ##x03B1 " to " \char ##x03C9 } } } \addlyrics { O \markup { \concat { Ph \char ##x0153 be! } } } } \markup { "Copyright 2008--2015" \char ##x00A9 }
![[image of music]](9e/lily-5b63b6ff.png)
著作権についての注意書きの中で著作権記号を入力するには、以下のようにします:
\header {
copyright = \markup { \char ##x00A9 "2008" }
}
| [ << 入出力全般 ] | [トップ][目次][インデックス][ ? ] | [ スペースの問題 >> ] | ||
| [ < Unicode ] | [ 上へ : 特殊文字 ] | [ 出力を制御する > ] | ||
ASCII エイリアス
特殊文字の ASCII エイリアスのリストを含めることができます:
\paper { #(include-special-characters) } \markup "&flqq; – &OE;uvre incomplète… &frqq;" \score { \new Staff { \repeat unfold 9 a'4 } \addlyrics { This is al -- so wor -- kin'~in ly -- rics: –_&OE;… } } \markup \column { "特殊文字への置換を無効にすることができます:" "– &OE; …" \override #'(replacement-alist . ()) "– &OE; …" }
![[image of music]](34/lily-89129dba.png)
また、エイリアスを作ることもできます。グローバルに作るか:
\paper { #(add-text-replacements! '(("100" . "hundred") ("dpi" . "dots per inch"))) } \markup "A 100 dpi."
![[image of music]](5e/lily-13b84b0c.png)
ローカルで作ります:
\markup \replace #'(("100" . "hundred") ("dpi" . "dots per inch")) "A 100 dpi."
![[image of music]](cd/lily-e5adb000.png)
参照
記譜法リファレンス: List of special characters
インストールされているファイル: ‘ly/text-replacements.ly’
| [ << 入出力全般 ] | [トップ][目次][インデックス][ ? ] | [ スペースの問題 >> ] | ||
| [ < ASCII エイリアス ] | [ 上へ : 入出力全般 ] | [ 音楽の断片を抽出する > ] | ||
3.4 出力を制御する
| 3.4.1 音楽の断片を抽出する | ||
| 3.4.2 校正済みの音楽をスキップする | ||
| 3.4.3 他の出力フォーマット | ||
| 3.4.4 記譜フォントを置換する |
| [ << 入出力全般 ] | [トップ][目次][インデックス][ ? ] | [ スペースの問題 >> ] | ||
| [ < 出力を制御する ] | [ 上へ : 出力を制御する ] | [ 校正済みの音楽をスキップする > ] | ||
3.4.1 音楽の断片を抽出する
大きな楽譜の中の小さな範囲を、出力から直接引用することができます。これは紙の楽譜の一部をはさみで切り抜くことに相当します。
これは切り抜く小節を定義することによって実行されます。例えば、以下の定義は、
\layout {
clip-regions
= #(list
(cons
(make-rhythmic-location 5 1 2)
(make-rhythmic-location 7 3 4)))
}
第 5 小節の中間から第 7 小節までを抽出します。5 1 2 は第 5 小節の先頭から 1/2 音符の位置を意味し、7 3 4 は第 7 小節の先頭から 4 分音符 3 つ分の位置を意味します。
リズムによる位置のペアをリストに追加することによって、更に多くの切り抜き範囲を定義することができます。
この機能を使用するには、LilyPond を ‘-dclip-systems’ を付けて呼び出す必要があります。切り抜きは EPS ファイルとして出力され、更にフォーマットが指定されている場合には PDF や PNG に変換されます。
出力フォーマットについての更なる情報は、 lilypond を呼び出す を参照してください。
| [ << 入出力全般 ] | [トップ][目次][インデックス][ ? ] | [ スペースの問題 >> ] | ||
| [ < 音楽の断片を抽出する ] | [ 上へ : 出力を制御する ] | [ 他の出力フォーマット > ] | ||
3.4.2 校正済みの音楽をスキップする
音楽を入力あるいはコピーしているとき、閲覧、校正する必要があるのは、たいてい終わり近くの音楽 (そこに音符を追加している場所) だけです。校正プロセスを速めるために、最後の数小節以外の譜刻をスキップすることができます。これはソース ファイルの中に以下を置くことによって実現できます:
showLastLength = R1*5
\score { ... }
これは入力ファイルの中にあるそれぞれの \score の最後の 5 小節だけを描画します (4/4 拍子と仮定して)。長い楽曲の場合、小さな部分だけを描画するのにかかる時間は楽曲をすべて描画するのにかかる時間よりも非常に短くなります。すでに譜刻済みの楽譜の開始部分に取り掛かる (例えば、新しいパートを追加する)
ときには、showFirstLength プロパティも役に立つかもしれません。
楽譜の中のいくつかのパートをスキップは、プロパティ Score.skipTypesetting
を用いたより細かなやり方で制御することができます。このプロパティがセットされていると、譜刻はまったく行われません。
このプロパティは MIDI ファイルへの出力を制御するためにも用いられます。このプロパティはすべてのイベント – テンポの変更や楽器の変更を含む – をスキップするということに注意してください。くれぐれも注意してください。
\relative { c''8 d \set Score.skipTypesetting = ##t e8 e e e e e e e \set Score.skipTypesetting = ##f c8 d b bes a g c2 }
![[image of music]](e0/lily-73d01af8.png)
多声の音楽では、Score.skipTypesetting はすべてのボイスと譜に影響を与えて、より多くの時間を節約します。
| [ << 入出力全般 ] | [トップ][目次][インデックス][ ? ] | [ スペースの問題 >> ] | ||
| [ < 校正済みの音楽をスキップする ] | [ 上へ : 出力を制御する ] | [ 記譜フォントを置換する > ] | ||
3.4.3 他の出力フォーマット
譜刻される楽譜のデフォルト出力フォーマットは、Portable Document Format (PDF) と PostScript (PS) です。コマンド ライン オプションを指定することにより、Scalable Vector Graphics (SVG), Encapsulated PostScript (EPS) それに Portable Network Graphics (PNG) 出力フォーマットが利用可能です。 Basic command line options for LilyPond を参照してください。
| [ << 入出力全般 ] | [トップ][目次][インデックス][ ? ] | [ スペースの問題 >> ] | ||
| [ < 他の出力フォーマット ] | [ 上へ : 出力を制御する ] | [ MIDI 出力 > ] | ||
3.4.4 記譜フォントを置換する
LilyPond で使用される Emmentaler フォントの代わりに Gonville に使うことができます。Gonville は以下からダウンロードできます:
http://www.chiark.greenend.org.uk/~sgtatham/gonville/
Gonville のサンプル小節です:
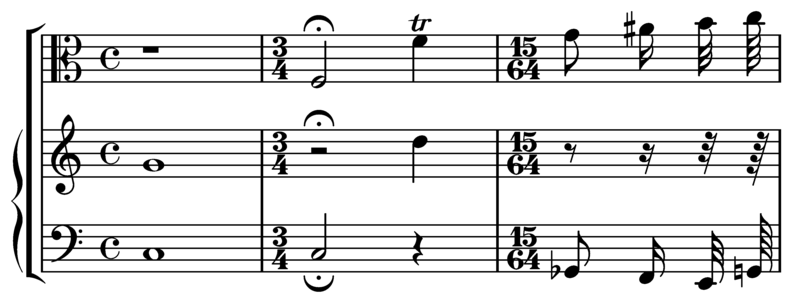
LilyPond の Emmentaler フォントのサンプル小節です:
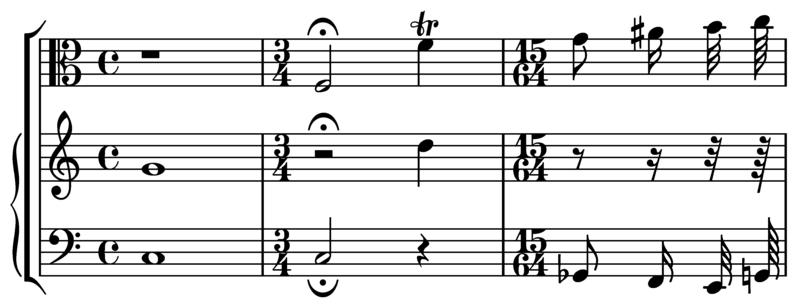
MacOS でのインストール手順
ZIP ファイルをダウンロードして、伸張します。lilyfonts ディレクトリを ‘SHARE_DIR/lilypond/current’ にコピーします
– 更なる情報は、
Other sources of information を参照してください。既存の fonts ディレクトリを fonts_orig にリネームして、lilyfonts ディレクトリを fonts にリネームします。Emmentaler フォントに戻すには、fonts_orig を fonts に戻します。
参照
学習マニュアル: Other sources of information
記譜法リファレンス: The Emmentaler font.
既知の問題と警告
Gonville では ‘古代の音楽’ を記譜することはできません。Gonville フォント ファミリーでは、これからリリースされる LilyPond の新しい図柄は提供されないかもしれません。ライセンス条件等を含む Gonville の更なる情報は、製作者の Web サイトを参照してください。
| [ << 入出力全般 ] | [トップ][目次][インデックス][ ? ] | [ スペースの問題 >> ] | ||
| [ < 記譜フォントを置換する ] | [ 上へ : 入出力全般 ] | [ MIDI ファイルを作り出す > ] | ||
3.5 MIDI 出力
MIDI (Musical Instrument Digital Interface) はデジタル楽器接続 / 制御の標準インタフェイスです。MIDI ファイルはいくつかのトラックの中にある音符の連なりです。MIDI ファイルは実際はサウンド ファイルではありません。音符の連なりと実際のサウンドの翻訳を行うには専用のソフトウェアが必要になります。
LilyPond で記述した音楽は MIDI ファイルに変換することができ、入力されたものを聴くことができます。これは音楽をチェックするのに便利です。オクターブの外れや臨時記号の付け間違いは MIDI 出力を聴いたときに際立ちます。
標準 MIDI 出力には粗雑さがあります。オプションで 奏法スクリプト を用いることにより、強化されたリアルな MIDI 出力を得ることができます。
MIDI 出力は譜毎に 1 つのチャンネルを割り当て、ドラムのためにチャンネル 10 を予約します。デバイス 1 つにつき MIDI チャンネルは 16 しかないため、楽譜が 16 以上の譜を保持している場合、MIDI チャンネルは再利用されます。
| 3.5.1 MIDI ファイルを作り出す | ||
| 3.5.2 MIDI ブロック | ||
| 3.5.3 何が MIDI に出力されるのか? | ||
| 3.5.4 MIDI での繰り返し | ||
| 3.5.5 MIDI での音の強弱を制御する | ||
| 3.5.6 MIDI での打楽器 | ||
| 3.5.7 奏法スクリプト |
| [ << 入出力全般 ] | [トップ][目次][インデックス][ ? ] | [ スペースの問題 >> ] | ||
| [ < MIDI 出力 ] | [ 上へ : MIDI 出力 ] | [ > ] | ||
3.5.1 MIDI ファイルを作り出す
LilyPond 入力ファイルから MIDI ファイルを作り出すには、score に \midi ブロックを付け加えます。例えば、以下のように:
\score {
...music...
\midi { }
}
\layout ブロックを持たない \score の中に
\midi ブロックがある場合、MIDI 出力だけが生成されます。楽譜も必要な場合は、\layout ブロックも存在している必要があります。
\score {
...music...
\midi { }
\layout { }
}
ピッチ、リズム、タイ、強弱記号、テンポの変更は解釈されて正確に MIDI 出力に翻訳されます。強弱記号、クレッシェンド、デクレッシェンドは MIDI ボリューム レベルに翻訳されます。強弱記号は利用可能な MIDI ボリューム レンジ内のある固定値に翻訳されます。クレッシェンドとデクレッシェンドはそれらの開始点と終了点の間でボリュームを線形に変化させます。MIDI 出力における強弱記号の効果を完全に削除することができます – MIDI ブロック を参照してください。
初期のテンポと後のテンポ変化は、音楽記譜内部の \tempo コマンドで指定することができます。通常このコマンドはメトロノーム記号を表示させますが、表示を抑制することができます
– メトロノーム記号 を参照してください。初期 MIDI テンポあるいは MIDI 全体のテンポを指定するための代替手段がこの後で記述されています – MIDI ブロック を参照してください。
Windows の制限により、Windows での MIDI ファイルのデフォルトの拡張子は
.mid です。他の OS では、拡張子は .midi となります。他の拡張子を使いたいのであれば、入力ファイルの最上位で、\book ブロック, \bookpart ブロック、それに \score
ブロックの前に以下の行を挿入します:
#(ly:set-option 'midi-extension "midi")
上記の行は、MIDI ファイルのデフォルトの拡張子を .midi にします。
上記の方法の代わりとして、コマンド ラインで以下のオプションを与える方法があります:
lilypond … -dmidi-extension=midi lilyFile.ly
| [ << 入出力全般 ] | [トップ][目次][インデックス][ ? ] | [ スペースの問題 >> ] | ||
| [ < MIDI ファイルを作り出す ] | [ 上へ : MIDI ファイルを作り出す ] | [ MIDI ブロック > ] | ||
楽器名
Staff.midiInstrument プロパティに楽器名を設定することで、使用する MIDI 楽器が指定されます。楽器名は MIDI instruments にあるリストから選択しなければなりません。
\new Staff {
\set Staff.midiInstrument = #"glockenspiel"
...notes...
}
\new Staff \with {midiInstrument = #"cello"} {
...notes...
}
選択された楽器が MIDI 楽器のリストにある楽器に一致しない場合、グランド ピアノ ("acoustic grand") 楽器が使用されます。
Selected Snippets
Changing MIDI output to one channel per voice
When outputting MIDI, the default behavior is for each staff to represent one MIDI channel, with all the voices on a staff amalgamated. This minimizes the risk of running out of MIDI channels, since there are only 16 available per track.
However, by moving the Staff_performer to the Voice
context, each voice on a staff can have its own MIDI channel, as is
demonstrated by the following example: despite being on the same staff,
two MIDI channels are created, each with a different
midiInstrument.
\score { \new Staff << \new Voice \relative c''' { \set midiInstrument = #"flute" \voiceOne \key g \major \time 2/2 r2 g-"Flute" ~ g fis ~ fis4 g8 fis e2 ~ e4 d8 cis d2 } \new Voice \relative c'' { \set midiInstrument = #"clarinet" \voiceTwo b1-"Clarinet" a2. b8 a g2. fis8 e fis2 r } >> \layout { } \midi { \context { \Staff \remove "Staff_performer" } \context { \Voice \consists "Staff_performer" } \tempo 2 = 72 } }
![[image of music]](d9/lily-e5a98773.png)
既知の問題と警告
MIDI ボリュームの変化は音符の開始点でのみ起こります。そのため、クレッシェンドとデクレッシェンドは単一の音符のボリューム変化には効果を持ちません。
すべての MIDI プレイヤが MIDI 出力の中にあるテンポ変化を正しく処理するわけではありません。正しく機能するプレイヤとして知られているものには MS Windows の Media Player や timidity があります。
| [ << 入出力全般 ] | [トップ][目次][インデックス][ ? ] | [ スペースの問題 >> ] | ||
| [ < ] | [ 上へ : MIDI 出力 ] | [ 何が MIDI に出力されるのか? > ] | ||
3.5.2 MIDI ブロック
MIDI 出力が必要な場合、score 内部に \midi ブロックを置く必要があります。MIDI ブロックはレイアウト ブロックに似ていますが、それよりも単純です。しばしば、\midi ブロックは空のままですが、コンテキストの再編成
– 新しいコンテキスト定義やプロパティの値を設定するためのコード –
を保持することもできます。例えば以下の例は、テンポ指示を譜刻することなしに、MIDI ファイルの初期テンポを設定します:
\score {
...music...
\midi {
\tempo 4 = 72
}
}
この例では、テンポは 1 分間あたり 72 個の 4 分音符にセットされています。\tempo は実際、コンパイルの最中にプロパティを設定する音楽コマンドです:
\midi ブロックのような出力定義コンテキストの中にある \tempo は当然のこととして、コンテキストを変更するものとして解釈されます。
\midi ブロック内部でのコンテキスト定義は、\layout ブロック内部でのコンテキスト定義の構文とまったく同じです。サウンドのモジュールへの翻訳は performer と呼ばれます。MIDI 出力のためのコンテキストは
‘../ly/performer-init.ly’ で定義されています
–
Other sources of information を参照してください。例えば、MIDI 出力から強弱記号の効果を削除するには、\midi{ } ブロックの中に以下のコードを挿入します。
\midi {
...
\context {
\Voice
\remove "Dynamic_performer"
}
}
MIDI 出力は、\score コマンドで定義された score ブロック内部に
\midi ブロックが存在する場合にのみ生成されます。
\score {
{ …notes… }
\midi { }
}
| [ << 入出力全般 ] | [トップ][目次][インデックス][ ? ] | [ スペースの問題 >> ] | ||
| [ < MIDI ブロック ] | [ 上へ : MIDI 出力 ] | [ > ] | ||
3.5.3 何が MIDI に出力されるのか?
| [ << 入出力全般 ] | [トップ][目次][インデックス][ ? ] | [ スペースの問題 >> ] | ||
| [ < 何が MIDI に出力されるのか? ] | [ 上へ : 何が MIDI に出力されるのか? ] | [ > ] | ||
MIDI でサポートされるもの
以下の記譜要素が MIDI 出力に反映されます:
- ピッチ
- 微分音 (臨時記号 を参照してください。演奏にはピッチ ベンドをサポートするプレイヤが必要になります。)
- コード名で入力された和音
- 音符の演奏時間として入力されたリズム – 連符を含みます
- ‘
:[number]’ を使わずに入力されたトレモロ - タイ
- 強弱記号
- 複数の音符にかかるクレッシェンド、デクレッシェンド
- テンポ記号で入力されたテンポ変化
- 歌詞
奏法スクリプト を用いることで、上記のリストにいくつかの要素が追加されます:
- アーティキュレーション (スラー、スタッカート等)
- トリル、ターン
- ラレンタンドとアッチェレランド
| [ << 入出力全般 ] | [トップ][目次][インデックス][ ? ] | [ スペースの問題 >> ] | ||
| [ < ] | [ 上へ : 何が MIDI に出力されるのか? ] | [ MIDI での繰り返し > ] | ||
MIDI でサポートされないもの
以下の記譜要素は MIDI 出力に影響を与えません:
- 注記 – 例えば swing – として入力されたリズム
- テンポ記号を使わずに注記として入力されたテンポ変化
- スタッカートと他のアーティキュレーションや装飾
- スラーとフレージング スラー
- 単一の音符に付けられたクレッシェンド、デクレッシェンド
- ‘
:[number]’ を使って入力されたトレモロ - 通奏低音
- 微分音の和音
| [ << 入出力全般 ] | [トップ][目次][インデックス][ ? ] | [ スペースの問題 >> ] | ||
| [ < ] | [ 上へ : MIDI 出力 ] | [ MIDI での音の強弱を制御する > ] | ||
3.5.4 MIDI での繰り返し
ちょっとした追加で、すべてのタイプの繰り返しを MIDI 出力に反映させることができます。これは \unfoldRepeats 音楽関数を適用することによって達成することができます。この関数はすべての繰り返しを展開します。
\unfoldRepeats { \repeat tremolo 8 { c'32 e' } \repeat percent 2 { c''8 d'' } \repeat volta 2 { c'4 d' e' f' } \alternative { { g' a' a' g' } { f' e' d' c' } } } \bar "|."
![[image of music]](8a/lily-6b12c4e2.png)
複数のボイスを持つ score で、繰り返しを正しく MIDI 出力に展開するには、各ボイス の繰り返し指示が完全に記譜されている必要があります。
MIDI のために \unfoldRepeats を使用する楽譜ファイルを作成する場合、2 つの \score ブロックが必要になります:
1 つは MIDI のため (繰り返しを展開します) で、もう 1 つは楽譜のため
(差し替え、トレモロ、パーセント記号の繰り返しを使用します) です。例えば、以下のようにします:
\score {
..music..
\layout { .. }
}
\score {
\unfoldRepeats ..music..
\midi { .. }
}
| [ << 入出力全般 ] | [トップ][目次][インデックス][ ? ] | [ スペースの問題 >> ] | ||
| [ < MIDI での繰り返し ] | [ 上へ : MIDI 出力 ] | [ > ] | ||
3.5.5 MIDI での音の強弱を制御する
MIDI での音の強弱は Dynamic_performer
– これはデフォルトでは Voice コンテキストの中に存在します –
によって実装されます。MIDI 全体のボリューム、強弱記号による相対ボリューム、楽器間の相対ボリュームを制御することができます。
| [ << 入出力全般 ] | [トップ][目次][インデックス][ ? ] | [ スペースの問題 >> ] | ||
| [ < MIDI での音の強弱を制御する ] | [ 上へ : MIDI での音の強弱を制御する ] | [ > ] | ||
強弱記号
強弱記号は利用可能な MIDI ボリューム レンジ内のある固定の分数に翻訳されます。デフォルトでの分数の範囲は、ppppp に対する 0.25 から、fffff に対する 0.95 までです。強弱記号とそれに対応する分数のセットを ‘../scm/midi.scm’ で調べることができます
–
Other sources of information を参照してください。引数として強弱記号をとり、それに対する分数を返す関数を作成し、その関数を Score.dynamicAbsoluteVolumeFunction にセットすることによって、分数のセットを変更あるいは拡張することができます。
例えば、リンフォルツァンド 強弱記号 – \rfz – を使う必要がある場合、この強弱記号はデフォルト セットの中に含まれていないため、MIDI ボリュームに影響を与えません。同様に make-dynamic-script で新しい強弱記号を定義した場合、その強弱記号もデフォルト セットには含まれません。以下の例は、そのような強弱記号に対する MIDI ボリュームを追加する方法を示しています。以下の Scheme 関数は、rfz の強弱記号があった場合は分数に 0.9 をセットし、そうでない場合はデフォルトの関数を呼び出します。
#(define (myDynamics dynamic) (if (equal? dynamic "rfz") 0.9 (default-dynamic-absolute-volume dynamic))) \score { \new Staff { \set Staff.midiInstrument = #"cello" \set Score.dynamicAbsoluteVolumeFunction = #myDynamics \new Voice { \relative { a'4\pp b c-\rfz } } } \layout {} \midi {} }
![[image of music]](14/lily-4a0980a3.png)
分数テーブル全体を再定義する必要がある場合、上記の方法の代わりに ‘../scm/midi.scm’ の中にある default-dynamic-absolute-volume プロシージャとそのモデルとなる関連テーブルを使用する方が良いでしょう。このセクションの最後の例で、その方法を示しています。
| [ << 入出力全般 ] | [トップ][目次][インデックス][ ? ] | [ スペースの問題 >> ] | ||
| [ < ] | [ 上へ : MIDI での音の強弱を制御する ] | [ > ] | ||
MIDI 全体でのボリューム
強弱記号に対する MIDI 全体の最小ボリュームと最大ボリュームは
Score レベルでプロパティ midiMinimumVolume と
midiMaximumVolume を設定することで制御できます。これらのプロパティは強弱記号に対してのみ効果を発揮します。そのため、楽譜の開始からそれらのプロパティを適用するには、楽譜の開始点に強弱記号を置く必要があります。各強弱記号に対応する分数は以下の式で算出されます:
midiMinimumVolume + (midiMaximumVolume - midiMinimumVolume) * fraction
以下の例では、MIDI 全体のボリュームの範囲は 0.2 - 0.5 の範囲に制限されています。
\score { << \new Staff { \key g \major \time 2/2 \set Staff.midiInstrument = #"flute" \new Voice \relative { r2 g''\mp g fis~ 4 g8 fis e2~ 4 d8 cis d2 } } \new Staff { \key g \major \set Staff.midiInstrument = #"clarinet" \new Voice \relative { b'1\p a2. b8 a g2. fis8 e fis2 r } } >> \layout {} \midi { \tempo 2 = 72 \context { \Score midiMinimumVolume = #0.2 midiMaximumVolume = #0.5 } } }
![[image of music]](e9/lily-19b42b04.png)
| [ << 入出力全般 ] | [トップ][目次][インデックス][ ? ] | [ スペースの問題 >> ] | ||
| [ < ] | [ 上へ : MIDI での音の強弱を制御する ] | [ > ] | ||
楽器の音の強さを均一化する (i)
Staff コンテキストの中で最小 MIDI ボリューム プロパティと最大 MIDI ボリューム プロパティが設定されている場合、MIDI 楽器間の相対ボリュームを制御することができます。これは基本的な楽器イコライザであり、MIDI 出力の品質を著しく高めることができます。
以下の例では、クラリネットのボリュームはフルートのボリュームよりも相対的に低く設定されています。これを正しく機能させるには、それぞれの楽器の最初の音符に強弱記号を置く必要があります。
\score { << \new Staff { \key g \major \time 2/2 \set Staff.midiInstrument = #"flute" \set Staff.midiMinimumVolume = #0.7 \set Staff.midiMaximumVolume = #0.9 \new Voice \relative { r2 g''\mp g fis~ 4 g8 fis e2~ 4 d8 cis d2 } } \new Staff { \key g \major \set Staff.midiInstrument = #"clarinet" \set Staff.midiMinimumVolume = #0.3 \set Staff.midiMaximumVolume = #0.6 \new Voice \relative { b'1\p a2. b8 a g2. fis8 e fis2 r } } >> \layout {} \midi { \tempo 2 = 72 } }
![[image of music]](4e/lily-eedbbeeb.png)
| [ << 入出力全般 ] | [トップ][目次][インデックス][ ? ] | [ スペースの問題 >> ] | ||
| [ < ] | [ 上へ : MIDI での音の強弱を制御する ] | [ MIDI での打楽器 > ] | ||
楽器の音の強さを均一化する (ii)
MIDI 最小/最大ボリューム プロパティが設定されていない場合、デフォルトでは、LilyPond はいくつかの楽器に軽度の均一化を適用します。適用を受ける楽器とその equalization は ‘../scm/midi.scm’ の中にあるテーブル instrument-equalizer-alist に示されています。
引数として MIDI 楽器名だけを受け入れて、その楽器に適用する最小/最大ボリュームの分数ペアを返す Scheme プロシージャを
Score コンテキストの中にある
instrumentEqualizer にセットすることで、この基本的なデフォルト イコライザを置き換えることができます。この置き換えは、このセクションの始めでの
dynamicAbsoluteVolumeFunction の再設定の方法とまったく同じです。‘../scm/midi.scm’ の中にあるデフォルト イコライザ
default-instrument-equalizer はそのようなプロシージャをどのように記述するのかを示しています。
以下の例は、フルートとクラリネットの相対ボリュームを前の例と同じ値にセットしています。
#(define my-instrument-equalizer-alist '()) #(set! my-instrument-equalizer-alist (append '( ("flute" . (0.7 . 0.9)) ("clarinet" . (0.3 . 0.6))) my-instrument-equalizer-alist)) #(define (my-instrument-equalizer s) (let ((entry (assoc s my-instrument-equalizer-alist))) (if entry (cdr entry)))) \score { << \new Staff { \key g \major \time 2/2 \set Score.instrumentEqualizer = #my-instrument-equalizer \set Staff.midiInstrument = #"flute" \new Voice \relative { r2 g''\mp g fis ~ 4 g8 fis e2 ~ 4 d8 cis d2 } } \new Staff { \key g \major \set Staff.midiInstrument = #"clarinet" \new Voice \relative { b'1\p a2. b8 a g2. fis8 e fis2 r } } >> \layout { } \midi { \tempo 2 = 72 } }
![[image of music]](ba/lily-8838195d.png)
| [ << 入出力全般 ] | [トップ][目次][インデックス][ ? ] | [ スペースの問題 >> ] | ||
| [ < ] | [ 上へ : MIDI 出力 ] | [ 奏法スクリプト > ] | ||
3.5.6 MIDI での打楽器
打楽器は一般的に DrumStaff コンテキストの中で記譜され、そのように記譜された場合、その打楽器は正しく MIDI チャンネル 10 に出力されます。しかしながら、いくつかのピッチを持つ打楽器
– ザイロフォン、マリンバ、ビブラフォン、ティンパニなど –
は “通常の” 楽器のように扱われ、正しい MIDI 出力を得るには、それらの楽器のための音楽を通常の Staff コンテキストに入力する必要があります
– DrumStaff には入力しません。
いくつかのピッチを持たない打楽器
– メロディック トム、太鼓、シンセドラムなど –
のサウンドは一般の MIDI 標準に含まれ、MIDI チャネル 10 経由では使用できません。そのため、そのような楽器の記譜も適切なピッチを使って通常の Staff コンテキストに入力すべきです。
多くの打楽器 – カスタネットなど – は一般の MIDI 標準には含まれません。そのような楽器のための記述を行っている場合に MIDI 出力を作り出すための最も容易な – けれども不十分な – 方法は、標準セットから最も近いサウンドを代わりに用いることです。
既知の問題と警告
一般の MIDI 標準はリム ショットを含まないため、代わりにサイドスティックを用います。
| [ << 入出力全般 ] | [トップ][目次][インデックス][ ? ] | [ スペースの問題 >> ] | ||
| [ < MIDI での打楽器 ] | [ 上へ : MIDI 出力 ] | [ 音楽情報を抽出する > ] | ||
3.5.7 奏法スクリプト
奏法スクリプトを用いることにより、よりリアルな MIDI 出力を得ることができます。奏法スクリプトは、音符を適切な時間比率の音符とスキップで置き換えることにより、アーティキュレーション (スラー、スタッカート等) を考慮に入れようとします。さらに、トリルやターンを展開しようとし、さらにラレンタンドとアッチェレランドを考慮に入れようとします。
奏法スクリプトを使うには、入力ファイルの先頭で以下をインクルードする必要があります。
\include "articulate.ly"
さらに、\score セクションで以下のようにします。
\unfoldRepeats \articulate << all the rest of the score... >>
この方法で入力ファイルを変更すると、出力される楽譜の見た目は著しく変わってしまいますが、標準の \midi ブロックはより良い MIDI ファイルを作り出します。
奏法スクリプトを機能させるための必須事項ではありませんが、上記の例のように \unfoldRepeats コマンドを挿入することにより、トリル などの短縮記譜の演奏が可能になります。
既知の問題と警告
Articulate shortens chords といくつかの音楽 (特にオルガン音楽) の演奏はうまくいかないことがあります。
| [ << 入出力全般 ] | [トップ][目次][インデックス][ ? ] | [ スペースの問題 >> ] | ||
| [ < 奏法スクリプト ] | [ 上へ : 入出力全般 ] | [ LilyPond 記譜法を表示する > ] | ||
3.6 音楽情報を抽出する
グラフィカルな出力と MIDI を作り出すことに加えて、LilyPond は音楽情報をテキストとして表示することができます。
| 3.6.1 LilyPond 記譜法を表示する | ||
| 3.6.2 Scheme 音楽表記を表示する | ||
| 3.6.3 音楽イベントをファイルに保存する |
| [ << 入出力全般 ] | [トップ][目次][インデックス][ ? ] | [ スペースの問題 >> ] | ||
| [ < 音楽情報を抽出する ] | [ 上へ : 音楽情報を抽出する ] | [ Scheme 音楽表記を表示する > ] | ||
3.6.1 LilyPond 記譜法を表示する
LilyPond 記譜法で書かれた音楽表記を音楽関数 \displayLilyMusic で表示することが可能です。出力を見るには、通常、コマンド ラインで LilyPond を実行します。例えば、
{
\displayLilyMusic \transpose c a, { c4 e g a bes }
}
は、以下を表示します:
{ a,4 cis e fis g }
デフォルトでは、LilyPond は上記のメッセージを他のすべてのメッセージと一緒にコンソールに表示します。上記のメッセージを分離して \display{STUFF} の結果を保存するには、出力をファイルにリダイレクトします。
lilypond file.ly >display.txt
LilyPond は音楽表記を表示するだけでなく、それを解釈します
(なぜなら、\displayLilyMusic は追加で音楽表記を表示するために返すだけだからです)。既存の音楽に \displayLilyMusic を挿入するだけでその音楽の情報を得るられるので便利です。本当に LilyPond に音楽を解釈させたくないのであれば、\void を使ってその音楽を無視させます:
{
\void \displayLilyMusic \transpose c a, { c4 e g a bes }
}
| [ << 入出力全般 ] | [トップ][目次][インデックス][ ? ] | [ スペースの問題 >> ] | ||
| [ < LilyPond 記譜法を表示する ] | [ 上へ : 音楽情報を抽出する ] | [ 音楽イベントをファイルに保存する > ] | ||
3.6.2 Scheme 音楽表記を表示する
Displaying music expressions を参照してください。
| [ << 入出力全般 ] | [トップ][目次][インデックス][ ? ] | [ スペースの問題 >> ] | ||
| [ < Scheme 音楽表記を表示する ] | [ 上へ : 音楽情報を抽出する ] | [ スペースの問題 > ] | ||
3.6.3 音楽イベントをファイルに保存する
以下のファイルをインクルードすることにより、音楽イベントをファイルに保存することができます。
\include "event-listener.ly"
これは譜毎に ‘FILENAME-STAFFNAME.notes’ あるいは ‘FILENAME-unnamed-staff.notes’ というファイルを作成します。複数の名前の無い譜がある場合、 すべての譜のイベントが同じファイルに出力されるということに注意してください。出力は以下のようになります:
0.000 note 57 4 p-c 2 12 0.000 dynamic f 0.250 note 62 4 p-c 7 12 0.500 note 66 8 p-c 9 12 0.625 note 69 8 p-c 14 12 0.750 rest 4 0.750 breathe
出力はタブ区切り行で、各行には 2 つの固定フィールドがあり、その後にオプション パラメータが続きます。
time type ...params...
この情報は、簡単に Python スクリプト等の他のプログラムに読み込ませることができ、LilyPond で音楽分析や録音再生実験を行おうとする研究者にとってとても有用です。
既知の問題と警告
lilypond 音楽イベントすべてが ‘event-listener.ly’ でサポートされるわけではありません。‘event-listener.ly’ は、良く作られた “概念実証” を意図しています。
読み取りたい音楽イベントがサポートされていないのであれば、あなたが作業している lilypond ディレクトリに ‘event-listener.ly’ をコピーして、編集することで、望みの情報を出力させることができます。
| [ << 入出力全般 ] | [トップ][目次][インデックス][ ? ] | [ デフォルトを変更する >> ] | ||
| [ < 音楽イベントをファイルに保存する ] | [ 上へ : Top ] | [ ページ レイアウト > ] | ||
4. スペースの問題
紙面全体のレイアウトは 3 つの要素によって決定されます: ページ レイアウト、改行、そしてスペースです。これらはすべて互いに影響を与え合います。スペース入れ方を選択することは音楽システムをどれくらいの密度で譜刻するかを決定します。これは改行をどこに挿入するかに影響を与え、それゆえ最終的には、楽曲が占めるページ数を決定します
大雑把に言って、このプロセスには 4 つのステップがあります: 最初に、演奏時間に基づいて可変距離 (‘スプリング’) が選択されます。とり得る改行の組み合わせがすべて試され、相対的に ‘悪い’ 楽譜が算出されます。それから、起こり得るシステムの高さが推定されます。 最後に、水平方向と垂直方向のスペースが混み合いすぎたり、広がりすぎたりしないように、改ページと改行の組み合わせが選択されます。
2 タイプのブロックがレイアウト設定を保持できます:
\paper {…} と \layout {…} です。\paper ブロックは book のすべての score で共通のページ レイアウト設定を保持します
– ページの高さやページ番号を表示するか等です。ページ レイアウト を参照してください。\layout ブロックは score のレイアウトを保持します
– システム数や譜グループ間の間隔等です。ページ レイアウト を参照してください。
| 4.1 ページ レイアウト | ||
| 4.2 楽譜レイアウト | ||
| 4.3 改行/改ページ | ||
| 4.4 垂直方向のスペース | ||
| 4.5 水平方向のスペース | ||
| 4.6 音楽を少ないページに収める |
| [ << スペースの問題 ] | [トップ][目次][インデックス][ ? ] | [ デフォルトを変更する >> ] | ||
| [ < スペースの問題 ] | [ 上へ : スペースの問題 ] | [ paper ブロック > ] | ||
4.1 ページ レイアウト
このセクションでは \paper ブロックで使用するページ レイアウト
オプションについて説明します。
4.1.1 \paper ブロック | ||
| 4.1.2 紙面サイズと自動拡縮 | ||
4.1.3 固定された垂直方向の \paper スペース変数 | ||
4.1.4 可変な垂直方向の \paper スペース変数 | ||
4.1.5 水平方向の \paper スペース変数 | ||
4.1.6 他の \paper 変数 |
| [ << スペースの問題 ] | [トップ][目次][インデックス][ ? ] | [ デフォルトを変更する >> ] | ||
| [ < ページ レイアウト ] | [ 上へ : ページ レイアウト ] | [ 紙面サイズと自動拡縮 > ] | ||
4.1.1 \paper ブロック
\paper ブロックは、\book ブロック内に配置することができますが、\score ブロック内に配置することはできません。\paper ブロックでの設定は book 全体に適用されます。book が複数の score を含む場合も、すべての score に適用されます。\paper ブロックで可能な設定には以下のものがあります:
-
set-paper-sizeScheme 関数 -
ページ レイアウトをカスタマイズするのに用いられる
\paper変数 - ヘッダ、フッタ、それにタイトルのレイアウトをカスタマイズするのに用いられるマークアップ定義
set-paper-size 関数は次のセクション
紙面サイズと自動拡縮
で説明します。ページ レイアウトを扱う \paper 変数は後のセクションで説明します。ヘッダ、フッタ、それにタイトルを扱うマークアップ定義は
カスタム ヘッダ、フッタ、タイトル で説明します。
たいていの \paper 変数は \paper ブロック内でのみ機能します。\layout ブロック内でも機能するいくつかの \paper 変数を\layout ブロック でリスト アップしています。
ページの長さに関係する \paper 変数の単位は、ユーザによって他の単位が指定されていなければ、ミリメーターです。例えば、以下の宣言は top-margin を 10mm に設定します:
\paper {
top-margin = 10
}
top-margin を 0.5 インチに設定するには、単位接尾辞 \in を使用します:
\paper {
top-margin = 0.5\in
}
利用可能な単位接尾辞は \mm, \cm, \in,
それに \pt です。これらの単位はミリメーターから変換するための値であり、‘ly/paper-defaults-init.ly’ で定義されています。技術的には必要はありませんが、明快さのために、ミリメーターを用いる場合であっても \mm をコードに記述します。
Scheme を用いて \paper の値を定義することも可能です。上の例と等価な Scheme は以下のようになります:
\paper {
#(define top-margin (* 0.5 in))
}
参照
記譜法リファレンス:
紙面サイズと自動拡縮,
カスタム ヘッダ、フッタ、タイトル,
\layout ブロック
インストールされているファイル: ‘ly/paper-defaults-init.ly’
| [ << スペースの問題 ] | [トップ][目次][インデックス][ ? ] | [ デフォルトを変更する >> ] | ||
| [ < paper ブロック ] | [ 上へ : ページ レイアウト ] | [ 紙面サイズを設定する > ] | ||
4.1.2 紙面サイズと自動拡縮
| 紙面サイズを設定する | ||
| 紙面サイズに応じた自動拡縮 |
| [ << スペースの問題 ] | [トップ][目次][インデックス][ ? ] | [ デフォルトを変更する >> ] | ||
| [ < 紙面サイズと自動拡縮 ] | [ 上へ : 紙面サイズと自動拡縮 ] | [ 紙面サイズに応じた自動拡縮 > ] | ||
紙面サイズを設定する
紙面サイズを変更するために 2 つの関数が利用可能です:
set-default-paper-size と set-paper-size です。
set-default-paper-size は最上位スコープに配置する必要があり、and set-paper-size は \paper ブロックの中に配置する必要があります:
‘A4’ が紙面サイズを明示的に設定しなかった場合のデフォルト値です。しかしながら、デフォルト値を変更するために使うことができる関数が 2 つあります。1 つは set-default-paper-size です:
#(set-default-paper-size "quarto")
この関数は常に最上位スコープに配置する必要があります。もう 1 つは set-paper-size です:
\paper {
#(set-paper-size "tabloid")
}
この間数は常に \paper ブロックの中に配置する必要があります。
set-default-paper-size 関数を最上位スコープで用いる場合、どの \paper ブロックよりも前に配置する必要があります。set-default-paper-size はすべてのページの紙面サイズを設定しますが、set-paper-size が設定する紙面サイズは \paper ブロックが適用されるページだけです。例えば、\paper ブロックがファイルの最上位に配置されている場合、すべてのページの紙面サイズに摘要されます。\paper ブロックが \book の中に配置されている場合、そのブックのページだけに適用されます。
set-paper-size 関数を用いる場合、同じ \paper ブロック内で用いられる他のすべての関数よりも 前に 配置する必要があります。紙面サイズに応じた自動拡縮 を参照してください。
紙面サイズは ‘scm/paper.scm’ で定義されていて、カスタム サイズを追加することも可能ですが、追加後のソフトウェア アップデートにより上書きされます。利用可能な紙面サイズは Predefined paper sizes でリスト アップされています。
以下のコマンドを用いてカスタム紙面サイズを追加することができ、追加した紙面サイズは
set-default-paper-size または set-paper-size で使用することがでいます。
#(set! paper-alist (cons '("my size" . (cons (* 15 in) (* 3 in))) paper-list))
\paper {
#(set-paper-size "my size")
}
単位 in (インチ)、cm (センチメートル)、それに mm
(ミリメートル) のすべてを使うことができます。
紙面サイズ関数にシンボル 'landscape を渡すとページは 90°回転し、それに応じてより長い行幅となります。
#(set-default-paper-size "a6" 'landscape)
紙面が回転するだけで、楽譜は回転 しません。
参照
記譜法リファレンス: 紙面サイズに応じた自動拡縮, Predefined paper sizes
インストールされているファイル: ‘scm/paper.scm’
| [ << スペースの問題 ] | [トップ][目次][インデックス][ ? ] | [ デフォルトを変更する >> ] | ||
| [ < 紙面サイズを設定する ] | [ 上へ : 紙面サイズと自動拡縮 ] | [ 固定された垂直方向の paper スペース変数 > ] | ||
紙面サイズに応じた自動拡縮
Scheme 関数
(set-default-paper-size または set-paper-size)
により紙面サイズが変更された場合、いくつかの \paper 変数は自動的に新しいサイズに合わせて拡縮されます。特定の変数の自動拡縮をスキップするには、紙面サイズを設定した後にその変数を設定します。paper-height 変数や paper-width 変数の変更では、自動拡縮は起こらないということに注意してください。しかしながら paper-width 変数の変更は他の値に影響を与えます
(これは拡縮とは別のことで、後で説明します)。
set-default-paper-size 関数と set-paper-size 関数については
紙面サイズを設定する で説明します。
自動拡縮によって影響を受ける垂直方向の長さは
top-margin と bottom-margin です
(固定された垂直方向の \paper スペース変数 を参照してください)。自動拡縮によって影響を受ける水平方向の長さは
right-margin, inner-margin, outer-margin,
binding-offset, indent, それに short-indent です
(水平方向の \paper スペース変数 を参照してください)。
これらの長さに対するデフォルト値は
top-margin-default, bottom-margin-default 等の内部変数を用いて ‘ly/paper-defaults-init.ly’ で設定されています。これらはデフォルトの紙面サイズ a4 の場合の値です。参考のために、a4 紙面での
paper-height は 297\mm であり、paper-width は 210\mm です。
参照
記譜法リファレンス:
固定された垂直方向の \paper スペース変数,
水平方向の \paper スペース変数
インストールされているファイル: ‘ly/paper-defaults-init.ly’, ‘scm/paper.scm’
| [ << スペースの問題 ] | [トップ][目次][インデックス][ ? ] | [ デフォルトを変更する >> ] | ||
| [ < 紙面サイズに応じた自動拡縮 ] | [ 上へ : ページ レイアウト ] | [ 可変な垂直方向の paper スペース変数 > ] | ||
4.1.3 固定された垂直方向の \paper スペース変数
Note: いくつかの \paper 変数は紙面サイズに応じて自動的に拡縮され、結果として予期せぬ振る舞いを引き起こすことがあります。紙面サイズに応じた自動拡縮 を参照してください。
(拡縮する前の) デフォルト値は ‘ly/paper-defaults-init.ly’ で定義されています。
-
paper-height -
ページの高さ – デフォルトでは設定されていません。これは垂直方向の長さの自動拡縮は影響を与えません。
-
top-margin -
ページの上端と印刷可能エリアの上端との間のマージン。紙面サイズが変更されると、それに応じてこの長さのデフォルト値も拡縮されます。
-
bottom-margin -
印刷可能エリアの下端とページの下端との間のマージン。紙面サイズが変更されると、それに応じてこの長さのデフォルト値も拡縮されます。
-
ragged-bottom -
真に設定されている場合、システムはページ下端まで広がりません。これは最後のページには影響しません。ページに 2, 3 しかシステムを持たない楽曲 – オーケストラ譜等 – では、この変数を真に設定すべきです。
-
ragged-last-bottom -
偽に設定されている場合、最後のページでシステムはページ下端まで広がります。2 ページ以上ある楽曲では、この変数を偽に設定すべきです。これは book パート – すなわち
\bookpartブロックによって作成された部分 – の最後のページにも影響を与えます。
参照
記譜法リファレンス: 紙面サイズに応じた自動拡縮
インストールされているファイル: ‘ly/paper-defaults-init.ly’
コード断片集: Spacing
既知の問題と警告
(\header ブロックによって作成された)
タイトルはシステムとして扱われます。このため、ragged-bottom と ragged-last-bottom はタイトルと score の最初のシステムとの間にスペースを追加します。
明示的に定義された紙面サイズは、ユーザ定義の上または下のマージン設定を上書きします。
| [ << スペースの問題 ] | [トップ][目次][インデックス][ ? ] | [ デフォルトを変更する >> ] | ||
| [ < 固定された垂直方向の paper スペース変数 ] | [ 上へ : ページ レイアウト ] | [ 可変な垂直方向スペース連想リストの構造 > ] | ||
4.1.4 可変な垂直方向の \paper スペース変数
たいていの場合、ある要素間
(マージン、タイトル、システム、score 等の間)
の垂直方向の間隔は、状況に応じて伸びたり縮んだりするよう、可変であることが好まれます。いくつかの \paper 変数
(以下でリスト アップします) は、長さを微調整することができます。
このセクションで説明する \paper 変数は、個々のシステム内にある譜のスペースを制御しないということに注意してください。システム内のスペースは、普通は \score ブロックや \score ブロックの中に配置される設定を通じて、グラフィカル オブジェクトのプロパティによって制御されます。システム内部の可変な垂直方向のスペース を参照してください。
| 可変な垂直方向スペース連想リストの構造 | ||
可変な垂直方向の \paper スペース変数のリスト |
| [ << スペースの問題 ] | [トップ][目次][インデックス][ ? ] | [ デフォルトを変更する >> ] | ||
| [ < 可変な垂直方向の paper スペース変数 ] | [ 上へ : 可変な垂直方向の paper スペース変数 ] | [ 可変な垂直方向の paper スペース変数のリスト > ] | ||
可変な垂直方向スペース連想リストの構造
可変な垂直方向の \paper スペース変数は、それぞれが 4 つの キー を保持する連想配列 (association list) です:
-
basic-distance– 2 つの要素の 参照ポイント 間の垂直方向の間隔。単位は譜スペースです。衝突が生じない場合は、伸縮されません。(タイトルまたは最上位の) マークアップの参照ポイントは最も上の箇所です。システムの参照ポイントは、譜線を持たない (Lyricsコンテキスト等) であっても、最も近くにあるStaffSymbolの垂直方向の中心です。basic-distanceの値がpaddingやminimum-distanceよりも小さいと無意味になります。なぜなら、間隔がpaddingやminimum-distanceよりも小さくなることはないからです。minimum-distanceの値がpaddingよりも小さいと無意味になります。なぜなら、間隔がpaddingよりも小さくなることはないからです。 -
padding– 2 つの要素間の境界ボックス (または輪郭) の間に必要な、垂直方向の最小の間隔。単位は譜スペースです。 -
stretchability– 間隔の伸び率。0 の場合、間隔は広がりません (衝突が生じない限りは)。正の値の場合、ある間隔のstretchability値は他の間隔のstretchabilityとの相対関係になります。例えば、ある間隔のstretchability値がもう一つの間隔のstretchabilityの 2 倍である場合、間隔の広がり方は 2 倍になります。値は 0 以上の有限数でなければなりません。+inf.0はprogramming_errorを引き起こし、無視されます。一方、1.0e7はほとんど無限の広がり方となります。値が設定されなければ、デフォルト値が設定されます。間隔の 縮み 率をユーザが直接設定することはできず、(basic-distance-minimum-distance) であることに注意してください。
譜がページの下端まで広がらない設定の場合、間隔は以下の中の最大値となります: largest of:
-
basic-distance, -
minimum-distance, -
padding+ 衝突を回避するのに必要な最小の距離
複数ページの楽譜で、最後のページの楽譜がページ下端まで広がらない場合、最後のページのスペースは前のページと同じです。
配列リストを変更する方法は、連想配列を変更する で説明します。以下の例は、連想配列を変更する 2 つの方法を提示しています。最初の宣言はキー値を個別に変更していて、2 つ目は変数全体を再定義しています:
\paper {
system-system-spacing.basic-distance = #8
score-system-spacing =
#'((basic-distance . 12)
(minimum-distance . 6)
(padding . 1)
(stretchability . 12))
}
| [ << スペースの問題 ] | [トップ][目次][インデックス][ ? ] | [ デフォルトを変更する >> ] | ||
| [ < 可変な垂直方向スペース連想リストの構造 ] | [ 上へ : 可変な垂直方向の paper スペース変数 ] | [ 水平方向の paper スペース変数 > ] | ||
可変な垂直方向の \paper スペース変数のリスト
以下の変数の名前は upper-lower-spacing という形式で、upper 要素と lower 要素との間隔です。間隔の距離は 2 つの要素の参照ポイント間です
(上記の連想配列構造の説明を参照してください)。変数名の中の ‘markup’ は タイトル マークアップ
(bookTitleMarkup や scoreTitleMarkup) と
最上位のマークアップ (ファイル構造) の両方を指します。すべての間隔の距離の単位は譜スペースです。
デフォルト設定は ‘ly/paper-defaults-init.ly’ で定義しています。
-
markup-system-spacing -
(タイトルまたは最上位の) マークアップと、その後に続くシステムとの間隔。
-
score-markup-spacing -
score の最後のシステムと、その後に続く (タイトルまたは最上位の) マークアップとの間隔
-
score-system-spacing -
score の最後のシステムと、その後に score の最初のシステムとの間隔 – score と score の間に (タイトルまたは最上位の) マークアップが無い場合。
-
system-system-spacing -
同じ score の中にある 2 つのシステムの間隔。
-
markup-markup-spacing -
2 つの (タイトルまたは最上位の) マークアップの間隔。
-
last-bottom-spacing -
ページの最後のシステムまたは最上位のマークアップから、印刷可能エリアの下端 (つまり、ボトム マージンの上端) までの距離。
-
top-system-spacing -
印刷可能エリアの上端 (つまり、トップ マージンの下端) から、ページの最初のシステムまでの距離 – 間に (タイトルまたは最上位の) マークアップが無い場合。
-
top-markup-spacing -
印刷可能エリアの上端 (つまり、トップ マージンの下端) から、ページの最初の (タイトルまたは最上位の) までの距離 – 間にシステムが無い場合。
参照
記譜法リファレンス: システム内部の可変な垂直方向のスペース
インストールされているファイル: ‘ly/paper-defaults-init.ly’
コード断片集: Spacing
| [ << スペースの問題 ] | [トップ][目次][インデックス][ ? ] | [ デフォルトを変更する >> ] | ||
| [ < 可変な垂直方向の paper スペース変数のリスト ] | [ 上へ : ページ レイアウト ] | [ 幅とマージンの paper 変数 > ] | ||
4.1.5 水平方向の \paper スペース変数
Note: いくつかの \paper の間隔は紙面サイズに応じて自動的に拡縮され、それにより予期せぬ結果となることがあります。紙面サイズに応じた自動拡縮 を参照してください。
幅とマージンの \paper 変数 | ||
両面モードのための \paper 変数 | ||
シフトとインデントのための \paper 変数 |
| [ << スペースの問題 ] | [トップ][目次][インデックス][ ? ] | [ デフォルトを変更する >> ] | ||
| [ < 水平方向の paper スペース変数 ] | [ 上へ : 水平方向の paper スペース変数 ] | [ 両面モードのための paper 変数 > ] | ||
幅とマージンの \paper 変数
ここでリスト アップされていない (拡縮する前の) デフォルト値は、‘ly/paper-defaults-init.ly’ で定義されています。
-
paper-width -
ページの幅 - デフォルトでは、値は設定されていません。
paper-widthは水平方向の自動拡縮に影響を与えませんが、line-width変数に影響を与えます。paper-widthとline-widthの両方に値が設定された場合、left-marginとright-marginが更新されます。check-consistencyも参照してください。 -
line-width -
この変数に値が設定されていない場合、インデントされず、ページ右端まで広がるシステムの譜線の水平方向の長さは、
(paper-width - left-margin - right-margin)です。left-marginとright-marginに値が設定されていなければ、マージンは自動的に更新されて、システムはページの中央に配置されます。check-consistencyも参照してください。この変数は\layoutブロック内で設定される可能性もあります。 -
left-margin -
ページの左端とインデントされていないシステムの譜線開始点との間のマージンです。紙面サイズが変更された場合、それに応じてこの変数のデフォルト値も拡縮されます。
left-marginに値が設定されず、line-widthとright-marginの両方に値が設定された場合、left-marginは(paper-width - line-width - right-margin)に設定されます。line-widthだけに値が設定された場合、左右のマージンは((paper-width - line-width) / 2)に設定され、結果としてシステムはページの中央に配置されます。check-consistencyも参照してください。 -
right-margin -
ページの右端とページの右端まで広がる譜線終点との間のマージンです。紙面サイズが変更された場合、それに応じてこの変数のデフォルト値も拡縮されます。
right-marginに値が設定されず、line-widthとleft-marginの両方に値が設定された場合、right-marginは(paper-width - line-width - left-margin)に設定されます。line-widthだけに値が設定された場合、左右のマージンは((paper-width - line-width) / 2)に設定され、結果としてシステムはページの中央に配置されます。check-consistencyも参照してください。 -
check-consistency -
真にセットされた場合、
left-margin,line-width, それにright-marginの和がpaper-widthにならなければ警告を表示して、left-marginとright-marginをデフォルト値に置き換え (必要に応じて紙面サイズに合わせて拡宿し) ます。偽にセットされた場合、不一致を無視して、システムがページの左端からはみ出すことを許可します。 -
ragged-right -
真にセットされた場合、システムは譜線の幅いっぱいまで広がらず、本来の長さで終了します。デフォルトでは、1 つだけシステムを持つ score の場合は
#t、複数のシステムを持つ score の場合は#fです。この変数は\layoutブロック内でセットされる可能性もあります。 -
ragged-last -
真にセットされた場合、score の最後のシステムは譜線の幅いっぱいまで広がらず、本来の長さで終了します。デフォルトでは
#fです。この変数は\layoutブロック内でセットされる可能性もあります。
参照
記譜法リファレンス: 紙面サイズに応じた自動拡縮
インストールされているファイル: ‘ly/paper-defaults-init.ly’
既知の問題と警告
明示的に定義された紙面サイズは、ユーザ定義の左または右のマージン設定を上書きします。
| [ << スペースの問題 ] | [トップ][目次][インデックス][ ? ] | [ デフォルトを変更する >> ] | ||
| [ < 幅とマージンの paper 変数 ] | [ 上へ : 水平方向の paper スペース変数 ] | [ シフトとインデントのための paper 変数 > ] | ||
両面モードのための \paper 変数
(拡縮される前の) デフォルト値は ‘ly/paper-defaults-init.ly’ で定義されています。
-
two-sided -
真にセットされた場合、ページ番号が偶数か奇数かに応じて
inner-margin,outer-marginそれにbinding-offsetを用いてマージンを決定します。これはleft-marginとright-marginを上書きします。 -
inner-margin -
book の一部であるページすべてが見開きページの内側に持つマージンです。(左ページの場合は右側のマージン、右ページの場合は左側のマージンです。) 紙面サイズが変更された場合、それに応じてこの変数のデフォルト値も拡縮されます。
two-sidedが真にセットされてい場合にのみ、機能します。 -
outer-margin -
book の一部であるページすべてが見開きページの外側に持つマージンです。(左ページの場合は左側のマージン、右ページの場合は右側のマージンです。) 紙面サイズが変更された場合、それに応じてこの変数のデフォルト値も拡縮されます。
two-sidedが真にセットされてい場合にのみ、機能します。 -
binding-offset -
製本により何かが隠れてしまわないように
inner-marginを増加させる量です。紙面サイズが変更された場合、それに応じてこの変数のデフォルト値も拡縮されます。two-sidedが真にセットされてい場合にのみ、機能します。
参照
記譜法リファレンス: 紙面サイズに応じた自動拡縮
インストールされているファイル: ‘ly/paper-defaults-init.ly’
| [ << スペースの問題 ] | [トップ][目次][インデックス][ ? ] | [ デフォルトを変更する >> ] | ||
| [ < 両面モードのための paper 変数 ] | [ 上へ : 水平方向の paper スペース変数 ] | [ 他の paper 変数 > ] | ||
シフトとインデントのための \paper 変数
このにリスト アップされていない (拡縮される前の) デフォルト値は ‘ly/paper-defaults-init.ly’ で定義されています。
-
horizontal-shift -
(タイトルとシステム セパレータを含む) すべてのシステムを右にシフトさせる量です。デフォルトでは
0.0\mmです。 -
indent -
score の最初のシステムに対するインデントのレベルです。紙面サイズが変更された場合、それに応じてこの変数のデフォルト値も拡縮されます。この変数は
\layoutブロック内でセットされる可能性もあります。 -
short-indent -
最初のシステムを除くすべてのシステムに対するインデントのレベルです。紙面サイズが変更された場合、それに応じてこの変数のデフォルト値も拡縮されます。この変数は
\layoutブロック内でセットされる可能性もあります。
参照
記譜法リファレンス: 紙面サイズに応じた自動拡縮
インストールされているファイル: ‘ly/paper-defaults-init.ly’
コード断片集: Spacing
| [ << スペースの問題 ] | [トップ][目次][インデックス][ ? ] | [ デフォルトを変更する >> ] | ||
| [ < シフトとインデントのための paper 変数 ] | [ 上へ : ページ レイアウト ] | [ 改行のための paper 変数 > ] | ||
4.1.6 他の \paper 変数
改行のための \paper 変数 | ||
改ページのための \paper 変数 | ||
ページ番号のための \paper 変数 | ||
その他の \paper 変数 |
| [ << スペースの問題 ] | [トップ][目次][インデックス][ ? ] | [ デフォルトを変更する >> ] | ||
| [ < 他の paper 変数 ] | [ 上へ : 他の paper 変数 ] | [ 改ページのための paper 変数 > ] | ||
改行のための \paper 変数
-
max-systems-per-page -
1 ページに配置されるシステムの最大数です。現在、これは
ly:optimal-breakingアルゴリズムでのみサポートされます。デフォルトでは、値は設定されていません。 -
min-systems-per-page -
1 ページに配置されるシステムの最小数です。この値が大きすぎると、システムがページからはみ出す可能性があります。現在、これは
ly:optimal-breakingアルゴリズムでのみサポートされます。デフォルトでは、値は設定されていません。 -
systems-per-page -
各ページに配置すべきシステム数です。現在、これは
ly:optimal-breakingアルゴリズムでのみサポートされます。デフォルトでは、値は設定されていません。 -
system-count -
score で使用すべきシステム数です。デフォルトでは、値は設定されていません。この変数は
\layoutブロック内でセットされる可能性もあります。
参照
記譜法リファレンス: 改行
| [ << スペースの問題 ] | [トップ][目次][インデックス][ ? ] | [ デフォルトを変更する >> ] | ||
| [ < 改行のための paper 変数 ] | [ 上へ : 他の paper 変数 ] | [ ページ番号のための paper 変数 > ] | ||
改ページのための \paper 変数
ここでリスト アップされていないデフォルト値は ‘ly/paper-defaults-init.ly’ で定義されています。
-
blank-after-score-page-penalty -
楽譜の後ろ (と次の楽譜の前) に強制的に白紙を挿入します。デフォルトでは、この値は
blank-page-penaltyよりも小さいため、楽譜の途中ではなく後ろに白紙が挿入されます。 -
blank-last-page-penalty -
楽譜の最後が奇数ページの場合、楽譜の後ろに白紙を挿入します。
-
blank-page-penalty -
楽譜の途中に強制的に白紙を挿入します。この値は
ly:optimal-breakingでは用いられません。なぜなら、楽譜の途中の白紙を考慮しないからです。 -
page-breaking -
改ページのアルゴリズムを指定します。選択肢は
ly:minimal-breaking,ly:page-turn-breaking, それにly:optimal-breakingです。 -
page-breaking-system-system-spacing -
改ページ アルゴリズムに
system-system-spacingを実際の値とは異なる値だと思わせるトリックです。例えば、page-breaking-system-system-spacing #'paddingをsystem-system-spacing #'paddingよりも十分に大きくすると、改ページ アルゴリズムは各ページに数個のシステムしか配置しません。デフォルトではセットされていません。 -
page-count -
score で使用すべきページ数です。デフォルトでは、値は設定されていません。
参照
記譜法リファレンス: 改ページ, 最適改ページ, 最適ページめくり, 最小改ページ, 1 行の改ページ
インストールされているファイル: ‘ly/paper-defaults-init.ly’
| [ << スペースの問題 ] | [トップ][目次][インデックス][ ? ] | [ デフォルトを変更する >> ] | ||
| [ < 改ページのための paper 変数 ] | [ 上へ : 他の paper 変数 ] | [ その他の paper 変数 > ] | ||
ページ番号のための \paper 変数
ここでリスト アップされていないデフォルト値は ‘ly/paper-defaults-init.ly’ で定義されています。
-
auto-first-page-number -
The page breaking algorithm is affected by the first page number being odd or even. If set to true, the page breaking algorithm will decide whether to start with an odd or even number. This will result in the first page number remaining as is or being increased by one. Default:
#f. -
first-page-number -
最初のページのページ番号の値です。
-
print-first-page-number -
真にセットされた場合、最初のページにページ番号が譜刻されます。
-
print-page-number -
偽にセットされた場合、ページ番号は譜刻されません。
参照
インストールされているファイル: ‘ly/paper-defaults-init.ly’
既知の問題と警告
奇数のページ番号は常に右側に配置されます。楽譜をページ 1 から始めたいのであれば、カバー ページの裏にブランク ページ配置して、ページ 1 が右側にくるようにする必要があります。
| [ << スペースの問題 ] | [トップ][目次][インデックス][ ? ] | [ デフォルトを変更する >> ] | ||
| [ < ページ番号のための paper 変数 ] | [ 上へ : 他の paper 変数 ] | [ 楽譜レイアウト > ] | ||
その他の \paper 変数
-
page-spacing-weight -
(垂直方向の) ページ スペースと (水平方向の) 行スペースの重要度の関係です。大きな値だと、ページ スペースがより重要になります。デフォルトでは、
10です。 -
print-all-headers -
真にセットされている場合、出力の各
\scoreのすべてのヘッダを譜刻します。通常、pieceヘッダ変数とopusヘッダ変数だけが譜刻されます。デフォルトでは、#fです。 -
system-separator-markup -
しばしばオーケストラ譜で使用される、システム間に挿入されるマークアップ オブジェクトです。デフォルトでは、設定されていません。以下の例のように、‘ly/titling-init.ly’ で定義されている
\slashSeparatorマークアップを使用すると適当です:#(set-default-paper-size "a8") \book { \paper { system-separator-markup = \slashSeparator } \header { tagline = ##f } \score { \relative { c''1 \break c1 \break c1 } } }![[image of music]](bc/lily-1ce64a74.png)
参照
インストールされているファイル: ‘ly/titling-init.ly’
コード断片集: Spacing
既知の問題と警告
デフォルトのページ ヘッダは、ページ番号と \header ブロックの instrument フィールドを同一の行に配置します。
| [ << スペースの問題 ] | [トップ][目次][インデックス][ ? ] | [ デフォルトを変更する >> ] | ||
| [ < その他の paper 変数 ] | [ 上へ : スペースの問題 ] | [ \layout ブロック > ] | ||
4.2 楽譜レイアウト
このセクションでは、\layout ブロックで使用する楽譜レイアウト オプションについて説明します。
4.2.1 \layout ブロック | ||
| 4.2.2 譜サイズを設定する |
| [ << スペースの問題 ] | [トップ][目次][インデックス][ ? ] | [ デフォルトを変更する >> ] | ||
| [ < 楽譜レイアウト ] | [ 上へ : 楽譜レイアウト ] | [ 譜サイズを設定する > ] | ||
4.2.1 \layout ブロック
\paper ブロックがドキュメント全体のページ フォーマットに関係する設定を保持する一方で、\layout ブロックは楽譜特有のレイアウトに関する設定を保持します。楽譜レイアウト オプションを全体に設定するには、設定を最上位の \layout ブロックに配置します。個々の楽譜に対してレイアウト オプションを設定するには、音楽表記の後の \score ブロック内の \layout ブロックの中に設定を配置します。\layout ブロックに配置される設定には以下のものがあります:
-
layout-set-staff-sizeScheme 関数、 -
\contextブロック内のコンテキスト変更、それに - 楽譜レイアウトに影響を与える
\paper変数
layout-set-staff-size 関数は次のセクション 譜サイズを設定する
で説明します。コンテキスト変更は コンテキストのプラグインを変更する と
コンテキストのデフォルト設定を変更する で説明します。\layout ブロック内で使用される \paper には以下のものがあります:
-
line-width,ragged-rightそれにragged-last(幅とマージンの\paper変数 を参照してください) -
indentとshort-indent(シフトとインデントのための\paper変数 を参照してください) -
system-count(改行のための\paper変数 を参照してください)
ここで、\layout ブロックの例を挙げます:
\layout {
indent = 2\cm
\context {
\StaffGroup
\override StaffGrouper.staff-staff-spacing.basic-distance = #8
}
\context {
\Voice
\override TextScript.padding = #1
\override Glissando.thickness = #3
}
}
最上位の表記として複数の \layout ブロックを配置することができます。これは、例えば、異なる設定が別個のファイルに保存されていて、任意の方法でインクルードする場合に有用です。内部的には、\layout ブロックが評価される時、カレントの
\layout 構成のコピーが作成され、評価する \layout ブロックの内部で定義されている変更が適用され、その結果が新しいカレントの構成として保存されます。ユーザからは \layout ブロックが組み合わされたように見えますが、衝突が発生した場合 (複数のブロックで同じプロパティが変更された場合)、最後の定義が有効になります。
例えば、下記のブロック:
\layout {
\context {
\Voice
\override TextScript.color = #magenta
\override Glissando.thickness = #1.5
}
}
これが一つ前の例の後に配置された場合、TextScript の 'padding
設定と 'color 設定は組み合わせれますが、Glissando の
'thickness 設定は前の設定と置き換わります (前の設定を上書きします)。
\layout ブロックを後で再利用するために変数に代入することができます。しかしながら、この方法は \layout ブロックを直接記述した場合とは少しですが重大な違いがあります。
変数を以下のように定義した場合:
layoutVariable = \layout {
\context {
\Voice
\override NoteHead.font-size = #4
}
}
カレントの \layout 構成に NoteHead #'font-size 設定を追加しますが、この組み合わせは新しいカレントの構成として保存され ません。‘カレントの構成’ は変数が定義された時に評価されるのであり、変数が使われる時に評価されるのではありません。そのため、変数の効果は変数がソースに配置された位置によって異なります。
変数を他の \layout ブロックの中で使うことができます。例えば、以下のように:
\layout {
\layoutVariable
\context {
\Voice
\override NoteHead.color = #red
}
}
上記のような変数を含む \layout ブロックは、カレントの構成をコピーせず、設定を追加するためのベースとなる構成として \layoutVariable の内容を用います。このことは、変数が定義されてから使われるまでの間に定義された変更は失われるということを意味します。
layoutVariable が使われる (あるいは \include される) 直前に定義されている場合、layoutVariable の内容はカレントの構成に変数内部で定義した設定を加えたものになります。そのため、上で示した \layoutVariable の使用例の場合、最終的な
\layout ブロックの構成は以下のようになります:
TextScript.padding = #1 TextScript.color = #magenta Glissando.thickness = #1.5 NoteHead.font-size = #4 NoteHead.color = #red
これに indent と StaffGrouper の設定がプラスしたものです。
しかしながら、変数が最初の \layout ブロックより前に定義されていた場合、カレントの構成は以下だけになってしまいます:
NoteHead.font-size= #4 % (変数定義で記述されたものです) NoteHead.color = #red % (変数が使用された後に追加されたものです)
注意深く計画を立てれば、\layout 変数はソースのレイアウト設計を構築して、\layout 構成を既知の状態にリセットするための有用なツールになります。
参照
記譜法リファレンス: コンテキストのデフォルト設定を変更する
コード断片集: Spacing
| [ << スペースの問題 ] | [トップ][目次][インデックス][ ? ] | [ デフォルトを変更する >> ] | ||
| [ < \layout ブロック ] | [ 上へ : 楽譜レイアウト ] | [ 改行/改ページ > ] | ||
4.2.2 譜サイズを設定する
デフォルトの 譜サイズ は 20 ポイントに設定されています。これを変更するには 2 つの方法があります:
譜サイズをファイルの中にあるすべての楽譜
(正確には book ブロックの中にあるすべての楽譜)
に設定するには、set-global-staff-size を使用します。
#(set-global-staff-size 14)
これはグローバルなデフォルトの譜サイズを高さが 14pt になるよう設定し、それに応じてすべてのフォントを拡縮します。
それぞれの楽譜に個別に譜サイズを設定するには、以下のようにします:
\score{
…
\layout {
#(layout-set-staff-size 15)
}
}
Emmentaler フォントは 8 つのサイズの音楽シンボルを提供します。 各フォントは譜サイズに合わせて調整されます: 小さなサイズになるにつれて、相対的に太くなる譜線に対して釣り合いをとるために、太くなります。推奨されるフォント サイズを以下の表にリストアップします:
フォント名
譜の高さ (pt)
譜の高さ (mm)
用途
feta11
11.22
3.9
ポケット サイズの楽譜
feta13
12.60
4.4
feta14
14.14
5.0
feta16
15.87
5.6
feta18
17.82
6.3
歌集
feta20
20
7.0
標準パート譜
feta23
22.45
7.9
feta26
25.2
8.9
これらのフォントは任意のサイズで利用可能です。コンテキスト プロパティ fontSize とレイアウト プロパティ staff-space
(
StaffSymbol の中にあります)
を使用することで、個々の譜に対してサイズを調整することができます。個々の譜のサイズはグローバル サイズとの相対値です。
参照
記譜法リファレンス: 記譜フォント サイズを選択する, The Emmentaler font.
コード断片集: Spacing
既知の問題と警告
layout-set-staff-size は譜線の間隔を変更しません。
| [ << スペースの問題 ] | [トップ][目次][インデックス][ ? ] | [ デフォルトを変更する >> ] | ||
| [ < 譜サイズを設定する ] | [ 上へ : スペースの問題 ] | [ 改行 > ] | ||
4.3 改行/改ページ
| 4.3.1 改行 | ||
| 4.3.2 改ページ | ||
| 4.3.3 最適改ページ | ||
| 4.3.4 最適ページめくり | ||
| 4.3.5 最小改ページ | ||
| 4.3.6 1 行の改ページ | ||
| 4.3.7 明示的な改行/改ページ | ||
| 4.3.8 改行/改ページのために追加のボイスを使用する |
| [ << スペースの問題 ] | [トップ][目次][インデックス][ ? ] | [ デフォルトを変更する >> ] | ||
| [ < 改行/改ページ ] | [ 上へ : 改行/改ページ ] | [ 改ページ > ] | ||
4.3.1 改行
通常、改行は自動的に決定されます。改行は、行が混み合って見えたり散漫に見えたりしないように、連続する行の密度が同じくらいになるように選択されます。
小節線が引かれる場所で手動で強制的に改行を入れるには、\break コマンドを使用します:
\relative c'' { c4 c c c | \break c4 c c c | }
![[image of music]](99/lily-ddd9276f.png)
デフォルトでは、小節の途中での \break は無視され、警告が表示されます。小節の途中で強制的に改行を入れるには、‘\bar ""’ を用いて不可視の小節線を追加します:
\relative c'' { c4 c c \bar "" \break c | c4 c c c | }
![[image of music]](04/lily-bb313f98.png)
連符が開始する小節と終了する小節が異なる場合などのように、前の小節が音符の途中で終わっている場合、前の小節の終わりに \break を配置しても無視されます。そのような状況で、\break コマンドを機能させるには、Voisce コンテキストから Forbid_line_break_engraver を削除します。音符の途中で強制的に改行を入れるには、音楽と並列に改行コマンドを追加する必要があるということに注意してください:
\new Voice \with { \remove "Forbid_line_break_engraver" } \relative { << { c''2. \tuplet 3/2 { c4 c c } c2. | } { s1 | \break s1 | } >> }
![[image of music]](cc/lily-2a380e99.png)
同様に、通常は連桁が小節線を跨いでいる場合も、改行は禁止されます。この振る舞いは、\override Beam.breakable = ##t により、変更することができます:
\relative c'' { \override Beam.breakable = ##t c2. c8[ c | \break c8 c] c2. | }
![[image of music]](c2/lily-29827c4d.png)
\noBreak コマンドは、コマンドが配置された小節線での改行を禁止します。
行スペースに影響を与える最も基本的な設定は indent と
line-width です。これらは \layout ブロック内で設定されます。これらは音楽の最初の行のインデントと行の長さを制御します。
\layout ブロック内で ragged-right が真にセットされた場合、システムは、行全体に広がらずに、本来の長さで終了します。これは短い楽譜の断片を記譜する場合や、本来のスペースがどれくらい密になっているかチェックする場合に有用です。
オプション ragged-last は ragged-right と似ていますが、楽曲の最後の行にだけ効果を持ちます。
\layout {
indent = 0\mm
line-width = 150\mm
ragged-last = ##t
}
規則的な間隔で改行を行うには、
スキップで区切られた \break を用いて、それを \repeat で繰り返します。例えば、以下の例は 28 小節 (4/4 拍子と仮定して) であり、4 小節ごとに改行が入ります
(それ以外の場所で改行が入ることはありません):
<<
\repeat unfold 7 {
s1 \noBreak s1 \noBreak
s1 \noBreak s1 \break
}
{ 実際の音楽… }
>>
改行設定を自動的に ‘.ly’ ファイルに保存することができます。これにより、2 回目のフォーマット実行時に垂直方向のスペースがページにフィットするよう引き伸ばされます。この機能は本当に新しく、複雑です。詳細は Spacing を参照してください。
定義済みコマンド
参照
記譜法リファレンス:
改行のための \paper 変数
コード断片集: Spacing
内部リファレンス: LineBreakEvent
| [ << スペースの問題 ] | [トップ][目次][インデックス][ ? ] | [ デフォルトを変更する >> ] | ||
| [ < 改行 ] | [ 上へ : 改行/改ページ ] | [ 最適改ページ > ] | ||
4.3.2 改ページ
デフォルトの改ページは、\pageBreak や \noPageBreak を挿入することによって上書きすることができます。これらのコマンドは \break と \noBreak に似ています。
これらのコマンドは小節線のところに挿入すべきであり、改ページを強制/禁止します。当然のことですが、\pageBreak は強制的に改行も行います。
\pageBreak コマンドと \noPageBreak コマンドは最上位レベルに挿入することができ、score や最上位レベルのマークアップの間に挿入することができます。
ragged-right や ragged-last と類似で、垂直方向のスペースに対して同じ効果を持つ設定があります:
ragged-bottom と ragged-last-bottom です。これらの設定が #t にセットされている場合、すべてのページあるいは最後のページのシステムはページの垂直方向全体には広がりません。固定された垂直方向の \paper スペース変数 を参照してください。
改ページは page-breaking 関数によって算出されます。LilyPond は改ページを算出するために 3 つのアルゴリズムを提供します:
ly:optimal-breaking, ly:page-turn-breaking, それに
ly:minimal-breaking です。デフォルトは ly:optimal-breaking ですが、\paper ブロックの中で変更することができます:
\paper {
page-breaking = #ly:page-turn-breaking
}
1 つのブックが多くの楽譜とページを持つ場合、改ページを処理するのに多くの処理時間とメモリが必要になり、改ページの問題を解決することが困難になる可能性があります。改ページ処理を簡単にするために、\bookpart ブロックを用いてブックをいくつかのパートに分割します:
改ページはパートごとに別々に処理されます。異なるブック パートには、異なる改ページ関数を使用することもできます。
\bookpart {
\header {
subtitle = "Preface"
}
\paper {
%% ほとんどテキストしか保持していないパートでは
%% ly:minimal-breaking が適しています
page-breaking = #ly:minimal-breaking
}
\markup { … }
…
}
\bookpart {
%% このパートは音楽を保持しているので、デフォルトの
%% ly:optimal-breaking を使用します
\header {
subtitle = "First movement"
}
\score { … }
…
}
定義済みコマンド
参照
記譜法リファレンス:
改行のための \paper 変数
コード断片集: Spacing
| [ << スペースの問題 ] | [トップ][目次][インデックス][ ? ] | [ デフォルトを変更する >> ] | ||
| [ < 改ページ ] | [ 上へ : 改行/改ページ ] | [ 最適ページめくり > ] | ||
4.3.3 最適改ページ
ly:optimal-breaking 関数は、LilyPond が改ページを決定するためのデフォルトの手法です。
この関数は、ページの (水平方向と垂直方向の両方の) 混み合いや広がりすぎを最小にする改ページを見つけ出そうと試みます。ly:page-turn-breaking とは異なり、この関数はページめくりについて考慮しません。
参照
コード断片集: Spacing
| [ << スペースの問題 ] | [トップ][目次][インデックス][ ? ] | [ デフォルトを変更する >> ] | ||
| [ < 最適改ページ ] | [ 上へ : 改行/改ページ ] | [ 最小改ページ > ] | ||
4.3.4 最適ページめくり
しばしば、2 枚目のページ (横書きの本を開いたときの右側のページ) の終わりに休符を置くための改ページ構成が必要になります。こうすることで、演奏者は音符を見失うことなくページをめくることができます。ly:page-turn-breaking 関数はページの混み合いや広がりすぎを最小にする改ページを見つけ出そうと試みますが、ページめくりを特定の場所だけに置くための制約を受けます。
この改ページ関数を使うには、2 つのステップがあります。最初に、改ページ で説明されているように、\paper ブロックの中でこの関数を有効にする必要があります。次に、この関数に改ページを許可したい場所を教える必要があります。
2 番目のステップを達成するには、2 つの方法があります。1 つ目の方法では、入力ファイルの適当な場所に \allowPageTurn を挿入することによって、潜在的なページめくりを手動で指定します。
この方法では手間がかかりすぎる場合は、Page_turn_engraver を
Staff あるいは Voice コンテキストに追加します。Page_turn_engraver はコンテキストをスキャンして音符の無いセクションを探します
(休符を探すわけではなく、音符の無い部分を探すということに注意してください。単一譜の多声で、ボイスの 1 つが休符を持つ場合に、Page_turn_engraver に渡されないようにするためです。)
Page_turn_engraver は音符を持たない十分に長いセクションを見つけると、‘特殊な’ 小節線 (2 重小節線など) がないかぎりは、そのセクションの最後の小節線のところに \allowPageTurn を挿入します。
Page_turn_engraver はコンテキスト プロパティ minimumPageTurnLength を読み込んで、どれくらい音符が無いセクションが続いたらページめくりを考慮するかを決定します。minimumPageTurnLength のデフォルト値は
(ly:make-moment 1/1) です。ページめくりを不可にしたいのならば、minimumPageTurnLength に非常に大きな値をセットします。
\new Staff \with { \consists "Page_turn_engraver" }
{
a4 b c d |
R1 | % ここでページめくりが許可されます
a4 b c d |
\set Staff.minimumPageTurnLength = #(ly:make-moment 5/2)
R1 | % ここではページめくりは許可されません
a4 b r2 |
R1*2 | % ここでページめくりが許可されます
a1
}
Page_turn_engraver は volta 繰り返しを検出します。繰り返しの開始と終わりにページめくりを行うのに十分な時間がある場合にのみ、その繰り返しの最中でのページめくりが許可されます。繰り返しが非常に短い場合、Page_turn_engraver はページめくりを不可にする可能性があります。コンテキスト プロパティ minimumRepeatLengthForPageTurn に値を設定した場合、その値よりも長い演奏時間を持つ繰り返しに対してのみ、Page_turn_engraver は繰り返しの最中でページめくりを許可します。
ページめくりコマンド \pageTurn, \noPageTurn
それに \allowPageTurn は、最上位レベル、score や最上位のマークアップの間で使用される可能性もあります。
定義済みコマンド
\pageTurn,
\noPageTurn,
\allowPageTurn
参照
コード断片集: Spacing
既知の問題と警告
score の中に配置する Page_turn_engraver は 1 つだけにするべきです。複数の Page_turn_engraver がある場合、互いに干渉し合います。
| [ << スペースの問題 ] | [トップ][目次][インデックス][ ? ] | [ デフォルトを変更する >> ] | ||
| [ < 最適ページめくり ] | [ 上へ : 改行/改ページ ] | [ 1 行の改ページ > ] | ||
4.3.5 最小改ページ
The ly:minimal-breaking 関数は最小限の改ページを算出します:
この関数は 1 ページに可能な限り多くのシステムを配置します。そのため、多くのページを持つ楽譜
– そのような場合、他の改ページ関数では時間がかかりすぎたり、メモリ使用量が多くなりすぎたりします –
や、多くのテキストを持つ楽譜でこの関数を使用すると良いかもしれません。この関数を有効にするには以下のようにします:
\paper {
page-breaking = #ly:minimal-breaking
}
参照
コード断片集: Spacing
| [ << スペースの問題 ] | [トップ][目次][インデックス][ ? ] | [ デフォルトを変更する >> ] | ||
| [ < 最小改ページ ] | [ 上へ : 改行/改ページ ] | [ 明示的な改行/改ページ > ] | ||
4.3.6 1 行の改ページ
ly:one-line-breaking 関数は特殊な目的のための改ページアルゴリズムで、楽譜をそれぞれ 1 ページに 1 行で配置します。この改ページ関数はタイトルやマージンを譜刻しません。楽譜だけを譜刻します。
ページ幅は最も長い楽譜が 1 行に納まるように調節されます。\paper ブロックの中にある変数 paper-width, line-width
それに indent は無視されますが、left-margin と
right-margin は有効です。ページの高さは変更されません。
| [ << スペースの問題 ] | [トップ][目次][インデックス][ ? ] | [ デフォルトを変更する >> ] | ||
| [ < 1 行の改ページ ] | [ 上へ : 改行/改ページ ] | [ 改行/改ページのために追加のボイスを使用する > ] | ||
4.3.7 明示的な改行/改ページ
LilyPond はしばしば明示的な \break や \pageBreak を却下します。この振る舞いを上書きするための 2 つのコマンドがあります:
\override NonMusicalPaperColumn.line-break-permission = ##f \override NonMusicalPaperColumn.page-break-permission = ##f
line-break-permission が偽に上書きされた場合、LilyPond は明示的な改行である \break コマンドのところで改行を行い、他の場所では改行を行いません。page-break-permission が偽に上書きされた場合、LilyPond は明示的な改ページである
\pageBreak コマンドのところで改ページを行い、他の場所では改ページを行いません。
\paper { indent = #0 ragged-right = ##t ragged-bottom = ##t } music = \relative { c''8 c c c } \score { \new Staff { \repeat unfold 2 { \music } \break \repeat unfold 4 { \music } \break \repeat unfold 6 { \music } \break \repeat unfold 8 { \music } \pageBreak \repeat unfold 8 { \music } \break \repeat unfold 6 { \music } \break \repeat unfold 4 { \music } \break \repeat unfold 2 { \music } } \layout { \context { \Score \override NonMusicalPaperColumn.line-break-permission = ##f \override NonMusicalPaperColumn.page-break-permission = ##f } } }
![[image of music]](03/lily-a6f51e7a.png)
参照
コード断片集: Spacing
| [ << スペースの問題 ] | [トップ][目次][インデックス][ ? ] | [ デフォルトを変更する >> ] | ||
| [ < 明示的な改行/改ページ ] | [ 上へ : 改行/改ページ ] | [ 垂直方向のスペース > ] | ||
4.3.8 改行/改ページのために追加のボイスを使用する
通常、改行/改ページ情報は音符入力部分に直接入力します。
music = \relative { c''4 c c c }
\score {
\new Staff {
\repeat unfold 2 { \music } \break
\repeat unfold 3 { \music }
}
}
この方法では \break と \pageBreak コマンドを入力しやすいですが、音楽入力と音楽をどのようにページにレイアウトするかを指定する情報とが混ざってしまいます。改行/改ページ情報を保持するための追加のボイスを導入することによって、音楽入力と改行/改ページ情報を 2 つ場所に分けることができます。この追加のボイスはスキップ、\break、\pageBreak、それに、その他の改行/改ページ情報だけを保持します。
music = \relative { c''4 c c c } \score { \new Staff << \new Voice { s1 * 2 \break s1 * 3 \break s1 * 6 \break s1 * 5 \break } \new Voice { \repeat unfold 2 { \music } \repeat unfold 3 { \music } \repeat unfold 6 { \music } \repeat unfold 5 { \music } } >> }
![[image of music]](7e/lily-b39e2c59.png)
以下の方法は、垂直方向のスペース で説明されているように、NonMusicalPaperColumnGrob の line-break-system-details と他の有用だが長いプロパティを上書きするときに、非常に役に立ちます。
music = \relative { c''4 c c c } \score { \new Staff << \new Voice { \overrideProperty Score.NonMusicalPaperColumn.line-break-system-details #'((Y-offset . 0)) s1 * 2 \break \overrideProperty Score.NonMusicalPaperColumn.line-break-system-details #'((Y-offset . 35)) s1 * 3 \break \overrideProperty Score.NonMusicalPaperColumn.line-break-system-details #'((Y-offset . 70)) s1 * 6 \break \overrideProperty Score.NonMusicalPaperColumn.line-break-system-details #'((Y-offset . 105)) s1 * 5 \break } \new Voice { \repeat unfold 2 { \music } \repeat unfold 3 { \music } \repeat unfold 6 { \music } \repeat unfold 5 { \music } } >> }
![[image of music]](0d/lily-cca437b5.png)
参照
記譜法リファレンス: 垂直方向のスペース
コード断片集: Spacing
| [ << スペースの問題 ] | [トップ][目次][インデックス][ ? ] | [ デフォルトを変更する >> ] | ||
| [ < 改行/改ページのために追加のボイスを使用する ] | [ 上へ : スペースの問題 ] | [ システム内部の可変な垂直方向のスペース > ] | ||
4.4 垂直方向のスペース
垂直方向のスペースは 3 つの要素によって制御されます: 利用可能なスペースの量 (つまり、紙面サイズとマージン)、システムの間隔、それにシステム内部での譜の間隔です。
| 4.4.1 システム内部の可変な垂直方向のスペース | ||
| 4.4.2 譜とシステムを明示的に配置する | ||
| 4.4.3 垂直方向の衝突回避 |
| [ << スペースの問題 ] | [トップ][目次][インデックス][ ? ] | [ デフォルトを変更する >> ] | ||
| [ < 垂直方向のスペース ] | [ 上へ : 垂直方向のスペース ] | [ システム内部のスペース プロパティ > ] | ||
4.4.1 システム内部の可変な垂直方向のスペース
システム内部の可変な垂直方向のスペースを制御する 3 つの仕組みがあり、以下のカテゴリに分けられます:
- グループ化されていない譜,
-
グループ化されている譜
(
ChoirStaff等のような譜グループ内の譜) -
譜ではない行
(
Lyrics,ChordNames等)
システムの高さは 2 つのステップで決定されます。最初に、すべての譜が利用可能なスペースの量に応じた間隔で配置されます。次に、譜ではない行が譜の間に配置されます。
このセクションでは、システム内部の譜と譜ではない行の垂直方向のスペースを制御する仕組みだけを説明しているということに注意してください。システム、score、マークアップ、それにマージン間の垂直方向のスペースは、\paper 変数によって制御されます
– 可変な垂直方向の \paper スペース変数 で説明しています。
| システム内部のスペース プロパティ | ||
| グループ化されていない譜のスペース | ||
| グループ化されている譜のスペース | ||
| 譜ではない行のスペース |
| [ << スペースの問題 ] | [トップ][目次][インデックス][ ? ] | [ デフォルトを変更する >> ] | ||
| [ < システム内部の可変な垂直方向のスペース ] | [ 上へ : システム内部の可変な垂直方向のスペース ] | [ グループ化されていない譜のスペース > ] | ||
システム内部のスペース プロパティ
システム内部の垂直方向のスペースは、2 セットのグラフィカル オブジェクト
プロパティによって制御されます。1 つ目は VerticalAxisGroup グラフィカル オブジェクト
– これは、譜と譜ではない行によって作成されます –
のプロパティ セットです。2 つ目は StaffGrouper グラフィカル オブジェクト
– これは、明示的に呼び出された場合に、譜グループによって作成されます –
のプロパティ セットです。これらのプロパティは、このセクションの終わりで説明します。
これらのプロパティの名前は (staff-affinity を除いて)、item1-item2-spacing という形式に従います
– ここで、item1 と item2 は、スペースを入れられる要素です。item2 は必ずしも item1 の下にある要素ではないということに注意してください。例えば、staff-affinity が UP である場合、nonstaff-relatedstaff-spacing は譜ではない行から上向きにスペースをとります。
スペースは、2 つの要素の 参照ポイント 間の距離です。譜の参照ポイントは、その譜の StaffSymbol
(すなわち、line-count が奇数の場合は中央の譜線で、line-count が偶数の場合は中央のスペースです)
の垂直方向の中央です。譜ではない行の参照ポイントは、以下の表のようになります:
| 譜ではない行 | 参照ポイント |
|---|---|
ChordNames | ベースライン |
NoteNames | ベースライン |
Lyrics | ベースライン |
Dynamics | 垂直方向の中央 |
FiguredBass | 最も上のポイント |
FretBoards | トップ ライン |
以下の画像では、水平方向の線が参照ポイントの位置を示しています:
![[image of music]](6d/lily-7e1a8e8a.png)
垂直方向のスペースのグラフィカル オブジェクト プロパティは
(staff-affinity を除いて)、可変な垂直方向の \paper スペース変数 で説明した
\paper スペース変数と同じ連想配列構造を使用します。
連想配列を変更する方法は、連想配列を変更する で説明します。グラフィカル オブジェクト プロパティの調節は、\score ブロックか \layout ブロックの内部で、\override を用いて行う必要があります。
以下の例は、連想配列を変更する 2 つの方法を示しています。最初の宣言は 1 つのキー値を個別に更新して、2 番目の宣言はプロパティ全体を再定義しています:
\new Staff \with {
\override VerticalAxisGroup.default-staff-staff-spacing.basic-distance = #10
} { … }
\new Staff \with {
\override VerticalAxisGroup.default-staff-staff-spacing =
#'((basic-distance . 10)
(minimum-distance . 9)
(padding . 1)
(stretchability . 10))
} { … }
スペース設定をグローバルに変更するには、そのスペース設定を \layout ブロックの中に配置します:
\layout {
\context {
\Staff
\override VerticalAxisGroup.default-staff-staff-spacing.basic-distance = #10
}
}
垂直方向スペースのグラフィカル オブジェクト プロパティの標準設定は VerticalAxisGroup と StaffGrouper でリスト アップしています。特定のタイプの譜ではない行のデフォルト設定は、 Contexts の中にある関連するコンテキストの説明でリスト アップしています。
VerticalAxisGroup グラフィカル オブジェクトのプロパティ
通常、VerticalAxisGroup プロパティは、Staff レベル (あるいはそれと同等のレベル) で、\override を用いて調節します。
-
staff-staff-spacing -
カレントの譜とそのすぐ下の譜の間隔 – その間に 1 つ以上の譜ではない行 (
Lyrics等) が配置されている場合であっても – を決定するために使用します。システムの最下段の譜には適用されません。VerticalAxisGroupのstaff-staff-spacingは、譜がグループの一部である場合はStaffGrouperのstaff-staff-spacingプロパティを適用し、グループではない譜の場合はその譜のdefault-staff-staff-spacingを適用する Scheme 関数です。これにより、グループ化されている譜に異なる間隔を入れることが可能です。グループ化されていることとは無関係に同一の間隔を入れるには、上で示したプロパティ再定義を用いて、この関数を可変スペースの連想配列で置き換えます。 -
default-staff-staff-spacing グループ化されていない譜で使用される
staff-staff-spacingを定義している可変スペースの連想配列です。staff-staff-spacingは\overrideを用いて上書きされることがあります。-
staff-affinity カレントの譜ではない行にスペースを入れるために使用する譜の方向です。選択肢は
UP,DOWN, それにCENTERです。CENTERの場合、衝突や他のスペース上の制約によって妨げられない限り、譜ではない行は上下にある近くの譜から等距離になるよう配置されます。隣接する譜ではない行のstaff-affinityは、方向が下から上へと増加しないようにする必要があります。例えば、DOWNに設定された譜ではない行のすぐ後にUPに設定された譜ではない行を置くべきではありません。システムの最上段にある譜ではない行はDOWNであるべきで、システムの最下段にある譜ではない行はUPであるべきです。譜ではない行のstaff-affinityを#fに設定すると、その行は譜として扱われます。譜に対してUP,CENTER, あるいはDOWNのstaff-affinityを設定すると、その譜は譜ではない行として扱われます。-
nonstaff-relatedstaff-spacing カレントの譜ではない行と
staff-affinityの方向にある最も近い譜との間隔です – 2 つの間に譜ではない行が無く、staff-affinityがUPとDOWNのどちらかである場合です。staff-affinityがCENTERである場合、nonstaff-relatedstaff-spacingは最も近くにある 上下両サイド の譜の間隔になります – たとえ、カレントの譜ではない行と上下どちらかの譜の間に、他の譜ではない行があったとしてもです。このことは、譜ではない行の配置は、上下にある譜と譜ではない行の両方に依存するということを意味します。このスペースのstretchabilityに小さな値を設定すると、そのとおりのスペースになりやすくなります。このスペースのstretchabilityに大きな値を設定すると、そのとおりのスペースになりにくくなります。-
nonstaff-nonstaff-spacing カレントの譜ではない行と
staff-affinityの方向にある次の譜ではない行の間隔です – 2 つの間に譜が無く、staff-affinityがUPとDOWNのどちらかである場合です。-
nonstaff-unrelatedstaff-spacing カレントの譜ではない行と
staff-affinityとは反対方向にある譜の間隔です – 2 つの間に他の譜ではない行が無く、staff-affinityがUPとDOWNのどちらかである場合です。これは、例えば、Lyrics行とLyricsが属していない譜との間のパディングを最小にする必要がある場合に使用される可能性があります。
StaffGrouper グラフィカル オブジェクトのプロパティ
通常、StaffGrouper プロパティは、StaffGroup レベル (あるいはそれと同等のレベル) で、\override を用いて調節します。
-
staff-staff-spacing カレントの譜グループ内部にある隣接する譜の間隔です。個々の譜の
VerticalAxisGroupグラフィカル オブジェクトのstaff-staff-spacingプロパティは、譜毎のスペース設定で上書きされる可能性があります。-
staffgroup-staff-spacing カレントの譜グループの最後の譜と、同じシステム内にあるすぐ下の譜の間隔です – 2 つの譜の間に 1 つ以上の譜ではない行 (
Lyrics等) が存在する場合であってもです。システムの最下段の譜には適用されません。個々の譜のVerticalAxisGroupグラフィカル オブジェクトのstaff-staff-spacingプロパティは、譜毎のスペース設定で上書きされる可能性があります。
参照
記譜法リファレンス:
可変な垂直方向の \paper スペース変数,
連想配列を変更する
インストールされているファイル: ‘ly/engraver-init.ly’, ‘scm/define-grobs.scm’
内部リファレンス: Contexts, VerticalAxisGroup, StaffGrouper
| [ << スペースの問題 ] | [トップ][目次][インデックス][ ? ] | [ デフォルトを変更する >> ] | ||
| [ < システム内部のスペース プロパティ ] | [ 上へ : システム内部の可変な垂直方向のスペース ] | [ グループ化されている譜のスペース > ] | ||
グループ化されていない譜のスペース
譜 (Staff, DrumStaff, TabStaff 等) は、1 つ以上のボイス コンテキストを保持することができ、他の譜を保持することはできないコンテキストです。
以下のプロパティは、グループ化されていない 譜のスペースに影響を与えます:
-
VerticalAxisGroupプロパティ:-
default-staff-staff-spacing -
staff-staff-spacing
-
これらのグラフィカル オブジェクト プロパティは、それぞれ上で説明しています。システム内部のスペース プロパティ を参照してください。
譜グループの一部である譜には、他にもプロパティがあります。グループ化されている譜のスペース を参照してください。
以下の例は、default-staff-staff-spacing プロパティがどのようにグループ化されていない譜のスペースに影響を与えるかを示しています。staff-staff-spacing に同じ上書きを適用すると同じ効果を持ちますが、譜がグループ化されている場合にも適用されます。
\layout { \context { \Staff \override VerticalAxisGroup.default-staff-staff-spacing = #'((basic-distance . 8) (minimum-distance . 7) (padding . 1)) } } << % 非常に低い位置にある音符は 'basic-distance が提供するよりも % 大きなスペースを必要とするため、この譜と次の譜の間隔は 'padding % によって決定されます。 \new Staff { b,2 r | } % ここでは、'basic-distance が十分なスペースを提供していて、 % ページ上にある他の要素のスペースを確保するためにスペースを % ('minimum-distance の値に向かって) 縮める必要はありません。 % そのため、この譜と次の譜の間隔は 'basic-distance によって % 決定されます。 \new Staff { \clef bass g2 r | } % 'padding に負の値を設定することにより、譜を重ねることができます。 % 'basic-distance が取り得る最小の値は 0 です。 \new Staff \with { \override VerticalAxisGroup.default-staff-staff-spacing = #'((basic-distance . 3.5) (padding . -10)) } { \clef bass g2 r | } \new Staff { \clef bass g2 r | } >>
![[image of music]](9e/lily-264c1dc7.png)
参照
インストールされているファイル: ‘scm/define-grobs.scm’
コード断片集: Spacing
内部リファレンス: VerticalAxisGroup
| [ << スペースの問題 ] | [トップ][目次][インデックス][ ? ] | [ デフォルトを変更する >> ] | ||
| [ < グループ化されていない譜のスペース ] | [ 上へ : システム内部の可変な垂直方向のスペース ] | [ 譜ではない行のスペース > ] | ||
グループ化されている譜のスペース
オーケストラ譜や他の大きな楽譜では、譜を譜ループ化することが一般的です。通常、グループ間のスペースは、同じグループの譜の間のスペースよりも大きくなります。
譜グループ (StaffGroup, ChoirStaff 等) は、同時進行する 1 つ以上の譜を保持することができるコンテキストです。
以下のプロパティは、譜グループの中にある譜のスペースに影響を与えます:
-
VerticalAxisGroupプロパティ:-
staff-staff-spacing
-
-
StaffGrouperプロパティ:-
staff-staff-spacing -
staffgroup-staff-spacing
-
これらのグラフィカル オブジェクト プロパティは、上で個々に説明しています。システム内部のスペース プロパティ を参照してください。
以下の例は、StaffGrouper グラフィカル オブジェクトのプロパティがどのようにグループ化された譜のスペースに影響を与えるかを示しています:
\layout { \context { \Score \override StaffGrouper.staff-staff-spacing.padding = #0 \override StaffGrouper.staff-staff-spacing.basic-distance = #1 } } << \new PianoStaff \with { \override StaffGrouper.staffgroup-staff-spacing.basic-distance = #20 } << \new Staff { c'1 } \new Staff { c'1 } >> \new StaffGroup << \new Staff { c'1 } \new Staff { c'1 } >> >>
![[image of music]](23/lily-d4009833.png)
参照
インストールされているファイル: ‘scm/define-grobs.scm’
コード断片集: Spacing
内部リファレンス: VerticalAxisGroup, StaffGrouper
| [ << スペースの問題 ] | [トップ][目次][インデックス][ ? ] | [ デフォルトを変更する >> ] | ||
| [ < グループ化されている譜のスペース ] | [ 上へ : システム内部の可変な垂直方向のスペース ] | [ 譜とシステムを明示的に配置する > ] | ||
譜ではない行のスペース
譜ではない行 (Lyrics, ChordNames 等) は、それが保持するレイアウト オブジェクトが譜のように譜刻される
(すなわち、システム内部の水平線上での譜刻) コンテキストです。具体的に言うと、譜ではない行は VerticalAxisGroup レイアウト オブジェクトを作成する譜ではないコンテキストです。
以下のプロパティが、譜ではない行のスペースに影響を与えいます:
-
VerticalAxisGroupプロパティ:-
staff-affinity -
nonstaff-relatedstaff-spacing -
nonstaff-nonstaff-spacing -
nonstaff-unrelatedstaff-spacing
-
これらのグラフィカル オブジェクト プロパティは、上で個々に説明しています。システム内部のスペース プロパティ を参照してください。
以下の例は、nonstaff-nonstaff-spacing プロパティがどのように隣接する譜ではない行のスペースに影響を与えるかを示しています。ここでは、stretchability キーに非常に大きな値を設定することにより、通常よりも歌詞が広がりやすくしています:
\layout { \context { \Lyrics \override VerticalAxisGroup.nonstaff-nonstaff-spacing.stretchability = #1000 } } \new StaffGroup << \new Staff \with { \override VerticalAxisGroup.staff-staff-spacing = #'((basic-distance . 30)) } { c'1 } \new Lyrics \with { \override VerticalAxisGroup.staff-affinity = #UP } \lyricmode { up } \new Lyrics \with { \override VerticalAxisGroup.staff-affinity = #CENTER } \lyricmode { center } \new Lyrics \with { \override VerticalAxisGroup.staff-affinity = #DOWN } \lyricmode { down } \new Staff { c'1 } >>
![[image of music]](63/lily-255cf8e4.png)
参照
インストールされているファイル: ‘ly/engraver-init.ly’, ‘scm/define-grobs.scm’
コード断片集: Spacing
内部リファレンス: Contexts, VerticalAxisGroup
| [ << スペースの問題 ] | [トップ][目次][インデックス][ ? ] | [ デフォルトを変更する >> ] | ||
| [ < 譜ではない行のスペース ] | [ 上へ : 垂直方向のスペース ] | [ 垂直方向の衝突回避 > ] | ||
4.4.2 譜とシステムを明示的に配置する
上で説明した可変な垂直方向のスペースの仕組みを理解する方法の 1 つに、譜とシステムの間の垂直方向のパティングの大きさを制御する設定をコレクションすることがあります。
NonMusicalPaperColumn #'line-break-system-details を用いて、垂直方向のスペースに別の方法でアプローチすることができます。可変な垂直方向のスペースの仕組みが垂直方向のパディングを指定するのに対して、NonMusicalPaperColumn #'line-break-system-details はページ上の垂直方向の位置を指定することができます。
NonMusicalPaperColumn #'line-break-system-details は
3 つ設定からなる連想配列を受け取ります:
-
X-offset -
Y-offset -
alignment-distances
以下の NonMusicalPaperColumn に対する上書きを含む、グラフィカル オブジェクトの上書きは、入力ファイルの中の 3 つの場所に配置することができます:
- 音符入力の途中に直接配置する
-
\contextブロックの中に配置する -
\withブロックの中に配置する
NonMusicalPaperColumn を上書きする場合、通常は \context ブロックや \with ブロックの中で\override コマンドを使用します。一方、音符入力の途中で NonMusicalPaperColumn を上書きする場合、特殊なコマンド \overrideProperty を使用します。ここで、特殊なコマンド \overrideProperty で
NonMusicalPaperColumn を上書きする例をいくつか挙げます:
\overrideProperty NonMusicalPaperColumn.line-break-system-details #'((X-offset . 20))
\overrideProperty NonMusicalPaperColumn.line-break-system-details #'((Y-offset . 40))
\overrideProperty NonMusicalPaperColumn.line-break-system-details #'((X-offset . 20)
(Y-offset . 40))
\overrideProperty NonMusicalPaperColumn.line-break-system-details #'((alignment-distances . (15)))
\overrideProperty NonMusicalPaperColumn.line-break-system-details #'((X-offset . 20)
(Y-offset . 40)
(alignment-distances . (15)))
これらの異なる設定がそれぞれどのように機能するのかを理解するために、まったく上書きを含まない例を見ることから始めます。
\header { tagline = ##f } \paper { left-margin = 0\mm } \book { \score { << \new Staff << \new Voice { s1*5 \break s1*5 \break s1*5 \break } \new Voice { \repeat unfold 15 { c'4 c' c' c' } } >> \new Staff { \repeat unfold 15 { d'4 d' d' d' } } >> } }
![[image of music]](1b/lily-03c967d6.png)
この楽譜は改行/改ページ情報を専用のボイスに孤立させています。この改行/改ページ用のボイスを作成するテクニックは、例がより複雑になっていくときに、レイアウトと音楽入力を分離することを助けてくれます。改行/改ページのために追加のボイスを使用する を参照してください。
明示的な \breaks は一様に音楽を 1 行あたり 5 小節に分割しています。垂直方向のスペースは LilyPond のデフォルトです。NonMusicalPaperColumn グラフィカル オブジェクトの
line-break-system-details 属性の中にある
Y-offset を設定することで、各システムの垂直方向の開始位置を設定することができます:
\header { tagline = ##f } \paper { left-margin = 0\mm } \book { \score { << \new Staff << \new Voice { \overrideProperty Score.NonMusicalPaperColumn.line-break-system-details #'((Y-offset . 0)) s1*5 \break \overrideProperty Score.NonMusicalPaperColumn.line-break-system-details #'((Y-offset . 40)) s1*5 \break \overrideProperty Score.NonMusicalPaperColumn.line-break-system-details #'((Y-offset . 80)) s1*5 \break } \new Voice { \repeat unfold 15 { c'4 c' c' c' } } >> \new Staff { \repeat unfold 15 { d'4 d' d' d' } } >> } }
![[image of music]](52/lily-9426b20c.png)
line-break-system-details は潜在的に多くの値を持つ連想リストをとりますが、ここでは値を 1 つだけしかセットしていないということに注意してください。また、ここでは Y-offset プロパティは、各システムがページに描画される垂直方向の位置を決定しているということにも注意してください。
これまでに各システムの垂直方向の開始位置を明示的に設定しましたが、各システム内部の各譜の垂直方向の開始位置を手動で設定することも可能です。line-break-system-details のサブプロパティ alignment-offsets を用います。
\header { tagline = ##f } \paper { left-margin = 0\mm } \book { \score { << \new Staff << \new Voice { \overrideProperty Score.NonMusicalPaperColumn.line-break-system-details #'((Y-offset . 20) (alignment-distances . (15))) s1*5 \break \overrideProperty Score.NonMusicalPaperColumn.line-break-system-details #'((Y-offset . 60) (alignment-distances . (15))) s1*5 \break \overrideProperty Score.NonMusicalPaperColumn.line-break-system-details #'((Y-offset . 100) (alignment-distances . (15))) s1*5 \break } \new Voice { \repeat unfold 15 { c'4 c' c' c' } } >> \new Staff { \repeat unfold 15 { d'4 d' d' d' } } >> } }
![[image of music]](c4/lily-c43c1e06.png)
ここでは NonMusicalPaperColumn グラフィカル オブジェクトのline-break-system-details 属性に 2 つの値を代入しているということに注意してください。line-break-system-details 属性の連想配列はもっと多くのスペース パラメータ
(例えば、Y-offset ペアに相当する X-offset ペア)
を受け付けますが、システムと譜の垂直方向の開始地点を制御するのに必要な設定は、Y-offset ペアと alignment-offsets ペアだけです。
最後に、alignment-offsets は譜の垂直方向の位置を指定するのであり、譜グループの位置を指定するわけではないということに注意してください。
\header { tagline = ##f } \paper { left-margin = 0\mm } \book { \score { << \new Staff << \new Voice { \overrideProperty Score.NonMusicalPaperColumn.line-break-system-details #'((Y-offset . 0) (alignment-distances . (30 10))) s1*5 \break \overrideProperty Score.NonMusicalPaperColumn.line-break-system-details #'((Y-offset . 60) (alignment-distances . (10 10))) s1*5 \break \overrideProperty Score.NonMusicalPaperColumn.line-break-system-details #'((Y-offset . 100) (alignment-distances . (10 30))) s1*5 \break } \new Voice { \repeat unfold 15 { c'4 c' c' c' } } >> \new StaffGroup << \new Staff { \repeat unfold 15 { d'4 d' d' d' } } \new Staff { \repeat unfold 15 { e'4 e' e' e' } } >> >> } }
![[image of music]](57/lily-546684d7.png)
考慮すべき点がいくつかあります:
-
alignment-offsetsを使用する場合、歌詞と他の譜ではない行は譜としてカウントされません。 -
X-offset,Y-offsetそれにalignment-offsetsに渡される数の単位は、譜線間隔の乗数と解釈されます。正の値は譜と歌詞を下または右に移動させ、負の値は譜と歌詞を上または左に移動させます。 - ここで扱った
NonMusicalPaperColumn #'line-break-system-details設定は譜とシステムを任意の場所に配置することを可能にするため、紙面領域やマージン領域を犯したり、他の譜やシステムの上に譜刻する可能性さえあります。これらの設定に適切な値を渡すことで、そのようなことは避けられます。
参照
コード断片集: Spacing
| [ << スペースの問題 ] | [トップ][目次][インデックス][ ? ] | [ デフォルトを変更する >> ] | ||
| [ < 譜とシステムを明示的に配置する ] | [ 上へ : 垂直方向のスペース ] | [ 水平方向のスペース > ] | ||
4.4.3 垂直方向の衝突回避
直観的に、音楽記譜には譜に属するオブジェクトと、譜の外側に配置されるべきオブジェクトがあります。譜の外側に属するオブジェクトには、リハーサル記号、テキスト、それに強弱記号などがあります (これからは、それらを譜外部オブジェクトと呼びます)。LilyPond が譜外部オブジェクトの垂直方向の配置を決定するとき、譜外部オブジェクトをできる限り譜の近くに、しかしながら、他のオブジェクトと衝突しない程度の近さに配置します。
LilyPond は outside-staff-priority プロパティを用いてあるグラフィカル オブジェクトが譜外部オブジェクトかどうかを決定します:
outside-staff-priority が数であれば、そのグラフィカル オブジェクトは譜外部オブジェクトです。さらに、outside-staff-priority は LilyPond に、そのグラフィカル オブジェクトを配置する順番を教えてくれます。
まず最初にに、LilyPond は譜外部オブジェクトには属さないオブジェクトをすべて配置します。次に、譜外部オブジェクトを outside-staff-priority に従って
(昇順に) ソートします。LilyPond は譜外部オブジェクトを、既に配置済みのオブジェクトと衝突しないよう、一つずつ配置していきます。つまり、2 つの譜外部オブジェクトが同じスペースをめぐって競合する場合、より小さな outside-staff-priority を持つオブジェクトが譜の近くに配置されます。
c4_"Text"\pp r2. \once \override TextScript.outside-staff-priority = #1 c4_"Text"\pp % ここでは、テキストが譜の近くに配置されます r2. % outside-staff-priority に数ではない値を設定することにより、 % 自動衝突回避を無効にします \once \override TextScript.outside-staff-priority = ##f \once \override DynamicLineSpanner.outside-staff-priority = ##f c4_"Text"\pp % ここでは、2 つのオブジェクトが衝突します
![[image of music]](24/lily-12034a24.png)
ある譜外部オブジェクトとその前に配置されたグラフィカル オブジェクトとの間にある垂直方向のパディングは、outside-staff-padding で制御することができます。
\once \override TextScript.outside-staff-padding = #0 a'^"このテキストは音符のすぐ近くに配置されます。" \once \override TextScript.outside-staff-padding = #3 c^"このテキストは前のテキストから離れた位置に配置されます" c^"この手キスとは前にテキストの近くに配置されます"
![[image of music]](4e/lily-40f5197a.png)
デフォルトでは、譜外部オブジェクトの配置は、配置済みのグラフィカル オブジェクトとの水平方向の衝突回避だけを考慮します。このことは、オブジェクト同士が水平方向に非常に近く配置される状況を招く可能性があります。譜の垂直方向の間隔を設定した場合も、譜外部オブジェクトが挟み込まれる可能性があります。outside-staff-horizontal-padding を設定すると、オブジェクトは垂直方向にずれるため、そのような状況は起こらなくなります。
% マークアップは後に続く音符に近寄りすぎています c4^"Text" c4 c''2 % outside-staff-horizontal-padding を設定することで修正します R1 \once \override TextScript.outside-staff-horizontal-padding = #1 c,,4^"Text" c4 c''2
![[image of music]](14/lily-f0b8bb73.png)
参照
コード断片集: Spacing
| [ << スペースの問題 ] | [トップ][目次][インデックス][ ? ] | [ デフォルトを変更する >> ] | ||
| [ < 垂直方向の衝突回避 ] | [ 上へ : スペースの問題 ] | [ 水平方向のスペースの概要 > ] | ||
4.5 水平方向のスペース
| 4.5.1 水平方向のスペースの概要 | ||
| 4.5.2 新しいスペース領域 | ||
| 4.5.3 水平方向のスペースを変更する | ||
| 4.5.4 行の長さ | ||
| 4.5.5 プロポーショナル ノーテーション |
| [ << スペースの問題 ] | [トップ][目次][インデックス][ ? ] | [ デフォルトを変更する >> ] | ||
| [ < 水平方向のスペース ] | [ 上へ : 水平方向のスペース ] | [ 新しいスペース領域 > ] | ||
4.5.1 水平方向のスペースの概要
スペース エンジンは異なる演奏時間を異なる長さの可変距離 (‘スプリング’) に翻訳します。長い演奏時間はより多くのスペースをとり、短い演奏時間はより少ないスペースをとります。最短の演奏時間は固定量のスペース
(これは
SpacingSpanner オブジェクトの中にある
shortest-duration-space によって制御されます)
をとります。演奏時間が長くなるほど、より多くのスペースをとります:
演奏時間が倍になると、固定量のスペース
(これは spacing-increment によって制御されます)
がその音符に付け加えられます。
例えば、以下の楽曲には多くの 2 分音符、4 分音符、それに 8 分音符が含まれています。 8 分音符の後には符頭幅 (NHW) 1 つ分が挿入されます。4 分音符の後には 2 NHW が挿入され、2 分音符の後には 3 NHW が挿入されます。
c2 c4. c8 c4. c8 c4. c8 c8 c8 c4 c4 c4
![[image of music]](a7/lily-a704cf7c.png)
通常、spacing-increment は 1.2 譜スペースに設定されています。これは符頭の幅とだいたい同じです。さらに、shortest-duration-space は 2.0 に設定されています。つまり、最短の音符は 2.4 譜スペース (spacing-increment の 2 倍) の水平方向のスペースをとります。このスペースはシンボルの左端からカウントされます。そのため、最短の音符の後には一般に 1 NHW のスペースが挿入されます。
上記の手順に正確に従った場合、8 分音符や 16 分音符を含む楽譜に 32 分音符を 1 つ付け加えると、楽譜全体が大きく引き伸ばされます。最短の音符はもはや 16 分音符ではなく、32 分音符であり、それぞれの 16 分音符に 1 NHW が付け加えられます。このことを防ぐため、スペースをとるための最短の演奏時間を、その楽譜の中にある最短の音符ではなく、最も頻繁に出現する音符とします。
最も共通する最短演奏時間は以下のように決定されます:
各小節において、最短の演奏時間が決定されます。スペースの基本として、最も共通する最短演奏時間が選択されます。条件として、この最短演奏時間は常に 8 分音符以上の長さになります。lilypond を ‘--verbose’ オプションを付けて実行すると、最短演奏時間が表示されます。
この演奏時間はカスタマイズすることもできます。
SpacingSpanner の中にある common-shortest-duration を設定した場合、スペースのための基本演奏時間が設定されれます。この基本演奏時間の最大値 (通常、8 分音符) は、base-shortest-duration によって設定されます。
共通の最短音符よりも短い音符の後には、その音符の演奏時間と共通の最短音符の演奏時間の比を反映したスペースが付けられます。そのため、上記の例に 16 分音符を数個付け加えた場合、16 分音符の後には NHW の半分の幅のスペースが付けられます:
c2 c4. c8 c4. c16[ c] c4. c8 c8 c8 c4 c4 c4
![[image of music]](03/lily-87b4a3d1.png)
Essay on automated music engraving において、符幹の向きはスペースに影響を与えるということを説明しました
(
Optical spacing を参照してください)。これは、
NoteSpacing オブジェクトの中にある
stem-spacing-correction プロパティによって制御されます。このオブジェクトは
Voice コンテキストごとに生成されます。StaffSpacing オブジェクト
(
Staff コンテキストの中で生成されます)
は、符幹/小節線のスペースを制御するために、同様のプロパティを保持します。以下の例は、それらプロパティによる修正の様子を示しています。
前半はデフォルト設定による修正であり、後半は修正を誇張しています:
![[image of music]](d9/lily-47cfc451.png)
プロポーショナル ノーテーション (proportional notation) がサポートされます。プロポーショナル ノーテーション を参照してください。
参照
Essay on automated music engraving: Optical spacing
コード断片集: Spacing
内部リファレンス: SpacingSpanner, NoteSpacing, StaffSpacing, NonMusicalPaperColumn
既知の問題と警告
スペースを手動で上書きするための、手軽な仕組みはありません。余分なスペースを楽譜に挿入するために、以下の手段があります – 必要に応じて、パディングの値を調整しています。
\override Score.NonMusicalPaperColumn.padding = #10
スペースを減らすための手段はありません。
| [ << スペースの問題 ] | [トップ][目次][インデックス][ ? ] | [ デフォルトを変更する >> ] | ||
| [ < 水平方向のスペースの概要 ] | [ 上へ : 水平方向のスペース ] | [ 水平方向のスペースを変更する > ] | ||
4.5.2 新しいスペース領域
newSpacingSection を用いることで、異なるスペース パラメータを持つ新しいセクションを開始することができます。これは、音符の長さに関して異なる概念を持つセクションがある場合に、有用です。
以下の例では、拍子記号が新たしいセクションを導入しています。その結果、16 分音符の間隔が広くなっています。
\relative c' { \time 2/4 c4 c8 c c8 c c4 c16[ c c8] c4 \newSpacingSection \time 4/16 c16[ c c8] }
![[image of music]](97/lily-6f59ed97.png)
\newSpacingSection コマンドは新たに
SpacingSpanner オブジェクトを作成します。そのため、その場所で新たに \override が使用される可能性があります。
参照
コード断片集: Spacing
内部リファレンス: SpacingSpanner
| [ << スペースの問題 ] | [トップ][目次][インデックス][ ? ] | [ デフォルトを変更する >> ] | ||
| [ < 新しいスペース領域 ] | [ 上へ : 水平方向のスペース ] | [ 行の長さ > ] | ||
4.5.3 水平方向のスペースを変更する
水平方向のスペースを、base-shortest-duration で変更することができます。ここで、同じ音楽を比較します。1 つではこのプロパティを変更せず、もう 1 つでは変更します。ly:make-moment の値が大きくなると、楽譜は小さくなります。ly:make-moment は演奏時間を構成するため、1 4 は 1 16 よりも長い演奏時間であるということに注意してください。
\score {
\relative {
g'4 e e2 | f4 d d2 | c4 d e f | g4 g g2 |
g4 e e2 | f4 d d2 | c4 e g g | c,1 |
d4 d d d | d4 e f2 | e4 e e e | e4 f g2 |
g4 e e2 | f4 d d2 | c4 e g g | c,1 |
}
}
![[image of music]](3a/lily-2e1c15e2.png)
\score {
\relative {
g'4 e e2 | f4 d d2 | c4 d e f | g4 g g2 |
g4 e e2 | f4 d d2 | c4 e g g | c,1 |
d4 d d d | d4 e f2 | e4 e e e | e4 f g2 |
g4 e e2 | f4 d d2 | c4 e g g | c,1 |
}
\layout {
\context {
\Score
\override SpacingSpanner.base-shortest-duration = #(ly:make-moment 1/16)
}
}
}
![[image of music]](e4/lily-23a07b57.png)
Selected Snippets
デフォルトでは、連符のスペースは演奏時間とは関係の無い要素
(臨時記号、音部記号の変化など)
に依存します。そのような記号を無視して、同じ演奏時間に等しいスペースを割り当てるには、Score.SpacingSpanner #'uniform-stretching を使用します。このプロパティは、楽譜の先頭でのみ、変更することができます。
\score { << \new Staff { \tuplet 5/4 { c8 c8 c8 c8 c8 } c8 c8 c8 c8 } \new Staff { c8 c8 c8 c8 \tuplet 5/4 { c8 c8 c8 c8 c8 } } >> \layout { \context { \Score \override SpacingSpanner.uniform-stretching = ##t } } }
![[image of music]](ba/lily-4aee2a41.png)
strict-note-spacing がセットされている場合、音部記号、小節線、それに装飾小音符を考慮せずに、音符にスペースが割り当てられます。
\override Score.SpacingSpanner.strict-note-spacing = ##t \new Staff { c8[ c \clef alto c \grace { c16 c } c8 c c] c32[ c32] }
![[image of music]](ca/lily-295c663e.png)
参照
コード断片集: Spacing
| [ << スペースの問題 ] | [トップ][目次][インデックス][ ? ] | [ デフォルトを変更する >> ] | ||
| [ < 水平方向のスペースを変更する ] | [ 上へ : 水平方向のスペース ] | [ プロポーショナル ノーテーション > ] | ||
4.5.4 行の長さ
スペースに影響を与える最も基本的な設定は、indent と line-width です。これらは \layout ブロックの中で設定されます。これらの設定は、楽譜の最初の行のインデントと、行の長さを制御します。
\layout ブロックの中で ragged-right が真にセットされている場合、システムは行全体を埋めるように水平方向に引き伸ばされず、本来の長さで終了します。これは、小さな楽譜の場合や、本来のスペースがどれくらいの密度なのかをチェックする場合に有用です。通常のデフォルト設定は偽ですが、1 つしかシステムを持たない楽譜の場合のデフォルト値は真です。
ragged-last オプションは ragged-right に似ていますが、楽曲の最後の行だけに影響を与えます。最後の行には、何の制限も加えられません。この結果は、文章の段落をフォーマットする場合と同じです。文章の段落において、最後の行は単純にそのままの長さにフォーマットされます。
\layout {
indent = #0
line-width = #150
ragged-last = ##t
}
参照
コード断片集: Spacing
| [ << スペースの問題 ] | [トップ][目次][インデックス][ ? ] | [ デフォルトを変更する >> ] | ||
| [ < 行の長さ ] | [ 上へ : 水平方向のスペース ] | [ 音楽を少ないページに収める > ] | ||
4.5.5 プロポーショナル ノーテーション
LilyPond はプロポーショナル ノーテーションをサポートします。この記譜法では、各音符は演奏時間に相当する水平方向のスペースをとります。このタイプの水平スペースは、方眼紙上の水平方向スペースと同等です。20 世紀後半、21 世紀前半の楽譜の中には、複雑なリズムをわかりやすく示すため、あるいは、時間軸や他の図の配置を容易にするために、プロポーショナル ノーテーションを使っているものがあります。
LilyPond はプロポーショナル ノーテーション用に 5 つの設定をサポートします。それらの設定は一緒に使われることもありますし、単独で使われることもあります:
-
proportionalNotationDuration -
uniform-stretching -
strict-note-spacing -
\remove "Separating_line_group_engraver" -
\override PaperColumn.used = ##t
以下の例では、これら 5 つのプロポーショナル ノーテーション用の設定を見ていき、それらがどのように相互に作用するかを調べます。
以下のような 1 小節の例から始めます。これは、ragged-right が ON であり、クラシック音楽でのスペースを使用します。
\score { << \new RhythmicStaff { c'2 c'16 c'16 c'16 c'16 \tuplet 5/4 { c'16 c'16 c'16 c'16 c'16 } } >> }
![[image of music]](c5/lily-27dc2511.png)
小節の始まりに配置された 2 分音符がその小節で占める水平方向のスペースは、半分よりもずっと少ないということに注意してください。そのため、小節の後半に配置された 16 分音符と、16 分音符からなる 5 連符 (すなわち、20 分音符) がその小節で占める水平方向のスペースは、半分よりもずっと多くなっています。
クラシック音楽の譜刻では、このスペースのとり方が望ましいかもしれません。なぜなら、2 分音符から水平方向のスペースを借りてきて、小節全体としてスペースを維持することができるからです。
他方で、時間軸や他の図を楽譜の上または下に挿入しようとした場合、プロポーショナル ノーテーションが必要になります。proportionalNotationDuration 設定でプロポーショナル ノーテーションを有効にします。
\score { << \new RhythmicStaff { c'2 c'16 c'16 c'16 c'16 \tuplet 5/4 { c'16 c'16 c'16 c'16 c'16 } } >> \layout { \context { \Score proportionalNotationDuration = #(ly:make-moment 1/20) } } }
![[image of music]](c7/lily-99a783ed.png)
今度は、小節の前半に配置された 2 分音符と、後半に配置された短い音符の集まりが占める水平方向のスペースは等しくなりました。これで、この例の上または下に、時間軸や他の図を配置することが可能になりました。
proportionalNotationDuration 設定は、Score の中にあるコンテキスト設定です。入力ファイルの中でコンテキスト設定が出現するのは、3 つの場所のどれかだということを思い出してください
– \with ブロックの中、\context ブロックの中、あるいは、\set コマンドを前に置いた形で音楽エントリの中に直接配置します。他のすべてのコンテキスト設定と同様に、ユーザはこれら 3 つの場所のどれか 1 つを選択して、そこで proportionalNotationDuration をセットすることができます。
proportionalNotationDuration 設定は引数を 1 つとります。これはすべての音楽要素へのスペースに関係する参照演奏時間です。LilyPond Scheme 関数 make-moment は 2 つの引数をとります
– 全音符の分数を表す分子と分母です。それゆえ、(ly:make-moment 1/20) という呼び出しは、20 分音符の参照演奏時間となります。(ly:make-moment 1/16), (ly:make-moment 1/8), それに
(ly:make-moment 3/97) という値はすべてとり得る値です。
では、どのように proportionalNotationDuration に渡す適切な参照演奏時間を決めるのでしょうか?通常、その楽曲の最速 (あるいは最小) の演奏時間に近い演奏時間から始めて、トライ&エラーで決めます。小さな参照演奏時間にすると疎な楽譜となり、大きな参照演奏時間にすると密な楽譜になります。
\score { << \new RhythmicStaff { c'2 c'16 c'16 c'16 c'16 \tuplet 5/4 { c'16 c'16 c'16 c'16 c'16 } } >> \layout { \context { \Score proportionalNotationDuration = #(ly:make-moment 1/8) } } } \score { << \new RhythmicStaff { c'2 c'16 c'16 c'16 c'16 \tuplet 5/4 { c'16 c'16 c'16 c'16 c'16 } } >> \layout { \context { \Score proportionalNotationDuration = #(ly:make-moment 1/16) } } } \score { << \new RhythmicStaff { c'2 c'16 c'16 c'16 c'16 \tuplet 5/4 { c'16 c'16 c'16 c'16 c'16 } } >> \layout { \context { \Score proportionalNotationDuration = #(ly:make-moment 1/32) } } }
![[image of music]](f7/lily-ba3436a2.png)
8 分音符以上などのようなあまりにも大きな演奏時間にすると、楽譜が密になりすぎて、符頭の衝突が発生する可能性があるということに注意してください。さらに、一般にプロポーショナル ノーテーションはクラシック音楽のスペースよりも多くの水平方向スペースをとるということに注意してください。プロポーショナル ノーテーションは、多くの水平方向スペースを使うことで、明快なリズムを提供します。
次に、重複する連符に最適なスペースを割り当てる方法を検証します。
まず、クラシック音楽のスペースで、異なるタイプの連符を付け加えたときに、何が起こるかを見ていきます。
\score { << \new RhythmicStaff { c'2 c'16 c'16 c'16 c'16 \tuplet 5/4 { c'16 c'16 c'16 c'16 c'16 } } \new RhythmicStaff { \tuplet 9/8 { c'8 c'8 c'8 c'8 c'8 c'8 c'8 c'8 c'8 } } >> }
![[image of music]](4a/lily-e908712b.png)
このスペースのとり方は良くありません。なぜなら、下の譜の音符の間隔が一様ではないからです。クラシック音楽の譜刻には複雑な連符はほとんど含まれないため、クラシック音楽の譜刻規則はこのような結果を生み出す可能性があります。proportionalNotationDuration を設定することにより、この状況はかなり修正されます。
\score { << \new RhythmicStaff { c'2 c'16 c'16 c'16 c'16 \tuplet 5/4 { c'16 c'16 c'16 c'16 c'16 } } \new RhythmicStaff { \tuplet 9/8 { c'8 c'8 c'8 c'8 c'8 c'8 c'8 c'8 c'8 } } >> \layout { \context { \Score proportionalNotationDuration = #(ly:make-moment 1/20) } } }
![[image of music]](9e/lily-0503154f.png)
しかしながら、注意深く見ると、9 連符の後半の音符の間隔が、前半の音符の間隔よりもわずかに広くなっています。間隔を一様にするため、SpacingSpanner のプロパティである
uniform-stretching を ON にします。
\score { << \new RhythmicStaff { c'2 c'16 c'16 c'16 c'16 \tuplet 5/4 { c'16 c'16 c'16 c'16 c'16 } } \new RhythmicStaff { \tuplet 9/8 { c'8 c'8 c'8 c'8 c'8 c'8 c'8 c'8 c'8 } } >> \layout { \context { \Score proportionalNotationDuration = #(ly:make-moment 1/20) \override SpacingSpanner.uniform-stretching = ##t } } }
![[image of music]](6e/lily-8d5eb31a.png)
今度は、適切にスペースが割り当てられました。リズムは視覚的に明快になり、必要があれば時間軸や図を挿入することができます。
LilyPond のプロポーショナル ノーテーション パッケージは、すべてのプロポーショナルな楽譜は SpacingSpanner の
'uniform-stretching 属性が ##t に設定されているものと見なします。SpacingSpanner の 'uniform-stretching 属性が ##t
に設定されずに、proportionalNotationDuration が設定されると、例えば、スキップ (空白音符) の水平方向のスペースが適切に割り当てられません。
SpacingSpanner は Score コンテキストの中にある抽象的なグラフィカル オブジェクトです。proportionalNotationDuration の設定と一緒に、SpacingSpanner をオーバライドする場所は、入力ファイルの 3 つの場所のいずれかになります
– Score \with ブロックの中、Score \context ブロックの中、あるいは音符入力の場所に直接配置するかです。
デフォルトでは、Score ごとに SpacingSpanner が 1 つあります。つまり、デフォルトでは、uniform-stretching は楽譜全体で ON であるか、OFF であるかのどちらかであるということです。しかしながら、この振る舞いをオーバライドして、楽譜内の異なる場所で異なるスペース機能を設定することができます。これを実現するには、コマンド \newSpacingSection を用います。更なる情報は、新しいスペース領域 を参照してください。
次に、Separating_line_group_engraver の効果を検証し、なぜプロポーショナルな楽譜は頻繁にこのエングラーバを削除するのかを見ていきます。以下の例は、各システムの最初の音符の直前に小さな “前置きの” スペースがあることを示しています。
\paper { indent = #0 } \new Staff { c'1 \break c'1 }
![[image of music]](b1/lily-bf557bf5.png)
この前置きのスペースの量は、前にあるのが拍子記号、調号、あるいは音部記号のいずれであっても、同じです。Separating_line_group_engraver はこのスペースに責任を負います。Separating_line_group_engraver を削除すると、このスペースはゼロになります。
\paper { indent = #0 } \new Staff \with { \remove "Separating_line_group_engraver" } { c'1 \break c'1 }
![[image of music]](6a/lily-0e5e9f2a.png)
拍子記号、調号、音部記号、それに臨時記号のような非音楽要素は、プロポーショナル ノーテーションでは問題になります。これらはすべて演奏時間を持ちません。しかしながら、これらはすべて水平方向のスペースを消費します。この問題に対して、プロポーショナルな楽譜はいくつかの異なるアプローチをとります。
調号のスペースの問題は、調号を持たないことで回避できるかもしれません。これは有効な選択肢です。なぜなら、たいていのプロポーショナルな楽譜は現代音楽だからです。拍子記号についても同じことが言えるかもしれません。時間軸や他の図を持つ楽譜であれば特にそうです。しかしながら、そのような楽譜は例外的なものであり、たいていのプロポーショナルな楽譜は少なくともいくつかの拍子記号を持ちます。さらに、音部記号と臨時記号はより必須のものです。
それでは、プロポーショナルなコンテキストにおける非音楽要素のスペースに対してどのような解決法が存在するのでしょうか?とり得る選択肢の 1 つに、SpacingSpanner の strict-note-spacing
プロパティがあります。以下の 2 つの楽譜を比べてください:
\new Staff { \set Score.proportionalNotationDuration = #(ly:make-moment 1/16) c''8 c''8 c''8 \clef alto d'8 d'2 } \new Staff { \set Score.proportionalNotationDuration = #(ly:make-moment 1/16) \override Score.SpacingSpanner.strict-note-spacing = ##t c''8 c''8 c''8 \clef alto d'8 d'2 }
![[image of music]](d3/lily-511490ca.png)
どちらの楽譜もプロポーショナルです。しかしながら、最初の楽譜は音部変更があるため広がりすぎています。2 番目の楽譜は、strict-note-spacing を ON にしているため、プロポーショナルな間隔を維持しています。strict-note-spacing を ON にすると、拍子記号、調号、音部記号、それに臨時記号の幅は、スペース アルゴリズムの中で何の役割も果たさなくなります。
この設定に加えて、他にもプロポーショナルな楽譜で頻出する設定があります。以下のような設定です:
-
\override SpacingSpanner.strict-grace-spacing = ##t -
tupletFullLength = ##t -
\override Beam.breakable = ##t -
\override Glissando.breakable = ##t -
\override TextSpanner.breakable = ##t -
\remove "Forbid_line_break_engraver" in the Voice context
これらの設定は、装飾小音符のスペースを厳密にし、連譜の囲みをリズム的な開始点、終了点まで拡張し、(連桁のような) 広がりを持つ要素が、システムやページが改まるときに中断されることを許可します。これらの設定について、本書の関連パートを参照してください。
参照
記譜法リファレンス: 新しいスペース領域
コード断片集: Spacing
| [ << スペースの問題 ] | [トップ][目次][インデックス][ ? ] | [ デフォルトを変更する >> ] | ||
| [ < プロポーショナル ノーテーション ] | [ 上へ : スペースの問題 ] | [ スペースを表示する > ] | ||
4.6 音楽を少ないページに収める
ときどき、譜の 1 つ、2 つが 2 番目 (あるいは、3 番目、4 番目…) のページに配置されてしまうことがあります。これは腹立たしいことです – 特に、前のページに十分なスペースがあるように見える場合は。
レイアウトの問題を解決しようとしている時、annotate-spacing は何にも代え難いツールです。このコマンドはさまざまなレイアウト スペース変数の値を表示します。詳細は以下のセクション スペースを表示する を参照してください。
| 4.6.1 スペースを表示する | ||
| 4.6.2 スペースを変更する |
| [ << スペースの問題 ] | [トップ][目次][インデックス][ ? ] | [ デフォルトを変更する >> ] | ||
| [ < 音楽を少ないページに収める ] | [ 上へ : 音楽を少ないページに収める ] | [ スペースを変更する > ] | ||
4.6.1 スペースを表示する
ページ フォーマットのために変更される可能性がある、垂直方向のレイアウト変数の値を表示させるには、\paper ブロックの中で annotate-spacing をセットします:
#(set-default-paper-size "a6" 'landscape) \book { \score { { c4 } } \paper { annotate-spacing = ##t } }
![[image of music]](a5/lily-c5e861c3.png)
すべてのレイアウト値は、\paper ブロックや \layout ブロックの中で指定された単位とは無関係に、譜スペースで表示されます。上の例では、paper-height の値は 59.75 譜スペース であり、staff-size は 20 ポイント (デフォルト値) です。以下のことに注意してください:
| 1 ポイント | = (25.4/72.27) mm |
| 1 譜スペース | = (staff-size)/4 ポイント |
= (staff-size)/4 * (25.4/72.27) mm |
この場合、1 譜スペースは約 1.757mm です。それゆえ、59.75 譜スペースである paper-height は 105mm であり、横置きの A6 紙の高さと同じです。ペア (a,b) は間隔を表します。a は間隔の下端を、b は上端を表します。
参照
記譜法リファレンス: 譜サイズを設定する
コード断片集: Spacing
| [ << スペースの問題 ] | [トップ][目次][インデックス][ ? ] | [ デフォルトを変更する >> ] | ||
| [ < スペースを表示する ] | [ 上へ : 音楽を少ないページに収める ] | [ デフォルトを変更する > ] | ||
4.6.2 スペースを変更する
annotate-spacing の出力は、垂直方向のレイアウト変数の値を詳細に取得します。マージンや他のレイアウト変数を変更することについての詳細は、ページ レイアウト を参照してください。
マージン以外にも、スペースを節約するための選択肢がいくつかあります:
-
(1 ページにできるだけ多くのシステムを収めるために)
スペースがある限り、システムを可能な限り近寄せる。それにより、ページの下部に空きスペースが無くなります。
\paper { system-system-spacing = #'((basic-distance . 0.1) (padding . 0)) ragged-last-bottom = ##f ragged-bottom = ##f } -
システム数を設定する。これは 2 つの意味でスペースを節約します。システム数を設定することで、たとえそれがデフォルト値であっても、各ページにより多くのシステムを収めることができる場合があります。なぜなら、見積もりのステップが迂回され、より正確な適合が得られるからです。さらに、システム数を減らすことで、より多くのページを節約できる場合があります。例えば、デフォルトのレイアウトが 11 システムである場合、以下の指定により、レイアウトは強制的に 10 システムに収められます。
\paper { system-count = #10 } -
強制的にページ数を設定する。例えば、以下の設定は強制的に 2 ページにレイアウトさせます。
\paper { page-count = #2 } -
オブジェクトがシステムの垂直方向のサイズを増加させるのを避ける
(あるいは減らす)。例えば、volta リピート (または、差し替えの繰り返し) は余分なスペースを必要とします。これらの繰り返しが 2 つのシステムに広がっている場合、1 システムが volta リピートを持ち、もう 1 システムが volta リピートを持たない場合よりも多くのスペースをとります。別の例では、システムから突き出ている強弱記号を譜に近づけることで、スペースを節約することができます:
e4 c g\f c e4 c g-\tweak X-offset #-2.7 -\tweak Y-offset #2.5 \f c
![[image of music]](7f/lily-dfec33d6.png)
-
SpacingSpanner経由で水平方向のスペースを変更する。詳細は、水平方向のスペースを変更する を参照してください。以下の例は、デフォルトをスペースを示しています:\score { \relative { g'4 e e2 | f4 d d2 | c4 d e f | g4 g g2 | g4 e e2 | } }![[image of music]](fe/lily-0ce56e46.png)
次の例では、
common-shortest-durationの値を1/4から1/2に変更しています。この例では、4 分音符が最も共通で、最短の演奏時間です。そのため、common-shortest-durationを長くすることで ‘詰め込む’ 効果を得られます:\score { \relative { g'4 e e2 | f4 d d2 | c4 d e f | g4 g g2 | g4 e e2 | } \layout { \context { \Score \override SpacingSpanner.common-shortest-duration = #(ly:make-moment 1/2) } } }![[image of music]](90/lily-f0bd39ce.png)
common-shortest-durationプロパティを動的に変更することはできません。そのため、このプロパティは常に\contextブロックの中に配置して、楽譜全体に適用されるようにする必要があります。
参照
記譜法リファレンス: ページ レイアウト, 水平方向のスペースを変更する
コード断片集: Spacing
| [ << スペースの問題 ] | [トップ][目次][インデックス][ ? ] | [ Notation manual tables >> ] | ||
| [ < スペースを変更する ] | [ 上へ : Top ] | [ コンテキストを理解する > ] | ||
5. デフォルトを変更する
LilyPond はデフォルトで最高品質の出力を提供できるよう設計されています。それにもかかわらず、デフォルトのレイアウトを変更する必要が発生する場合もあります。レイアウトは、‘プロパティ’ と呼ばれる多数の ‘つまみとスイッチ’ によって制御されています。これらのプロパティにアクセスし、変更するための手引は学習マニュアルの中にあります – 出力を調整する を参照してください。まずはこれを読むべきです。本章は同様の内容をカバーしていますが、よりリファレンス マニュアルに適したスタイルで提供します。
調整のために利用できる制御の定義についての説明は、別のドキュメントの中にあります: 内部リファレンス です。このマニュアルは利用可能なすべての変数、関数、それにオプションをリストアップしています。これは HTML ドキュメントとして記述されていて、オンライン で入手可能であり、LilyPond ドキュメント パッケージにも含まれています。
内部的には、LilyPond は Scheme (LISP 派生語) を用いて機能を提供しています。レイアウトについての決定をオーバライドすることは、プログラムの内部にアクセスすることであり、Scheme 入力が必要になります。Scheme の要素は、.ly の中で、ハッシュ記号 # を付けて記述します。1
| 5.1 コンテキストを理解する | ||
| 5.2 内部リファレンスの説明 | ||
| 5.3 プロパティを変更する | ||
| 5.4 役に立つコンセプトとプロパティ | ||
| 5.5 高度な調整 | ||
| 5.6 音楽関数を使用する |
| [ << デフォルトを変更する ] | [トップ][目次][インデックス][ ? ] | [ Notation manual tables >> ] | ||
| [ < デフォルトを変更する ] | [ 上へ : デフォルトを変更する ] | [ コンテキストの説明 > ] | ||
5.1 コンテキストを理解する
このセクションでは、コンテキストとは何なのか、それをどのように変更するのかについて説明します。
| 5.1.1 コンテキストの説明 | ||
| 5.1.2 コンテキストを作成して参照する | ||
| 5.1.3 コンテキストを残しておく | ||
| 5.1.4 コンテキストのプラグインを変更する | ||
| 5.1.5 コンテキストのデフォルト設定を変更する | ||
| 5.1.6 新しいコンテキストを定義する | ||
| 5.1.7 コンテキストの配置順序 |
参照
学習マニュアル: コンテキストとエングラーバ
インストールされているファイル: ‘ly/engraver-init.ly’, ‘ly/performer-init.ly’
コード断片集: Contexts and engravers
内部リファレンス: Contexts, Engravers and Performers
| [ << デフォルトを変更する ] | [トップ][目次][インデックス][ ? ] | [ Notation manual tables >> ] | ||
| [ < コンテキストを理解する ] | [ 上へ : コンテキストを理解する ] | [ Score - すべてのコンテキストのマスタ > ] | ||
5.1.1 コンテキストの説明
コンテキストは階層的に配置されます:
| Score - すべてのコンテキストのマスタ | ||
| 上位コンテキスト - 譜コンテナ | ||
| 中位コンテキスト - 譜 | ||
| 下位コンテキスト - ボイス |
| [ << デフォルトを変更する ] | [トップ][目次][インデックス][ ? ] | [ Notation manual tables >> ] | ||
| [ < コンテキストの説明 ] | [ 上へ : コンテキストの説明 ] | [ 上位コンテキスト - 譜コンテナ > ] | ||
Score - すべてのコンテキストのマスタ
これは最上位の記譜コンテキストです。他のコンテキストが Score コンテキストを保持することはできません。デフォルトでは、Score コンテキストが拍子記号の管理を扱い、音部記号、拍子記号、調号などのアイテムが譜間で揃っていることを保証します。
Score コンテキストは、\score {…} や \layout {…}
ブロックが処理されたときに暗黙的にインスタンス化されます。
| [ << デフォルトを変更する ] | [トップ][目次][インデックス][ ? ] | [ Notation manual tables >> ] | ||
| [ < Score - すべてのコンテキストのマスタ ] | [ 上へ : コンテキストの説明 ] | [ 中位コンテキスト - 譜 > ] | ||
上位コンテキスト - 譜コンテナ
StaffGroup
譜をグループ化して、左端に角括弧を付けます。このコンテキストに保持されている譜の小節線は垂直につながります。StaffGroup は譜のコレクション、それに左端の角括弧と延長された小節線だけを保持します。
ChoirStaff
保持されている譜の小節線が垂直につながらないことを除けば、StaffGroup と同じです。
GrandStaff
譜をグループ化して、左端に波括弧を付けます。このコンテキストに保持されている譜の小節線は垂直につながります。
PianoStaff
GrandStaff と似ていますが、各システムの左端に楽器名を付けることができます。
| [ << デフォルトを変更する ] | [トップ][目次][インデックス][ ? ] | [ Notation manual tables >> ] | ||
| [ < 上位コンテキスト - 譜コンテナ ] | [ 上へ : コンテキストの説明 ] | [ 下位コンテキスト - ボイス > ] | ||
中位コンテキスト - 譜
Staff
音部記号、小節線、調、臨時記号を扱います。このコンテキストは Voice コンテキストを保持することができます。
RhythmicStaff
Staff と似ていますが、リズムを表示するためのものです。ピッチは無視され、音符は線として表示されます。
TabStaff
タブ譜を生成するためのコンテキストです。デフォルトでは、音楽表記を 6 線のギター タブ譜として配置します。
DrumStaff
打楽器の譜刻を扱います。DrumVoice を保持することができます。
VaticanaStaff
Staff と同じですが、グレゴリア形式の楽曲を譜刻するためにデザインされている点が異なります。
MensuralStaff
Staff と同じでが、定量形式の楽曲を譜刻するためにデザインされている点が異なります。
| [ << デフォルトを変更する ] | [トップ][目次][インデックス][ ? ] | [ Notation manual tables >> ] | ||
| [ < 中位コンテキスト - 譜 ] | [ 上へ : コンテキストの説明 ] | [ コンテキストを作成して参照する > ] | ||
下位コンテキスト - ボイス
Voice レベルのコンテキストはある特定のプロパティを初期化し、適切なエングラーバを開始させます。下位コンテキストであるため、他のコンテキストを保持することはできません。
Voice
譜の上にあるボイスに相当します。このコンテキストは、強弱記号、符幹、連桁、上付き/下付き文字、タイ、それに休符の変換を扱います。1 つの譜に複数のボイスを配置する必要がある場合、ボイスを明示的にインスタンス化する必要があります。
VaticanaVoice
Voice と同じですが、グレゴリア形式の楽曲を譜刻するためにデザインされている点が異なります。
MensuralVoice
Voice と同じですが、定量形式の楽曲を譜刻するためにデザインされている点が異なります。
Lyrics
歌詞を保持するボイスに相当します。単一行の歌詞の表示を扱います。
DrumVoice
打楽器譜で使用されるボイス コンテキストです。
FiguredBass
このコンテキストの中で、\figuremode モードで記述された入力から
BassFigure オブジェクトが作成されます。
TabVoice
TabStaff コンテキスト内部で使用されるボイス コンテキストです。通常、暗黙的に作成されます。
CueVoice
小さなサイズの音符を描画するために使用されるボイス コンテキストです。主に合図音符を譜に付け加えることを目的としています。合図音符をフォーマットする を参照してください。通常、暗黙的に作成されます。
ChordNames
コード ネームを譜刻します。
| [ << デフォルトを変更する ] | [トップ][目次][インデックス][ ? ] | [ Notation manual tables >> ] | ||
| [ < 下位コンテキスト - ボイス ] | [ 上へ : コンテキストを理解する ] | [ コンテキストを残しておく > ] | ||
5.1.2 コンテキストを作成して参照する
LilyPond は、適切なコンテキストが存在しないうちに音楽表記に遭遇すると、自動的に下位コンテキストを作成します。しかしながら、通常これは、シンプルな楽譜やドキュメントの中の楽譜断片のような単純な場合にしかうまくいきません。もっと複雑な楽譜の場合、すべてのコンテキストを \new コマンドや
\context コマンドを用いて明示的に指定することをお勧めします。これら 2 つのコマンドの構文はほとんど同じです:
[\new | \context] Context [ = name] [music-expression]
ここで、\new と \context のどちらかを使用します。Context は作成するコンテキストのタイプであり、name は作成されるコンテキストにオプションで付けることができる名前であり、music-expression はこのコンテキストのエングラーバとパフォーマによって処理される単一の音楽表記です。
コンテキスト名を持たない \new コマンドは一般的に複数の譜を持つ
score を作成するのに用いられます:
<< \new Staff \relative { % 暗黙的に Voice コンテキストが作成されます c''4 c } \new Staff \relative { d''4 d } >>
![[image of music]](bb/lily-ac1d3775.png)
そして、1 つの譜に複数のボイスが配置されます:
\new Staff << \new Voice \relative { \voiceOne c''8 c c4 c c } \new Voice \relative { \voiceTwo g'4 g g g } >>
![[image of music]](f6/lily-8f07bf9c.png)
\new と \context は動作が異なります:
-
\newはコンテキスト名を持っているか、いないかにかかわらず、例え同じ名前を持つコンテキストが存在していたとしても、常に全く新たなコンテキストを作成します:\new Staff << \new Voice = "A" \relative { \voiceOne c''8 c c4 c c } \new Voice = "A" \relative { \voiceTwo g'4 g g g } >>![[image of music]](0c/lily-8034ac86.png)
-
コンテキスト名を持つ
\contextは、階層、名前、それにタイプが同じコンテキストが存在しない場合にのみ、新たなコンテキスを作成します。存在する場合、\contextはすでに作成されているコンテキストへの参照となり、音楽表記はそのコンテキストに渡されて処理されます。名前を持つコンテキストの用途の 1 つとして、楽譜レイアウトと音楽コンテンツを分離させることができます。以下の 2 つの形式はどちらも有効です:
\score { << % 楽譜レイアウト \new Staff << \new Voice = "one" { \voiceOne } \new Voice = "two" { \voiceTwo } >> % 音楽コンテンツ \context Voice = "one" { \relative { c''4 c c c } } \context Voice = "two" { \relative { g'8 g g4 g g } } >> }![[image of music]](37/lily-ab9ce483.png)
\score { << % 楽譜レイアウト \new Staff << \context Voice = "one" { \voiceOne } \context Voice = "two" { \voiceTwo } >> % 音楽コンテンツ \context Voice = "one" { \relative { c''4 c c c } } \context Voice = "two" { \relative { g'8 g g4 g g } } >> }![[image of music]](df/lily-3b8b68d1.png)
名前付きコンテキストの他の使用例として、2 つの音楽表記をつなげて 1 つのコンテキストにすることができます。以下の例では、アーティキュレーションと音符は別々に入力されています: 変数を用いても同じことができます。 Organizing pieces with variables を参照してください。
-
コンテキスト名を持たない
\contextは、階層とタイプが一致するコンテキストのうち最初に作成されたものに適用され (例えそのコンテキストが名前を持っていたとしても適用されます)、音楽表記はそのコンテキストに渡されて処理されます。この形式が有用なことは稀です。しかしながら、コンテキスト名と音楽表記を持たない\contextは、コンテキスト内で\applyContextで記述した Scheme プロシージャを実行させるのに用いられます:\new Staff \relative { c'1 \context Timing \applyContext #(lambda (ctx) (newline) (display (ly:context-current-moment ctx))) c1 }
後で参照するコンテキストには名前を付ける必要があります。例えば、歌詞を音楽に関連付けるような場合です:
\new Voice = "tenor" music ... \new Lyrics \lyricsto "tenor" lyrics
歌詞を音楽に関連付ける方法についての詳細は 歌詞音節の自動演奏時間 を参照してください。
ある特定のタイプのすべてのコンテキストのプロパティを \layout
ブロックで変更することができます (構文は異なります)
– 同じタイプの全コンテキストを変更する を参照してください。この構造でもレイアウトを音楽コンテンツから分離させることができます。単一のコンテキストを変更するのであれば、\with ブロックを用いる必要があります – 指定したコンテキストだけを変更する を参照してください。
参照
学習マニュアル: Organizing pieces with variables
記譜法リファレンス: 指定したコンテキストだけを変更する, 歌詞音節の自動演奏時間
| [ << デフォルトを変更する ] | [トップ][目次][インデックス][ ? ] | [ Notation manual tables >> ] | ||
| [ < コンテキストを作成して参照する ] | [ 上へ : コンテキストを理解する ] | [ コンテキストのプラグインを変更する > ] | ||
5.1.3 コンテキストを残しておく
通常、コンテキストは何もすることが無くなった最初の音楽的タイミングで消滅させられます。そのため、Voice コンテキストはすべてのイベントを終えるとすぐに消滅し、Staff コンテキストは保持しているすべての Voice コンテキストのイベントが終了するとすぐに消滅する、などとなっています。このことは、早い段階のすでに消滅したコンテキスを参照する必要がある場合に、障害となります。例えば、\change コマンドで譜を変更する場合、\lyricsto コマンドで歌詞をボイスに結び付ける場合、あるいは、早い段階で登場したコンテキストに音楽イベントを追加する場合に障害となります。
この規則には 1 つ例外があります:
Staff コンテキストや <<...>> 構造の中にある Voice
コンテキストのうち 1 つだけは、例え途中ですることが無くなったとしても、Staff コンテキストあるいは
<<...>> 構造の終わりまで維持されます。このように維持されるコンテキストは、最初の {...} 構造の中にある最初のコンテキストであり、<<...>> 構造の中にあるものは無視されます。
各音楽タイミングで何かすることを持たせることにより、任意のコンテキストを残しておくことができます。Staff コンテキストを残しておくには、それに含まれるボイスの 1 つが維持されることを保証する必要があります。ボイスを残しておく方法の 1 つに、ボイスに含まれる実際の音楽と並列に、空白休符をそのボイスに付け加えるという方法があります。残しておく必要があるすべての Voice コンテキストに対して、空白休符を付け加える必要があります。ところどころで使用されるボイスがある場合、前述の例外によって必要なボイスを残そうとするよりは、それらのボイスすべてを残しておく方が安全です。
以下の例では、空白休符の追加を用いる方法で、ボイス A とボイス B の両方が楽曲全体を通して維持されます:
musicA = \relative { d''4 d d d } musicB = \relative { g'4 g g g } keepVoicesAlive = { << \new Voice = "A" { s1*5 } % Voice "A" を 5 小節の間、維持する \new Voice = "B" { s1*5 } % Voice "B" を 5 小節の間、維持する >> } music = { \context Voice = "A" { \voiceOneStyle \musicA } \context Voice = "B" { \voiceTwoStyle \musicB } \context Voice = "A" { \musicA } \context Voice = "B" { \musicB } \context Voice = "A" { \musicA } } \score { \new Staff << \keepVoicesAlive \music >> }
![[image of music]](70/lily-dea4f512.png)
以下の例は、空白休符を用いる方法で、途切れ途切れのメロディに歌詞を持たせる方法を示しています。もちろん、実際に楽譜を書く場合は、メロディや伴奏は複数のセクションによって構成されることになります。
melody = \relative { a'4 a a a } accompaniment = \relative { d'4 d d d } words = \lyricmode { These words fol -- low the mel -- o -- dy } \score { << \new Staff = "music" { << \new Voice = "melody" { \voiceOne s1*4 % Voice "melody" を 4 小節の間、残します } { \new Voice = "accompaniment" { \voiceTwo \accompaniment } << \context Voice = "melody" { \melody } \context Voice = "accompaniment" { \accompaniment } >> \context Voice = "accompaniment" { \accompaniment } << \context Voice = "melody" { \melody } \context Voice = "accompaniment" { \accompaniment } >> } >> } \new Lyrics \with { alignAboveContext = #"music" } \lyricsto "melody" { \words } >> }
![[image of music]](b5/lily-0497fd6a.png)
これに代わる方法として、メロディに直接空白休符を付け加えて、メロディが伴奏と揃うようにする方法があります – 多くの場合、こちらの方法の方が良いかもしれません:
melody = \relative { s1 % 1 小節スキップします a'4 a a a s1 % 1 小節スキップします a4 a a a } accompaniment = \relative { d'4 d d d d4 d d d d4 d d d d4 d d d } words = \lyricmode { These words fol -- low the mel -- o -- dy } \score { << \new Staff = "music" { << \new Voice = "melody" { \voiceOne \melody } \new Voice = "accompaniment" { \voiceTwo \accompaniment } >> } \new Lyrics \with { alignAboveContext = #"music" } \lyricsto "melody" { \words } >> }
![[image of music]](53/lily-38f21eea.png)
| [ << デフォルトを変更する ] | [トップ][目次][インデックス][ ? ] | [ Notation manual tables >> ] | ||
| [ < コンテキストを残しておく ] | [ 上へ : コンテキストを理解する ] | [ コンテキストのデフォルト設定を変更する > ] | ||
5.1.4 コンテキストのプラグインを変更する
記譜コンテキスト (Score や Staff のような) はプロパティを保存するだけなく、‘エングラーバ’ と呼ばれる記譜要素を作成するプラグインを保持します。例えば、Voice コンテキストは Note_head_engraver を保持し、Staff コンテキストは Key_engraver を保持します。
各プラグインについての説明は、 Engravers and Performers. を参照してください。 Contexts の中にある各コンテキストについての説明では、そのコンテキストで使用されるエングラーバがリストアップされています。
これらのプラグインを入れ換えると有用な場合があります。プラグインを入れ換えるには、新たに作成するコンテキストを
\new あるいは \context で開始し、そのコンテキストを以下のように変更します:
\new context \with {
\consists …
\consists …
\remove …
\remove …
etc.
}
{
..music..
}
ここで、… はエングラーバの名前になります。ここで、Staff コンテキストから Time_signature_engraver と
Clef_engraver を削除する簡単な例を示します:
<< \new Staff { f2 g } \new Staff \with { \remove "Time_signature_engraver" \remove "Clef_engraver" } { f2 g2 } >>
![[image of music]](c7/lily-9c14d6cf.png)
2 番目の譜には、拍子記号と音部記号がありません。この方法は、オブジェクトを不可視にするよりも乱暴な方法です。なぜなら、譜全体に影響を与えるからです。さらに、望む望まないに係わらず、この方法はスペースにも影響を与えます。オブジェクトを消すもっと洗練された方法については、 オブジェクトの可視性と色 を参照してください。
次の例は、ある実用的な応用です。通常、小節線と拍子記号は楽譜全体で同期されます。これは Timing_translator と Default_bar_line_engraver
によって行われます。このプラグインは拍子記号の管理や、小節内の配置の管理などを行います。これらのエングラーバを Score コンテキストから
Staff コンテキストへ異動させることにより、楽譜の各譜に独自の拍子記号を持たせることが可能になります。
\new Score \with { \remove "Timing_translator" \remove "Default_bar_line_engraver" } << \new Staff \with { \consists "Timing_translator" \consists "Default_bar_line_engraver" } { \time 3/4 c4 c c c c c } \new Staff \with { \consists "Timing_translator" \consists "Default_bar_line_engraver" } { \time 2/4 c4 c c c c c } >>
![[image of music]](f9/lily-f70536d3.png)
既知の問題と警告
エングラーバを指定する順序は、エングラーバが処理を行う順序です。通常、エングラーバが指定される順序は問題にはなりません。しかしながら、いくつかの特殊なケースでは、この順序が重要になります。例えば、あるエングラーバがプロパティを記述して、それを他のエングラーバが読む場合、あるいは、あるエングラーバがグラフィカル オブジェクトを作成し、それを他のエングラーバが処理しなければならない場合です。
以下の順序は重要です:
-
通常、
Bar_engraverを最初にする必要があります。 -
New_fingering_engraverをScript_column_engraverの前に配置する必要があります。 -
Timing_translatorをBar_number_engraverの前に配置する必要があります。
参照
インストールされているファイル: ‘ly/engraver-init.ly’
| [ << デフォルトを変更する ] | [トップ][目次][インデックス][ ? ] | [ Notation manual tables >> ] | ||
| [ < コンテキストのプラグインを変更する ] | [ 上へ : コンテキストを理解する ] | [ 同じタイプの全コンテキストを変更する > ] | ||
5.1.5 コンテキストのデフォルト設定を変更する
プロパティを変更する で説明したように、コンテキストとグラフィカル
オブジェクトのプロパティを \set コマンドや \override
コマンドで変更することができます。これらのコマンドは音楽イベントを生成して、楽譜処理中にコマンドが出現するポイントで変更に効果を発揮させます。
対照的に、このセクションではコンテキストが作成された時点でコンテキストとグラフィカル オブジェクトのプロパティの デフォルト 値を変更する方法を説明します。これを行う方法は 2 つあります。1 つはある特定のタイプの全コンテキストのデフォルト値を変更する方法で、もう 1 つはただ 1 つのコンテキストのインスタンスのデフォルト値を変更する方法です。
| 同じタイプの全コンテキストを変更する | ||
| 指定したコンテキストだけを変更する | ||
| 適用順序 |
| [ << デフォルトを変更する ] | [トップ][目次][インデックス][ ? ] | [ Notation manual tables >> ] | ||
| [ < コンテキストのデフォルト設定を変更する ] | [ 上へ : コンテキストのデフォルト設定を変更する ] | [ 指定したコンテキストだけを変更する > ] | ||
同じタイプの全コンテキストを変更する
Score, Staff, Voice, その他のコンテキストにおいてデフォルトで使用されるコンテキスト設定は、\layout ブロックの中の\context ブロックでで指定することができます。\layout ブロックは、それを適用する \score ブロックの中で、かつ、音楽表記の後に配置する必要があります。
\layout {
\context {
\Voice
[すべての Voice コンテキストのコンテキスト設定]
}
\context {
\Staff
[context settings for all Staff contexts]
}
}
以下のタイプの設定を指定することができます:
-
\overrideコマンド – コンテキスト名を省略します\score { \relative { a'4^"Thicker stems" a a a a4 a a\ff a } \layout { \context { \Staff \override Stem.thickness = #4.0 } } }![[image of music]](68/lily-7c3277b0.png)
-
コンテキスト プロパティを直接設定します
\score { \relative { a'4^"Smaller font" a a a a4 a a\ff a } \layout { \context { \Staff fontSize = #-4 } } }![[image of music]](d8/lily-42efcbd2.png)
-
\dynamicUpや\accidentalStyle dodecaphonicのような音楽表記等、あらかじめ定義されているコマンド\score { \relative { a'4^"Dynamics above" a a a a4 a a\ff a } \layout { \context { \Voice \dynamicUp } \context { \Staff \accidentalStyle dodecaphonic } } }![[image of music]](2c/lily-afcc0add.png)
-
\withブロックを有するユーザ定義変数 –\withブロックの詳細は 指定したコンテキストだけを変更する を参照してください。StaffDefaults = \with { fontSize = #-4 } \score { \new Staff { \relative { a'4^"Smaller font" a a a a4 a a a } } \layout { \context { \Staff \StaffDefaults } } }![[image of music]](9b/lily-f422a76f.png)
プロパティ設定コマンドは、\context ブロックで囲まずに、\layout ブロックの中に配置することができます。そのような設定は、指定されたタイプの任意のコンテキストの開始時にプロパティ設定コマンドをインクルードするのと等価です。コンテキストを指定しない場合、すべての 下位コンテキストに影響を与えます – 下位コンテキスト - ボイス を参照してください。\layout ブロックの中でのプロパティ設定コマンドの構文は、音楽ストリームの中で同じコマンドを記述するのと同じです。
\score { \new Staff { \relative { a'4^"Smaller font" a a a a4 a a a } } \layout { \accidentalStyle dodecaphonic \set fontSize = #-4 \override Voice.Stem.thickness = #4.0 } }
![[image of music]](39/lily-ca177414.png)
| [ << デフォルトを変更する ] | [トップ][目次][インデックス][ ? ] | [ Notation manual tables >> ] | ||
| [ < 同じタイプの全コンテキストを変更する ] | [ 上へ : コンテキストのデフォルト設定を変更する ] | [ 適用順序 > ] | ||
指定したコンテキストだけを変更する
\with ブロックで指定したコンテキスト インスタンスのコンテキスト
プロパティだけを変更することができます。他の全ての同じタイプのコンテキスト インスタンスは、LilyPond に組み込まれてスコープ内の \layout ブロックによって変更されたデフォルト設定のままです。\with ブロックは \new context-type コマンドの直後に配置する必要があります:
\new Staff
\with {
[このコンテキスト インスタンスだけに適用されるコンテキスト設定]
} {
...
}
以下のタイプの設定を指定することができます:
-
\overrideコマンド – コンテキスト名を省略します\score { \new Staff { \new Voice \with { \override Stem.thickness = #4.0 } { \relative { a'4^"Thick stems" a a a a4 a a a } } } }![[image of music]](9b/lily-73911881.png)
-
コンテキスト プロパティを直接設定します
\score { << \new Staff { \relative { a'4^"Default font" a a a a4 a a a } } \new Staff \with { fontSize = #-4 } { \relative { a'4^"Smaller font" a a a a4 a a a } } >> }![[image of music]](06/lily-071f828e.png)
-
\dynamicUp等のあらかじめ定義されているコマンド\score { << \new Staff { \new Voice { \relative { a'4^"Dynamics below" a a a a4 a a\ff a } } } \new Staff \with { \accidentalStyle dodecaphonic } { \new Voice \with { \dynamicUp } { \relative { a'4^"Dynamics above" a a a a4 a a\ff a } } } >> }![[image of music]](50/lily-29efafc6.png)
| [ << デフォルトを変更する ] | [トップ][目次][インデックス][ ? ] | [ Notation manual tables >> ] | ||
| [ < 指定したコンテキストだけを変更する ] | [ 上へ : コンテキストのデフォルト設定を変更する ] | [ 新しいコンテキストを定義する > ] | ||
適用順序
ある特定のタイミングで適用されるプロパティの値は以下のように決定されます:
-
入力ストリームの中の
\overrideコマンドや\setコマンドが ある場合、その値が用いられます。 -
さもなければ、コンテキスト初期宣言の
\withから取得したデフォルト値が用いられます。 -
さもなければ、
\layoutブロックの中にある直近で適切な\contextブロックから取得したデフォルト値が用いられます。 - さもなければ、LilyPond の組み込みデフォルト値が用いられます。
参照
学習マニュアル: Modifying context properties
記譜法リファレンス:
コンテキストの説明,
下位コンテキスト - ボイス,
\set コマンド,
\override コマンド,
\layout ブロック
| [ << デフォルトを変更する ] | [トップ][目次][インデックス][ ? ] | [ Notation manual tables >> ] | ||
| [ < 適用順序 ] | [ 上へ : コンテキストを理解する ] | [ コンテキストの配置順序 > ] | ||
5.1.6 新しいコンテキストを定義する
Staff や Voice のようなコンテキストは、簡単なブロックの組み合わせで構成されています。
エングラーバ プラグインの組み合わせを変えることで、新しいタイプのコンテキスを作成することができます。
次の例は、ゼロからタイプの異なる Voice コンテキストを作り上げる方法を示しています。このコンテキストは Voice コンテキストに似ていますが、音符の代わりにスラッシュを譜の中央に譜刻します。これはジャズで即興を表すのに使うことができます。
![[image of music]](fa/lily-c3ecc078.png)
これらの設定は \layout ブロック内部の \context ブロックの中で定義します:
\layout {
\context {
…
}
}
以下では、上記の例の … に入るべき入力について議論します。
最初に、新しいコンテキストの名前を定義する必要があります:
\name ImproVoice
このコンテキストは Voice に似せる必要があるため、(既存の) Voice と同じ機能を実現するコマンドが必要です。これは、新しいコンテキストにエイリアス Voice を与えることで実現できます。
\alias Voice
このコンテキストは音符と指示テキストを譜刻しますので、それらの機能を提供するエングラーバを付け加える必要があります:
\consists "Note_heads_engraver" \consists "Text_engraver"
しかしながら、音符の代わりにスラッシュを譜の中央線上に配置します:
\consists "Pitch_squash_engraver" squashedPosition = #0
Pitch_squash_engraver は
(
Note_heads_engraver によって作成される) 符頭を変更し、符頭の垂直位置を squashedPosition にセットします
– 今回は 0、つまり中央線上です。
音符はスラッシュで、符幹を持ちません:
\override NoteHead.style = #'slash \hide Stem
これらのプラグインすべてが共同する必要があり、それには特殊なプラグインが必要です。このプラグインは常に Engraver_group であり、キーワード \type を付ける必要があります。
\type "Engraver_group"
まとめると、以下のようになります:
\context {
\name ImproVoice
\type "Engraver_group"
\consists "Note_heads_engraver"
\consists "Text_engraver"
\consists "Pitch_squash_engraver"
squashedPosition = #0
\override NoteHead.style = #'slash
\hide Stem
\alias Voice
}
コンテキストは階層を構成します。c
通常の Voice と同様に、ImproVoice を Staff の下に置く必要があります。それゆえ、Staff 定義を \accepts コマンドで変更します:
\context {
\Staff
\accepts ImproVoice
}
\accepts の反対は \denies です。これは既存のコンテキスト定義を再利用する場合に必要となります。
以下のように、両方を \layout ブロックの中に置きます:
\layout {
\context {
\name ImproVoice
…
}
\context {
\Staff
\accepts "ImproVoice"
}
}
それから、このサブセクションの最初にあった出力を入力します:
\relative {
a'4 d8 bes8
\new ImproVoice {
c4^"ad lib" c
c4 c^"undress"
c c_"while playing :)"
}
a1
}
| [ << デフォルトを変更する ] | [トップ][目次][インデックス][ ? ] | [ Notation manual tables >> ] | ||
| [ < 新しいコンテキストを定義する ] | [ 上へ : コンテキストを理解する ] | [ 内部リファレンスの説明 > ] | ||
5.1.7 コンテキストの配置順序
通常、コンテキストは入力ファイルの中で記述した順に楽譜の段の上から下に配置されます。コンテキストがネストされている場合、外側のコンテキストは入力ファイルの中で指定されたコンテキストを内側に保持して、内側のコンテキストは外側のコンテキストの “accepts” リストに含まれます。ネストされたコンテキストのうち外側のコンテキストの “accepts” リストに含まれないものは、ネストされずに外側のコンテキストの下に再配置されます。
コンテキストの “accepts” リストを \accepts コマンドと
\denies コマンドで変更することができます。\accepts はコンテキストを “accepts” リストに追加して、\denies は “accepts” リストからコンテキストを削除します。例えば、通常、コード ネームは Staff コンテキストの中にネストされないため、ChordNames コンテキストはデフォルトでは Staff
コンテキストの “accepts” リストには含まれませんが、リストに含める必要があれば含めることができます:
\score { \new Staff { c' d' e' f' \chords { d1:m7 b1:min7.5- } } }
![[image of music]](5e/lily-4e21fe8b.png)
\score { \new Staff { c' d' e' f' \chords { d1:m7 b1:min7.5- } } \layout { \context { \Staff \accepts "ChordNames" } } }
![[image of music]](76/lily-e5b9e7e5.png)
\denies は主に、他のコンテキストをベースに新しいコンテキストを作成した時に、中にネストするコンテキストを変更するために用いられます。
例えば、VaticanaStaff コンテキストは Staff コンテキストをベースにしていますが、“accepts” リストでは Voice コンテキストの代わりに VaticanaVoice コンテキストを保持しています。
コンテキストに保持されるべきコマンドが出現して、それを保持するための適切なコンテキストが存在しない場合、コンテキストが暗黙的に作成されるということに注意してください。これは予期しない譜や楽譜を生み出す可能性があります。
短い期間、あるコンテキストを存在させる必要がある場合があります。オッシアの譜コンテキストが良い例です。通常、これは主音楽の対応するセクションと並列に、適切な場所でコンテキスト定義を行うことで実現します。デフォルトでは、一時コンテキストは既存のすべてのコンテキストの下に配置されます。“main” というコンテキストの上に配置し直すには以下のようにします:
\new Staff \with { alignAboveContext = #"main" }
ChoirStaff のような複数の譜のレイアウトで一時的な歌詞を配置する場合
– 例えば、繰り返しセクションに 2 番目の歌詞を追加する場合 –
にも同様な状況が発生します。デフォルトでは、一時的な歌詞は下段の譜の下に配置されます。一時的な歌詞コンテキストを alignBelowContext で定義することにより、1 番目の歌詞を保持する (名前付きの) 歌詞コンテキストの下に配置することができます。
一時コンテキストを再配置する例は他にもあります – Nesting music expressions、+個々の譜を変更する、それに 歌詞に特有のテクニック を参照してください。
参照
学習マニュアル: Nesting music expressions
記譜法リファレンス: 個々の譜を変更する, 歌詞に特有のテクニック
アプリケーション使用方法: An extra staff appears
インストールされているファイル: ‘ly/engraver-init.ly’
| [ << デフォルトを変更する ] | [トップ][目次][インデックス][ ? ] | [ Notation manual tables >> ] | ||
| [ < コンテキストの配置順序 ] | [ 上へ : デフォルトを変更する ] | [ 内部リファレンスを使いこなす > ] | ||
5.2 内部リファレンスの説明
| 5.2.1 内部リファレンスを使いこなす | ||
| 5.2.2 レイアウト インターフェイス | ||
| 5.2.3 グラフィカル オブジェクト プロパティを決定する | ||
| 5.2.4 命名規約 |
| [ << デフォルトを変更する ] | [トップ][目次][インデックス][ ? ] | [ Notation manual tables >> ] | ||
| [ < 内部リファレンスの説明 ] | [ 上へ : 内部リファレンスの説明 ] | [ レイアウト インターフェイス > ] | ||
5.2.1 内部リファレンスを使いこなす
以下の譜面の運指記号を移動させたいとします:
c-2 \stemUp f
![[image of music]](7e/lily-8e004f01.png)
運指指示のドキュメント (運指の指示) を見ると、以下のようなセクションがあることに気付くはずです:
参照
内部リファレンス: Fingering
Fingering へのリンクを辿ってください。ページの先頭に、以下のような記述があります:
Fingering objects are created by: Fingering_engraver and New_fingering_engraver.
内部リファレンスの中にある関連リンクを辿っていくことで、プログラム内部の情報フローを追っていくことができます:
-
Fingering:
Fingering objects are created by:
Fingering_engraver
( Fingering: Fingering オブジェクトを作成するのは: Fingering_engraver)
-
Fingering_engraver:
Music types accepted:
fingering-event
( Fingering_engraver: 受け取る音楽タイプは: fingering-event)
-
fingering-event:
Music event type
fingering-eventis in Music expressions named FingeringEvent( fingering-event: 音楽イベント タイプ
fingering-eventは FingeringEvent という名前の音楽表記の中にあります)
このパスは、プログラム内部での情報フローとは逆向きです: 出力からスタートして、入力イベントで終わっています。入力イベントからスタートして、情報フローを読み進め、最後は出力オブジェクトに辿り着くこともできます。
内部リファレンスを通常のドキュメントのように読むこともできます。内部リファレンスに含まれる章は、 Music definitions, Translation, それに Backend です。 各章は、使用されているすべての定義と調整可能なすべてのプロパティをリストアップしています。
| [ << デフォルトを変更する ] | [トップ][目次][インデックス][ ? ] | [ Notation manual tables >> ] | ||
| [ < 内部リファレンスを使いこなす ] | [ 上へ : 内部リファレンスの説明 ] | [ グラフィカル オブジェクト プロパティを決定する > ] | ||
5.2.2 レイアウト インターフェイス
前のセクションで見た HTML ページには、 Fingering と呼ばれるレイアウト オブジェクトについての記述がありました。そのようなオブジェクトは楽譜で記号となります。レイアウト オブジェクトは (太さや向きのような) 数値を保持するプロパティを持っていますが、関連オブジェクトへのポインタも持っています。レイアウト オブジェクトは Grob – これはグラフィカル オブジェクトを縮めたものです – とも呼ばれます。Grob についての詳細は、 grob-interface を参照してください。
Fingering のページは、Fingering オブジェクトの定義をリストアップしています。例えば、このページには以下のような記述があります:
padding(dimension, in staff space):
0.5
これは、この数値は少なくとも符頭の 0.5 倍の距離を保つということを意味します。
各レイアウト オブジェクトは、記譜要素あるいは写植要素としての機能をいくつか持つ場合があります。例えば、Fingering オブジェクトは以下の側面を持っています:
-
Its size is independent of the horizontal spacing, unlike slurs or beams.
(このオブジェクトのサイズは、スラーや連桁と異なり、水平方向のスペースとは無関係です)
-
It is a piece of text. Granted, it is usually a very short text.
(このオブジェクトはテキストです。通常、これは非常に短いテキストです。)
-
That piece of text is typeset with a font, unlike slurs or beams.
(このテキストは、スラーや連桁と異なり、フォントで写植されます。)
-
Horizontally, the center of the symbol should be aligned to the
center of the note head.
(水平方向では、この記号の中心は符頭の中心に揃えられます。)
-
Vertically, the symbol is placed next to the note and the staff.
(垂直方向では、この記号は音符や譜の近く配置されます。)
-
The vertical position is also coordinated with other superscript
and subscript symbols.
(また、垂直方向の位置は、他の上付き記号や下付き記号との調整によって決まります。)
これらの側面はそれぞれ、いわゆる インターフェイス として捉ええられます。それらは、 Fingering ページの最下部でリストアップされています。
This object supports the following interfaces:
(このオブジェクトは以下のインターフェイスをサポートします:)
item-interface, self-alignment-interface, side-position-interface, text-interface, text-script-interface, font-interface, finger-interface, and grob-interface.
リンクのいずれかをクリックすると、それぞれのオブジェクト インターフェイスのページに行くことができます。各インターフェイスはいくつかのプロパティを持ちます。それらプロパティの中には、ユーザにとって役に立たないもの (‘内部プロパティ’) もありますが、それ以外は変更可能です。
これまで Fingering オブジェクトについて話してきましたが、これは実際にはそれほど多くのことをしているわけではありません。初期化ファイル (
その他の情報源 を参照してください)
‘scm/define-grobs.scm’ がこの ‘オブジェクト’ の本質を示しています:
(Fingering
. ((padding . 0.5)
(avoid-slur . around)
(slur-padding . 0.2)
(staff-padding . 0.5)
(self-alignment-X . 0)
(self-alignment-Y . 0)
(script-priority . 100)
(stencil . ,ly:text-interface::print)
(direction . ,ly:script-interface::calc-direction)
(font-encoding . fetaText)
(font-size . -5) ; don't overlap when next to heads.
(meta . ((class . Item)
(interfaces . (finger-interface
font-interface
text-script-interface
text-interface
side-position-interface
self-alignment-interface
item-interface))))))
見て取ることができるように、Fingering オブジェクトは変数設定の塊に過ぎず、内部リファレンスの中にある Web ページは、この定義から直接生成されたに過ぎません。
| [ << デフォルトを変更する ] | [トップ][目次][インデックス][ ? ] | [ Notation manual tables >> ] | ||
| [ < レイアウト インターフェイス ] | [ 上へ : 内部リファレンスの説明 ] | [ 命名規約 > ] | ||
5.2.3 グラフィカル オブジェクト プロパティを決定する
以下の 2 の位置を変更しようとしていたことを思い出してください:
c-2 \stemUp f
垂直方向で見て、2 は元の音符の隣に配置されるのですから、この配置に関連するインターフェイスに干渉する必要があります。これは side-position-interface を用いて行います。このインターフェイスについてのページには、以下のように記述されています:
side-position-interfacePosition a victim object (this one) next to other objects (the support). The property
directionsignifies where to put the victim object relative to the support (left or right, up or down?)(対象オブジェクトを他のオブジェクト (サポート オブジェクト) の隣に配置します。このプロパティ
directionは、対象オブジェクトをどこに配置するかをサポート オブジェクトからの相対位置で示します (左あるいは右、上あるいは下?))
この記述の下に、以下のような変数 padding についての記述があります:
padding(dimension, in staff space) (譜スペースを単位とする距離)
Add this much extra space between objects that are next to each other. (隣り合うオブジェクトの間にスペースを付け加えます)
padding の値を増やすことで、運指記号を符頭から離すことができます。以下のコマンドは、音符と運指記号の間に 3 譜スペースを挿入します:
\once \override Voice.Fingering.padding = #3
このコマンドを Fingering オブジェクトが作成される前に挿入する
– つまり c2 の前に挿入する – と、以下のような結果が得られます:
\once \override Voice.Fingering.padding = #3 c-2 \stemUp f
![[image of music]](37/lily-12ecf0a1.png)
このケースでは、調整されるコンテキストは Voice です。このことは、内部リファレンスの
Fingering_engraver
プラグインについてのページからわかります。このページには、以下のような記述があります:
Fingering_engraver is part of contexts: … Voice
(Fingering_engraver は次のコンテキストの一部です: … Voice)
| [ << デフォルトを変更する ] | [トップ][目次][インデックス][ ? ] | [ Notation manual tables >> ] | ||
| [ < グラフィカル オブジェクト プロパティを決定する ] | [ 上へ : 内部リファレンスの説明 ] | [ プロパティを変更する > ] | ||
5.2.4 命名規約
内部リファレンスについて他に説明しておくべき事柄として、さまざまな命名規約についての概要があります:
- Scheme スタイル: 小文字の単語をハイフンでつなぎます (1 単語の名前を含みます) – 例: lowercase-with-hyphens
- Scheme 関数: Scheme スタイルの先頭に
ly:を付けます – 例: ly:plus-scheme-style - 音楽イベント、音楽クラス、それに音楽プロパティ: Scheme スタイルです – 例: as-scheme-functions
- グラフィカル オブジェクト インターフェイス: Scheme スタイルです – 例: scheme-style
- バックエンド プロパティ: Scheme スタイルです (が、X と Y があります!)
- コンテキスト (それに、音楽表記とグラフィカル オブジェクト): 大文字で始まる単語、あるいはそれらをつなげます – 例: Capitalized, CamelCase
- コンテキスト プロパティ: 小文字で始まる単語に、大文字で始まる単語をつなげます – 例: lowercaseFollowedByCamelCase
- エングラーバ: 大文字で始まる単語に、小文字で始まる単語をアンダスコアでつなげます – 例: Capitalized_followed_by_lowercase_and_with_underscores
疑問:
- 命名規約のうち、慣習なのはどれで、規則なのはどれか?
- 命名規約のうち、どれが基本言語の規則で、どれが LP (訳者: LilyPond?) 特有の規則なのか?
| [ << デフォルトを変更する ] | [トップ][目次][インデックス][ ? ] | [ Notation manual tables >> ] | ||
| [ < 命名規約 ] | [ 上へ : デフォルトを変更する ] | [ プロパティ変更の概要 > ] | ||
5.3 プロパティを変更する
| 5.3.1 プロパティ変更の概要 | ||
5.3.2 \set コマンド | ||
5.3.3 \override コマンド | ||
5.3.4 \tweak コマンド | ||
5.3.5 \set 対 \override | ||
| 5.3.6 連想配列を変更する |
| [ << デフォルトを変更する ] | [トップ][目次][インデックス][ ? ] | [ Notation manual tables >> ] | ||
| [ < プロパティを変更する ] | [ 上へ : プロパティを変更する ] | [ set コマンド > ] | ||
5.3.1 プロパティ変更の概要
各コンテキストは、ある特定のタイプのグラフィカル オブジェクトを作成することについて責任を持ちます。それらのオブジェクトを表示するために使用される設定も、コンテキストによって保存されます。それらの設定を変更することにより、オブジェクトの見た目を変えることができます。
コンテキストに保存されるプロパティには 2 種類あります: コンテキスト プロパティとグラフィカル オブジェクト プロパティです。コンテキスト プロパティは、コンテキスト全体に適用され、コンテキスト自体をどのように表示するかを制御します。対照的に、グラフィカル オブジェクト プロパティは、コンテキストの中に表示されるある特定のタイプのグラフィカル オブジェクトに適用されます。
\set コマンドと \unset コマンドは、コンテキスト プロパティの値を変更するために使用されます。\override コマンドと \revert コマンドは、グラフィカル オブジェクト プロパティの値を変更するために使用されます。
参照
内部リファレンス: Backend, All layout objects, OverrideProperty, RevertProperty, PropertySet
既知の問題と警告
バックエンドはオブジェクト プロパティのタイプ チェックをそれほど厳密には行いません。Scheme 値の循環参照は、ハング アップまたはクラッシュ、あるいは両方を引き起こす可能性があります。
| [ << デフォルトを変更する ] | [トップ][目次][インデックス][ ? ] | [ Notation manual tables >> ] | ||
| [ < プロパティ変更の概要 ] | [ 上へ : プロパティを変更する ] | [ override コマンド > ] | ||
5.3.2 \set コマンド
各コンテキストは プロパティ の集合を持ちます。プロパティとは、コンテキストの中に保持されている変数です。コンテキスト プロパティは、\set コマンドによって変更されます。\set コマンドは以下のような構文を持ちます:
\set context.property = #value
value は Scheme オブジェクトですので、# 文字を前に置く必要があります。
通常、コンテキスト プロパティの名前は、小文字で始まる単語に大文字で始まる単語をつなげたものです。これらはたいてい音楽から記譜への翻訳を制御します
– 例えば、localAlterations (臨時記号を表示するかどうかを決定します)
や、measurePosition (小節線を表示するタイミングを決定します) です。コンテキスト プロパティは、楽曲の解釈をしている間、ずっと値を変更しておくことができます。measurePosition がその良い例です。コンテキスト プロパティは \set で変更されます。
例えば、コンテキスト プロパティ skipBars が
#t にセットされていれば、複小節休符は 1 つの小節に統合されます:
R1*2 \set Score.skipBars = ##t R1*2
![[image of music]](fb/lily-25faca59.png)
context 引数が省略されている場合、プロパティはカレントの最下位のコンテキストにセットされます
(一般に、ChordNames, Voice, TabVoice,
あるいは Lyrics です)。
\set Score.autoBeaming = ##f \relative { e''8 e e e \set autoBeaming = ##t e8 e e e } \\ \relative { c''8 c c c c8 c c c }
![[image of music]](2f/lily-a20a1dcb.png)
変更は ‘オンザフライ’ (その場、その時々) で適用されるため、設定 \set autoBeaming = ##t は 2 番目の 8 分音符グループだけに効果を持ちます。
最下位コンテキストが常に変更しようとしているプロパティを持っているとは限らないということに注意してください
– 例えば、skipBars プロパティをデフォルトの最下位コンテキスト
(この場合は、Voice です) にセットしようと試みても、効果はありません。なぜなら、skipBars は Score コンテキストのプロパティだからです。
R1*2 \set skipBars = ##t R1*2
![[image of music]](d5/lily-fa1492ba.png)
コンテキストは階層構造をとるため、音楽表記を囲っているコンテキスト
– 例えば、Staff – が指定された場合、変更はカレントの Staff の中にあるすべての Voice に適用されます。
\unset コマンド:
\unset context.property
は、context から property の定義を削除するために使用されます。このコマンドは、context の中にセットされた場合にのみ、定義を削除します。音楽表記を囲っているコンテキストにセットされたプロパティは、囲まれているコンテキストの中にある \unset では変更されません:
\set Score.autoBeaming = ##t \relative { \unset autoBeaming e''8 e e e \unset Score.autoBeaming e8 e e e } \\ \relative { c''8 c c c c8 c c c }
![[image of music]](75/lily-20cbf006.png)
\set と同様に、
最下位コンテキストに対しては context 引数を指定する必要はありません。ですから、以下の 2 つの記述:
\set Voice.autoBeaming = ##t \set autoBeaming = ##t
は、カレントの最下位コンテキストが Voice であれば、等価です。
\set の前に \once を置くと、その設定は単一の時間ステップにだけ適用されます:
c''4 \once \set fontSize = #4.7 c''4 c''4
![[image of music]](b0/lily-16c54f1e.png)
利用可能なすべてのコンテキスト プロパティについての完全な記述は、内部リファレンスにあります。以下を参照してください: Tunable context properties.
参照
内部リファレンス: Tunable context properties
| [ << デフォルトを変更する ] | [トップ][目次][インデックス][ ? ] | [ Notation manual tables >> ] | ||
| [ < set コマンド ] | [ 上へ : プロパティを変更する ] | [ tweak コマンド > ] | ||
5.3.3 \override コマンド
特殊なタイプのコンテキスト プロパティがあります:
グラフィカル オブジェクト記述です。グラフィカル オブジェクト記述には StudlyCaps という名前
(大文字で始まります) が付けられています。これらは、関連リストとして、ある特定の種類のグラフィカル オブジェクト用の
‘デフォルト設定’ を保持します。各グラフィカル オブジェクト記述の設定を調べるには、‘scm/define-grobs.scm’ を参照してください。各グラフィカル オブジェクト記述は \override を用いて変更します。
\override コマンドの構文は以下の通りです:
\override [context.]GrobName.property = #value
例えば、Stem オブジェクトの thickness プロパティをオーバライドすることによって、符幹の太さを太くすることができます:
c''4 c'' \override Voice.Stem.thickness = #3.0 c''4 c''
![[image of music]](d7/lily-3cf3b799.png)
\override でコンテキストが指定されていない場合、その下にあるコンテキストに適用されます:
\override Staff.Stem.thickness = #3.0 << \relative { e''4 e \override Stem.thickness = #0.5 e4 e } \\ \relative { c''4 c c c } >>
![[image of music]](53/lily-acbb2672.png)
調整可能なオプションには ‘サブプロパティ’ があり、これはプロパティの内部に存在します。これを調整するには、以下のような形式のコマンドを用います:
\override Stem.details.beamed-lengths = #'(4 4 3)
また、スパナの端を変更するには、以下のようにします:
\override TextSpanner.bound-details.left.text = #"left text" \override TextSpanner.bound-details.right.text = #"right text"
\override の効果は、\revert によって元に戻すことができます。
\revert の構文は以下の通りです:
\revert [context.]GrobName.property
例を示します:
\relative { c''4 \override Voice.Stem.thickness = #3.0 c4 c \revert Voice.Stem.thickness c4 }
![[image of music]](27/lily-071c4f3d.png)
\override と \revert の効果は、その時点から影響を受けるコンテキストの中にあるすべてのグラフィカル オブジェクトに適用されます:
<< \relative { e''4 \override Staff.Stem.thickness = #3.0 e4 e e } \\ \relative { c''4 c c \revert Staff.Stem.thickness c4 } >>
![[image of music]](ad/lily-9df6c157.png)
\once を \override と共に用いることで、カレントの時間ステップだけに効果を与えることができます:
<< \relative c { \override Stem.thickness = #3.0 e''4 e e e } \\ \relative { c''4 \once \override Stem.thickness = #3.0 c4 c c } >>
![[image of music]](04/lily-6465a626.png)
参照
内部リファレンス: Backend
| [ << デフォルトを変更する ] | [トップ][目次][インデックス][ ? ] | [ Notation manual tables >> ] | ||
| [ < override コマンド ] | [ 上へ : プロパティを変更する ] | [ set 対 override > ] | ||
5.3.4 \tweak コマンド
\tweak を用いたグラフィカル オブジェクト プロパティの変更は、コンテキストの中にあるすべてのグラフィカル オブジェクトに適用されます。しかしながら、影響を受けるコンテキストの中にあるすべてのグラフィカル オブジェクトではなく、1 つのグラフィカル オブジェクトだけに変更を適用したい場合もあります。そうするには、\tweak コマンドを用います。\tweak コマンドは以下のような構文を持ちます:
\tweak [layout-object.]grob-property value
layout-object の指定はオプションです。\tweak コマンドは、音楽の流れの中で
value のすぐ後に現れる音楽オブジェクトに変更を適用します。
調整コマンドの構文と使用方法についての紹介は、 調整手段 を参照してください。
同じようなオブジェクトがいくつか、同じ音楽タイミングで配置されている場合、\override コマンドでそれらの 1 つだけを変更することはできません
– \tweak コマンドを用いる必要があります。同じ音楽タイミングで複数出現する可能性があるオブジェクトには、以下のようなものがあります:
- 和音の中にある音符の符頭
- 1 つの音符に付けられるアーティキュレーション記号
- 和音の中にある音符の間に付けられるタイ
- 同時に始まる連符の囲み
以下の例では、和音の中にある符頭の 1 つの色を変更し、さらに他の符頭のタイプを変更しています:
< c'' \tweak color #red d'' g'' \tweak duration-log #1 a'' > 4
![[image of music]](ed/lily-77786b2f.png)
\tweak を用いて、スラーを変更することができます:
\relative { c'-\tweak thickness #5 ( d e f) }
![[image of music]](78/lily-ced0c525.png)
\tweak コマンドが機能するためには、入力ファイルが音楽の流れに変換されたときに、\tweak コマンドのすぐ後に変更が適用されるオブジェクトが配置されている必要があります。
和音全体に対する調整は何の効果もありません。なぜなら、和音の音楽イベントはコンテナと機能するだけで、すべてのレイアウト
オブジェクトは EventChord の内部にあるイベントによって作成されるからです:
\tweak color #red c''4 \tweak color #red <c'' e''>4 <\tweak color #red c'' e''>4
![[image of music]](e7/lily-94d955a2.png)
単純な \tweak コマンドでは入力から直接作成されないオブジェクトを変更することはできません。特に、符幹、自動連桁、それに臨時記号には効果を持ちません。なぜなら、それらは入力ストリームの中の音楽要素によって生成されるのではなく、後になって NoteHead レイアウト オブジェクトによって生成されるからです。
そのような直接作成されないレイアウト オブジェクトは、グラフィカル
オブジェクト名を明示的に指定した \tweak コマンドを用いることで調整することができます:
\tweak Stem.color #red \tweak Beam.color #green c''8 e'' <c'' e'' \tweak Accidental.font-size #-3 ges''>4
![[image of music]](f3/lily-acdf0baf.png)
\tweak コマンドで音部記号や拍子記号を変更することはできません。なぜなら、コンテキストを指定するために必要とされる追加要素の自動挿入により、それらは前に配置された \tweak コマンドとは分離されるからです。
記譜要素の前に複数の \tweak コマンドを配置することができます
– それらはすべて効果を持ちます:
c' -\tweak style #'dashed-line -\tweak dash-fraction #0.2 -\tweak thickness #3 -\tweak color #red \glissando f''
![[image of music]](c5/lily-36b918ef.png)
入力ファイルのあるセクションから生成される音楽の流れ
– 自動的に挿入される要素も含めて –
が、検証されます。
Displaying music expressions を参照してください。これは、\tweak コマンドによって変更されるオブジェクトを決定するとき、あるいは、\tweak の適用で入力を調整する方法を決定するときに役に立つかもしれません。
参照
学習マニュアル: 調整手段
拡張: Displaying music expressions
既知の問題と警告
\tweak コマンドで和音の中にある複数のタイのうち 1 つだけの位置を変更することはできません。入力ファイルの中で最初に遭遇したタイの位置を変更してしまいます。
| [ << デフォルトを変更する ] | [トップ][目次][インデックス][ ? ] | [ Notation manual tables >> ] | ||
| [ < tweak コマンド ] | [ 上へ : プロパティを変更する ] | [ 連想配列を変更する > ] | ||
5.3.5 \set 対 \override
| [ << デフォルトを変更する ] | [トップ][目次][インデックス][ ? ] | [ Notation manual tables >> ] | ||
| [ < set 対 override ] | [ 上へ : プロパティを変更する ] | [ 役に立つコンセプトとプロパティ > ] | ||
5.3.6 連想配列を変更する
ユーザが変更可能なプロパティの中には、内部的には 連想配列 として存在しているものがあります – 連想配列は キー と 値 のペアの配列を保持します。連想配列の構造は下記のとおりです:
'((キー1 . 値1) (キー2 . 値2) (キー3 . 値3) …)
ある連想配列がグラフィカル オブジェクト プロパティまたは
\paper 変数である場合、その連想配列の個々のキーを、他のキーに影響を与えることなく、変更することができます。
例えば、譜グループの中にある隣り合う譜間のスペースを減らすには、StaffGrouper グラフィカル オブジェクトの
staff-staff-spacing プロパティを使用します。このプロパティは 4 つのキー
– basic-distance, minimum-distance,
padding, それに stretchability –
を持つ連想配列です。このプロパティの標準設定は、内部リファレンスの “Backend” セクションでリストアップされています
(
StaffGrouper を参照してください):
'((basic-distance . 9) (minimum-distance . 7) (padding . 1) (stretchability . 5))
譜間のスペースを小さくする方法の 1 つは、basic-distance キーの値 (9) を
minimum-distance キーの値 (7) 近くまで減らすことです。個々のキーを変更するには、ネストされた宣言 を使います:
% デフォルトの譜間スペース \new PianoStaff << \new Staff { \clef treble c''1 } \new Staff { \clef bass c1 } >> % 譜間スペースを減らします \new PianoStaff \with { % this is the nested declaration \override StaffGrouper.staff-staff-spacing.basic-distance = #7 } << \new Staff { \clef treble c''1 } \new Staff { \clef bass c1 } >>
![[image of music]](a0/lily-32b39d26.png)
ネストされた宣言は、プロパティの他のキーに変更を加えることなく、指定されたキー (上の例では basic-distance) を更新します。
今度は、譜を重ならない範囲でできる限り近づけたいとします。最も簡単な方法は、連想配列の 4 つのキーすべてを 0 にセットすることです。しかしながら、4 つのネストされた宣言を記述する必要はありません。1 つの宣言でプロパティを丸ごと再定義することができます:
\new PianoStaff \with { \override StaffGrouper.staff-staff-spacing = #'((basic-distance . 0) (minimum-distance . 0) (padding . 0) (stretchability . 0)) } << \new Staff { \clef treble c''1 } \new Staff { \clef bass c1 } >>
![[image of music]](5e/lily-1aebdd21.png)
連想配列の再定義でリストアップされなかったキーは、セットされなかった場合のデフォルト値 にリセットされます。staff-staff-spacing の場合、セットされなかったキーは 0 にリセットされます
(stretchability は例外で、セットされなかった場合、basic-distance にリセットされます)。このため、以下の 2 つの宣言は等価です:
\override StaffGrouper.staff-staff-spacing =
#'((basic-distance . 7))
\override StaffGrouper.staff-staff-spacing =
#'((basic-distance . 7)
(minimum-distance . 0)
(padding . 0)
(stretchability . 7))
連想配列の再定義でリストアップされなかったキーがあることにより、初期化ファイルでセットされたり、入力ファイルがコンパイルされるときに読み込まれた標準設定が (意図せずに) 削除される可能性があります。上の例では、padding と minimum-distance の標準設定
(‘scm/define-grobs.scm’ で定義されます) は、セットされなかった場合のデフォルト値 (両方とも 0) にリセットされます。プロパティや (任意のサイズ) 連想配列を定義した場合、セットされなかったキー値はすべて セットされなかった場合のデフォルト値
にリセットされます。そうすることを意図しているのでない限り、ネストされた宣言を用いてキー値を個々に更新する方が安全です。
Note: ネストされた宣言は、コンテキスト プロパティ連想配列
(beamExceptions, keyAlterations, timeSignatureSettings 等)
に対しては機能しません。これらのプロパティを変更するには、連想配列として丸ごと再定義するしかありません。
| [ << デフォルトを変更する ] | [トップ][目次][インデックス][ ? ] | [ Notation manual tables >> ] | ||
| [ < 連想配列を変更する ] | [ 上へ : デフォルトを変更する ] | [ 入力モード > ] | ||
5.4 役に立つコンセプトとプロパティ
| 5.4.1 入力モード | ||
| 5.4.2 向きと配置 | ||
| 5.4.3 距離と距離の単位 | ||
| 5.4.4 譜記号プロパティ | ||
| 5.4.5 スパナ | ||
| 5.4.6 オブジェクトの可視性 | ||
| 5.4.7 ライン スタイル | ||
| 5.4.8 オブジェクトを回転させる |
| [ << デフォルトを変更する ] | [トップ][目次][インデックス][ ? ] | [ Notation manual tables >> ] | ||
| [ < 役に立つコンセプトとプロパティ ] | [ 上へ : 役に立つコンセプトとプロパティ ] | [ 向きと配置 > ] | ||
5.4.1 入力モード
入力ファイルの中に保持されている記譜を解釈する方法は、カレントの入力モードによって決定されます。
和音モード
このモードは \chordmode コマンドで有効になり、入力はコード記譜法の構文で解釈されるようになります。和音記譜法 を参照してください。コードは、譜面上に音符として描画されます。
和音モードは \chords コマンドでも有効になります。このコマンドは新たに ChordNames コンテキストも作成します。入力はコード記譜法の構文で解釈され、さらに ChordNames コンテキストの中にコード ネームとして描画されます。コード ネームを譜刻する を参照してください。
ドラム モード
このモードは \drummode コマンドで有効になり、入力はドラム記譜法の構文で解釈されるようになります。基本的な打楽器の記譜法 を参照してください。
また、ドラム モードは \drums コマンドでも有効になります。このモードも新たに DrumStaff コンテキストを作成し、コマンドの後に続く入力をドラム記譜法の構文で解釈して、ドラム譜上にドラム記号として描画します。基本的な打楽器の記譜法 を参照してください。
音型モード
このモードは \figuremode コマンドで有効になり、入力は通奏低音の構文で解釈されるようになります。通奏低音を入力する を参照してください。
また、音型モードは \figures コマンドでも有効になります。このモードも新たに FiguredBass コンテキストを作成し、コマンドの後に続く入力を通奏低音の構文で解釈して、FiguredBass コンテキストの中に通奏低音記号として描画します。通奏低音の導入部 を参照してください。
フレットとタブ モード
フレット記号とタブ記号を入力するための特別な入力モードはありません。
タブ図を作成するには、音符モードで音符や和音を入力して、それらを TabStaff コンテキストの中に描画します。デフォルトのタブ譜 を参照してください。
譜の上にフレット図を作成するには、2 つの方法があります。FretBoards コンテキスト
(自動フレット ダイアグラム を参照してください) を用いるか、あるいは、音符の上に \fret-diagram コマンド
(フレット ダイアグラム マークアップ) を用いてフレット図をマークアップとして入力するかのどちらかになります。
歌詞モード
このモードは \lyricmode コマンドで有効になり、入力はオプションで演奏時間を持つ歌詞音節として解釈され、歌詞識別子に関連付けされます。通奏低音の構文で解釈されるようになります。声楽 を参照してください。
また、歌詞モードは \addlyrics コマンドでも有効になります。このモードも新たに Lyrics コンテキストを作成し、暗黙的に lyricsto コマンドを作成します。lyricsto は、後に続く歌詞を、前にある音楽に関連付けします。
マークアップ モード
このモードは \markup コマンドで有効になり、入力はマークアップの構文で解釈されるようになります。Text markup commands を参照してください。
音符モード
このモードはデフォルトのモードであり、\notemode コマンドで有効にすることもできます。入力はピッチ、演奏時間、マークアップなどとして解釈され、譜面上に音楽記譜として写植されます。
通常、音符モードを明示的に指定する必要はありません。しかしながら、ある特定の状況 – 例えば、歌詞モード、和音モード、あるいは他のモードを使っていて、音符モードの構文でしか入力できないものを入力しようとしている場合 – では、音符モードを明示的に指定することが有用な場合があります。
例えば、合唱曲で節ごとに強弱記号を指定するには、音符モードで入力して記号を解釈させる必要があります:
{ c4 c4 c4 c4 } \addlyrics { \notemode{\set stanza = \markup{ \dynamic f 1. } } To be sung loudly } \addlyrics { \notemode{\set stanza = \markup{ \dynamic p 2. } } To be sung quietly }
![[image of music]](97/lily-b32dd288.png)
| [ << デフォルトを変更する ] | [トップ][目次][インデックス][ ? ] | [ Notation manual tables >> ] | ||
| [ < 入力モード ] | [ 上へ : 役に立つコンセプトとプロパティ ] | [ アーティキュレーションの方向指示子 > ] | ||
5.4.2 向きと配置
楽譜を写植しているとき、多くの要素の向きと配置には選択の余地があります。例えば、音符の符幹は上向きあるいは下向きにすることができ、歌詞、強弱記号、他の表現記号は譜の上あるいは下に配置することができ、テキストは左揃え、右揃え、あるいは中央揃えにすることができる、などです。これらの選択のほとんどは LilyPond によって自動的に決定されますが、強制的に向きや配置を指定することが望ましい場合もあります。
| アーティキュレーションの方向指示子 | ||
| 方向プロパティ |
| [ << デフォルトを変更する ] | [トップ][目次][インデックス][ ? ] | [ Notation manual tables >> ] | ||
| [ < 向きと配置 ] | [ 上へ : 向きと配置 ] | [ 方向プロパティ > ] | ||
アーティキュレーションの方向指示子
デフォルトでは、アーティキュレーションのいくつかの向きは常に上または下になっています (例えば、強弱記号やフェルマータ)。一方、他のアーティキュレーションは、符幹の向きによって、向きが上下します (スラーやアクセントなど)。
アーティキュレーションの前に 方向指示子 を置くことで、デフォルトの向きをオーバライドすることができます。3 つの方向指示子があります: ^ (“上向き” を意味します)、_ (“下向き” を意味します)、それに - (“デフォルトの向き” を意味します) です。通常、方向指示子は省略することができ、その場合は - と見なされます。しかしながら、以下のものの前には 常に 方向指示子を置く必要があります:
-
\tweakコマンド -
\markupコマンド -
\tagコマンド - 文字列マークアップ。例えば、-"string"
- 運指指示。例えば、
-1 - アーティキュレーションの短縮記法。例えば、
-.,->,--
方向指示子は、その後にくる音符だけに効果を持ちます:
\relative { c''2( c) c2_( c) c2( c) c2^( c) }
![[image of music]](b7/lily-feeca3e5.png)
| [ << デフォルトを変更する ] | [トップ][目次][インデックス][ ? ] | [ Notation manual tables >> ] | ||
| [ < アーティキュレーションの方向指示子 ] | [ 上へ : 向きと配置 ] | [ 距離と距離の単位 > ] | ||
方向プロパティ
多くのレイアウト オブジェクトの位置や向きは、direction プロパティによって制御されます。
direction プロパティの値は、1 (“上向き” あるいは “上” を意味します)、-1 (“下向き” あるいは “下” を意味します)
にセットすることができます。記号 UP と DOWN は、それぞれ 1 と -1 の代わりに用いることができます。デフォルトの向きを指定するには、direction を 0 あるいは CENTER にセットします。このような方法を用いる代わりに、多くの場合で、向きを指定するための前置コマンドが存在しています。それらはすべて以下のような形式をとります:
\xxxUp, xxxDown, xxxNeutral
ここで、xxxNeutral は “デフォルトの向きを使用する”
ことを意味します。
譜内部オブジェクト を参照してください。
いくつかのケースでは
– 一般的な例としてはアルペジオしかありません –
direction プロパティの値は、オブジェクトが親オブジェクトの左右どちらに配置されるかを指定します。
この場合、-1 あるいは LEFT は “左側” を意味し、1 あるいは RIGHT は “右側” を意味します。0 あるいは CENTER は、前のケースと同様に、“デフォルトの向きを使用する” ことを意味します。
これらの指示子は、キャンセルされるまで効果を持ちます。
\relative { c''2( c) \slurDown c2( c) c2( c) \slurNeutral c2( c) }
![[image of music]](e6/lily-2c232739.png)
多声の音楽では、一般的にオブジェクトの向きを変えるよりも明示的に
voice を指定した方が良いです。更なる情報は、複数のボイス を参照してください。
参照
学習マニュアル: Within-staff objects
記譜法リファレンス: 複数のボイス
| [ << デフォルトを変更する ] | [トップ][目次][インデックス][ ? ] | [ Notation manual tables >> ] | ||
| [ < 方向プロパティ ] | [ 上へ : 役に立つコンセプトとプロパティ ] | [ 譜記号プロパティ > ] | ||
5.4.3 距離と距離の単位
LilyPond における距離には 2 つのタイプがあります: 絶対距離と相対距離です。
絶対距離は、マージン、インデント、それにその他の詳細なページ レイアウトを指定するために使用され、デフォルトではミリメートルで指定されます。
距離は以下の単位で指定することもできます: \mm, \cm,
\inch (インチ), それに \pt (ポイント。1/73.27 インチ) です。また、ページ レイアウトにおける距離は、値の後ろに \staff-space を付けることにより、
比率で指定することもできます (次の段落を参照してください)。ページ レイアウトについての詳細は、ページ レイアウト に記述されています。
相対距離は常に譜スペースを単位として指定されます
– 稀に、半譜スペースが使用されます。譜スペースは隣り合う 2 本の譜線間の距離です。グローバル譜サイズを設定することにより、デフォルト値をグローバルに変更することができます。また、StaffSymbol の staff-space プロパティを変更することにより、譜スペースをローカルにオーバライドすることもできます。相対距離は、グローバル譜サイズや StaffSymbol の staff-space
プロパティのいずれかが変更されると、自動的に変更されます。しかしながら、フォントの比率はグローバル譜サイズが変更された場合にのみ、自動的に変更されます。そのため、グローバル譜サイズは容易に描画される楽譜全体のサイズを変更することができます。グローバル譜サイズを設定するための手段については、譜サイズを設定する を参照してください。
楽譜のある部分だけの比率を変更したいのなら
– 例えば、オッシア セクションや脚注で –
単純にグローバル譜サイズを変更するわけにはいきません。なぜなら、グローバル譜サイズを変更すると、楽譜全体が影響を受けるからです。そのような場合、StaffSymbol の staff-space プロパティとフォントのサイズをオーバライドすることにより、サイズを変更します。フォント サイズの変更を staff-space 単位の変更に変換するには、Scheme 関数 magstep を使用することができます。この関数の説明と使用例については、
オブジェクトの長さと太さ を参照してください。
参照
学習マニュアル: オブジェクトの長さと太さ
記譜法リファレンス: ページ レイアウト, 譜サイズを設定する
| [ << デフォルトを変更する ] | [トップ][目次][インデックス][ ? ] | [ Notation manual tables >> ] | ||
| [ < 距離と距離の単位 ] | [ 上へ : 役に立つコンセプトとプロパティ ] | [ スパナ > ] | ||
5.4.4 譜記号プロパティ
譜線の垂直位置と譜線の本数を同時に定義することができます。以下の例が示すように、音符の位置は譜線の位置には影響されません。
Note: 'line-positions プロパティは 'line-count をオーバライドします。譜線の本数は、'line-positions の値リストの中にある要素数によって、暗黙的に定義されます。
\new Staff \with { \override StaffSymbol.line-positions = #'(7 3 0 -4 -6 -7) } \relative { a4 e' f b | d1 }
![[image of music]](d1/lily-9e0c6f31.png)
譜の幅を変更することができます。単位は譜スペースです。譜内部のオブジェクトのスペースは、この設定によって影響を受けません。
\new Staff \with { \override StaffSymbol.width = #23 } \relative { a4 e' f b | d1 }
![[image of music]](63/lily-0e51daa9.png)
| [ << デフォルトを変更する ] | [トップ][目次][インデックス][ ? ] | [ Notation manual tables >> ] | ||
| [ < 譜記号プロパティ ] | [ 上へ : 役に立つコンセプトとプロパティ ] | [ spanner-interface を使用する > ] | ||
5.4.5 スパナ
多くの音楽記譜オブジェクトは、複数の音符あるいは複数の小節にまたがって、広がりを持ちます。例としては、スラー、連桁、連譜の囲み、volta 繰り返しの囲み、クレッシェンド、トリル、それにグリッサンドがあります。そのようなオブジェクトは総称して “スパナ” と呼ばれ、それらの見た目と振る舞いを制御するための特殊なプロパティを持ちます。これらのプロパティのいくつかは、すべてのスパナに共通しています。他のプロパティはスパナの部分集合に限定されています。
すべてのスパナは spanner-interface をサポートします。いくつかのスパナ – 2 つのオブジェクトの間に直線を描くもの – は、さらに、line-spanner-interface をサポートします。
spanner-interface を使用する | ||
line-spanner-interface を使用する |
| [ << デフォルトを変更する ] | [トップ][目次][インデックス][ ? ] | [ Notation manual tables >> ] | ||
| [ < スパナ ] | [ 上へ : スパナ ] | [ line-spanner-interface を使用する > ] | ||
spanner-interface を使用する
このインターフェイスは、いくつかのスパナに適用される 2 つのプロパティを提供します。
The minimum-length プロパティ
スパナの最短の長さは、minimum-length プロパティによって指定されます。通常、このプロパティを増加させると、スパナの両端の間にある音符の間隔は増加します。しかしながら、このオーバライドは多くのスパナで効果を持ちません。なぜなら、それらの長さは他の要素によって決定されるからです。以下に効果を持つ例を 2, 3 示します。
a'~ a' a' % タイの長さを増加させます -\tweak minimum-length #5 ~ a'
![[image of music]](02/lily-badc1843.png)
a1 \compressFullBarRests R1*23 % 休符バーの長さを増加させます \once \override MultiMeasureRest.minimum-length = #20 R1*23 a1
![[image of music]](2d/lily-07f00e02.png)
\relative { a' \< a a a \! % ヘアピンの長さを増加させます \override Hairpin.minimum-length = #20 a \< a a a \! }
![[image of music]](6d/lily-31fd710f.png)
さらに、このオーバライドはスラーとフレージング スラーの長さを増加させるためにも使用されます:
\relative { a'( g) a -\tweak minimum-length #5 ( g) a\( g\) a -\tweak minimum-length #5 \( g\) }
![[image of music]](45/lily-0a2bf799.png)
いくつかのレイアウト オブジェクトでは、minimum-length プロパティは、set-spacing-rods プロシージャが明示的に呼び出された場合にのみ効果を持ちます。このプロシージャを呼び出すには、springs-and-rods プロパティにly:spanner::set-spacing-rods をセットしておく必要があります。例えば、グリッサンドの最短長は、springs-and-rods プロパティが設定されていない限り、効果を持ちません:
% デフォルト e' \glissando c'' % 単独では効果を持ちません \once \override Glissando.minimum-length = #20 e' \glissando c'' % 以下の両方のオーバライドが存在する場合にのみ、効果を持ちます \once \override Glissando.minimum-length = #20 \once \override Glissando.springs-and-rods = #ly:spanner::set-spacing-rods e' \glissando c''
![[image of music]](19/lily-4f2b5b49.png)
Beam オブジェクトでも同じことが言えます:
% 単独では効果を持ちません \once \override Beam.minimum-length = #20 e'8 e' e' e' % 以下の両方のオーバライドが存在する場合にのみ、効果を持ちます \once \override Beam.minimum-length = #20 \once \override Beam.springs-and-rods = #ly:spanner::set-spacing-rods e'8 e' e' e'
![[image of music]](5c/lily-c637bf42.png)
The to-barline プロパティ
spanner-interface の 2 番目に有用なプロパティは
to-barline です。デフォルトではこのプロパティは真であり、小節の最初の音符のところで終了するヘアピンや他のスパナは直前の小節線のところで終了させられます。偽に設定すると、スパナは小節線を越えて、音符のところで終了します:
\relative { a' \< a a a a \! a a a \break \override Hairpin.to-barline = ##f a \< a a a a \! a a a }
![[image of music]](58/lily-3c43c1b5.png)
このプロパティはすべてのスパナに対して効果を持つわけではありません。例えば、スラーやフレージング スラー、あるいは小節線で終了させることに意味が無い他のスパナに対して、このプロパティを #t に設定しても効果がありません。
| [ << デフォルトを変更する ] | [トップ][目次][インデックス][ ? ] | [ Notation manual tables >> ] | ||
| [ < spanner-interface を使用する ] | [ 上へ : スパナ ] | [ オブジェクトの可視性 > ] | ||
line-spanner-interface を使用する
line-spanner-interface をサポートするオブジェクトには以下のものがあります:
-
DynamicTextSpanner -
Glissando -
TextSpanner -
TrillSpanner -
VoiceFollower
これらのスパナのステンシルを描画する責任を持つルーチンは
ly:line-interface::print です。このルーチンはスパナの両端の位置を綿密に決定し、求めに応じたスタイルでそれらの間に線を描きますスパナの両端の位置はオンザフライ (その場、その時々) で算出されますが、それらの Y 座標をオーバライドすることができます。指定する必要のあるプロパティは、プロパティ階層内で 2 階層下にネストされていますが、この \override コマンドは非常にシンプルです:
e''2 \glissando b' \once \override Glissando.bound-details.left.Y = #3 \once \override Glissando.bound-details.right.Y = #-2 e''2 \glissando b'
![[image of music]](67/lily-dade2278.png)
Y プロパティの単位は staff-space であり、譜の中央線が 0 位置です。グリッサンドでは、スパナの両端は各符頭の中心であり、Y はそれらの点を上下させます。
Y が設定されていない場合、値はスパナの両端の垂直位置から算出されます。
改行の場合、終点の Y の値は bound-details の部分リスト left-broken や right-broken のによって指定されます。例を示します:
\override Glissando.breakable = ##t \override Glissando.bound-details.right-broken.Y = #-3 c1 \glissando \break f1
![[image of music]](e5/lily-52a5ed09.png)
bound-details プロパティの部分リスト left や right の下位プロパティのいくつかは、Y と同じ方法で変更することができます:
-
Y 終点の Y 座標を、譜の中央線からの
staff-spaceオフセットで、設定します。デフォルトでは、終点オブジェクトの中心です。ですから、グリッサンドは符頭の中心に向かって進みます。水平方向に広がるスパナ – テキスト スパナやトリル スパナなど – では、この値は 0 に固定されています。
-
attach-dir スパナのラインがオブジェクトの左右どちらから始まり、終わるのかを決定します。
-1(あるいはLEFT) であれば、ラインは符頭の左側から開始あるいは終了します。-
X 終点の絶対 X 座標です。通常、オンザフライ (その場、その時々) で算出され、これをオーバライドしてもあまり意味がありません。
-
stencil ライン スパナは開始点や終了点で記号を持つ場合があり、その記号はこのサブ プロパティに保持されています。このサブ プロパティは内部で使用するためのものです。このサブ プロパティの代わりに
textを使用することを推奨します。-
text ステンシルを作成するために評価されるマークアップです。水平スパナに cresc., tr それに他のテキストを配置するために使用されます。
\override TextSpanner.bound-details.left.text = \markup { \small \bold Slower } c2\startTextSpan b c a\stopTextSpan![[image of music]](ac/lily-6d932479.png)
-
stencil-align-dir-y -
stencil-offset これらの 1 つを設定しなければ、ステンシルは、
XとYサブ プロパティで定義されたとおりに、ラインに中央揃えで、終点に配置されます。stencil-align-dir-yあるいはstencil-offsetのどちらかを設定すると、記号が上下します:\override TextSpanner.bound-details.left.stencil-align-dir-y = #-2 \override TextSpanner.bound-details.right.stencil-align-dir-y = #UP \override TextSpanner.bound-details.left.text = #"ggg" \override TextSpanner.bound-details.right.text = #"hhh" c4^\startTextSpan c c c \stopTextSpan
![[image of music]](10/lily-4c40c6e7.png)
予期される結果とは逆に、負の値はテキストを 上げる ということに注意してください。なぜなら、
-1あるいはDOWNはテキストの 下端 をスパナ ラインに揃え、1あるいはUPはテキストの 上端 をスパナ ラインに揃えるからです。-
arrow このサブ プロパティに
#tをセットするとラインの終点に矢印が描かれます。-
padding このサブ プロパティはラインの終点と実際の終点の間のスペースを制御します。パディングがなければ、グリッサンドは両端の符頭の中心から描かれます。
音楽関数 \endSpanners は直後の音符から始まるスパナをすぐに終了させます。ちょうど 1 音符分でスパナを終了させますが、to-barline が真で、かつ、次の音符の前に小節線がある場合はその小節線のところでスパナを終了させます。
\endSpanners c2 \startTextSpan c2 c2 \endSpanners c2 \< c2 c2
![[image of music]](6b/lily-5676bc21.png)
\endSpanners を使用している場合、\startTextSpan を \endTextSpan で閉じる必要はなく、ヘアピンを \! で閉じる必要もありません。
参照
内部リファレンス: TextSpanner, Glissando, VoiceFollower, TrillSpanner, line-spanner-interface
| [ << デフォルトを変更する ] | [トップ][目次][インデックス][ ? ] | [ Notation manual tables >> ] | ||
| [ < line-spanner-interface を使用する ] | [ 上へ : 役に立つコンセプトとプロパティ ] | [ ステンシルを削除する > ] | ||
5.4.6 オブジェクトの可視性
レイアウト オブジェクトの可視性を制御する主な方法は 4 つあります:
オブジェクトのステンシルを削除する方法、オブジェクトを透明にする方法、オブジェクトの色を白にする方法、あるいは、オブジェクトの break-visibility プロパティをオーバライドする方法です。
最初の 3 つの方法はすべてのレイアウト オブジェクトに適用されますが、最後の方法はいくつかの – 改行可能な オブジェクト –
だけに適用されます。学習マニュアルでは、これら 4 つのテクニックについて紹介しています。
オブジェクトの可視性と色 を参照してください。
さらに、特定のレイアウト オブジェクト特有のテクニックがいくつかあります。それらについては、特別な考慮でカバーされています。
| ステンシルを削除する | ||
| オブジェクトを透明にする | ||
| オブジェクトを白で描く | ||
| break-visibility を用いる | ||
| 特別な考慮を必要とするもの |
| [ << デフォルトを変更する ] | [トップ][目次][インデックス][ ? ] | [ Notation manual tables >> ] | ||
| [ < オブジェクトの可視性 ] | [ 上へ : オブジェクトの可視性 ] | [ オブジェクトを透明にする > ] | ||
ステンシルを削除する
レウアウト オブジェクトはそれぞれステンシル プロパティを持ちます。デフォルトでは、このプロパティはそのオブジェクトを描画する特殊な関数にセットされています。このプロパティが #f にオーバライドされた場合、関数は呼び出されず、そのオブジェクトは描画されません。\rever でデフォルトの動作に戻すことができます。
a1 a \omit Score.BarLine a a \undo \omit Score.BarLine a a a
![[image of music]](27/lily-5affe06e.png)
| [ << デフォルトを変更する ] | [トップ][目次][インデックス][ ? ] | [ Notation manual tables >> ] | ||
| [ < ステンシルを削除する ] | [ 上へ : オブジェクトの可視性 ] | [ オブジェクトを白で描く > ] | ||
オブジェクトを透明にする
レイアウト オブジェクトはそれぞれ transparent プロパティを持っていて、デフォルトでは #f にセットされています。#t にセットされると、そのオブジェクトはスペースを占めたままですが、不可視になります。
a'4 a' \once \hide NoteHead a' a'
![[image of music]](4a/lily-2d00dc5c.png)
| [ << デフォルトを変更する ] | [トップ][目次][インデックス][ ? ] | [ Notation manual tables >> ] | ||
| [ < オブジェクトを透明にする ] | [ 上へ : オブジェクトの可視性 ] | [ break-visibility を用いる > ] | ||
オブジェクトを白で描く
レイアウト オブジェクトはそれぞれ color プロパティを持っていて、デフォルトでは black にセットされています。このプロパティが white にセットされてると、そのオブジェクトは白い背景と区別が付かなくなります。しかしながら、そのオブジェクトが他のオブジェクトと交差している場合、交差している場所の色はオブジェクトの描画順序によって決定されます。これにより、以下に示すように、白いオブジェクトの画像が幽霊のように浮かび上がることがあります:
\override Staff.Clef.color = #white a'1
![[image of music]](fd/lily-5b559d30.png)
オブジェクトの描画順序を変更することにより、これを回避することができます。すべてのレイアウト オブジェクトは layer プロパティを持っており、このプロパティには整数がセットされています。より小さな値の layer を持つオブジェクトが最初に描画され、より大きな値の layer を持つオブジェクトが後になってから描画されます。このため、より大きな値を持つオブジェクトがより小さな値を持つオブジェクトを上書きします。デフォルトでは、たいていのオブジェクトの layer には 1 が代入されています。しかしながら、いくつかのオブジェクト
– StaffSymbol や BarLine など –
には 0 が代入されています。同じ値の layer を持つオブジェクトを描画する順番は不確定です。
上記の例において、白い音部記号
(この layer のデフォルト値は 1 です)
は譜線 (この layer のデフォルト値は 0 です)
の後に描画されます。そのため、音部記号は譜線を上書きしています。これを変更するには、Clef オブジェクトの layer により小さな値 – 例えば、-1 – を与えて、音部記号を先に描画させる必要があります:
\override Staff.Clef.color = #white \override Staff.Clef.layer = #-1 a'1
![[image of music]](9d/lily-ba94492c.png)
| [ << デフォルトを変更する ] | [トップ][目次][インデックス][ ? ] | [ Notation manual tables >> ] | ||
| [ < オブジェクトを白で描く ] | [ 上へ : オブジェクトの可視性 ] | [ 特別な考慮を必要とするもの > ] | ||
break-visibility を用いる
たいていのレイアウト オブジェクトは 1 回だけ描画されます。しかしながら、小節線、音部記号、拍子記号、それに調号などのオブジェクトは、改行が起こると 2 回描画する必要があります
– 行の最後で 1 回、次の行の最初でもう 1 回。そのようなオブジェクトは 改行可能 と呼ばれ、それらのオブジェクトが描画される可能性がある 3 つの場所
– 行の先頭、行の途中 (それらが変更された場合)、それに、行の最後 (そこで変更が行われた場合) –
における可視性を制御する break-visibility プロパティを持ちます。
例えば、デフォルトでは拍子記号は最初の行の先頭で描画されますが、変更されない限り他の場所には描画されません。変更された場合、拍子記号は変更が行われた場所に描画されます。この変更が行の最後で行われた場合、新しい拍子記号は次の行の先頭に描画され、その前の行の最後にも忠告の拍子記号が描画されます。
この振る舞いは break-visibility プロパティによって制御されます。このプロパティについての説明は
オブジェクトの可視性と色
を参照してください。このプロパティは 3 つのブール値からなるベクトルをとり、順に、そのオブジェクトが行の最後で描画されるかどうか、行の途中で描画されるかどうか、そして、行の先頭で描画されるかどうかを決定します。より正確には、改行の前、改行がない場合、改行の後です。
break-visibility プロパティによって制御する代わりに、これら 8 通りの組み合わせを ‘scm/output-lib.scm’ で定義されている定義済み関数によって指定することもできます。このファイルの中で、最後の 3 列がその列のヘッダで示される場所での可視性を表しています:
| 関数形式 | ベクトル形式 | 改行前 | 改行なし | 改行後 |
|---|---|---|---|---|
all-visible | '#(#t #t #t) | yes | yes | yes |
begin-of-line-visible | '#(#f #f #t) | no | no | yes |
center-visible | '#(#f #t #f) | no | yes | no |
end-of-line-visible | '#(#t #f #f) | yes | no | no |
begin-of-line-invisible | '#(#t #t #f) | yes | yes | no |
center-invisible | '#(#t #f #t) | yes | no | yes |
end-of-line-invisible | '#(#f #t #t) | no | yes | yes |
all-invisible | '#(#f #f #f) | no | no | no |
break-visibility のデフォルト設定はレイアウト オブジェクトによって異なります。以下の表は、break-visibility によって影響をうけるすべてのレイアウト オブジェクトと、そのプロパティのデフォルト設定を示しています:
| レイアウト オブジェクト | 通常のコンテキスト | デフォルト設定 |
|---|---|---|
BarLine | Score | calculated |
BarNumber | Score | begin-of-line-visible |
BreathingSign | Voice | begin-of-line-invisible |
Clef | Staff | begin-of-line-visible |
Custos | Staff | end-of-line-visible |
DoublePercentRepeat | Voice | begin-of-line-invisible |
KeyCancellation | Staff | begin-of-line-invisible |
KeySignature | Staff | begin-of-line-visible |
ClefModifier | Staff | begin-of-line-visible |
RehearsalMark | Score | end-of-line-invisible |
TimeSignature | Staff | all-visible |
以下の例は、小節線の可視性を制御するベクトルの使用方法を示しています:
\relative { f'4 g a b f4 g a b % カレント行の最後で小節線を削除します \once \override Score.BarLine.break-visibility = #'#(#f #t #t) \break f4 g a b f4 g a b }
![[image of music]](8d/lily-d2123b3b.png)
break-visibility をオーバライドするために使用されるベクトルの要素 3 つをすべて記述する必要がありますが、それらすべてが各レイアウト オブジェクトに対して効果を持つわけではなく、組み合わせによってはエラーになる場合もあります。以下の制限があります:
- 小節線を行の先頭に描画することはできません。
- 小節番号は 1 から始まるのでなければ、最初の行の先頭に描画することはできません。
- 音部記号 – 以下を参照してください
- 2 重線のパーセント繰り返しはすべて描画するか、すべて描画しないかのどちらかです。描画するには
begin-of-line-invisibleを用い、描画しないのならall-invisibleを用います。 - Key signature – 以下を参照してください
- ClefModifier – 以下を参照してください
| [ << デフォルトを変更する ] | [トップ][目次][インデックス][ ? ] | [ Notation manual tables >> ] | ||
| [ < break-visibility を用いる ] | [ 上へ : オブジェクトの可視性 ] | [ ライン スタイル > ] | ||
特別な考慮を必要とするもの
明示的な変更の後の可視性
break-visibility プロパティが調号の可視性と音部記号の変更を制御するのは、行の先頭 – つまり、改行の後 – においてだけです。行の途中や終わりでの明示的な調の変更や音部記号の変更の後に出現する調号や音部記号の可視性には効果を持ちません。以下の例では、all-invisible がセットされていますが、B フラット メジャーへの明示的な変更の後に出現する調号は可視のままです。
\relative { \key g \major f'4 g a b % すべての調号を削除しようと試みます \override Staff.KeySignature.break-visibility = #all-invisible \key bes \major f4 g a b \break f4 g a b f4 g a b }
![[image of music]](64/lily-8b67252a.png)
そのような明示的な調号や音部記号の変更の可視性は
explicitKeySignatureVisibility プロパティや
explicitClefVisibility プロパティによって制御されます。これらは break-visibility プロパティと等価であり、どちらも break-visibility と同様に 3 つのブール値からなるベクトルか上でリストアップした定義済み関数をとります。どちらも Staff コンテキストのプロパティであり、レイアウト オブジェクト自体のプロパティではありません。ですから、これらは \set コマンドでセットします。どちらもデフォルトでは all-visible がセットされています。これらのプロパティは明示的な変更の結果として生じる調号と音部記号の可視性だけを制御し、行の先頭での調号や音部記号には効果を持ちませんので、オブジェクトを削除するには適切な break-visibility
をオーバライドする必要があります。
\relative { \key g \major f'4 g a b \set Staff.explicitKeySignatureVisibility = #all-invisible \override Staff.KeySignature.break-visibility = #all-invisible \key bes \major f4 g a b \break f4 g a b f4 g a b }
![[image of music]](fb/lily-2df09bb1.png)
前の調をキャンセルする臨時記号の可視性
明示的な調の変更で描画される前の調をキャンセルする臨時記号を削除するには、Staff コンテキスト プロパティ printKeyCancellation に
#f をセットします:
\relative { \key g \major f'4 g a b \set Staff.explicitKeySignatureVisibility = #all-invisible \set Staff.printKeyCancellation = ##f \override Staff.KeySignature.break-visibility = #all-invisible \key bes \major f4 g a b \break f4 g a b f4 g a b }
![[image of music]](08/lily-0286162a.png)
このオーバライドによって、調の変更を示す臨時記号だけが残ります。
調を C メジャーや A マイナーに変更する時、前の調をキャンセルする臨時記号は前の調のキャンセルしている だけ であることに注意してください。そのようなケースでは、printKeyCancellation を #f に設定しても効果はありません:
\relative { \key g \major f'4 g a b \set Staff.explicitKeySignatureVisibility = #all-invisible \set Staff.printKeyCancellation = ##f \key c \major f4 g a b \break f4 g a b f4 g a b }
![[image of music]](6c/lily-91414cae.png)
調を C メジャーや A マイナーに変更する場合に、前の調をキャンセルする臨時記号を消すには、KeyCancellation
グラフィカル オブジェクトの可視性をオーバライドします:
\relative { \key g \major f'4 g a b \set Staff.explicitKeySignatureVisibility = #all-invisible \override Staff.KeyCancellation.break-visibility = #all-invisible \key c \major f4 g a b \break f4 g a b f4 g a b }
![[image of music]](2f/lily-888bc645.png)
自動小節線
特殊なケースとして、Score コンテキストの automaticBars プロパティを設定することにより、小節線の描画を Off にすることもできます。#f をセットされた場合、小節線は自動的には描画されなくなり、\bar コマンドで明示的に作成しなければならなくなります。定義済みコマンド \cadenzaOn とは異なり、小節数はカウントされ続けます。後になってこのプロパティに #t がセットされると、このカウントに従って小節線の生成が再開されます。#f がセットされている場合、改行が起こりえるのは明示的な \bar コマンドがある場所でだけになります。
オクターブ移調付きの音部記号
オクターブ移調付きの音部記号上の小さなオクターブ記号は
ClefModifier レイアウト オブジェクトによって作り出されます。このオブジェクトの可視性は
Clef オブジェクトの可視性とは独立して制御されます。そのため、各行の先頭においてそのような音部記号を完全に消そうとするなら、Clef オブジェクトと ClefModifier オブジェクトの両方に対して必要な break-visibility のオーバライドを行う必要があります。
明示的な音部記号の変更では、explicitClefVisibility プロパティが音部記号とそれに関連するオクターブ記号の両方を制御します。
参照
学習マニュアル: オブジェクトの可視性と色
| [ << デフォルトを変更する ] | [トップ][目次][インデックス][ ? ] | [ Notation manual tables >> ] | ||
| [ < 特別な考慮を必要とするもの ] | [ 上へ : 役に立つコンセプトとプロパティ ] | [ オブジェクトを回転させる > ] | ||
5.4.7 ライン スタイル
いくつかの演奏指示子 – 例えば、rallentando, accelerando それに trills など – はテキストとして記述され、線で (点線や波線の場合もあります) でいくつもの小節にわたって広がります。
これらはすべてグリッサンドと同じルーチンを用いてテキストと線を描きます。そのため、それらの振る舞いの調整も同じように行います。これらはスパナによって実現され、スパナを描くルーチンは
ly:line-interface::print です。このルーチンは 2 つの スパン ポイント の位置を決定し、要求されたスタイルに応じてそれら 2 点の間に線を描きます。
利用可能なライン スタイルと、それらをどのように調整するかを示す例を挙げます。
d2 \glissando d'2 \once \override Glissando.style = #'dashed-line d,2 \glissando d'2 \override Glissando.style = #'dotted-line d,2 \glissando d'2 \override Glissando.style = #'zigzag d,2 \glissando d'2 \override Glissando.style = #'trill d,2 \glissando d'2
![[image of music]](a6/lily-112258f3.png)
スパナの終点の位置は各グラフィック オブジェクトごとにオンザフライ (その場、その時々) で計算されますが、それらをオーバライドすることもできます:
\relative { e''2 \glissando f \once \override Glissando.bound-details.right.Y = #-2 e2 \glissando f }
![[image of music]](ad/lily-ff2a148f.png)
グリッサンドの終点の Y には -2 がセットされています。right の代わりに left を指定することにより、始点も同じように調整することができます。
Y がセットされていない場合、その値はスパナが取り付けられるポイントの垂直位置から算出されます。
スパナに他の調整を行うことも可能です。詳細は スパナ を参照してください。
| [ << デフォルトを変更する ] | [トップ][目次][インデックス][ ? ] | [ Notation manual tables >> ] | ||
| [ < ライン スタイル ] | [ 上へ : 役に立つコンセプトとプロパティ ] | [ レイアウト オブジェクトを回転させる > ] | ||
5.4.8 オブジェクトを回転させる
レイアウト オブジェクトとマークアップ テキストの要素はどちらも任意のポイントを中心にして任意の角度で回転させることができます。しかしながら、回転させる方法はまったく異なります。
| レイアウト オブジェクトを回転させる | ||
| マークアップを回転させる |
| [ << デフォルトを変更する ] | [トップ][目次][インデックス][ ? ] | [ Notation manual tables >> ] | ||
| [ < オブジェクトを回転させる ] | [ 上へ : オブジェクトを回転させる ] | [ マークアップを回転させる > ] | ||
レイアウト オブジェクトを回転させる
grob-interface をサポートするすべてのレイアウト オブジェクトは、それらのオブジェクトの rotation プロパティを設定することにより、回転させることができます。これは 3 要素のリストをとります: 反時計回りの回転の角度、オブジェクトの参照ポイントからの相対座標 x と y
(この座標が回転の中心になります) です。回転の角度は ‘°’で指定し、座標は譜スペースで指定します。
回転の角度と回転の中心座標は、トライ&エラーで決定する必要があります。
レイアウト オブジェクトを回転させることが有用な状況はあまりありません。以下の例は、有用であるかもしれないシチュエーションの 1 つを示しています:
g4\< e' d'' f''\! \override Hairpin.rotation = #'(20 -1 0) g4\< e' d'' f''\!
![[image of music]](6c/lily-3d3f6629.png)
| [ << デフォルトを変更する ] | [トップ][目次][インデックス][ ? ] | [ Notation manual tables >> ] | ||
| [ < レイアウト オブジェクトを回転させる ] | [ 上へ : オブジェクトを回転させる ] | [ 高度な調整 > ] | ||
マークアップを回転させる
すべてのマークアップ テキストは、\rotate コマンドを前に置くことにより、任意の角度に回転させることができます。このコマンドは 2 つの引数をとります: 反時計回りの回転の角度 ‘°’ と、回転させられるテキストです。テキストの領域は回転しません:
テキストの領域は回転させられるテキストの四隅になります。以下の例では、自動衝突回避を不可にするためにテキストの outside-staff-priority プロパティに #f をセットしています。そうしなければテキストのいくつかは高く押し上げられてしまいます。
\override TextScript.outside-staff-priority = ##f g4^\markup { \rotate #30 "a G" } b^\markup { \rotate #30 "a B" } des'^\markup { \rotate #30 "a D-Flat" } fis'^\markup { \rotate #30 "an F-Sharp" }
![[image of music]](b0/lily-3eb3d416.png)
| [ << デフォルトを変更する ] | [トップ][目次][インデックス][ ? ] | [ Notation manual tables >> ] | ||
| [ < マークアップを回転させる ] | [ 上へ : デフォルトを変更する ] | [ オブジェクトを揃える > ] | ||
5.5 高度な調整
このセクションでは、楽譜の見た目を細かく調節するためのさまざまなアプローチについて議論します。
| 5.5.1 オブジェクトを揃える | ||
| 5.5.2 グラフィカル オブジェクトを垂直方向にグループ化する | ||
| 5.5.3 ステンシルを変更する | ||
| 5.5.4 形状を変更する | ||
| 5.5.5 unpure-pure コンテナ |
参照
記譜法リファレンス: 内部リファレンスの説明, プロパティを変更する
拡張: Interfaces for programmers
インストールされているファイル: ‘scm/define-grobs.scm’
コード断片集: Tweaks and overrides
内部リファレンス: All layout objects
| [ << デフォルトを変更する ] | [トップ][目次][インデックス][ ? ] | [ Notation manual tables >> ] | ||
| [ < 高度な調整 ] | [ 上へ : 高度な調整 ] | [ X-offset と Y-offset を直接設定する > ] | ||
5.5.1 オブジェクトを揃える
self-alignment-interface と/あるいは side-position-interface をサポートするグラフィカル オブジェクトは、さまざまな形式で配置済みのオブジェクトに揃えることができます。そのようなオブジェクトのリストは、
self-alignment-interface と
side-position-interface を参照してください。
すべてのグラフィカル オブジェクトは参照ポイント、水平方向の広がり、それに垂直方向の広がりを持ちます。水平方向の広がりは、参照ポイントから左端と右端までの距離を意味する数値のペアであり、左端は負値です。垂直方向の広がりは、参照ポイントから下端と上端までの距離を意味する数値のペアであり、下端は負値です。
あるオブジェクトの譜面上の位置は、X-offset プロパティと
Y-offset プロパティの値によって与えられます。X-offset の値は、親オブジェクトの参照ポイントの X 座標からの距離を意味します。Y-offset の値は、譜の中央線からの距離を意味します。X-offset と Y-offset の値は直接設定されることもありますし、いくつかの形式で親オブジェクトと揃えるためにプロシージャによって算出されることもあります。
Note: 多くのオブジェクトは特殊な配置規則を持っています。そのため、そのオブジェクトが self-alignment-interface をサポートしていたとしても、X-offset あるいは Y-offset の設定は無視されたり、変更されることがあります。
例えば、臨時記号は Y-offset を設定することにより垂直方向の位置を変更することができますが、X-offset は効果を持ちません。
リハーサル記号は、小節線、音部記号、拍子記号それに調号などの改行可能なオブジェクトに揃えることができます。リハーサル記号をそのようなオブジェクトに合わせて配置するために、break-aligned-interface の中に特別なプロパティがあります。
参照
記譜法リファレンス:
break-alignable-interface を使用する,
X-offset と Y-offset を直接設定する | ||
side-position-interface を使用する | ||
self-alignment-interface を使用する | ||
break-alignable-interface を使用する |
| [ << デフォルトを変更する ] | [トップ][目次][インデックス][ ? ] | [ Notation manual tables >> ] | ||
| [ < オブジェクトを揃える ] | [ 上へ : オブジェクトを揃える ] | [ side-position-interface を使用する > ] | ||
X-offset と Y-offset を直接設定する
多くのオブジェクトの X-offset プロパティと Y-offset プロパティに数値を与えることができます。以下の例は、3 つの音符を示していて、1 つはデフォルト配置の運指記号を持ち、他の 2 つの運指記号は X-offset と Y-offset が変更されています。
a'-3 a' -\tweak X-offset #0 -\tweak Y-offset #0 -3 a' -\tweak X-offset #-1 -\tweak Y-offset #1 -3
![[image of music]](f8/lily-06fa918f.png)
| [ << デフォルトを変更する ] | [トップ][目次][インデックス][ ? ] | [ Notation manual tables >> ] | ||
| [ < X-offset と Y-offset を直接設定する ] | [ 上へ : オブジェクトを揃える ] | [ self-alignment-interface を使用する > ] | ||
side-position-interface を使用する
side-position-interface をサポートするオブジェクトは、その親オブジェクトの隣に配置することができ、それにより、それら 2 つのオブジェクトの指定された端をくっつけることができます。オブジェクトを親オブジェクトの上、下、右、あるいは左に配置することができます。親オブジェクトを指定することはできません:
親オブジェクトは入力ストリームの中での要素の順序によって決定されます。たいていのオブジェクトの親オブジェクトは、そのオブジェクトに関連する符頭となります。
side-axis プロパティと direction プロパティの値は、以下のように、オブジェクトが配置される場所を決定します:
side-axis | direction | |
|---|---|---|
| property | property | Placement |
0 | -1 | 左 |
0 | 1 | 右 |
1 | -1 | 下 |
1 | 1 | 上 |
side-axis が 0 である場合、X-offset にはプロシージャ ly:side-position-interface::x-aligned-side をセットする必要があります。このプロシージャは、direction の値に基づいて親オブジェクトの左あるいは右にオブジェクトを配置するための適切な値を
X-offset に返します。
side-axis が 1 である場合、Y-offset にはプロシージャ ly:side-position-interface::y-aligned-side をセットする必要があります。このプロシージャは、direction の値に基づいて親オブジェクトの上あるいは下にオブジェクトを配置するための適切な値を
Y-offset に返します。
| [ << デフォルトを変更する ] | [トップ][目次][インデックス][ ? ] | [ Notation manual tables >> ] | ||
| [ < side-position-interface を使用する ] | [ 上へ : オブジェクトを揃える ] | [ break-alignable-interface を使用する > ] | ||
self-alignment-interface を使用する
オブジェクトを自動的に水平方向に揃える
self-alignment-interface をサポートするオブジェクトの水平方向の揃えは、self-alignment-X プロパティの値によって制御され、そのオブジェクトの X-offset プロパティには任意の実数値を与えることができる
ly:self-alignment-interface::x-aligned-on-self.
self-alignment-X がセットされます。与える実数値は、そのオブジェクトの X 方向の広がりの半分を単位とします。負値はオブジェクトを右に移動させ、正値はオブジェクトを左に移動させます。値が 0 であればそのオブジェクトは親オブジェクトの参照ポイントに中央揃えされ、値が -1 であればそのオブジェクトの左端が親オブジェクトの参照ポイントに揃えられ、値が 1 であればそのオブジェクトの右端が親オブジェクトの参照ポイントに揃えられます。記号 LEFT, CENTER, それに RIGHT はそれぞれ -1, 0, それに 1 に対応します。
通常、\override コマンドを用いて self-alignment-X の値を変更しますが、\tweak コマンドを用いることで単一の音符に付けられている複数の注釈を個別に揃えることができます:
a' -\tweak self-alignment-X #-1 ^"left-aligned" -\tweak self-alignment-X #0 ^"center-aligned" -\tweak self-alignment-X #RIGHT ^"right-aligned" -\tweak self-alignment-X #-2.5 ^"aligned further to the right"
![[image of music]](bd/lily-51efd865.png)
オブジェクトを自動的に垂直方向に揃える
オブジェクトの Y-offset プロパティに
ly:self-alignment-interface::y-aligned-on-self がセットされていれば、水平方向の揃えと同じように、垂直方向に揃えることができます。しかしながら、垂直方向の揃えには他のメカニズムも関与します:
Y-offset の値は、垂直方向の揃えに関与する変数の 1 つに過ぎません。このことにより、いくつかのオブジェクトの Y-offset 値の調整はややこしくなります。単位はそのオブジェクトの垂直方向の広がりの半分です。通常これは非常に小さいため、非常に大きな数値が必要になる可能性があります。値が -1 であればそのオブジェクトの下端が親オブジェクトの参照ポイントに揃えられ、値が 0 であればそのオブジェクトの中央が親オブジェクトの参照ポイントに揃えられ、値が 1 であればそのオブジェクトの上端が親オブジェクトの参照ポイントに揃えられます。記号 DOWN, CENTER, それに UP はそれぞれ -1, 0, それに 1 に対応します。
オブジェクトを自動的に両方向に揃える
X-offset と Y-offset の両方の設定を行うことで、オブジェクトの水平方向と垂直方向の揃えを同時に行うことができます。
以下の例は、運指記号を符頭に近づけるための調整方法を示しています。
a' -\tweak self-alignment-X #0.5 % 左方向に移動させます -\tweak Y-offset #ly:self-alignment-interface::y-aligned-on-self -\tweak self-alignment-Y #-1 % 上方向に移動させます -3 % 3 の指
![[image of music]](4f/lily-f96b751a.png)
| [ << デフォルトを変更する ] | [トップ][目次][インデックス][ ? ] | [ Notation manual tables >> ] | ||
| [ < self-alignment-interface を使用する ] | [ 上へ : オブジェクトを揃える ] | [ グラフィカル オブジェクトを垂直方向にグループ化する > ] | ||
break-alignable-interface を使用する
リハーサル記号と小節番号を小節線ではなく、記譜オブジェクトに揃えることができます。対象となる記譜オブジェクトには、ambitus,
breathing-sign, clef, custos, staff-bar,
left-edge, key-cancellation, key-signature, それに
time-signature があります。
デフォルトでは、リハーサル記号と小節番号はオブジェクトの上で水平方向に中央揃えされます:
% リハーサル記号は音部記号の上に中央揃えされます \override Score.RehearsalMark.break-align-symbols = #'(clef) \key a \major \clef treble \mark "↓" e'1 % リハーサル記号は拍子記号の上に中央揃えされます \override Score.RehearsalMark.break-align-symbols = #'(time-signature) \key a \major \clef treble \time 3/4 \mark "↓" e'2. % リハーサル記号はブレス記号の上に中央揃えされます \override Score.RehearsalMark.break-align-symbols = #'(breathing-sign) \key a \major \clef treble \time 4/4 e'1 \breathe \mark "↓"
![[image of music]](dd/lily-38684a46.png)
揃えの対象となり得るオブジェクトのリストを指定することができます。揃えを行う時点で対象リストの中にあるオブジェクトのいくつかが不可視である
– break-visibility の設定や、調号と音部に対する明示的な可視性の設定により –
場合、リハーサル記号あるいは小節番号はリストの中にある最初の可視のオブジェクトに揃えられます。リストの中にあるオブジェクトがすべて不可視である場合、小節線に揃えられます。小節線が不可視である場合、小節線があるはずの場所に揃えられます。
% リハーサル記号は調号の上に中央揃えされます \override Score.RehearsalMark.break-align-symbols = #'(key-signature clef) \key a \major \clef treble \mark "↓" e'1 % リハーサル記号は音部記号の上に中央揃えされます \set Staff.explicitKeySignatureVisibility = #all-invisible \override Score.RehearsalMark.break-align-symbols = #'(key-signature clef) \key a \major \clef bass \mark "↓" gis,1 % リハーサル記号は小節線の上に中央揃えされます \set Staff.explicitKeySignatureVisibility = #all-invisible \set Staff.explicitClefVisibility = #all-invisible \override Score.RehearsalMark.break-align-symbols = #'(key-signature clef) \key a \major \clef treble \mark "↓" e'1
![[image of music]](57/lily-45648607.png)
以下の例で示すように、記譜オブジェクトに対するリハーサル記号の揃えを変更することができます。複数の譜を持つ楽譜では、この設定はすべての譜に適用されます。
% RehearsalMark は KeySignature の上に中央揃えされます \override Score.RehearsalMark.break-align-symbols = #'(key-signature) \key a \major \clef treble \time 4/4 \mark "↓" e'1 % RehearsalMark は KeySignature の左端に揃えられます \once \override Score.KeySignature.break-align-anchor-alignment = #LEFT \mark "↓" \key a \major e'1 % RehearsalMark は KeySignature の右端に揃えられます \once \override Score.KeySignature.break-align-anchor-alignment = #RIGHT \key a \major \mark "↓" e'1
![[image of music]](fe/lily-a051cef9.png)
また、リハーサル記号を左端に揃えて、さらに任意の量だけ右あるいは左にずらすことができます。単位は譜スペースです:
% リハーサル記号は調号の左端に揃えられて % さらに 3.5 譜スペース右にずらされます \override Score.RehearsalMark.break-align-symbols = #'(key-signature) \once \override Score.KeySignature.break-align-anchor = #3.5 \key a \major \mark "↓" e'1 % リハーサル記号は調号の左端に揃えられて % さらに 2 譜スペース左にずらされます \once \override Score.KeySignature.break-align-anchor = #-2 \key a \major \mark "↓" e'1
![[image of music]](93/lily-4d502113.png)
| [ << デフォルトを変更する ] | [トップ][目次][インデックス][ ? ] | [ Notation manual tables >> ] | ||
| [ < break-alignable-interface を使用する ] | [ 上へ : 高度な調整 ] | [ ステンシルを変更する > ] | ||
5.5.2 グラフィカル オブジェクトを垂直方向にグループ化する
VerticalAlignment グラフィカル オブジェクトと VerticalAxisGroup グラフィカル オブジェクトは対で機能します。VerticalAxisGroup は Staff, Lyrics, 等のような異なるグラフィカル オブジェクトをグループにまとめます。それから、VerticalAlignment が VerticalAxisGroup によってグループ化されたグラフィカル オブジェクトを垂直方向に揃えます。通常、楽譜には VerticalAlignment は 1 つしかありませんが、Staff, Lyrics 等はそれ自体でそれぞれに VerticalAxisGroup を持ちます。
| [ << デフォルトを変更する ] | [トップ][目次][インデックス][ ? ] | [ Notation manual tables >> ] | ||
| [ < グラフィカル オブジェクトを垂直方向にグループ化する ] | [ 上へ : 高度な調整 ] | [ 形状を変更する > ] | ||
5.5.3 ステンシルを変更する
すべてのレイアウト オブジェクトは、grob-interface の一部である stencil プロパティを持ちます。通常、デフォルトでこのプロパティには、出力でそのオブジェクトを具現化する記号を描画するための特有の関数がセットされています。例えば、MultiMeasureRest オブジェクトの stencil プロパティに対する標準設定は、ly:multi-measure-rest::print です。
stencil プロパティを変更して異なる描画関数を参照させることにより、オブジェクトの標準記号を置き換えることができます。これには LilyPond 内部機能についての高い知識が求められます。しかしながら、多くの場合にまずまずの結果を生み出すもっと簡単な方法があります。
簡単な方法では、stencil プロパティにテキストを描画する関数
– ly:text-interface::print – をセットし、必要な記号を生み出すマークアップ テキストを保持するよう設定された
text プロパティ与えます。マークアップの自由度の高さにより、多くのことを達成できます。詳細は、マークアップ内部でのグラフィック記譜法 を参照してください。
以下の例では、この方法を用いて符頭記号を内部に×を持つ円に変更しています。
XinO = { \once \override NoteHead.stencil = #ly:text-interface::print \once \override NoteHead.text = \markup { \combine \halign #-0.7 \draw-circle #0.85 #0.2 ##f \musicglyph #"noteheads.s2cross" } } \relative { a' a \XinO a a }
![[image of music]](3b/lily-3d8fa877.png)
\musicglyph マークアップ コマンドには、Emmentaler フォントに含まれる任意の図柄を提供することができます。The Emmentaler font を参照してください。
参照
記譜法リファレンス: マークアップ内部でのグラフィック記譜法, テキストをフォーマットする, Text markup commands, The Emmentaler font.
| [ << デフォルトを変更する ] | [トップ][目次][インデックス][ ? ] | [ Notation manual tables >> ] | ||
| [ < ステンシルを変更する ] | [ 上へ : 高度な調整 ] | [ タイとスラーの形状を変更する > ] | ||
5.5.4 形状を変更する
| タイとスラーの形状を変更する |
| [ << デフォルトを変更する ] | [トップ][目次][インデックス][ ? ] | [ Notation manual tables >> ] | ||
| [ < 形状を変更する ] | [ 上へ : 形状を変更する ] | [ unpure-pure コンテナ > ] | ||
タイとスラーの形状を変更する
Tie, Slur, PhrasingSlur, LaissezVibrerTie,
それに RepeatTie はすべて 3 次のベジエ曲線として描かれます。自動的に算出されるタイやスラーの形状が最適ではない場合、以下の 2 つの方法を用いて手動で形状を変更することができます:
- 自動的に算出されるベジエ曲線の制御ポイントの移動させる
- 求める曲線を定義するのに必要な 4 つの制御ポイントの位置を明示的に指定する
2 つの方法について以下で説明します。曲線の調節がわずかであれば、最初の方法が適しています。2 番目の方法は単一の音符に関連付けられる曲線を作り出す場合に適しています。
3 次ベジエ曲線
3 次あるいは 3 乗のベジエ曲線は、4 つの制御ポイントによって定義されます。1 番目と 4 番目の制御ポイントは曲線の始点と終点になります。間にある 2 つの制御ポイントは曲線の形状を定義します。Web でベジエ曲線が描かれる様子を示すアニメーションを見つけることができるでしょう。しかしながら、以下の記述も役に立つかもしれません。ベジエ曲線は最初の制御ポイントから 2 番目の制御ポイントに進み、徐々に 3 番目の制御ポイントの方へ向きを変えながら 4 番目の制御ポイントの方へ向かい続け、3 番目の制御ポイントから 4 番目の制御ポイントに到達します。ベジエ曲線は 4 つの制御ポイントからなる四角形の中に納まります。制御ポイントの平行移動、回転、伸縮はすべて同じ操作です。
制御ポイントを移動させる
以下の例では、タイの自動配置が最適ではなく、\tieDown も役に立ちません。
<< { e1 ~ 1 } \\ { r4 <g c,> <g c,> <g c,> } >>
![[image of music]](92/lily-eabe68a3.png)
\shape でタイの制御ポイントを調節することで衝突を避けることができます。
\shape の構文は以下の通りです:
[-]\shape displacements item
これは item の制御ポイントを displacements だけ移動させます。引数 displacements は数のペアのリスト、あるいはそのようなリストのリストです。ペアの要素は制御ポイントの座標の移動量を表しています。item が文字列の場合、指定されたグラフィカル オブジェクト タイプに \once \override で適用されます。item が音楽表記の場合、その音楽表記に調節が適用されます。
言い換えると、\shape 関数は、引数 item が “Slur”
のようなグラフィカル オブジェクト名であるか “(” のような音楽表記であるかによって、\once \override コマンドあるいは \tweak
コマンドのどちらにでもなり得ます。引数 displacements は 4 つの (dx . dy) ペアのリストで 4 つの制御ポイントの移動を指定します – 値の単位は譜スペースです。
(曲線が複数のセグメントを持つ場合、引数 displacements は 4 つのペアを持つリストのリストになります。)
\tweak 形式で用いる場合にのみ、先頭にハイフン - を付ける必要があrます。
それでは、上記の例に \once \override 形式の \shape を使ってタイを 0.5 譜スペースだけ上に移動させてみましょう:
<< { \shape #'((0 . 0.5) (0 . 0.5) (0 . 0.5) (0 . 0.5)) Tie e'1~ 1 } \\ \relative { r4 <g' c,> <g c,> <g c,> } >>
![[image of music]](34/lily-38c74a3f.png)
タイの位置は改善されましたが、中央部分をもっと持ち上げるべきです。以下の例で \tweak 形式でそれを行っています:
<< { e'1-\shape #'((0 . 0.5) (0 . 1) (0 . 1) (0 . 0.5)) ~ e' } \\ \relative { r4 <g' c,> <g c,> <g c,> } >>
![[image of music]](19/lily-ab194301.png)
同じ方法で制御ポイントを水平方向に移動させることもできて、同じ音楽タイミングで発生する 2 つの曲線をうまく配置することができます:
\relative { c''8(\( a) a'4 e c\) \shape #'((0.7 . -0.4) (0.5 . -0.4) (0.3 . -0.3) (0 . -0.2)) Slur \shape #'((0 . 0) (0 . 0.5) (0 . 0.5) (0 . 0)) PhrasingSlur c8(\( a) a'4 e c\) }
![[image of music]](24/lily-09c0a232.png)
\shape 関数は改行を跨ぐ曲線の制御ポイントを移動させることもできます。分割される曲線それぞれにリストを与えて制御ポイントを移動させます。片方の曲線は変更する必要がない場合、空のリストを渡します。以下の例では、1 つのスラーが改行で 2 つに分割されています:
\relative { c'4( f g c \break d,4 c' f, c) }
![[image of music]](c4/lily-c2fa312b.png)
分割されたスラーの形状を変更することで、改行を跨いで続くスラーであることがわかりやすくなります:
% 片方のスラーを変更する必要がない場合、 % () を ((0 . 0) (0 . 0) (0 . 0) (0 . 0)) の短縮形として使うことができます \relative c' { \shape #'( (( 0 . 0) (0 . 0) (0 . 0) (0 . 1)) ((0.5 . 1.5) (1 . 0) (0 . 0) (0 . -1.5)) ) Slur c4( f g c \break d,4 c' f, c) }
![[image of music]](5e/lily-9f5364ff.png)
S 字曲線が求められた場合は、常に制御ポイントを手動で調節する必要があります — LilyPond が自動的にそのような形状を選択することはありません。
\relative c'' { c8( e b-> f d' a e-> g) \shape #'((0 . -1) (5.5 . -0.5) (-5.5 . -10.5) (0 . -5.5)) PhrasingSlur c8\( e b-> f d' a e-> g\) }
![[image of music]](77/lily-623d5927.png)
制御ポイントの位置を明示的に指定する
ベジエ曲線の制御ポイントの座標を指定します – 単位は譜スペースです。X 座標はタイあるいはスラーを取り付ける音符の参照ポイントからの相対位置で、X 座標は譜の中央線からの相対位置です。制御ポイントの座標をリストで指定します – リストは数のペアを 4 つ持ちます。両端の座標を推測して、それから 2 つ中間点の座標を推測します。最適値はトライ&エラーで見つけます。音楽やレイアウトに変更が加えられた場合、手動で値を調節する必要があるということに注意してください。
制御ポイントを移動させるよりも、位置を明示的に指定する方が望ましいシチュエーションの 1 つは、単一の音符に関連付けられる曲線の場合です。ここで、そのような例を示します。繰り返しの差し替え部分まで延びるスラーを表示する方法を示しています。
\relative { c''1 \repeat volta 3 { c4 d( e f } \alternative { { g2) d } { g2 % スラーを作成して、新しい位置に移動させます % <> はスラーを終わらせるための空の和音です -\tweak control-points #'((-2 . 3.8) (-1 . 3.9) (0 . 4) (1 . 3.4)) ( <> ) f, } { e'2 % スラーを作成して、新しい位置に移動させます -\tweak control-points #'((-2 . 3) (-1 . 3.1) (0 . 3.2) (1 . 2.4)) ( <> ) f, } } }
![[image of music]](9a/lily-7395772e.png)
既知の問題と警告
同じ音楽タイミングに複数のタイあるいはスラーが存在する場合、control-points プロパティを変更してもそれらの形状を変更することはできません。\tweak コマンドを用いたとしても変更できません。しかしながら、TieColumn の tie-configuration プロパティをオーバライドすることで、タイの垂直方向の位置と領域を変更することができます。
参照
内部リファレンス: TieColumn
| [ << デフォルトを変更する ] | [トップ][目次][インデックス][ ? ] | [ Notation manual tables >> ] | ||
| [ < タイとスラーの形状を変更する ] | [ 上へ : 高度な調整 ] | [ 音楽関数を使用する > ] | ||
5.5.5 unpure-pure コンテナ
unpure-pure コンテナは Y-axis スペース - 特に Y-offset と
Y-extent - の算出を文字 (つまり、数字やペア) ではなく、Scheme 関数で上書きする際に有用です。
ある特定のグラフィカル オブジェクトでは、Y-extent は stencil
プロパティをベースにしていて、それらの stencil プロパティを上書きする場合は
unpure-pure コンテナで Y-extent も上書きする必要があります。関数が Y-offset と/または Y-extent を上書きした場合、その関数はコンパイルの最中に改行の算出を早すぎるタイミングで引き起こすと見なされます。そのため、その関数はまったく評価されず (通常、‘0’ または ‘'(0 . 0)’ の値を返します)、結果として衝突を引き起こすことがあります。‘pure’ 関数はプロパティ、オブジェクト、あるいはグラフィカル オブジェクトの消失に影響を与えないため、その関数の Y-axis に関する評価は常に正しく行われます。
現在のところ ‘pure’ と見なされる関数が約 30 あり、Unpure-pure コンテナを用いて ‘pure’ ではない関数を ‘pure’ な関数としてセットすることができます。‘pure’ 関数は改行の 前に 評価されるため、水平方向のスペースを ‘正しいタイミングで’ 調節することができます。‘unpure’ 関数は改行の 後に 評価されます。
Note: ‘pure’ な関数を常に把握していることは困難なので、作成する ‘pure’
関数ではグラフィカル オブジェクト Beam や VerticalAlignment を使わないことをおすすめします。
unpure-pure コンテナは以下のように構築します:
(ly:make-unpure-pure-container f0 f1)
ここで f0 は n (n >= 1) 個の引数を取る関数であり、最初の引数は常にグラフィカル オブジェクトである必要があります。これが実際に結果を返す関数です。f1 は ‘pure’ であると見なされる関数であり、n + 2 個の引数を取ります。f1 も最初の引数は常にグラフィカル オブジェクトである必要があり、2 番目と
3 番目の引数は ‘start’ と ‘end’ です。
‘start’ と ‘end’ は事実上、Spanners (つまり、Hairpin や
Beam) だけで問題となるダミー値であり、
start and end are, for all intents and purposes, dummy
values that only matter for Spanners (i.e Hairpin or
Beam), that can return different height estimations based on a
starting and ending column.
f1 の残りの引数は f0 の引数と同じです (n = 1 である場合は残りの引数はありません)。
関数 f1 の結果は概算であり、f0 が実際の値を得るのに用いられます。f0 の結果はもっと後のスペースの処理で微調整に用いられます。
#(define (square-line-circle-space grob) (let* ((pitch (ly:event-property (ly:grob-property grob 'cause) 'pitch)) (notename (ly:pitch-notename pitch))) (if (= 0 (modulo notename 2)) (make-circle-stencil 0.5 0.0 #t) (make-filled-box-stencil '(0 . 1.0) '(-0.5 . 0.5))))) squareLineCircleSpace = { \override NoteHead.stencil = #square-line-circle-space } smartSquareLineCircleSpace = { \squareLineCircleSpace \override NoteHead.Y-extent = #(ly:make-unpure-pure-container ly:grob::stencil-height (lambda (grob start end) (ly:grob::stencil-height grob))) } \new Voice \with { \remove "Stem_engraver" } \relative c'' { \squareLineCircleSpace cis4 ces disis d \smartSquareLineCircleSpace cis4 ces disis d }
![[image of music]](0d/lily-1d458801.png)
最初の小節では unpure-pure コンテナを用いていないため、スペース算出エンジンは符頭の幅を知ることができず、符頭と臨時記号が衝突しています。次の小節では unpure-pure コンテナを用いているため、スペース算出エンジンは符頭の幅を知ることができ、それに応じて小節の幅を増やすことで衝突を回避しています。
通常、簡単な計算では、unpure-pure コンテナの ‘unpure’ パートと ‘pure’ パートの両方に、引数の数とスコープを変えただけのほとんど同じ関数を用いることができます。
Note: ‘pure’ と見なした関数が ‘pure’ でなかった場合、予期しない結果となることがあります。
| [ << デフォルトを変更する ] | [トップ][目次][インデックス][ ? ] | [ Notation manual tables >> ] | ||
| [ < unpure-pure コンテナ ] | [ 上へ : デフォルトを変更する ] | [ 置換関数の構文 > ] | ||
5.6 音楽関数を使用する
調整を異なる音楽表記に再利用する必要がある場合、その調整を音楽関数にしておくと便利です。このセクションでは、置換 関数についてだけ議論します。置換関数は変数を LilyPond 入力コードに置き換えます。他のもっと複雑な関数については、 Music functions で記述されています。
| 5.6.1 置換関数の構文 | ||
| 5.6.2 置換関数の例 |
| [ << デフォルトを変更する ] | [トップ][目次][インデックス][ ? ] | [ Notation manual tables >> ] | ||
| [ < 音楽関数を使用する ] | [ 上へ : 音楽関数を使用する ] | [ 置換関数の例 > ] | ||
5.6.1 置換関数の構文
変数を LilyPond コードに置換する関数を作成することは簡単にできます。置換関数の一般的な形式は以下のようなものです:
function =
#(define-music-function
(arg1 arg2 …)
(type1? type2? …)
#{
…music…
#})
ここで
argN | n 番目の引数 |
typeN? | argN が #t を返す Scheme の 型述語 (type predicate)。 |
…music… | 通常の LilyPond 入力。引数を参照するには $ (LilyPond 構造が許可されている場合のみ) や # (引数を Scheme 値、音楽関数の引数、あるいは音楽リスト内部の音楽として使う場合) を用います
(例: ‘#arg1’)。 |
です。
引数 parser と location を省略することはできず、
Music functions で記述されている高度な状況で使用されることがあります。
置換関数において、必ずこれらの引数を記述してください。
引数として、型述語のリストも必須です。音楽関数で用いられる一般的な型述語には下記のものがあります:
boolean? cheap-list? (‘list?’ の代わりに用いることで、処理を高速にします) ly:music? markup? number? pair? string? symbol?
利用可能な型述語のリストは、Predefined type predicates を参照してください。ユーザが型述語を定義することもできます。
参照
記譜法リファレンス: Predefined type predicates
拡張: Music functions
インストールされているファイル: ‘lily/music-scheme.cc’, ‘scm/c++.scm’, ‘scm/lily.scm’
| [ << デフォルトを変更する ] | [トップ][目次][インデックス][ ? ] | [ Notation manual tables >> ] | ||
| [ < 置換関数の構文 ] | [ 上へ : 音楽関数を使用する ] | [ Notation manual tables > ] | ||
5.6.2 置換関数の例
このセクションでは、置換関数の例をいくつか紹介します。高度なことはしていませんが、シンプルな置換関数を実現する方法を示しています。
最初の例では、TextScript のパディング設定を容易にするための関数が定義されています:
padText = #(define-music-function (padding) (number?) #{ \once \override TextScript.padding = $padding #}) \relative { c'''4^"piu mosso" b a b \padText #1.8 c4^"piu mosso" d e f \padText #2.6 c4^"piu mosso" fis a g }
![[image of music]](f8/lily-eb854d9c.png)
数値のほかに、音符などの音楽表記を音楽関数への引数にすることができます:
custosNote = #(define-music-function (note) (ly:music?) #{ \tweak NoteHead.stencil #ly:text-interface::print \tweak NoteHead.text \markup \musicglyph #"custodes.mensural.u0" \tweak Stem.stencil ##f #note #}) \relative { c'4 d e f \custosNote g }
![[image of music]](a3/lily-21583305.png)
複数の引数をとる置換関数を定義することもできます:
tempoPadded = #(define-music-function (padding tempotext) (number? markup?) #{ \once \override Score.MetronomeMark.padding = $padding \tempo \markup { \bold #tempotext } #}) \relative { \tempo \markup { "Low tempo" } c''4 d e f g1 \tempoPadded #4.0 "High tempo" g4 f e d c1 }
![[image of music]](96/lily-dbf18182.png)
| [ << デフォルトを変更する ] | [トップ][目次][インデックス][ ? ] | [ カンニング ペーパー >> ] | ||
| [ < 置換関数の例 ] | [ 上へ : Top ] | [ Chord name chart > ] | ||
A. Notation manual tables
| [ << Notation manual tables ] | [トップ][目次][インデックス][ ? ] | [ カンニング ペーパー >> ] | ||
| [ < Notation manual tables ] | [ 上へ : Notation manual tables ] | [ Common chord modifiers > ] | ||
A.1 Chord name chart
The following chart shows two standard systems for printing chord names, along with the pitches they represent.
![[image of music]](d9/lily-03a6097d.png)
| [ << Notation manual tables ] | [トップ][目次][インデックス][ ? ] | [ カンニング ペーパー >> ] | ||
| [ < Chord name chart ] | [ 上へ : Notation manual tables ] | [ Predefined string tunings > ] | ||
A.2 Common chord modifiers
The following table shows chord modifiers that can be used to generate standard chord structures.
| Type | Interval | Modifier | Example | Output |
| Major | Major third, perfect fifth | 5 or nothing | c1:5 |
|
| Minor | Minor third, perfect fifth | m or m5 | c1:m |
|
| Augmented | Major third, augmented fifth | aug | c1:aug |
|
| Diminished | Minor third, diminished fifth | dim | c1:dim |
|
| Dominant seventh | Major triad, minor seventh | 7 | c1:7 |
|
| Major seventh | Major triad, major seventh | maj7 or maj | c1:maj7 |
|
| Minor seventh | Minor triad, minor seventh | m7 | c1:m7 |
|
| Diminished seventh | Diminished triad, diminished seventh | dim7 | c1:dim7 |
|
| Augmented seventh | Augmented triad, minor seventh | aug7 | c1:aug7 |
|
| Half-diminished seventh | Diminished triad, minor seventh | m7.5- | c1:m7.5- |
|
| Minor-major seventh | Minor triad, major seventh | m7+ | c1:m7+ |
|
| Major sixth | Major triad, sixth | 6 | c1:6 |
|
| Minor sixth | Minor triad, sixth | m6 | c1:m6 |
|
| Dominant ninth | Dominant seventh, major ninth | 9 | c1:9 |
|
| Major ninth | Major seventh, major ninth | maj9 | c1:maj9 |
|
| Minor ninth | Minor seventh, major ninth | m9 | c1:m9 |
|
| Dominant eleventh | Dominant ninth, perfect eleventh | 11 | c1:11 |
|
| Major eleventh | Major ninth, perfect eleventh | maj11 | c1:maj11 |
|
| Minor eleventh | Minor ninth, perfect eleventh | m11 | c1:m11 |
|
| Dominant thirteenth | Dominant ninth, major thirteenth | 13 | c1:13 |
|
| Dominant thirteenth | Dominant eleventh, major thirteenth | 13.11 | c1:13.11 |
|
| Major thirteenth | Major eleventh, major thirteenth | maj13.11 | c1:maj13.11 |
|
| Minor thirteenth | Minor eleventh, major thirteenth | m13.11 | c1:m13.11 |
|
| Suspended second | Major second, perfect fifth | sus2 | c1:sus2 |
|
| Suspended fourth | Perfect fourth, perfect fifth | sus4 | c1:sus4 |
|
| Power chord (two-voiced) | Perfect fifth | 1.5 | \powerChords c1:5 |
|
| Power chord (three-voiced) | Perfect fifth, octave | 1.5.8 | \powerChords c1:5.8 |
|
![[image of music]](45/lily-fb74c9cc.png)
![[image of music]](99/lily-3e23cd08.png)
![[image of music]](de/lily-ccfbe47d.png)
![[image of music]](9b/lily-0ff2418b.png)
![[image of music]](68/lily-b5cb8d13.png)
![[image of music]](93/lily-8bd91dfe.png)
![[image of music]](f1/lily-f33492ed.png)
![[image of music]](d1/lily-01edeb45.png)
![[image of music]](1b/lily-740d849c.png)
![[image of music]](fb/lily-21cecfef.png)
![[image of music]](e6/lily-d2af371c.png)
![[image of music]](ce/lily-45cd0946.png)
![[image of music]](c1/lily-299ec8af.png)
![[image of music]](a1/lily-210395cc.png)
![[image of music]](1c/lily-a0d8fb4b.png)
![[image of music]](06/lily-66517c5a.png)
![[image of music]](19/lily-dce55aea.png)
![[image of music]](40/lily-1d6b76c1.png)
![[image of music]](72/lily-ddb75daf.png)
![[image of music]](9c/lily-180bd371.png)
![[image of music]](b1/lily-22669939.png)
![[image of music]](06/lily-1219f569.png)
![[image of music]](47/lily-5df6f1d5.png)
![[image of music]](7a/lily-d81ce11a.png)
![[image of music]](48/lily-bb111bd8.png)
![[image of music]](eb/lily-a3ba12e6.png)
![[image of music]](a7/lily-6a7c1e33.png)
| [ << Notation manual tables ] | [トップ][目次][インデックス][ ? ] | [ カンニング ペーパー >> ] | ||
| [ < Common chord modifiers ] | [ 上へ : Notation manual tables ] | [ Predefined fretboard diagrams > ] | ||
A.3 Predefined string tunings
The chart below shows the predefined string tunings.
![[image of music]](82/lily-64f97959.png)
| [ << Notation manual tables ] | [トップ][目次][インデックス][ ? ] | [ カンニング ペーパー >> ] | ||
| [ < Predefined string tunings ] | [ 上へ : Notation manual tables ] | [ Diagrams for Guitar > ] | ||
A.4 Predefined fretboard diagrams
| Diagrams for Guitar | ||
| Diagrams for Ukulele | ||
| Diagrams for Mandolin |
| [ << Notation manual tables ] | [トップ][目次][インデックス][ ? ] | [ カンニング ペーパー >> ] | ||
| [ < Predefined fretboard diagrams ] | [ 上へ : Predefined fretboard diagrams ] | [ Diagrams for Ukulele > ] | ||
Diagrams for Guitar
![[image of music]](09/lily-1eb52495.png)
| [ << Notation manual tables ] | [トップ][目次][インデックス][ ? ] | [ カンニング ペーパー >> ] | ||
| [ < Diagrams for Guitar ] | [ 上へ : Predefined fretboard diagrams ] | [ Diagrams for Mandolin > ] | ||
Diagrams for Ukulele
![[image of music]](07/lily-e970c3b6.png)
| [ << Notation manual tables ] | [トップ][目次][インデックス][ ? ] | [ カンニング ペーパー >> ] | ||
| [ < Diagrams for Ukulele ] | [ 上へ : Predefined fretboard diagrams ] | [ Predefined paper sizes > ] | ||
Diagrams for Mandolin
![[image of music]](20/lily-c5f31485.png)
| [ << Notation manual tables ] | [トップ][目次][インデックス][ ? ] | [ カンニング ペーパー >> ] | ||
| [ < Diagrams for Mandolin ] | [ 上へ : Notation manual tables ] | [ MIDI instruments > ] | ||
A.5 Predefined paper sizes
Paper sizes are defined in ‘scm/paper.scm’
The “ISO 216” A Series
-
"a10" (26 x 37 mm)
-
"a9" (37 x 52 mm)
-
"a8" (52 x 74 mm)
-
"a7" (74 x 105 mm)
-
"a6" (105 x 148 mm)
-
"a5" (148 x 210 mm)
-
"a4" (210 x 297 mm)
-
"a3" (297 x 420 mm)
-
"a2" (420 x 594 mm)
-
"a1" (594 x 841 mm)
-
"a0" (841 x 1189 mm)
The “ISO 216” B Series
-
"b10" (31 x 44 mm)
-
"b9" (44 x 62 mm)
-
"b8" (62 x 88 mm)
-
"b7" (88 x 125 mm)
-
"b6" (125 x 176 mm)
-
"b5" (176 x 250 mm)
-
"b4" (250 x 353 mm)
-
"b3" (353 x 500 mm)
-
"b2" (500 x 707 mm)
-
"b1" (707 x 1000 mm)
-
"b0" (1000 x 1414 mm)
Two extended sizes as defined in “DIN 476”
-
"4a0" (1682 x 2378 mm)
-
"2a0" (1189 x 1682 mm)
“ISO 269” standard C series
-
"c10" (28 x 40 mm)
-
"c9" (40 x 57 mm)
-
"c8" (57 x 81 mm)
-
"c7" (81 x 114 mm)
-
"c6" (114 x 162 mm)
-
"c5" (162 x 229 mm)
-
"c4" (229 x 324 mm)
-
"c3" (324 x 458 mm)
-
"c2" (458 x 648 mm)
-
"c1" (648 x 917 mm)
-
"c0" (917 x 1297 mm)
North American paper sizes
-
"junior-legal" (8.0 x 5.0 in)
-
"legal" (8.5 x 14.0 in)
-
"ledger" (17.0 x 11.0 in)
-
"letter" (8.5 x 11.0 in)
-
"tabloid" (11.0 x 17.0 in)
-
"11x17" (11.0 x 17.0 in)
-
"17x11" (17.0 x 11.0 in)
Government-letter by IEEE Printer Working Group, for children’s writing
-
"government-letter" (8 x 10.5 in)
-
"government-legal" (8.5 x 13.0 in)
-
"philippine-legal" (8.5 x 13.0 in)
ANSI sizes
-
"ansi a" (8.5 x 11.0 in)
-
"ansi b" (17.0 x 11.0 in)
-
"ansi c" (17.0 x 22.0 in)
-
"ansi d" (22.0 x 34.0 in)
-
"ansi e" (34.0 x 44.0 in)
-
"engineering f" (28.0 x 40.0 in)
North American Architectural sizes
-
"arch a" (9.0 x 12.0 in)
-
"arch b" (12.0 x 18.0 in)
-
"arch c" (18.0 x 24.0 in)
-
"arch d" (24.0 x 36.0 in)
-
"arch e" (36.0 x 48.0 in)
-
"arch e1" (30.0 x 42.0 in)
Antique sizes still used in the United Kingdom
-
"statement" (5.5 x 8.5 in)
-
"half letter" (5.5 x 8.5 in)
-
"quarto" (8.0 x 10.0 in)
-
"octavo" (6.75 x 10.5 in)
-
"executive" (7.25 x 10.5 in)
-
"monarch" (7.25 x 10.5 in)
-
"foolscap" (8.27 x 13.0 in)
-
"folio" (8.27 x 13.0 in)
-
"super-b" (13.0 x 19.0 in)
-
"post" (15.5 x 19.5 in)
-
"crown" (15.0 x 20.0 in)
-
"large post" (16.5 x 21.0 in)
-
"demy" (17.5 x 22.5 in)
-
"medium" (18.0 x 23.0 in)
-
"broadsheet" (18.0 x 24.0 in)
-
"royal" (20.0 x 25.0 in)
-
"elephant" (23.0 x 28.0 in)
-
"double demy" (22.5 x 35.0 in)
-
"quad demy" (35.0 x 45.0 in)
-
"atlas" (26.0 x 34.0 in)
-
"imperial" (22.0 x 30.0 in)
-
"antiquarian" (31.0 x 53.0 in)
PA4 based sizes
-
"pa0" (840 x 1120 mm)
-
"pa1" (560 x 840 mm)
-
"pa2" (420 x 560 mm)
-
"pa3" (280 x 420 mm)
-
"pa4" (210 x 280 mm)
-
"pa5" (140 x 210 mm)
-
"pa6" (105 x 140 mm)
-
"pa7" (70 x 105 mm)
-
"pa8" (52 x 70 mm)
-
"pa9" (35 x 52 mm)
-
"pa10" (26 x 35 mm)
Used in Southeast Asia and Australia
-
"f4" (210 x 330 mm)
Used for very small @lilypond examples in the
documentation based on a8 landscape.
-
"a8landscape" (74 x 52 mm)
| [ << Notation manual tables ] | [トップ][目次][インデックス][ ? ] | [ カンニング ペーパー >> ] | ||
| [ < Predefined paper sizes ] | [ 上へ : Notation manual tables ] | [ List of colors > ] | ||
A.6 MIDI instruments
The following is a list of names that can be used for the
midiInstrument property. The order of the instruments
below, starting in the left-hand column moving down, corresponds
to the General MIDI Standard’s 128 Program Numbers.
acoustic grand contrabass lead 7 (fifths) bright acoustic tremolo strings lead 8 (bass+lead) electric grand pizzicato strings pad 1 (new age) honky-tonk orchestral harp pad 2 (warm) electric piano 1 timpani pad 3 (polysynth) electric piano 2 string ensemble 1 pad 4 (choir) harpsichord string ensemble 2 pad 5 (bowed) clav synthstrings 1 pad 6 (metallic) celesta synthstrings 2 pad 7 (halo) glockenspiel choir aahs pad 8 (sweep) music box voice oohs fx 1 (rain) vibraphone synth voice fx 2 (soundtrack) marimba orchestra hit fx 3 (crystal) xylophone trumpet fx 4 (atmosphere) tubular bells trombone fx 5 (brightness) dulcimer tuba fx 6 (goblins) drawbar organ muted trumpet fx 7 (echoes) percussive organ french horn fx 8 (sci-fi) rock organ brass section sitar church organ synthbrass 1 banjo reed organ synthbrass 2 shamisen accordion soprano sax koto harmonica alto sax kalimba concertina tenor sax bagpipe acoustic guitar (nylon) baritone sax fiddle acoustic guitar (steel) oboe shanai electric guitar (jazz) english horn tinkle bell electric guitar (clean) bassoon agogo electric guitar (muted) clarinet steel drums overdriven guitar piccolo woodblock distorted guitar flute taiko drum guitar harmonics recorder melodic tom acoustic bass pan flute synth drum electric bass (finger) blown bottle reverse cymbal electric bass (pick) shakuhachi guitar fret noise fretless bass whistle breath noise slap bass 1 ocarina seashore slap bass 2 lead 1 (square) bird tweet synth bass 1 lead 2 (sawtooth) telephone ring synth bass 2 lead 3 (calliope) helicopter violin lead 4 (chiff) applause viola lead 5 (charang) gunshot cello lead 6 (voice)
| [ << Notation manual tables ] | [トップ][目次][インデックス][ ? ] | [ カンニング ペーパー >> ] | ||
| [ < MIDI instruments ] | [ 上へ : Notation manual tables ] | [ The Emmentaler font > ] | ||
A.7 List of colors
Normal colors
Usage syntax is detailed in オブジェクトに色を付ける.
black white red green blue cyan magenta yellow grey darkred darkgreen darkblue darkcyan darkmagenta darkyellow
X color names
X color names come several variants:
Any name that is spelled as a single word with capitalization (e.g., ‘LightSlateBlue’) can also be spelled as space separated words without capitalization (e.g., ‘light slate blue’).
The word ‘grey’ can always be spelled ‘gray’ (e.g., ‘DarkSlateGray’).
Some names can take a numerical suffix (e.g., ‘LightSalmon4’).
Color Names without a numerical suffix:
snow GhostWhite WhiteSmoke gainsboro FloralWhite OldLace linen AntiqueWhite PapayaWhip BlanchedAlmond bisque PeachPuff NavajoWhite moccasin cornsilk ivory LemonChiffon seashell honeydew MintCream azure AliceBlue lavender LavenderBlush MistyRose white black DarkSlateGrey DimGrey SlateGrey LightSlateGrey grey LightGrey MidnightBlue navy NavyBlue CornflowerBlue DarkSlateBlue SlateBlue MediumSlateBlue LightSlateBlue MediumBlue RoyalBlue blue DodgerBlue DeepSkyBlue SkyBlue LightSkyBlue SteelBlue LightSteelBlue LightBlue PowderBlue PaleTurquoise DarkTurquoise MediumTurquoise turquoise cyan LightCyan CadetBlue MediumAquamarine aquamarine DarkGreen DarkOliveGreen DarkSeaGreen SeaGreen MediumSeaGreen LightSeaGreen PaleGreen SpringGreen LawnGreen green chartreuse MediumSpringGreen GreenYellow LimeGreen YellowGreen ForestGreen OliveDrab DarkKhaki khaki PaleGoldenrod LightGoldenrodYellow LightYellow yellow gold LightGoldenrod goldenrod DarkGoldenrod RosyBrown IndianRed SaddleBrown sienna peru burlywood beige wheat SandyBrown tan chocolate firebrick brown DarkSalmon salmon LightSalmon orange DarkOrange coral LightCoral tomato OrangeRed red HotPink DeepPink pink LightPink PaleVioletRed maroon MediumVioletRed VioletRed magenta violet plum orchid MediumOrchid DarkOrchid DarkViolet BlueViolet purple MediumPurple thistle DarkGrey DarkBlue DarkCyan DarkMagenta DarkRed LightGreen
Color names with a numerical suffix
In the following names the suffix N can be a number in the range 1-4:
snowN seashellN AntiqueWhiteN bisqueN PeachPuffN NavajoWhiteN LemonChiffonN cornsilkN ivoryN honeydewN LavenderBlushN MistyRoseN azureN SlateBlueN RoyalBlueN blueN DodgerBlueN SteelBlueN DeepSkyBlueN SkyBlueN LightSkyBlueN LightSteelBlueN LightBlueN LightCyanN PaleTurquoiseN CadetBlueN turquoiseN cyanN aquamarineN DarkSeaGreenN SeaGreenN PaleGreenN SpringGreenN greenN chartreuseN OliveDrabN DarkOliveGreenN khakiN LightGoldenrodN LightYellowN yellowN goldN goldenrodN DarkGoldenrodN RosyBrownN IndianRedN siennaN burlywoodN wheatN tanN chocolateN firebrickN brownN salmonN LightSalmonN orangeN DarkOrangeN coralN tomatoN OrangeRedN redN DeepPinkN HotPinkN pinkN LightPinkN PaleVioletRedN maroonN VioletRedN magentaN orchidN plumN MediumOrchidN DarkOrchidN purpleN MediumPurpleN thistleN
Grey Scale
A grey scale can be obtained using:
greyN
Where N is in the range 0-100.
| [ << Notation manual tables ] | [トップ][目次][インデックス][ ? ] | [ カンニング ペーパー >> ] | ||
| [ < List of colors ] | [ 上へ : Notation manual tables ] | [ Clef glyphs > ] | ||
A.8 The Emmentaler font
The Emmentaler font consists of two sub-sets of glyphs. “Feta”, used for classical notation and “Parmesan”, used for Ancient notation.
Any glyph within the Emmentaler font can be accessed directly by using text markup along with the name of the glyph (as shown in the tables below). For example;
g^\markup {\musicglyph #"scripts.segno" }
or
\markup {\musicglyph #"five"}
For more information see テキストをフォーマットする.
| [ << Notation manual tables ] | [トップ][目次][インデックス][ ? ] | [ カンニング ペーパー >> ] | ||
| [ < The Emmentaler font ] | [ 上へ : The Emmentaler font ] | [ Time Signature glyphs > ] | ||
Clef glyphs
![[image of music]](0b/lily-76dbcd67.png)
| [ << Notation manual tables ] | [トップ][目次][インデックス][ ? ] | [ カンニング ペーパー >> ] | ||
| [ < Clef glyphs ] | [ 上へ : The Emmentaler font ] | [ Number glyphs > ] | ||
Time Signature glyphs
![[image of music]](c6/lily-8b332c94.png)
| [ << Notation manual tables ] | [トップ][目次][インデックス][ ? ] | [ カンニング ペーパー >> ] | ||
| [ < Time Signature glyphs ] | [ 上へ : The Emmentaler font ] | [ Accidental glyphs > ] | ||
Number glyphs
![[image of music]](80/lily-8d8bb8a3.png)
| [ << Notation manual tables ] | [トップ][目次][インデックス][ ? ] | [ カンニング ペーパー >> ] | ||
| [ < Number glyphs ] | [ 上へ : The Emmentaler font ] | [ Default Notehead glyphs > ] | ||
Accidental glyphs
![[image of music]](1b/lily-5b13ce04.png)
| [ << Notation manual tables ] | [トップ][目次][インデックス][ ? ] | [ カンニング ペーパー >> ] | ||
| [ < Accidental glyphs ] | [ 上へ : The Emmentaler font ] | [ Special Notehead glyphs > ] | ||
Default Notehead glyphs
![[image of music]](38/lily-f4d0afc9.png)
| [ << Notation manual tables ] | [トップ][目次][インデックス][ ? ] | [ カンニング ペーパー >> ] | ||
| [ < Default Notehead glyphs ] | [ 上へ : The Emmentaler font ] | [ Shape-note Notehead glyphs > ] | ||
Special Notehead glyphs
![[image of music]](9d/lily-088c978c.png)
| [ << Notation manual tables ] | [トップ][目次][インデックス][ ? ] | [ カンニング ペーパー >> ] | ||
| [ < Special Notehead glyphs ] | [ 上へ : The Emmentaler font ] | [ Rest glyphs > ] | ||
Shape-note Notehead glyphs
![[image of music]](71/lily-5c91a201.png)
| [ << Notation manual tables ] | [トップ][目次][インデックス][ ? ] | [ カンニング ペーパー >> ] | ||
| [ < Shape-note Notehead glyphs ] | [ 上へ : The Emmentaler font ] | [ Flag glyphs > ] | ||
Rest glyphs
![[image of music]](fa/lily-40869867.png)
| [ << Notation manual tables ] | [トップ][目次][インデックス][ ? ] | [ カンニング ペーパー >> ] | ||
| [ < Rest glyphs ] | [ 上へ : The Emmentaler font ] | [ Dot glyphs > ] | ||
Flag glyphs
![[image of music]](09/lily-2be182be.png)
| [ << Notation manual tables ] | [トップ][目次][インデックス][ ? ] | [ カンニング ペーパー >> ] | ||
| [ < Flag glyphs ] | [ 上へ : The Emmentaler font ] | [ Dynamic glyphs > ] | ||
Dot glyphs
![[image of music]](81/lily-8155deab.png)
| [ << Notation manual tables ] | [トップ][目次][インデックス][ ? ] | [ カンニング ペーパー >> ] | ||
| [ < Dot glyphs ] | [ 上へ : The Emmentaler font ] | [ Script glyphs > ] | ||
Dynamic glyphs
![[image of music]](fb/lily-ae3fd948.png)
| [ << Notation manual tables ] | [トップ][目次][インデックス][ ? ] | [ カンニング ペーパー >> ] | ||
| [ < Dynamic glyphs ] | [ 上へ : The Emmentaler font ] | [ Arrowhead glyphs > ] | ||
Script glyphs
![[image of music]](e5/lily-20e8632d.png)
| [ << Notation manual tables ] | [トップ][目次][インデックス][ ? ] | [ カンニング ペーパー >> ] | ||
| [ < Script glyphs ] | [ 上へ : The Emmentaler font ] | [ Bracket-tip glyphs > ] | ||
Arrowhead glyphs
![[image of music]](92/lily-8d82df0c.png)
| [ << Notation manual tables ] | [トップ][目次][インデックス][ ? ] | [ カンニング ペーパー >> ] | ||
| [ < Arrowhead glyphs ] | [ 上へ : The Emmentaler font ] | [ Pedal glyphs > ] | ||
Bracket-tip glyphs
![[image of music]](a4/lily-7fd84ff8.png)
| [ << Notation manual tables ] | [トップ][目次][インデックス][ ? ] | [ カンニング ペーパー >> ] | ||
| [ < Bracket-tip glyphs ] | [ 上へ : The Emmentaler font ] | [ Accordion glyphs > ] | ||
Pedal glyphs
![[image of music]](62/lily-a2bf82dd.png)
| [ << Notation manual tables ] | [トップ][目次][インデックス][ ? ] | [ カンニング ペーパー >> ] | ||
| [ < Pedal glyphs ] | [ 上へ : The Emmentaler font ] | [ Tie glyphs > ] | ||
Accordion glyphs
![[image of music]](63/lily-3b47d3fe.png)
| [ << Notation manual tables ] | [トップ][目次][インデックス][ ? ] | [ カンニング ペーパー >> ] | ||
| [ < Accordion glyphs ] | [ 上へ : The Emmentaler font ] | [ Vaticana glyphs > ] | ||
Tie glyphs
![[image of music]](f5/lily-dffaecd2.png)
| [ << Notation manual tables ] | [トップ][目次][インデックス][ ? ] | [ カンニング ペーパー >> ] | ||
| [ < Tie glyphs ] | [ 上へ : The Emmentaler font ] | [ Medicaea glyphs > ] | ||
Vaticana glyphs
![[image of music]](08/lily-b69af986.png)
| [ << Notation manual tables ] | [トップ][目次][インデックス][ ? ] | [ カンニング ペーパー >> ] | ||
| [ < Vaticana glyphs ] | [ 上へ : The Emmentaler font ] | [ Hufnagel glyphs > ] | ||
Medicaea glyphs
![[image of music]](fd/lily-1981c3c7.png)
| [ << Notation manual tables ] | [トップ][目次][インデックス][ ? ] | [ カンニング ペーパー >> ] | ||
| [ < Medicaea glyphs ] | [ 上へ : The Emmentaler font ] | [ Mensural glyphs > ] | ||
Hufnagel glyphs
![[image of music]](4a/lily-d9988a2c.png)
| [ << Notation manual tables ] | [トップ][目次][インデックス][ ? ] | [ カンニング ペーパー >> ] | ||
| [ < Hufnagel glyphs ] | [ 上へ : The Emmentaler font ] | [ Neomensural glyphs > ] | ||
Mensural glyphs
![[image of music]](f4/lily-907bc72d.png)
| [ << Notation manual tables ] | [トップ][目次][インデックス][ ? ] | [ カンニング ペーパー >> ] | ||
| [ < Mensural glyphs ] | [ 上へ : The Emmentaler font ] | [ Petrucci glyphs > ] | ||
Neomensural glyphs
![[image of music]](2d/lily-707477b7.png)
| [ << Notation manual tables ] | [トップ][目次][インデックス][ ? ] | [ カンニング ペーパー >> ] | ||
| [ < Neomensural glyphs ] | [ 上へ : The Emmentaler font ] | [ Solesmes glyphs > ] | ||
Petrucci glyphs
![[image of music]](07/lily-3f4afecc.png)
| [ << Notation manual tables ] | [トップ][目次][インデックス][ ? ] | [ カンニング ペーパー >> ] | ||
| [ < Petrucci glyphs ] | [ 上へ : The Emmentaler font ] | [ Kievan Notation glyphs > ] | ||
Solesmes glyphs
![[image of music]](5a/lily-b3dc0958.png)
| [ << Notation manual tables ] | [トップ][目次][インデックス][ ? ] | [ カンニング ペーパー >> ] | ||
| [ < Solesmes glyphs ] | [ 上へ : The Emmentaler font ] | [ Note head styles > ] | ||
Kievan Notation glyphs
![[image of music]](4d/lily-2abb8a04.png)
| [ << Notation manual tables ] | [トップ][目次][インデックス][ ? ] | [ カンニング ペーパー >> ] | ||
| [ < Kievan Notation glyphs ] | [ 上へ : Notation manual tables ] | [ Clef styles > ] | ||
A.9 Note head styles
The following styles may be used for note heads.
![[image of music]](dc/lily-033e8857.png)
| [ << Notation manual tables ] | [トップ][目次][インデックス][ ? ] | [ カンニング ペーパー >> ] | ||
| [ < Note head styles ] | [ 上へ : Notation manual tables ] | [ Standard clefs > ] | ||
A.10 Clef styles
The following table shows all the clef styles possible (including where middle C sits relative to the clef).
| Standard clefs | ||
| Percussion staff clef | ||
| Tab staff clefs | ||
| Ancient music clefs |
| [ << Notation manual tables ] | [トップ][目次][インデックス][ ? ] | [ カンニング ペーパー >> ] | ||
| [ < Clef styles ] | [ 上へ : Clef styles ] | [ Percussion staff clef > ] | ||
Standard clefs
| Example | Output | Example | Output |
|---|---|---|---|
\clef G |
| \clef "G2" |
|
\clef treble |
| \clef violin |
|
\clef french |
| \clef GG |
|
\clef tenorG |
| ||
\clef soprano |
| \clef mezzosoprano |
|
\clef C |
| \clef alto |
|
\clef tenor |
| \clef baritone |
|
\clef varC |
| \clef altovarC |
|
\clef tenorvarC |
| \clef baritonevarC |
|
\clef varbaritone |
| \clef baritonevarF |
|
\clef F |
| \clef bass |
|
\clef subbass |
|
![[image of music]](3f/lily-2af16f63.png)
![[image of music]](d7/lily-277da48e.png)
![[image of music]](7b/lily-953a367c.png)
![[image of music]](bb/lily-2d240373.png)
![[image of music]](de/lily-91461fc3.png)
![[image of music]](09/lily-eaa247ef.png)
![[image of music]](04/lily-25881d83.png)
![[image of music]](12/lily-6cd7d6fd.png)
![[image of music]](7b/lily-bf3c2f11.png)
![[image of music]](ba/lily-8eeb0692.png)
![[image of music]](83/lily-5eaf9f54.png)
![[image of music]](fc/lily-3dcbaf49.png)
![[image of music]](3e/lily-64b35772.png)
![[image of music]](84/lily-6d9568b6.png)
![[image of music]](a5/lily-0e4a0a4e.png)
![[image of music]](d6/lily-c31772d2.png)
![[image of music]](62/lily-af39d62c.png)
![[image of music]](48/lily-5c84fb03.png)
![[image of music]](75/lily-ed95bb9d.png)
![[image of music]](c6/lily-30534dba.png)
![[image of music]](76/lily-2a636445.png)
![[image of music]](a0/lily-ddb11764.png)
| [ << Notation manual tables ] | [トップ][目次][インデックス][ ? ] | [ カンニング ペーパー >> ] | ||
| [ < Standard clefs ] | [ 上へ : Clef styles ] | [ Tab staff clefs > ] | ||
Percussion staff clef
| Example | Output | Example | Output |
|---|---|---|---|
\clef percussion |
| \clef varpercussion |
|
![[image of music]](4c/lily-addb2eb0.png)
![[image of music]](9f/lily-e9e68e39.png)
| [ << Notation manual tables ] | [トップ][目次][インデックス][ ? ] | [ カンニング ペーパー >> ] | ||
| [ < Percussion staff clef ] | [ 上へ : Clef styles ] | [ Ancient music clefs > ] | ||
Tab staff clefs
| Example | Output | Example | Output |
|---|---|---|---|
\new TabStaff { |
|
\new TabStaff { |
|
![[image of music]](64/lily-cc4ef33b.png)
![[image of music]](d1/lily-95f6af4a.png)
| [ << Notation manual tables ] | [トップ][目次][インデックス][ ? ] | [ カンニング ペーパー >> ] | ||
| [ < Tab staff clefs ] | [ 上へ : Clef styles ] | [ Text markup commands > ] | ||
Ancient music clefs
Gregorian
| Example | Output | Example | Output |
|---|---|---|---|
\clef "vaticana-do1" |
| \clef "vaticana-do2" |
|
\clef "vaticana-do3" |
| \clef "vaticana-fa1" |
|
\clef "vaticana-fa2" |
| ||
\clef "medicaea-do1" |
| \clef "medicaea-do2" |
|
\clef "medicaea-do3" |
| \clef "medicaea-fa1" |
|
\clef "medicaea-fa2" |
| ||
\clef "hufnagel-do1" |
| \clef "hufnagel-do2" |
|
\clef "hufnagel-do3" |
| \clef "hufnagel-fa1" |
|
\clef "hufnagel-fa2" |
| \clef |
|
![[image of music]](0b/lily-fbcc8138.png)
![[image of music]](4c/lily-91955b80.png)
![[image of music]](ee/lily-765f0c4f.png)
![[image of music]](6c/lily-2830d06e.png)
![[image of music]](1d/lily-9b768083.png)
![[image of music]](7b/lily-9b279ce7.png)
![[image of music]](e0/lily-4d01b8b1.png)
![[image of music]](f7/lily-7d781d54.png)
![[image of music]](9d/lily-0440d67c.png)
![[image of music]](d8/lily-1a19c6e0.png)
![[image of music]](53/lily-1db08986.png)
![[image of music]](42/lily-f93f7325.png)
![[image of music]](ca/lily-a9915196.png)
![[image of music]](f4/lily-a627e2dc.png)
![[image of music]](74/lily-b93c82e5.png)
![[image of music]](53/lily-6b61c528.png)
Mensural
| Example | Output | Example | Output |
|---|---|---|---|
\clef "mensural-c1" |
| \clef "mensural-c2" |
|
\clef "mensural-c3" |
| \clef "mensural-c4" |
|
\clef "mensural-c5" |
| ||
\clef "mensural-f" |
| \clef "mensural-g" |
|
\clef "blackmensural-c1" |
| \clef "blackmensural-c2" |
|
\clef "blackmensural-c3" |
| \clef "blackmensural-c4" |
|
\clef "blackmensural-c5" |
| ||
\clef "neomensural-c1" |
| \clef "neomensural-c2" |
|
\clef "neomensural-c3" |
| \clef "neomensural-c4" |
|
\clef "neomensural-c5" |
| ||
\clef "petrucci-c1" |
| \clef "petrucci-c2" |
|
\clef "petrucci-c3" |
| \clef "petrucci-c4" |
|
\clef "petrucci-c5" |
| ||
\clef "petrucci-f" |
| \clef "petrucci-f2" |
|
\clef "petrucci-f3" |
| \clef "petrucci-f4" |
|
\clef "petrucci-f5" |
| ||
\clef "petrucci-g1" |
| \clef "petrucci-g2" |
|
\clef "petrucci-g" |
|
![[image of music]](98/lily-9eb88972.png)
![[image of music]](dd/lily-2ebe17d8.png)
![[image of music]](6e/lily-879e2f23.png)
![[image of music]](4c/lily-0356e0ca.png)
![[image of music]](87/lily-0895da12.png)
![[image of music]](45/lily-2e095cde.png)
![[image of music]](54/lily-5b28375e.png)
![[image of music]](56/lily-5c9b1df9.png)
![[image of music]](5d/lily-f8cfd4d4.png)
![[image of music]](0a/lily-670edd80.png)
![[image of music]](ef/lily-d6245509.png)
![[image of music]](0b/lily-7c0a5668.png)
![[image of music]](56/lily-d0649c9f.png)
![[image of music]](7c/lily-569c1cc5.png)
![[image of music]](d1/lily-3fe1e1f3.png)
![[image of music]](b7/lily-1b0c5e58.png)
![[image of music]](1a/lily-596dc154.png)
![[image of music]](f3/lily-109b2030.png)
![[image of music]](e9/lily-bb8878a8.png)
![[image of music]](1f/lily-d73e2217.png)
![[image of music]](64/lily-8187ab71.png)
![[image of music]](6e/lily-c11115d8.png)
![[image of music]](25/lily-38fc50da.png)
![[image of music]](75/lily-9da51e43.png)
![[image of music]](a8/lily-5ad9c597.png)
![[image of music]](10/lily-7e0bbb97.png)
![[image of music]](3d/lily-d3ba487b.png)
![[image of music]](28/lily-991520ae.png)
![[image of music]](56/lily-0da079e9.png)
![[image of music]](92/lily-347c1ecd.png)
Kievan
| Example | Output | ||
|---|---|---|---|
\clef "kievan-do" |
|
![[image of music]](c6/lily-3768c4ef.png)
| [ << Notation manual tables ] | [トップ][目次][インデックス][ ? ] | [ カンニング ペーパー >> ] | ||
| [ < Ancient music clefs ] | [ 上へ : Notation manual tables ] | [ Font > ] | ||
A.11 Text markup commands
The following commands can all be used inside \markup { }.
| A.11.1 Font | ||
| A.11.2 Align | ||
| A.11.3 Graphic | ||
| A.11.4 Music | ||
| A.11.5 Instrument Specific Markup | ||
| A.11.6 Accordion Registers | ||
| A.11.7 Other |
| [ << Notation manual tables ] | [トップ][目次][インデックス][ ? ] | [ カンニング ペーパー >> ] | ||
| [ < Text markup commands ] | [ 上へ : Text markup commands ] | [ Align > ] | ||
A.11.1 Font
-
\abs-fontsizesize (number) arg (markup) -
Use size as the absolute font size (in points) to display arg. Adjusts
baseline-skipandword-spaceaccordingly.\markup { default text font size \hspace #2 \abs-fontsize #16 { text font size 16 } \hspace #2 \abs-fontsize #12 { text font size 12 } }![[image of music]](07/lily-a533d7d0.png)
Used properties:
-
baseline-skip(3) -
word-space(0.6)
-
-
\boldarg (markup) -
Switch to bold font-series.
\markup { default \hspace #2 \bold bold }![[image of music]](a4/lily-bdc91b91.png)
-
\boxarg (markup) -
Draw a box round arg. Looks at
thickness,box-paddingandfont-sizeproperties to determine line thickness and padding around the markup.\markup { \override #'(box-padding . 0.5) \box \line { V. S. } }![[image of music]](1f/lily-9c4b432d.png)
Used properties:
-
box-padding(0.2) -
font-size(0) -
thickness(1)
-
-
\capsarg (markup) -
Copy of the
\smallCapscommand.\markup { default \hspace #2 \caps { Text in small caps } }![[image of music]](9e/lily-f0523a10.png)
-
\dynamicarg (markup) -
Use the dynamic font. This font only contains s, f, m, z, p, and r. When producing phrases, like ‘più f’, the normal words (like ‘più’) should be done in a different font. The recommended font for this is bold and italic.
\markup { \dynamic { sfzp } }![[image of music]](c5/lily-54157874.png)
-
\fingerarg (markup) -
Set arg as small numbers.
\markup { \finger { 1 2 3 4 5 } }![[image of music]](63/lily-67c5bce6.png)
-
\fontCapsarg (markup) -
Set
font-shapetocapsNote:
\fontCapsrequires the installation and selection of fonts which support thecapsfont shape. -
\fontsizeincrement (number) arg (markup) -
Add increment to the font-size. Adjusts
baseline-skipaccordingly.\markup { default \hspace #2 \fontsize #-1.5 smaller }![[image of music]](2e/lily-c996094b.png)
Used properties:
-
baseline-skip(2) -
word-space(1) -
font-size(0)
-
-
\hugearg (markup) -
Set font size to +2.
\markup { default \hspace #2 \huge huge }![[image of music]](5f/lily-9e6de9c2.png)
-
\italicarg (markup) -
Use italic
font-shapefor arg.\markup { default \hspace #2 \italic italic }![[image of music]](56/lily-f14476e1.png)
-
\largearg (markup) -
Set font size to +1.
\markup { default \hspace #2 \large large }![[image of music]](f3/lily-6ab0a294.png)
-
\largerarg (markup) -
Increase the font size relative to the current setting.
\markup { default \hspace #2 \larger larger }![[image of music]](1a/lily-f127dcec.png)
-
\magnifysz (number) arg (markup) -
Set the font magnification for its argument. In the following example, the middle A is 10% larger:
A \magnify #1.1 { A } ANote: Magnification only works if a font name is explicitly selected. Use
\fontsizeotherwise.\markup { default \hspace #2 \magnify #1.5 { 50% larger } }![[image of music]](9d/lily-30a6e9fd.png)
-
\mediumarg (markup) -
Switch to medium font-series (in contrast to bold).
\markup { \bold { some bold text \hspace #2 \medium { medium font series } \hspace #2 bold again } }![[image of music]](c4/lily-7510f114.png)
-
\normal-size-subarg (markup) -
Set arg in subscript with a normal font size.
\markup { default \normal-size-sub { subscript in standard size } }![[image of music]](47/lily-a43fd333.png)
Used properties:
-
font-size(0)
-
-
\normal-size-superarg (markup) -
Set arg in superscript with a normal font size.
\markup { default \normal-size-super { superscript in standard size } }![[image of music]](5d/lily-98e474e7.png)
Used properties:
-
font-size(0)
-
-
\normal-textarg (markup) -
Set all font related properties (except the size) to get the default normal text font, no matter what font was used earlier.
\markup { \huge \bold \sans \caps { huge bold sans caps \hspace #2 \normal-text { huge normal } \hspace #2 as before } }![[image of music]](9a/lily-7ef735fc.png)
-
\normalsizearg (markup) -
Set font size to default.
\markup { \teeny { this is very small \hspace #2 \normalsize { normal size } \hspace #2 teeny again } }![[image of music]](de/lily-4cf1269f.png)
-
\numberarg (markup) -
Set font family to
number, which yields the font used for time signatures and fingerings. This font contains numbers and some punctuation; it has no letters.\markup { \number { 0 1 2 3 4 5 6 7 8 9 . , } }![[image of music]](b1/lily-0bac8bb4.png)
-
\overtiearg (markup) -
Overtie arg.
\markup \line { \overtie "overtied" \override #'(offset . 5) \override #'(thickness . 1) \overtie "overtied" \override #'(offset . 1) \override #'(thickness . 5) \overtie "overtied" }![[image of music]](84/lily-400aa8f0.png)
Used properties:
-
shorten-pair((0 . 0)) -
direction(1) -
offset(2) -
thickness(1)
-
-
\replacereplacements (list) arg (markup) -
Used to automatically replace a string by another in the markup arg. Each pair of the alist replacements specifies what should be replaced. The
keyis the string to be replaced by thevaluestring.\markup \replace #'(("thx" . "Thanks!")) thx![[image of music]](fd/lily-0204d62b.png)
-
\romanarg (markup) -
Set font family to
roman.\markup { \sans \bold { sans serif, bold \hspace #2 \roman { text in roman font family } \hspace #2 return to sans } }![[image of music]](06/lily-6032c5ab.png)
-
\sansarg (markup) -
Switch to the sans serif font family.
\markup { default \hspace #2 \sans { sans serif } }![[image of music]](c4/lily-8e100f64.png)
-
\simplestr (string) -
A simple text string;
\markup { foo }is equivalent with\markup { \simple #"foo" }.Note: for creating standard text markup or defining new markup commands, the use of
\simpleis unnecessary.\markup { \simple #"simple" \simple #"text" \simple #"strings" }![[image of music]](94/lily-03ff91d9.png)
-
\smallarg (markup) -
Set font size to -1.
\markup { default \hspace #2 \small small }![[image of music]](63/lily-8bfd873e.png)
-
\smallCapsarg (markup) -
Emit arg as small caps.
Note:
\smallCapsdoes not support accented characters.\markup { default \hspace #2 \smallCaps { Text in small caps } }![[image of music]](f3/lily-5e9c2b94.png)
-
\smallerarg (markup) -
Decrease the font size relative to the current setting.
\markup { \fontsize #3.5 { some large text \hspace #2 \smaller { a bit smaller } \hspace #2 more large text } }![[image of music]](18/lily-bbb67e29.png)
-
\subarg (markup) -
Set arg in subscript.
\markup { \concat { H \sub { 2 } O } }![[image of music]](32/lily-e7633b8c.png)
Used properties:
-
font-size(0)
-
-
\superarg (markup) -
Set arg in superscript.
\markup { E = \concat { mc \super 2 } }![[image of music]](21/lily-be5cd42b.png)
Used properties:
-
font-size(0)
-
-
\teenyarg (markup) -
Set font size to -3.
\markup { default \hspace #2 \teeny teeny }![[image of music]](24/lily-606f40ec.png)
-
\textarg (markup) -
Use a text font instead of music symbol or music alphabet font.
\markup { \number { 1, 2, \text { three, four, } 5 } }![[image of music]](ae/lily-c28c6cd8.png)
-
\tiearg (markup) -
Adds a horizontal bow created with
make-tie-stencilat bottom or top of arg. Looks atthicknessto determine line thickness, andoffsetto determine y-offset. The added bow fits the extent of arg,shorten-pairmay be used to modify this. direction may be set using anoverrideor direction-modifiers orvoiceOne, etc.\markup { \override #'(direction . 1) \tie "above" \override #'(direction . -1) \tie "below" }![[image of music]](9d/lily-9cb7c7b8.png)
Used properties:
-
shorten-pair((0 . 0)) -
direction(1) -
offset(2) -
thickness(1)
-
-
\tinyarg (markup) -
Set font size to -2.
\markup { default \hspace #2 \tiny tiny }![[image of music]](d0/lily-504a1c12.png)
-
\typewriterarg (markup) -
Use
font-familytypewriter for arg.\markup { default \hspace #2 \typewriter typewriter }![[image of music]](98/lily-f25474de.png)
-
\underlinearg (markup) -
Underline arg. Looks at
thicknessto determine line thickness, andoffsetto determine line y-offset.\markup \fill-line { \underline "underlined" \override #'(offset . 5) \override #'(thickness . 1) \underline "underlined" \override #'(offset . 1) \override #'(thickness . 5) \underline "underlined" }![[image of music]](fb/lily-f56d7339.png)
Used properties:
-
offset(2) -
thickness(1)
-
-
\undertiearg (markup) -
\markup \line { \undertie "undertied" \override #'(offset . 5) \override #'(thickness . 1) \undertie "undertied" \override #'(offset . 1) \override #'(thickness . 5) \undertie "undertied" }![[image of music]](5e/lily-0b582f9f.png)
Used properties:
-
shorten-pair((0 . 0)) -
direction(1) -
offset(2) -
thickness(1)
-
-
\uprightarg (markup) -
Set
font-shapetoupright. This is the opposite ofitalic.\markup { \italic { italic text \hspace #2 \upright { upright text } \hspace #2 italic again } }![[image of music]](39/lily-f80005b5.png)
| [ << Notation manual tables ] | [トップ][目次][インデックス][ ? ] | [ カンニング ペーパー >> ] | ||
| [ < Font ] | [ 上へ : Text markup commands ] | [ Graphic > ] | ||
A.11.2 Align
-
\center-alignarg (markup) -
Align
argto its X center.\markup { \column { one \center-align two three } }![[image of music]](09/lily-2d72abf3.png)
-
\center-columnargs (markup list) -
Put
argsin a centered column.\markup { \center-column { one two three } }![[image of music]](88/lily-6233fe4d.png)
Used properties:
-
baseline-skip
-
-
\columnargs (markup list) -
Stack the markups in args vertically. The property
baseline-skipdetermines the space between markups in args.\markup { \column { one two three } }![[image of music]](10/lily-5cb028ed.png)
Used properties:
-
baseline-skip
-
-
\combinearg1 (markup) arg2 (markup) -
Print two markups on top of each other.
Note:
\combinecannot take a list of markups enclosed in curly braces as an argument; for this purpose use\overlayinstead.\markup { \fontsize #5 \override #'(thickness . 2) \combine \draw-line #'(0 . 4) \arrow-head #Y #DOWN ##f }![[image of music]](4e/lily-1172d7bf.png)
-
\concatargs (markup list) -
Concatenate args in a horizontal line, without spaces in between. Strings and simple markups are concatenated on the input level, allowing ligatures. For example,
\concat { "f" \simple #"i" }is equivalent to"fi".\markup { \concat { one two three } }![[image of music]](84/lily-04ec9ccd.png)
-
\dir-columnargs (markup list) -
Make a column of args, going up or down, depending on the setting of the
directionlayout property.\markup { \override #`(direction . ,UP) { \dir-column { going up } } \hspace #1 \dir-column { going down } \hspace #1 \override #'(direction . 1) { \dir-column { going up } } }![[image of music]](46/lily-aece8e9c.png)
Used properties:
-
baseline-skip -
direction
-
-
\fill-lineargs (markup list) -
Put markups in a horizontal line of width line-width. The markups are spaced or flushed to fill the entire line. If there are no arguments, return an empty stencil.
\markup { \column { \fill-line { Words evenly spaced across the page } \null \fill-line { \line { Text markups } \line { \italic { evenly spaced } } \line { across the page } } } }![[image of music]](d8/lily-5b1d8663.png)
Used properties:
-
line-width(#f) -
word-space(0.6) -
text-direction(1)
-
-
\fill-with-patternspace (number) dir (direction) pattern (markup) left (markup) right (markup) -
Put left and right in a horizontal line of width
line-widthwith a line of markups pattern in between. Patterns are spaced apart by space. Patterns are aligned to the dir markup.\markup \column { "right-aligned :" \fill-with-pattern #1 #RIGHT . first right \fill-with-pattern #1 #RIGHT . second right \null "center-aligned :" \fill-with-pattern #1.5 #CENTER - left right \null "left-aligned :" \override #'(line-width . 50) \fill-with-pattern #2 #LEFT : left first \override #'(line-width . 50) \fill-with-pattern #2 #LEFT : left second }![[image of music]](cb/lily-c5fee2e9.png)
Used properties:
-
line-width -
word-space
-
-
\general-alignaxis (integer) dir (number) arg (markup) -
Align arg in axis direction to the dir side.
\markup { \column { one \general-align #X #LEFT two three \null one \general-align #X #CENTER two three \null \line { one \general-align #Y #UP two three } \null \line { one \general-align #Y #3.2 two three } } }![[image of music]](86/lily-c14cbf32.png)
-
\haligndir (number) arg (markup) -
Set horizontal alignment. If dir is
-1, then it is left-aligned, while+1is right. Values in between interpolate alignment accordingly.\markup { \column { one \halign #LEFT two three \null one \halign #CENTER two three \null one \halign #RIGHT two three \null one \halign #-5 two three } }![[image of music]](6c/lily-2e9ecce2.png)
-
\hcenter-inlength (number) arg (markup) -
Center arg horizontally within a box of extending length/2 to the left and right.
\new StaffGroup << \new Staff { \set Staff.instrumentName = \markup { \hcenter-in #12 Oboe } c''1 } \new Staff { \set Staff.instrumentName = \markup { \hcenter-in #12 Bassoon } \clef tenor c'1 } >>![[image of music]](38/lily-e2d3a780.png)
-
\hspaceamount (number) -
Create an invisible object taking up horizontal space amount.
\markup { one \hspace #2 two \hspace #8 three }![[image of music]](4b/lily-194e484f.png)
-
\justify-fieldsymbol (symbol) -
Justify the data which has been assigned to symbol.
\header { title = "My title" myText = "Lorem ipsum dolor sit amet, consectetur adipisicing elit, sed do eiusmod tempor incididunt ut labore et dolore magna aliqua. Ut enim ad minim veniam, quis nostrud exercitation ullamco laboris nisi ut aliquip ex ea commodo consequat." } \paper { bookTitleMarkup = \markup { \column { \fill-line { \fromproperty #'header:title } \null \justify-field #'header:myText } } } \markup { \null }![[image of music]](1b/lily-46468ab9.png)
-
\justify-lineargs (markup list) -
Put markups in a horizontal line of width line-width. The markups are spread to fill the entire line and separated by equal space. If there are no arguments, return an empty stencil.
\markup { \justify-line { Space between neighboring words is constant } }![[image of music]](d9/lily-ee98df63.png)
Used properties:
-
line-width(#f) -
word-space(0.6) -
text-direction(1)
-
-
\justifyargs (markup list) -
Like
\wordwrap, but with lines stretched to justify the margins. Use\override #'(line-width . X)to set the line width; X is the number of staff spaces.\markup { \justify { Lorem ipsum dolor sit amet, consectetur adipisicing elit, sed do eiusmod tempor incididunt ut labore et dolore magna aliqua. Ut enim ad minim veniam, quis nostrud exercitation ullamco laboris nisi ut aliquip ex ea commodo consequat. } }![[image of music]](99/lily-631e2cfc.png)
Used properties:
-
text-direction(1) -
word-space -
line-width(#f) -
baseline-skip
-
-
\justify-stringarg (string) -
Justify a string. Paragraphs may be separated with double newlines
\markup { \override #'(line-width . 40) \justify-string #"Lorem ipsum dolor sit amet, consectetur adipisicing elit, sed do eiusmod tempor incididunt ut labore et dolore magna aliqua. Ut enim ad minim veniam, quis nostrud exercitation ullamco laboris nisi ut aliquip ex ea commodo consequat. Excepteur sint occaecat cupidatat non proident, sunt in culpa qui officia deserunt mollit anim id est laborum" }![[image of music]](7a/lily-ec3abd25.png)
Used properties:
-
text-direction(1) -
word-space -
line-width -
baseline-skip
-
-
\left-alignarg (markup) -
Align arg on its left edge.
\markup { \column { one \left-align two three } }![[image of music]](65/lily-ff1886f9.png)
-
\left-columnargs (markup list) -
Put
argsin a left-aligned column.\markup { \left-column { one two three } }![[image of music]](ac/lily-77ac1e2b.png)
Used properties:
-
baseline-skip
-
-
\lineargs (markup list) -
Put args in a horizontal line. The property
word-spacedetermines the space between markups in args.\markup { \line { one two three } }![[image of music]](7d/lily-36a54b45.png)
Used properties:
-
text-direction(1) -
word-space
-
-
\loweramount (number) arg (markup) -
Lower arg by the distance amount. A negative amount indicates raising; see also
\raise.\markup { one \lower #3 two three }![[image of music]](35/lily-8d734fc5.png)
-
\overlayargs (markup list) -
Takes a list of markups combining them.
\markup { \fontsize #5 \override #'(thickness . 2) \overlay { \draw-line #'(0 . 4) \arrow-head #Y #DOWN ##f \translate #'(0 . 4)\arrow-head #Y #UP ##f } }![[image of music]](15/lily-1d694e20.png)
-
\pad-aroundamount (number) arg (markup) -
Add padding amount all around arg.
\markup { \box { default } \hspace #2 \box { \pad-around #0.5 { padded } } }![[image of music]](8e/lily-883982a2.png)
-
\pad-markupamount (number) arg (markup) -
Add space around a markup object. Identical to
pad-around.\markup { \box { default } \hspace #2 \box { \pad-markup #1 { padded } } }![[image of music]](b1/lily-839c52d7.png)
-
\pad-to-boxx-ext (pair of numbers) y-ext (pair of numbers) arg (markup) -
Make arg take at least x-ext, y-ext space.
\markup { \box { default } \hspace #4 \box { \pad-to-box #'(0 . 10) #'(0 . 3) { padded } } }![[image of music]](2e/lily-509331d5.png)
-
\pad-xamount (number) arg (markup) -
Add padding amount around arg in the X direction.
\markup { \box { default } \hspace #4 \box { \pad-x #2 { padded } } }![[image of music]](6f/lily-4ddc44f8.png)
-
\put-adjacentaxis (integer) dir (direction) arg1 (markup) arg2 (markup) -
Put arg2 next to arg1, without moving arg1.
-
\raiseamount (number) arg (markup) -
Raise arg by the distance amount. A negative amount indicates lowering, see also
\lower.The argument to
\raiseis the vertical displacement amount, measured in (global) staff spaces.\raiseand\superraise objects in relation to their surrounding markups.If the text object itself is positioned above or below the staff, then
\raisecannot be used to move it, since the mechanism that positions it next to the staff cancels any shift made with\raise. For vertical positioning, use thepaddingand/orextra-offsetproperties.\markup { C \small \bold \raise #1.0 9/7+ }![[image of music]](4d/lily-b2aebb50.png)
-
\right-alignarg (markup) -
Align arg on its right edge.
\markup { \column { one \right-align two three } }![[image of music]](29/lily-7f417d73.png)
-
\right-columnargs (markup list) -
Put
argsin a right-aligned column.\markup { \right-column { one two three } }![[image of music]](d8/lily-8e035aec.png)
Used properties:
-
baseline-skip
-
-
\rotateang (number) arg (markup) -
Rotate object with ang degrees around its center.
\markup { default \hspace #2 \rotate #45 \line { rotated 45° } }![[image of music]](1c/lily-2d6f2a83.png)
-
\translateoffset (pair of numbers) arg (markup) -
Translate arg relative to its surroundings. offset is a pair of numbers representing the displacement in the X and Y axis.
\markup { * \translate #'(2 . 3) \line { translated two spaces right, three up } }![[image of music]](2a/lily-87eb1b1a.png)
-
\translate-scaledoffset (pair of numbers) arg (markup) -
Translate arg by offset, scaling the offset by the
font-size.\markup { \fontsize #5 { * \translate #'(2 . 3) translate \hspace #2 * \translate-scaled #'(2 . 3) translate-scaled } }![[image of music]](3d/lily-dcb78441.png)
Used properties:
-
font-size(0)
-
-
\vcenterarg (markup) -
Align
argto its Y center.\markup { one \vcenter two three }![[image of music]](61/lily-8a33767a.png)
-
\vspaceamount (number) -
Create an invisible object taking up vertical space of amount multiplied by 3.
\markup { \center-column { one \vspace #2 two \vspace #5 three } }![[image of music]](21/lily-1d0faef3.png)
-
\wordwrap-fieldsymbol (symbol) -
Wordwrap the data which has been assigned to symbol.
\header { title = "My title" myText = "Lorem ipsum dolor sit amet, consectetur adipisicing elit, sed do eiusmod tempor incididunt ut labore et dolore magna aliqua. Ut enim ad minim veniam, quis nostrud exercitation ullamco laboris nisi ut aliquip ex ea commodo consequat." } \paper { bookTitleMarkup = \markup { \column { \fill-line { \fromproperty #'header:title } \null \wordwrap-field #'header:myText } } } \markup { \null }![[image of music]](93/lily-421490f7.png)
-
\wordwrapargs (markup list) -
Simple wordwrap. Use
\override #'(line-width . X)to set the line width, where X is the number of staff spaces.\markup { \wordwrap { Lorem ipsum dolor sit amet, consectetur adipisicing elit, sed do eiusmod tempor incididunt ut labore et dolore magna aliqua. Ut enim ad minim veniam, quis nostrud exercitation ullamco laboris nisi ut aliquip ex ea commodo consequat. } }![[image of music]](67/lily-2be2fcad.png)
Used properties:
-
text-direction(1) -
word-space -
line-width(#f) -
baseline-skip
-
-
\wordwrap-stringarg (string) -
Wordwrap a string. Paragraphs may be separated with double newlines.
\markup { \override #'(line-width . 40) \wordwrap-string #"Lorem ipsum dolor sit amet, consectetur adipisicing elit, sed do eiusmod tempor incididunt ut labore et dolore magna aliqua. Ut enim ad minim veniam, quis nostrud exercitation ullamco laboris nisi ut aliquip ex ea commodo consequat. Excepteur sint occaecat cupidatat non proident, sunt in culpa qui officia deserunt mollit anim id est laborum" }![[image of music]](69/lily-be6c88cd.png)
Used properties:
-
text-direction(1) -
word-space -
line-width -
baseline-skip
-
| [ << Notation manual tables ] | [トップ][目次][インデックス][ ? ] | [ カンニング ペーパー >> ] | ||
| [ < Align ] | [ 上へ : Text markup commands ] | [ Music > ] | ||
A.11.3 Graphic
-
\arrow-headaxis (integer) dir (direction) filled (boolean) -
Produce an arrow head in specified direction and axis. Use the filled head if filled is specified.
\markup { \fontsize #5 { \general-align #Y #DOWN { \arrow-head #Y #UP ##t \arrow-head #Y #DOWN ##f \hspace #2 \arrow-head #X #RIGHT ##f \arrow-head #X #LEFT ##f } } }![[image of music]](f3/lily-81ed5186.png)
-
\beamwidth (number) slope (number) thickness (number) -
Create a beam with the specified parameters.
\markup { \beam #5 #1 #2 }![[image of music]](3c/lily-5d2fd875.png)
-
\bracketarg (markup) -
Draw vertical brackets around arg.
\markup { \bracket { \note {2.} #UP } }![[image of music]](d0/lily-2d9b0a5b.png)
-
\circlearg (markup) -
Draw a circle around arg. Use
thickness,circle-paddingandfont-sizeproperties to determine line thickness and padding around the markup.\markup { \circle { Hi } }![[image of music]](ce/lily-4d702799.png)
Used properties:
-
circle-padding(0.2) -
font-size(0) -
thickness(1)
-
-
\draw-circleradius (number) thickness (number) filled (boolean) -
A circle of radius radius and thickness thickness, optionally filled.
\markup { \draw-circle #2 #0.5 ##f \hspace #2 \draw-circle #2 #0 ##t }![[image of music]](ae/lily-56fe5c01.png)
-
\draw-dashed-linedest (pair of numbers) -
A dashed line.
If
full-lengthis set to #t (default) the dashed-line extends to the whole length given by dest, without white space at beginning or end.offwill then be altered to fit. To insist on the given (or default) values ofon,offuse\override #'(full-length . #f)Manual settings foron,offandphaseare possible.\markup { \draw-dashed-line #'(5.1 . 2.3) \override #'(on . 0.3) \override #'(off . 0.5) \draw-dashed-line #'(5.1 . 2.3) }![[image of music]](65/lily-2e6443da.png)
Used properties:
-
full-length(#t) -
phase(0) -
off(1) -
on(1) -
thickness(1)
-
-
\draw-dotted-linedest (pair of numbers) -
A dotted line.
The dotted-line always extends to the whole length given by dest, without white space at beginning or end. Manual settings for
offare possible to get larger or smaller space between the dots. The given (or default) value ofoffwill be altered to fit the line-length.\markup { \draw-dotted-line #'(5.1 . 2.3) \override #'(thickness . 2) \override #'(off . 0.2) \draw-dotted-line #'(5.1 . 2.3) }![[image of music]](9d/lily-132b6cdb.png)
Used properties:
-
phase(0) -
off(1) -
thickness(1)
-
-
\draw-hline -
Draws a line across a page, where the property
span-factorcontrols what fraction of the page is taken up.\markup { \column { \draw-hline \override #'(span-factor . 1/3) \draw-hline } }![[image of music]](82/lily-cc26b5d0.png)
Used properties:
-
span-factor(1) -
line-width -
draw-line-markup
-
-
\draw-linedest (pair of numbers) -
A simple line.
\markup { \draw-line #'(4 . 4) \override #'(thickness . 5) \draw-line #'(-3 . 0) }![[image of music]](d8/lily-214a2d5c.png)
Used properties:
-
thickness(1)
-
-
\draw-squiggle-linesq-length (number) dest (pair of numbers) eq-end? (boolean) -
A squiggled line.
If
eq-end?is set to#t, it is ensured the squiggled line ends with a bow in same direction as the starting one.sq-lengthis the length of the first bow.destis the end point of the squiggled line. To matchdestthe squiggled line is scaled accordingly. Its appearance may be customized by overrides forthickness,angularity,heightandorientation.\markup \column { \draw-squiggle-line #0.5 #'(6 . 0) ##t \override #'(orientation . -1) \draw-squiggle-line #0.5 #'(6 . 0) ##t \draw-squiggle-line #0.5 #'(6 . 0) ##f \override #'(height . 1) \draw-squiggle-line #0.5 #'(6 . 0) ##t \override #'(thickness . 5) \draw-squiggle-line #0.5 #'(6 . 0) ##t \override #'(angularity . 2) \draw-squiggle-line #0.5 #'(6 . 0) ##t }![[image of music]](78/lily-40d8f1ac.png)
Used properties:
-
orientation(1) -
height(0.5) -
angularity(0) -
thickness(0.5)
-
-
\ellipsearg (markup) -
Draw an ellipse around arg. Use
thickness,x-padding,y-paddingandfont-sizeproperties to determine line thickness and padding around the markup.\markup { \ellipse { Hi } }![[image of music]](e2/lily-7f181378.png)
Used properties:
-
y-padding(0.2) -
x-padding(0.2) -
font-size(0) -
thickness(1)
-
-
\epsfileaxis (number) size (number) file-name (string) -
Inline an EPS image. The image is scaled along axis to size.
\markup { \general-align #Y #DOWN { \epsfile #X #20 #"context-example.eps" \epsfile #Y #20 #"context-example.eps" } }![[image of music]](4c/lily-0db74e6a.png)
-
\filled-boxxext (pair of numbers) yext (pair of numbers) blot (number) -
Draw a box with rounded corners of dimensions xext and yext. For example,
\filled-box #'(-.3 . 1.8) #'(-.3 . 1.8) #0
creates a box extending horizontally from -0.3 to 1.8 and vertically from -0.3 up to 1.8, with corners formed from a circle of diameter 0 (i.e., sharp corners).
\markup { \filled-box #'(0 . 4) #'(0 . 4) #0 \filled-box #'(0 . 2) #'(-4 . 2) #0.4 \filled-box #'(1 . 8) #'(0 . 7) #0.2 \with-color #white \filled-box #'(-4.5 . -2.5) #'(3.5 . 5.5) #0.7 }![[image of music]](9e/lily-fffa3173.png)
-
\hbracketarg (markup) -
Draw horizontal brackets around arg.
\markup { \hbracket { \line { one two three } } }![[image of music]](a7/lily-c460185e.png)
-
\ovalarg (markup) -
Draw an oval around arg. Use
thickness,x-padding,x-paddingandfont-sizeproperties to determine line thickness and padding around the markup.\markup { \oval { Hi } }![[image of music]](fe/lily-b25b8d2d.png)
Used properties:
-
y-padding(0.75) -
x-padding(0.75) -
font-size(0) -
thickness(1)
-
-
\parenthesizearg (markup) -
Draw parentheses around arg. This is useful for parenthesizing a column containing several lines of text.
\markup { \line { \parenthesize { \column { foo bar } } \override #'(angularity . 2) { \parenthesize { \column { bah baz } } } } }![[image of music]](94/lily-6ee74cd9.png)
Used properties:
-
width(0.25) -
line-thickness(0.1) -
thickness(1) -
size(1) -
padding -
angularity(0)
-
-
\paththickness (number) commands (list) -
Draws a path with line thickness according to the directions given in commands. commands is a list of lists where the
carof each sublist is a drawing command and thecdrcomprises the associated arguments for each command.There are seven commands available to use in the list
commands:moveto,rmoveto,lineto,rlineto,curveto,rcurveto, andclosepath. Note that the commands that begin with r are the relative variants of the other three commands.The commands
moveto,rmoveto,lineto, andrlinetotake 2 arguments; they are the X and Y coordinates for the destination point.The commands
curvetoandrcurvetocreate cubic Bézier curves, and take 6 arguments; the first two are the X and Y coordinates for the first control point, the second two are the X and Y coordinates for the second control point, and the last two are the X and Y coordinates for the destination point.The
closepathcommand takes zero arguments and closes the current subpath in the active path.Note that a sequence of commands must begin with a
movetoorrmovetoto work with the SVG output.Line-cap styles and line-join styles may be customized by overriding the
line-cap-styleandline-join-styleproperties, respectively. Available line-cap styles are'butt,'round, and'square. Available line-join styles are'miter,'round, and'bevel.The property
filledspecifies whether or not the path is filled with color.samplePath = #'((moveto 0 0) (lineto -1 1) (lineto 1 1) (lineto 1 -1) (curveto -5 -5 -5 5 -1 0) (closepath)) \markup { \path #0.25 #samplePath \override #'(line-join-style . miter) \path #0.25 #samplePath \override #'(filled . #t) \path #0.25 #samplePath }![[image of music]](80/lily-291532d2.png)
Used properties:
-
filled(#f) -
line-join-style(round) -
line-cap-style(round)
-
-
\postscriptstr (string) -
This inserts str directly into the output as a PostScript command string.
ringsps = #" 0.15 setlinewidth 0.9 0.6 moveto 0.4 0.6 0.5 0 361 arc stroke 1.0 0.6 0.5 0 361 arc stroke " rings = \markup { \with-dimensions #'(-0.2 . 1.6) #'(0 . 1.2) \postscript #ringsps } \relative c'' { c2^\rings a2_\rings }![[image of music]](88/lily-cdb39f69.png)
-
\rounded-boxarg (markup) -
Draw a box with rounded corners around arg. Looks at
thickness,box-paddingandfont-sizeproperties to determine line thickness and padding around the markup; thecorner-radiusproperty makes it possible to define another shape for the corners (default is 1).c4^\markup { \rounded-box { Overtura } } c,8. c16 c4 r![[image of music]](de/lily-8cb670ea.png)
Used properties:
-
box-padding(0.5) -
font-size(0) -
corner-radius(1) -
thickness(1)
-
-
\scalefactor-pair (pair of numbers) arg (markup) -
Scale arg. factor-pair is a pair of numbers representing the scaling-factor in the X and Y axes. Negative values may be used to produce mirror images.
\markup { \line { \scale #'(2 . 1) stretched \scale #'(1 . -1) mirrored } }![[image of music]](1c/lily-9922ae3e.png)
-
\trianglefilled (boolean) -
A triangle, either filled or empty.
\markup { \triangle ##t \hspace #2 \triangle ##f }![[image of music]](c3/lily-f3900e43.png)
Used properties:
-
baseline-skip(2) -
font-size(0) -
thickness(0.1)
-
-
\with-urlurl (string) arg (markup) -
Add a link to URL url around arg. This only works in the PDF backend.
\markup { \with-url #"http://lilypond.org/" { LilyPond ... \italic { music notation for everyone } } }![[image of music]](c6/lily-a704a130.png)
| [ << Notation manual tables ] | [トップ][目次][インデックス][ ? ] | [ カンニング ペーパー >> ] | ||
| [ < Graphic ] | [ 上へ : Text markup commands ] | [ Instrument Specific Markup > ] | ||
A.11.4 Music
-
\compound-metertime-sig (number or pair) -
Draw a numeric time signature.
\markup { \column { \line { Single number: \compound-meter #3 } \line { Conventional: \compound-meter #'(4 . 4) or \compound-meter #'(4 4) } \line { Compound: \compound-meter #'(2 3 8) } \line { Single-number compound: \compound-meter #'((2) (3)) } \line { Complex compound: \compound-meter #'((2 3 8) (3 4)) } } }![[image of music]](98/lily-e5210e08.png)
-
\customTabClefnum-strings (integer) staff-space (number) -
Draw a tab clef sans-serif style.
-
\doubleflat -
Draw a double flat symbol.
\markup { \doubleflat }![[image of music]](58/lily-5e0ba4c2.png)
-
\doublesharp -
Draw a double sharp symbol.
\markup { \doublesharp }![[image of music]](d3/lily-04150c9d.png)
-
\fermata -
Create a fermata glyph. When direction is
DOWN, use an inverted glyph. Note that within music, one would usually use the\fermataarticulation instead of a markup.{ c''1^\markup \fermata d''1_\markup \fermata } \markup { \fermata \override #`(direction . ,DOWN) \fermata }![[image of music]](d2/lily-b002d4aa.png)
Used properties:
-
direction(1)
-
-
\flat -
Draw a flat symbol.
\markup { \flat }![[image of music]](48/lily-c7c32ec7.png)
-
\musicglyphglyph-name (string) -
glyph-name is converted to a musical symbol; for example,
\musicglyph #"accidentals.natural"selects the natural sign from the music font. See The Emmentaler font for a complete listing of the possible glyphs.\markup { \musicglyph #"f" \musicglyph #"rests.2" \musicglyph #"clefs.G_change" }![[image of music]](87/lily-e4348127.png)
-
\natural -
Draw a natural symbol.
\markup { \natural }![[image of music]](28/lily-1cf440ce.png)
-
\note-by-numberlog (number) dot-count (number) dir (number) -
Construct a note symbol, with stem and flag. By using fractional values for dir, longer or shorter stems can be obtained. Supports all note-head-styles. Ancient note-head-styles will get mensural-style-flags.
flag-stylemay be overridden independently. Supported flag-styles aredefault,old-straight-flag,modern-straight-flag,flat-flag,mensuralandneomensural. The latter two flag-styles will both result in mensural-flags. Both are supplied for convenience.\markup { \note-by-number #3 #0 #DOWN \hspace #2 \note-by-number #1 #2 #0.8 }![[image of music]](48/lily-a653e27b.png)
Used properties:
-
style(’()) -
flag-style(’()) -
font-size(0)
-
-
\noteduration (duration) dir (number) -
This produces a note with a stem pointing in dir direction, with the duration for the note head type and augmentation dots. For example,
\note {4.} #-0.75creates a dotted quarter note, with a shortened down stem.\markup { \override #'(style . cross) { \note {4..} #UP } \hspace #2 \note {\breve} #0 }![[image of music]](11/lily-58c1534b.png)
Used properties:
-
style(’()) -
flag-style(’()) -
font-size(0)
-
-
\rest-by-numberlog (number) dot-count (number) -
A rest or multi-measure-rest symbol.
\markup { \rest-by-number #3 #2 \hspace #2 \rest-by-number #0 #1 \hspace #2 \override #'(multi-measure-rest . #t) \rest-by-number #0 #0 }![[image of music]](32/lily-62e9f182.png)
Used properties:
-
multi-measure-rest(#f) -
style(’()) -
font-size(0)
-
-
\restduration (string) -
This produces a rest, with the duration for the rest type and augmentation dots.
"breve","longa"and"maxima"are valid input-strings.Printing MultiMeasureRests could be enabled with
\override #'(multi-measure-rest . #t)If MultiMeasureRests are taken, the MultiMeasureRestNumber is printed above. This is enabled for all styles using default-glyphs. Could be disabled with\override #'(multi-measure-rest-number . #f)\markup { \rest #"4.." \hspace #2 \rest #"breve" \hspace #2 \override #'(multi-measure-rest . #t) { \rest #"7" \hspace #2 \override #'(multi-measure-rest-number . #f) \rest #"7" } }![[image of music]](fb/lily-a95806ac.png)
Used properties:
-
word-space(0.6) -
multi-measure-rest-number(#t) -
multi-measure-rest(#f) -
style(’())
-
-
\scorescore (score) -
Inline an image of music. The reference point (usually the middle staff line) of the lowest staff in the top system is placed on the baseline.
\markup { \score { \new PianoStaff << \new Staff \relative c' { \key f \major \time 3/4 \mark \markup { Allegro } f2\p( a4) c2( a4) bes2( g'4) f8( e) e4 r } \new Staff \relative c { \clef bass \key f \major \time 3/4 f8( a c a c a f c' es c es c) f,( bes d bes d bes) f( g bes g bes g) } >> \layout { indent = 0.0\cm \context { \Score \override RehearsalMark #'break-align-symbols = #'(time-signature key-signature) \override RehearsalMark #'self-alignment-X = #LEFT } \context { \Staff \override TimeSignature #'break-align-anchor-alignment = #LEFT } } } }![[image of music]](a8/lily-1c5d448e.png)
Used properties:
-
baseline-skip
-
-
\semiflat -
Draw a semiflat symbol.
\markup { \semiflat }![[image of music]](49/lily-f23bbdb7.png)
-
\semisharp -
Draw a semisharp symbol.
\markup { \semisharp }![[image of music]](93/lily-83bf7dcc.png)
-
\sesquiflat -
Draw a 3/2 flat symbol.
\markup { \sesquiflat }![[image of music]](21/lily-6794e4fa.png)
-
\sesquisharp -
Draw a 3/2 sharp symbol.
\markup { \sesquisharp }![[image of music]](1d/lily-9499c80c.png)
-
\sharp -
Draw a sharp symbol.
\markup { \sharp }![[image of music]](d8/lily-14cf5e2d.png)
-
\tied-lyricstr (string) -
Like simple-markup, but use tie characters for ‘~’ tilde symbols.
\markup \column { \tied-lyric #"Siam navi~all'onde~algenti Lasciate~in abbandono" \tied-lyric #"Impetuosi venti I nostri~affetti sono" \tied-lyric #"Ogni diletto~e scoglio Tutta la vita~e~un mar." }![[image of music]](11/lily-2fd32d5e.png)
Used properties:
-
word-space
-
| [ << Notation manual tables ] | [トップ][目次][インデックス][ ? ] | [ カンニング ペーパー >> ] | ||
| [ < Music ] | [ 上へ : Text markup commands ] | [ Accordion Registers > ] | ||
A.11.5 Instrument Specific Markup
-
\fret-diagramdefinition-string (string) -
Make a (guitar) fret diagram. For example, say
\markup \fret-diagram #"s:0.75;6-x;5-x;4-o;3-2;2-3;1-2;"
for fret spacing 3/4 of staff space, D chord diagram
Syntax rules for definition-string:
- - Diagram items are separated by semicolons.
- -
Possible items:
-
s:number – Set the fret spacing of the diagram (in staff spaces). Default: 1. -
t:number – Set the line thickness (relative to normal line thickness). Default: 0.5. -
h:number – Set the height of the diagram in frets. Default: 4. -
w:number – Set the width of the diagram in strings. Default: 6. -
f:number – Set fingering label type (0 = none, 1 = in circle on string, 2 = below string). Default: 0. -
d:number – Set radius of dot, in terms of fret spacing. Default: 0.25. -
p:number – Set the position of the dot in the fret space. 0.5 is centered; 1 is on lower fret bar, 0 is on upper fret bar. Default: 0.6. -
c:string1-string2-fret – Include a barre mark from string1 to string2 on fret. -
string
-fret – Place a dot on string at fret. If fret is ‘o’, string is identified as open. If fret is ‘x’, string is identified as muted. -
string
-fret-fingering – Place a dot on string at fret, and label with fingering as defined by thef:code.
-
- - Note: There is no limit to the number of fret indications per string.
Used properties:
-
thickness(0.5) -
fret-diagram-details -
size(1.0) -
align-dir(-0.4)
-
\fret-diagram-tersedefinition-string (string) -
Make a fret diagram markup using terse string-based syntax.
Here is an example
\markup \fret-diagram-terse #"x;x;o;2;3;2;"
for a D chord diagram.
Syntax rules for definition-string:
- Strings are terminated by semicolons; the number of semicolons is the number of strings in the diagram.
- Mute strings are indicated by ‘x’.
- Open strings are indicated by ‘o’.
- A number indicates a fret indication at that fret.
- If there are multiple fret indicators desired on a string, they should be separated by spaces.
-
Fingerings are given by following the fret number with a
-, followed by the finger indicator, e.g. ‘3-2’ for playing the third fret with the second finger. -
Where a barre indicator is desired, follow the fret (or fingering) symbol
with
-(to start a barre and-)to end the barre.
Used properties:
-
thickness(0.5) -
fret-diagram-details -
size(1.0) -
align-dir(-0.4)
-
\fret-diagram-verbosemarking-list (pair) -
Make a fret diagram containing the symbols indicated in marking-list.
For example,
\markup \fret-diagram-verbose #'((mute 6) (mute 5) (open 4) (place-fret 3 2) (place-fret 2 3) (place-fret 1 2))produces a standard D chord diagram without fingering indications.
Possible elements in marking-list:
-
(mute string-number) Place a small ‘x’ at the top of string string-number.
-
(open string-number) Place a small ‘o’ at the top of string string-number.
-
(barre start-string end-string fret-number) Place a barre indicator (much like a tie) from string start-string to string end-string at fret fret-number.
-
(capo fret-number) Place a capo indicator (a large solid bar) across the entire fretboard at fret location fret-number. Also, set fret fret-number to be the lowest fret on the fret diagram.
(place-fret string-number fret-number [finger-value] [color-modifier] [color] [
'parenthesized['default-paren-color]]) Place a fret playing indication on string string-number at fret fret-number with an optional fingering label finger-value, an optional color modifier color-modifier, an optional color color, an optional parenthesis'parenthesizedand an optional paranthesis color'default-paren-color. By default, the fret playing indicator is a solid dot. This can be globally changed by setting the value of the variable dot-color or for a single dot by setting the value of color. The dot can be parenthesized by adding'parenthesized. By default the color for the parenthesis is taken from the dot. Adding'default-paren-colorwill take the parenthesis-color from the global dot-color, as a fall-back black will be used. Setting color-modifier toinvertedinverts the dot color for a specific fingering. The values for string-number, fret-number, and the optional finger should be entered first in that order. The order of the other optional arguments does not matter. If the finger part of theplace-fretelement is present, finger-value will be displayed according to the setting of the variable finger-code. There is no limit to the number of fret indications per string.
Used properties:
-
thickness(0.5) -
fret-diagram-details -
size(1.0) -
align-dir(-0.4)
-
-
\harp-pedaldefinition-string (string) -
Make a harp pedal diagram.
Possible elements in definition-string:
-
^ pedal is up
-
- pedal is neutral
-
v pedal is down
-
| vertical divider line
-
o the following pedal should be circled (indicating a change)
The function also checks if the string has the typical form of three pedals, then the divider and then the remaining four pedals. If not it prints out a warning. However, in any case, it will also print each symbol in the order as given. This means you can place the divider (even multiple dividers) anywhere you want, but you’ll have to live with the warnings.
The appearance of the diagram can be tweaked inter alia using the size property of the TextScript grob (
\override Voice.TextScript #'size = #0.3) for the overall, the thickness property (\override Voice.TextScript #'thickness = #3) for the line thickness of the horizontal line and the divider. The remaining configuration (box sizes, offsets and spaces) is done by the harp-pedal-details list of properties (\override Voice.TextScript #'harp-pedal-details #'box-width = #1). It contains the following settings:box-offset(vertical shift of the box center for up/down pedals),box-width,box-height,space-before-divider(the spacing between two boxes before the divider) andspace-after-divider(box spacing after the divider).\markup \harp-pedal #"^-v|--ov^"
![[image of music]](a1/lily-21a60347.png)
Used properties:
-
thickness(0.5) -
harp-pedal-details(’()) -
size(1.2)
-
-
\woodwind-diagraminstrument (symbol) user-draw-commands (list) -
Make a woodwind-instrument diagram. For example, say
\markup \woodwind-diagram #'oboe #'((lh . (d ees)) (cc . (five3qT1q)) (rh . (gis)))
for an oboe with the left-hand d key, left-hand ees key, and right-hand gis key depressed while the five-hole of the central column effectuates a trill between 1/4 and 3/4 closed.
The following instruments are supported:
- - piccolo
- - flute
- - oboe
- - clarinet
- - bass-clarinet
- - saxophone
- - bassoon
- - contrabassoon
To see all of the callable keys for a given instrument, include the function
(print-keys 'instrument)in your .ly file, where instrument is the instrument whose keys you want to print.Certain keys allow for special configurations. The entire gamut of configurations possible is as follows:
- - 1q (1/4 covered)
- - 1h (1/2 covered)
- - 3q (3/4 covered)
- - R (ring depressed)
- - F (fully covered; the default if no state put)
Additionally, these configurations can be used in trills. So, for example,
three3qTReffectuates a trill between 3/4 full and ring depressed on the three hole. As another example,threeRTeffectuates a trill between R and open, whereasthreeTReffectuates a trill between open and shut. To see all of the possibilities for all of the keys of a given instrument, invoke(print-keys-verbose 'instrument).Lastly, substituting an empty list for the pressed-key alist will result in a diagram with all of the keys drawn but none filled, for example:
\markup \woodwind-diagram #'oboe #'()
Used properties:
-
graphical(#t) -
thickness(0.1) -
size(1)
| [ << Notation manual tables ] | [トップ][目次][インデックス][ ? ] | [ カンニング ペーパー >> ] | ||
| [ < Instrument Specific Markup ] | [ 上へ : Text markup commands ] | [ Other > ] | ||
A.11.6 Accordion Registers
-
\discantname (string) -
\discant namegenerates a discant accordion register symbol.To make it available,
#(use-modules (scm accreg))
is required near the top of your input file.
The register names in the default
\discantregister set have modeled after numeric Swiss notation like depicted in http://de.wikipedia.org/wiki/Register_%28Akkordeon%29, omitting the slashes and dropping leading zeros.The string name is basically a three-digit number with the lowest digit specifying the number of 16’ reeds, the tens the number of 8’ reeds, and the hundreds specifying the number of 4’ reeds. Without modification, the specified number of reeds in 8’ is centered in the symbol. Newer instruments may have registrations where 8’ can be used either within or without a tone chamber, ‘cassotto’. Notationally, the central dot then indicates use of cassotto. One can suffix the tens’ digits ‘1’ and ‘2’ with ‘+’ or ‘-’ to indicate clustering the dots at the right or left respectively rather than centered.
Some examples are
![[image of music]](27/lily-e9da4674.png)
Used properties:
-
font-size(0)
-
-
\freeBassname (string) -
\freeBass namegenerates a free bass/converter accordion register symbol for the usual two-reed layout.To make it available,
#(use-modules (scm accreg))
is required near the top of your input file.
Available registrations are
![[image of music]](96/lily-29e6488d.png)
Used properties:
-
font-size(0)
-
-
\stdBassname (string) -
\stdBass namegenerates a standard bass accordion register symbol.To make it available,
#(use-modules (scm accreg))
is required near the top of your input file.
The default bass register definitions have been modeled after the article http://www.accordions.com/index/art/stradella.shtml originally appearing in Accord Magazine.
The underlying register model is
![[image of music]](1d/lily-74361a0c.png)
This kind of overlapping arrangement is common for Italian instruments though the exact location of the octave breaks differ.
When not composing for a particular target instrument, using the five reed definitions makes more sense than using a four reed layout: in that manner, the ‘Master’ register is unambiguous. This is rather the rule in literature bothering about bass registrations at all.
Available registrations are
![[image of music]](bd/lily-365b2a59.png)
Used properties:
-
font-size(0)
-
-
\stdBassIVname (string) -
\stdBassIV namegenerates a standard bass accordion register symbol.To make it available,
#(use-modules (scm accreg))
is required near the top of your input file.
The main use is for four-reed standard bass instruments with reedbank layout
![[image of music]](fb/lily-a8c3f87a.png)
Notable instruments are Morino models with MIII (the others are five-reed instead) and the Atlantic IV. Most of those models have three register switches. Some newer Morinos with MIII might have five or even seven.
The prevalent three-register layout uses the middle three switches ‘Tenor’, ‘Master’, ‘Soft Bass’. Note that the sound is quite darker than the same registrations of ‘c,’-based instruments.
Available registrations are
![[image of music]](37/lily-7f1f75cd.png)
Used properties:
-
font-size(0)
-
-
\stdBassVname (string) -
\stdBassV namegenerates a standard bass accordion register symbol.To make it available,
#(use-modules (scm accreg))
is required near the top of your input file.
The main use is for five-reed standard bass instruments with reedbank layout
![[image of music]](0d/lily-2304f6b5.png)
This tends to be the bass layout for Hohner’s Morino series without convertor or MIII manual.
With the exception of the rather new 7-register layout, the highest two chord reeds are usually sounded together. The Older instruments offer 5 or 3 bass registers. The Tango VM offers an additional ‘Solo Bass’ setting that mutes the chord reeds. The symbol on the register buttons of the Tango VM would actually match the physical five-octave layout reflected here, but it is not used in literature.
Composers should likely prefer the five-reed versions of these symbols. The mismatch of a four-reed instrument with five-reed symbols is easier to resolve for the player than the other way round.
Available registrations are
![[image of music]](3d/lily-1aff50f1.png)
Used properties:
-
font-size(0)
-
-
\stdBassVIname (string) -
\stdBassVI namegenerates a standard bass accordion register symbol for six reed basses.To make it available,
#(use-modules (scm accreg))
is required near the top of your input file.
This is primarily the register layout for the Hohner “Gola” model. The layout is
![[image of music]](9b/lily-66ce7adf.png)
The registers are effectively quite similar to that of
\stdBass. An additional bass reed at alto pitch is omitted for esthetical reasons from the ‘Master’ setting, so the symbols are almost the same except for the ‘Alto/Soprano’ register with bass notes at Alto pitch and chords at Soprano pitch.Available registrations are
![[image of music]](dc/lily-db328fda.png)
Used properties:
-
font-size(0)
-
| [ << Notation manual tables ] | [トップ][目次][インデックス][ ? ] | [ カンニング ペーパー >> ] | ||
| [ < Accordion Registers ] | [ 上へ : Text markup commands ] | [ Text markup list commands > ] | ||
A.11.7 Other
-
\auto-footnotemkup (markup) note (markup) -
Have footnote note act as an annotation to the markup mkup.
\markup { \auto-footnote a b \override #'(padding . 0.2) \auto-footnote c d }![[image of music]](69/lily-bd030652.png)
The footnote will be annotated automatically.
Used properties:
-
padding(0.0) -
raise(0.5)
-
-
\backslashed-digitnum (integer) -
A feta number, with backslash. This is for use in the context of figured bass notation.
\markup { \backslashed-digit #5 \hspace #2 \override #'(thickness . 3) \backslashed-digit #7 }![[image of music]](69/lily-8a537b0e.png)
Used properties:
-
thickness(1.6) -
font-size(0)
-
-
\charnum (integer) -
Produce a single character. Characters encoded in hexadecimal format require the prefix
#x.\markup { \char #65 \char ##x00a9 }![[image of music]](6d/lily-0febdff9.png)
-
\eyeglasses -
Prints out eyeglasses, indicating strongly to look at the conductor.
\markup { \eyeglasses }![[image of music]](38/lily-f240ded8.png)
-
\first-visibleargs (markup list) -
Use the first markup in args that yields a non-empty stencil and ignore the rest.
\markup { \first-visible { \fromproperty #'header:composer \italic Unknown } }![[image of music]](9f/lily-26f95834.png)
-
\footnotemkup (markup) note (markup) -
Have footnote note act as an annotation to the markup mkup.
\markup { \auto-footnote a b \override #'(padding . 0.2) \auto-footnote c d }
The footnote will not be annotated automatically.
-
\fractionarg1 (markup) arg2 (markup) -
Make a fraction of two markups.
\markup { π ≈ \fraction 355 113 }![[image of music]](51/lily-55e03936.png)
Used properties:
-
font-size(0)
-
-
\frompropertysymbol (symbol) -
Read the symbol from property settings, and produce a stencil from the markup contained within. If symbol is not defined, it returns an empty markup.
\header { myTitle = "myTitle" title = \markup { from \italic \fromproperty #'header:myTitle } } \markup { \null }![[image of music]](43/lily-d3b1dc05.png)
-
\left-bracesize (number) -
A feta brace in point size size.
\markup { \left-brace #35 \hspace #2 \left-brace #45 }![[image of music]](00/lily-3b688333.png)
-
\lookupglyph-name (string) -
Lookup a glyph by name.
\markup { \override #'(font-encoding . fetaBraces) { \lookup #"brace200" \hspace #2 \rotate #180 \lookup #"brace180" } }![[image of music]](10/lily-d83d47d1.png)
-
\markalphabetnum (integer) -
Make a markup letter for num. The letters start with A to Z and continue with double letters.
\markup { \markalphabet #8 \hspace #2 \markalphabet #26 }![[image of music]](ff/lily-41e52510.png)
-
\markletternum (integer) -
Make a markup letter for num. The letters start with A to Z (skipping letter I), and continue with double letters.
\markup { \markletter #8 \hspace #2 \markletter #26 }![[image of music]](ef/lily-fb856aae.png)
-
\null -
An empty markup with extents of a single point.
\markup { \null }![[image of music]](93/lily-39c60670.png)
-
\on-the-flyprocedure (procedure) arg (markup) -
Apply the procedure markup command to arg. procedure takes the same arguments as
interpret-markupand returns a stencil. -
\overridenew-prop (pair) arg (markup) -
Add the argument new-prop to the property list. Properties may be any property supported by font-interface, text-interface and instrument-specific-markup-interface.
\markup { \line { \column { default baseline-skip } \hspace #2 \override #'(baseline-skip . 4) { \column { increased baseline-skip } } } }![[image of music]](56/lily-5b351c76.png)
-
\page-linkpage-number (number) arg (markup) -
Add a link to the page page-number around arg. This only works in the PDF backend.
\markup { \page-link #2 { \italic { This links to page 2... } } }![[image of music]](4c/lily-ffde738f.png)
-
\page-reflabel (symbol) gauge (markup) default (markup) -
Reference to a page number. label is the label set on the referenced page (using the
\labelcommand), gauge a markup used to estimate the maximum width of the page number, and default the value to display when label is not found.(If the current book or bookpart is set to use roman numerals for page numbers, the reference will be formatted accordingly – in which case the gauge’s width may require additional tweaking.)
-
\patterncount (integer) axis (integer) space (number) pattern (markup) -
Prints count times a pattern markup. Patterns are spaced apart by space. Patterns are distributed on axis.
\markup \column { "Horizontally repeated :" \pattern #7 #X #2 \flat \null "Vertically repeated :" \pattern #3 #Y #0.5 \flat }![[image of music]](32/lily-66c81ab7.png)
-
\property-recursivesymbol (symbol) -
Print out a warning when a header field markup contains some recursive markup definition.
-
\right-bracesize (number) -
A feta brace in point size size, rotated 180 degrees.
\markup { \right-brace #45 \hspace #2 \right-brace #35 }![[image of music]](91/lily-c726779b.png)
-
\slashed-digitnum (integer) -
A feta number, with slash. This is for use in the context of figured bass notation.
\markup { \slashed-digit #5 \hspace #2 \override #'(thickness . 3) \slashed-digit #7 }![[image of music]](7f/lily-0d0c71a7.png)
Used properties:
-
thickness(1.6) -
font-size(0)
-
-
\stencilstil (stencil) -
Use a stencil as markup.
\markup { \stencil #(make-circle-stencil 2 0 #t) }![[image of music]](d7/lily-2cb74d75.png)
-
\strut -
Create a box of the same height as the space in the current font.
-
\transparentarg (markup) -
Make arg transparent.
\markup { \transparent { invisible text } }![[image of music]](d3/lily-9eacc13e.png)
-
\verbatim-filename (string) -
Read the contents of file name, and include it verbatim.
\markup { \verbatim-file #"simple.ly" }![[image of music]](a0/lily-a42859d3.png)
-
\whiteoutarg (markup) -
Provide a white background for arg. The shape of the white background is determined by
style. The default isboxwhich produces a rectangle.rounded-boxproduces a rounded rectangle.outlineapproximates the outline of the markup.\markup { \combine \filled-box #'(-1 . 15) #'(-3 . 4) #1 \override #'(thickness . 1.5) \whiteout whiteout-box } \markup { \combine \filled-box #'(-1 . 24) #'(-3 . 4) #1 \override #'(style . rounded-box) \override #'(thickness . 3) \whiteout whiteout-rounded-box } \markup { \combine \filled-box #'(-1 . 18) #'(-3 . 4) #1 \override #'(style . outline) \override #'(thickness . 3) \whiteout whiteout-outline }![[image of music]](55/lily-ab9b98c3.png)
Used properties:
-
thickness(’()) -
style(box)
-
-
\with-colorcolor (color) arg (markup) -
Draw arg in color specified by color.
\markup { \with-color #red red \hspace #2 \with-color #green green \hspace #2 \with-color #blue blue }![[image of music]](73/lily-2e302c29.png)
-
\with-dimensions-fromarg1 (markup) arg2 (markup) -
Print arg2 with the dimensions of arg1.
-
\with-dimensionsx (pair of numbers) y (pair of numbers) arg (markup) -
Set the dimensions of arg to x and y.
-
\with-linklabel (symbol) arg (markup) -
Add a link to the page holding label label around arg. This only works in the PDF backend.
\markup { \with-link #'label { \italic { This links to the page containing the label... } } }![[image of music]](6a/lily-528361b3.png)
-
\with-outlineoutline (markup) arg (markup) -
Print arg with the outline and dimensions of outline.
| [ << Notation manual tables ] | [トップ][目次][インデックス][ ? ] | [ カンニング ペーパー >> ] | ||
| [ < Other ] | [ 上へ : Notation manual tables ] | [ List of special characters > ] | ||
A.12 Text markup list commands
The following commands can all be used with \markuplist:
-
\column-linesargs (markup list) -
Like
\column, but return a list of lines instead of a single markup.baseline-skipdetermines the space between each markup in args.Used properties:
-
baseline-skip
-
-
\justified-linesargs (markup list) -
Like
\justify, but return a list of lines instead of a single markup. Use\override-lines #'(line-width . X)to set the line width; X is the number of staff spaces.Used properties:
-
text-direction(1) -
word-space -
line-width(#f) -
baseline-skip
-
-
\map-markup-commandscompose (procedure) args (markup list) -
This applies the function compose to every markup in args (including elements of markup list command calls) in order to produce a new markup list. Since the return value from a markup list command call is not a markup list but rather a list of stencils, this requires passing those stencils off as the results of individual markup calls. That way, the results should work out as long as no markups rely on side effects.
-
\override-linesnew-prop (pair) args (markup list) -
Like
\override, for markup lists. -
\score-linesscore (score) -
This is the same as the
\scoremarkup but delivers its systems as a list of lines. Its score argument is entered in braces like it would be for\score. -
\tablecolumn-align (number list) lst (markup list) -
Returns a table.
column-align specifies how each column is aligned, possible values are -1, 0, 1. The number of elements in column-align determines how many columns will be printed. The entries to print are given by lst, a markup-list. If needed, the last row is filled up with
point-stencils. Overridingpaddingmay be used to increase columns horizontal distance. Overridingbaseline-skipto increase rows vertical distance.\markuplist { \override #'(padding . 2) \table #'(0 1 0 -1) { \underline { center-aligned right-aligned center-aligned left-aligned } one \number 1 thousandth \number 0.001 eleven \number 11 hundredth \number 0.01 twenty \number 20 tenth \number 0.1 thousand \number 1000 one \number 1.0 } }![[image of music]](a0/lily-2524d31c.png)
Used properties:
-
baseline-skip -
padding(0)
-
-
\table-of-contents -
Used properties:
-
baseline-skip
-
-
\wordwrap-internaljustify (boolean) args (markup list) -
Internal markup list command used to define
\justifyand\wordwrap.Used properties:
-
text-direction(1) -
word-space -
line-width(#f)
-
-
\wordwrap-linesargs (markup list) -
Like
\wordwrap, but return a list of lines instead of a single markup. Use\override-lines #'(line-width . X)to set the line width, where X is the number of staff spaces.Used properties:
-
text-direction(1) -
word-space -
line-width(#f) -
baseline-skip
-
-
\wordwrap-string-internaljustify (boolean) arg (string) -
Internal markup list command used to define
\justify-stringand\wordwrap-string.Used properties:
-
text-direction(1) -
word-space -
line-width
-
| [ << Notation manual tables ] | [トップ][目次][インデックス][ ? ] | [ カンニング ペーパー >> ] | ||
| [ < Text markup list commands ] | [ 上へ : Notation manual tables ] | [ List of articulations > ] | ||
A.13 List of special characters
The following special characters references can be used; for more details, see ASCII エイリアス.
The HTML syntax is used and most of these references are the same as HTML. The rest of them are inspired by LaTeX.
The characters are boxed so that you can see their size. A small padding has been added between the character and the box for more readability.
![[image of music]](d8/lily-a86eefb3.png)
| [ << Notation manual tables ] | [トップ][目次][インデックス][ ? ] | [ カンニング ペーパー >> ] | ||
| [ < List of special characters ] | [ 上へ : Notation manual tables ] | [ Articulation scripts > ] | ||
A.14 List of articulations
The following lists show all the scripts in the Feta font that may be attached to notes (eg. ‘f\accent’ or ‘f->’). Each example shows the script in the up, down and neutral positions respectively.
| Articulation scripts | ||
| Ornament scripts | ||
| Fermata scripts | ||
| Instrument-specific scripts | ||
| Repeat sign scripts | ||
| Ancient scripts |
| [ << Notation manual tables ] | [トップ][目次][インデックス][ ? ] | [ カンニング ペーパー >> ] | ||
| [ < List of articulations ] | [ 上へ : List of articulations ] | [ Ornament scripts > ] | ||
Articulation scripts
\accent or ->
| \espressivo
| \marcato or -^
| \portato or -_
|
\staccatissimo or -!
| \staccato or -.
| \tenuto or --
|
![[image of music]](cb/lily-72965cb3.png)
![[image of music]](0f/lily-a10f635d.png)
![[image of music]](f7/lily-74152d99.png)
![[image of music]](f6/lily-7faac76f.png)
![[image of music]](e0/lily-e780ba24.png)
![[image of music]](1a/lily-19e3ae89.png)
![[image of music]](d7/lily-537017c7.png)
| [ << Notation manual tables ] | [トップ][目次][インデックス][ ? ] | [ カンニング ペーパー >> ] | ||
| [ < Articulation scripts ] | [ 上へ : List of articulations ] | [ Fermata scripts > ] | ||
Ornament scripts
\prall
| \prallup
| \pralldown
| \upprall
|
\downprall
| \prallprall
| \lineprall
| \prallmordent
|
\mordent
| \upmordent
| \downmordent
| \trill
|
\turn
| \reverseturn
|
![[image of music]](2e/lily-9b4faafd.png)
![[image of music]](2b/lily-768e8e16.png)
![[image of music]](04/lily-4df1be34.png)
![[image of music]](a7/lily-6d421be3.png)
![[image of music]](c2/lily-a817bf96.png)
![[image of music]](3f/lily-34e1996e.png)
![[image of music]](72/lily-7a8d9dcc.png)
![[image of music]](4d/lily-0d1ed6be.png)
![[image of music]](24/lily-944703c0.png)
![[image of music]](d4/lily-c3732308.png)
![[image of music]](36/lily-e24f7c6c.png)
![[image of music]](1e/lily-1782f53d.png)
![[image of music]](5b/lily-37faa2a3.png)
![[image of music]](81/lily-4f0426f4.png)
| [ << Notation manual tables ] | [トップ][目次][インデックス][ ? ] | [ カンニング ペーパー >> ] | ||
| [ < Ornament scripts ] | [ 上へ : List of articulations ] | [ Instrument-specific scripts > ] | ||
Fermata scripts
\shortfermata
| \fermata
| \longfermata
| \verylongfermata
|
![[image of music]](f5/lily-0fe2acbd.png)
![[image of music]](8c/lily-eef5e8cb.png)
![[image of music]](c1/lily-0c58d5b9.png)
![[image of music]](7b/lily-519fa6d5.png)
| [ << Notation manual tables ] | [トップ][目次][インデックス][ ? ] | [ カンニング ペーパー >> ] | ||
| [ < Fermata scripts ] | [ 上へ : List of articulations ] | [ Repeat sign scripts > ] | ||
Instrument-specific scripts
\upbow
| \downbow
| \flageolet
| \open
|
\halfopen
| \lheel
| \rheel
| \ltoe
|
\rtoe
| \snappizzicato
| \stopped or -+
|
![[image of music]](fb/lily-14beec34.png)
![[image of music]](0d/lily-3bc57a39.png)
![[image of music]](ce/lily-17c571b4.png)
![[image of music]](c4/lily-23dcd671.png)
![[image of music]](ee/lily-97c172d5.png)
![[image of music]](09/lily-f9e47e67.png)
![[image of music]](90/lily-a34ea3c2.png)
![[image of music]](e4/lily-6b21bd29.png)
![[image of music]](79/lily-d1547c5c.png)
![[image of music]](4d/lily-a3dff7a4.png)
![[image of music]](f2/lily-1224b0e2.png)
| [ << Notation manual tables ] | [トップ][目次][インデックス][ ? ] | [ カンニング ペーパー >> ] | ||
| [ < Instrument-specific scripts ] | [ 上へ : List of articulations ] | [ Ancient scripts > ] | ||
Repeat sign scripts
\segno
| \coda
| \varcoda
|
![[image of music]](71/lily-4bd9ef26.png)
![[image of music]](75/lily-21095245.png)
![[image of music]](c5/lily-7353a670.png)
| [ << Notation manual tables ] | [トップ][目次][インデックス][ ? ] | [ カンニング ペーパー >> ] | ||
| [ < Repeat sign scripts ] | [ 上へ : List of articulations ] | [ Percussion notes > ] | ||
Ancient scripts
\accentus
| \circulus
| \ictus
|
\semicirculus
| \signumcongruentiae
|
![[image of music]](51/lily-f24ea0cc.png)
![[image of music]](91/lily-05e60fd1.png)
![[image of music]](ad/lily-59673e43.png)
![[image of music]](bd/lily-9600eb69.png)
![[image of music]](1e/lily-fca2d753.png)
| [ << Notation manual tables ] | [トップ][目次][インデックス][ ? ] | [ カンニング ペーパー >> ] | ||
| [ < Ancient scripts ] | [ 上へ : Notation manual tables ] | [ Technical glossary > ] | ||
A.15 Percussion notes
bassdrum
| acousticbassdrum
| snare
| acousticsnare
|
electricsnare
| lowfloortom
| highfloortom
| lowtom
|
hightom
| lowmidtom
| highmidtom
| highhat
|
closedhihat
| openhighhat
| halfopenhihat
| pedalhihat
|
crashcymbal
| crashcymbala
| crashcymbalb
| ridecymbal
|
ridecymbala
| ridecymbalb
| chinesecymbal
| splashcymbal
|
ridebell
| cowbell
| hibongo
| openhibongo
|
mutehibongo
| lobongo
| openlobongo
| mutelobongo
|
hiconga
| openhiconga
| mutehiconga
| loconga
|
openloconga
| muteloconga
| hitimbale
| lotimbale
|
hiagogo
| loagogo
| sidestick
| hisidestick
|
losidestick
| guiro
| shortguiro
| longguiro
|
cabasa
| maracas
| shortwhistle
| longwhistle
|
handclap
| tambourine
| vibraslap
| tamtam
|
claves
| hiwoodblock
| lowoodblock
| opencuica
|
mutecuica
| triangle
| opentriangle
| mutetriangle
|
oneup
| twoup
| threeup
| fourup
|
fiveup
| onedown
| twodown
| threedown
|
fourdown
| fivedown
|
![[image of music]](c9/lily-05584a10.png)
![[image of music]](57/lily-29271335.png)
![[image of music]](d0/lily-d4e29a1f.png)
![[image of music]](08/lily-5aa41bf3.png)
![[image of music]](a9/lily-4fe64f8e.png)
![[image of music]](36/lily-1d0b43c2.png)
![[image of music]](ae/lily-6356d14f.png)
![[image of music]](15/lily-7505246e.png)
![[image of music]](2d/lily-3448eb0e.png)
![[image of music]](4f/lily-effdc95a.png)
![[image of music]](31/lily-8b699580.png)
![[image of music]](b1/lily-f9d817cd.png)
![[image of music]](21/lily-1bf6e63c.png)
![[image of music]](0d/lily-65f2af40.png)
![[image of music]](99/lily-cb31f5b7.png)
![[image of music]](13/lily-1e5febea.png)
![[image of music]](78/lily-ff5e6853.png)
![[image of music]](6b/lily-098d96d1.png)
![[image of music]](a4/lily-11b926e9.png)
![[image of music]](04/lily-0f4d4bb7.png)
![[image of music]](35/lily-00d7ae26.png)
![[image of music]](05/lily-4c5c1705.png)
![[image of music]](73/lily-2d1168e9.png)
![[image of music]](1c/lily-de564350.png)
![[image of music]](1a/lily-31b7c590.png)
![[image of music]](1d/lily-eebc90cd.png)
![[image of music]](79/lily-653418fe.png)
![[image of music]](f3/lily-d343fc97.png)
![[image of music]](21/lily-bd9313f2.png)
![[image of music]](25/lily-77b4dd60.png)
![[image of music]](bd/lily-5699281f.png)
![[image of music]](71/lily-040d5d57.png)
![[image of music]](ff/lily-6bb651bc.png)
![[image of music]](52/lily-4d948e84.png)
![[image of music]](80/lily-6aae8ef4.png)
![[image of music]](c7/lily-2ed85c98.png)
![[image of music]](93/lily-d86b470d.png)
![[image of music]](e1/lily-2781d24b.png)
![[image of music]](91/lily-fd142de0.png)
![[image of music]](9d/lily-286f9c85.png)
![[image of music]](8f/lily-c6b0c2bb.png)
![[image of music]](25/lily-7bd9dc21.png)
![[image of music]](34/lily-a02ac06b.png)
![[image of music]](e1/lily-4dd7f309.png)
![[image of music]](1d/lily-95cf6e19.png)
![[image of music]](ae/lily-b8dc6afc.png)
![[image of music]](63/lily-e593cf6d.png)
![[image of music]](a7/lily-a3e86073.png)
![[image of music]](82/lily-27adb759.png)
![[image of music]](0c/lily-79020d1d.png)
![[image of music]](62/lily-8b73f454.png)
![[image of music]](43/lily-ed424f35.png)
![[image of music]](49/lily-cf71da38.png)
![[image of music]](db/lily-a8065781.png)
![[image of music]](18/lily-6d470220.png)
![[image of music]](2f/lily-18ac1917.png)
![[image of music]](b9/lily-136673b0.png)
![[image of music]](b2/lily-8a9a7d2f.png)
![[image of music]](79/lily-8a4b6b65.png)
![[image of music]](34/lily-18425206.png)
![[image of music]](dd/lily-51f98a9b.png)
![[image of music]](07/lily-cc8a6448.png)
![[image of music]](3f/lily-5c6d2567.png)
![[image of music]](40/lily-cd055cb8.png)
![[image of music]](29/lily-65d80df7.png)
![[image of music]](c4/lily-afbdfcb1.png)
![[image of music]](50/lily-2761864d.png)
![[image of music]](6d/lily-b96dda21.png)
![[image of music]](c8/lily-623e3b7d.png)
![[image of music]](21/lily-174ac5b8.png)
![[image of music]](a5/lily-d5c10480.png)
![[image of music]](40/lily-efc52434.png)
![[image of music]](1e/lily-4ebb39dd.png)
![[image of music]](e1/lily-d8439fa7.png)
| [ << Notation manual tables ] | [トップ][目次][インデックス][ ? ] | [ カンニング ペーパー >> ] | ||
| [ < Percussion notes ] | [ 上へ : Notation manual tables ] | [ alist > ] | ||
A.16 Technical glossary
A glossary of the technical terms and concepts used internally in LilyPond. These terms may appear in the manuals, on mailing lists or in the source code.
| alist | ||
| callback | ||
| closure | ||
| glyph | ||
| grob | ||
| immutable | ||
| interface | ||
| lexer | ||
| mutable | ||
| output-def | ||
| parser | ||
| parser variable | ||
| prob | ||
| smob | ||
| stencil |
| [ << Notation manual tables ] | [トップ][目次][インデックス][ ? ] | [ カンニング ペーパー >> ] | ||
| [ < Technical glossary ] | [ 上へ : Technical glossary ] | [ callback > ] | ||
alist
An association list or alist for short is a Scheme pair
which associates a value with a key: (key . value). For
example, in ‘scm/lily.scm’, the alist
“type-p-name-alist” associates certain type predicates
(e.g., ly:music?) with names (e.g., “music”) so
that type-check failures can be reported with a console message that
includes the name of the expected type predicate.
| [ << Notation manual tables ] | [トップ][目次][インデックス][ ? ] | [ カンニング ペーパー >> ] | ||
| [ < alist ] | [ 上へ : Technical glossary ] | [ closure > ] | ||
callback
A callback is a routine, function or method whose reference is passed as an argument in a call to another routine, so allowing the called routine to invoke it. The technique enables a lower- level software layer to call a function defined in a higher layer. Callbacks are used extensively in LilyPond to permit user-level Scheme code to define how many low-level actions are performed.
| [ << Notation manual tables ] | [トップ][目次][インデックス][ ? ] | [ カンニング ペーパー >> ] | ||
| [ < callback ] | [ 上へ : Technical glossary ] | [ glyph > ] | ||
closure
In Scheme, a closure is created when a function, usually a lambda expression, is passed as a variable. The closure contains the function’s code plus references to the lexical bindings of the function’s free variables (i.e., those variables used in the expression but defined outside it). When this function is applied to different arguments later, the free variable bindings that were captured in the closure are used to obtain the values of the free variables to be used in the calculation. One useful property of closures is the retention of internal variable values between invocations, so permitting state to be maintained.
| [ << Notation manual tables ] | [トップ][目次][インデックス][ ? ] | [ カンニング ペーパー >> ] | ||
| [ < closure ] | [ 上へ : Technical glossary ] | [ grob > ] | ||
glyph
A glyph is a particular graphical representation of a typographic character, or a combination of two characters formating a ligature. A set of glyphs with a single style and shape comprise a font, and a set of fonts covering several styles and sizes comprise a typeface.
参照
Notation Reference: フォント, 特殊文字.
| [ << Notation manual tables ] | [トップ][目次][インデックス][ ? ] | [ カンニング ペーパー >> ] | ||
| [ < glyph ] | [ 上へ : Technical glossary ] | [ immutable > ] | ||
grob
LilyPond objects which represent items of notation in the printed
output such as note heads, stems, slurs, ties, fingering, clefs,
etc are called ‘Layout objects’, often known as ‘GRaphical
OBjects’, or grobs for short. They are represented by
instances of the Grob class.
参照
Learning Manual: Objects and interfaces, Naming conventions of objects and properties, Properties of layout objects.
Internals Reference: grob-interface, All layout objects.
| [ << Notation manual tables ] | [トップ][目次][インデックス][ ? ] | [ カンニング ペーパー >> ] | ||
| [ < grob ] | [ 上へ : Technical glossary ] | [ interface > ] | ||
immutable
An immutable object is one whose state cannot be modified after creation, in contrast to a mutable object, which can be modified after creation.
In LilyPond, immutable or shared properties define the default
style and behavior of grobs. They are shared between many objects.
In apparent contradiction to the name, they can be changed using
\override and \revert.
参照
Notation Reference: mutable.
| [ << Notation manual tables ] | [トップ][目次][インデックス][ ? ] | [ カンニング ペーパー >> ] | ||
| [ < immutable ] | [ 上へ : Technical glossary ] | [ lexer > ] | ||
interface
Actions and properties which are common to a number of grobs are
grouped together in an object called a grob-interface, or
just ‘interface’ for short.
参照
Learning Manual: Objects and interfaces, Naming conventions of objects and properties, Properties found in interfaces.
Notation Reference: レイアウト インターフェイス.
Internals Reference: Graphical Object Interfaces.
| [ << Notation manual tables ] | [トップ][目次][インデックス][ ? ] | [ カンニング ペーパー >> ] | ||
| [ < interface ] | [ 上へ : Technical glossary ] | [ mutable > ] | ||
lexer
A lexer is a program which converts a sequence of characters into a sequence of tokens, a process called lexical analysis. The LilyPond lexer converts the stream obtained from an input ‘.ly’ file into a tokenized stream more suited to the next stage of processing - parsing, for which see parser. The LilyPond lexer is built with Flex from the lexer file ‘lily/lexer.ll’ which contains the lexical rules. This file is part of the source code and is not included in the LilyPond binary installation.
| [ << Notation manual tables ] | [トップ][目次][インデックス][ ? ] | [ カンニング ペーパー >> ] | ||
| [ < lexer ] | [ 上へ : Technical glossary ] | [ output-def > ] | ||
mutable
A mutable object is one whose state can be modified after creation, in contrast to an immutable object, whose state is fixed at the time of creation.
In LilyPond, mutable properties contain values that are specific to one grob. Typically, lists of other objects or results from computations are stored in mutable properties.
参照
Notation Reference: immutable.
| [ << Notation manual tables ] | [トップ][目次][インデックス][ ? ] | [ カンニング ペーパー >> ] | ||
| [ < mutable ] | [ 上へ : Technical glossary ] | [ parser > ] | ||
output-def
An instance of the Output-def class contains the methods and
data structures associated with an output block. Instances are
created for midi, layout and paper blocks.
| [ << Notation manual tables ] | [トップ][目次][インデックス][ ? ] | [ カンニング ペーパー >> ] | ||
| [ < output-def ] | [ 上へ : Technical glossary ] | [ parser variable > ] | ||
parser
A parser analyzes the sequence of tokens produced by a lexer to determine its grammatical structure, grouping the tokens progressively into larger groupings according to the rules of the grammar. If the sequence of tokens is valid the end product is a tree of tokens whose root is the grammar’s start symbol. If this cannot be achieved the file is invalid and an appropriate error message is produced. The syntactic groupings and the rules for constructing the groupings from their parts for the LilyPond syntax are defined in ‘lily/parser.yy’ and shown in Backus Normal Form (BNF) in LilyPond grammar. This file is used to build the parser during the program build by the parser generator, Bison. It is part of the source code and is not included in the LilyPond binary installation.
| [ << Notation manual tables ] | [トップ][目次][インデックス][ ? ] | [ カンニング ペーパー >> ] | ||
| [ < parser ] | [ 上へ : Technical glossary ] | [ prob > ] | ||
parser variable
These are variables defined directly in Scheme. Their direct use by users is strongly discouraged, because their scoping semantics can be confusing.
When the value of such a variable is changed in a ‘.ly’ file,
the change is global, and unless explicitly reverted, the new value
will persist to the end of the file, affecting subsequent
\score blocks as well as external files added with the
\include command. This can lead to unintended consequences
and in complex typesetting projects the consequent errors can be
difficult to track down.
LilyPond uses the following parser variables:
- afterGraceFraction
- musicQuotes
- mode
- output-count
- output-suffix
- partCombineListener
- pitchnames
- toplevel-bookparts
- toplevel-scores
- showLastLength
- showFirstLength
| [ << Notation manual tables ] | [トップ][目次][インデックス][ ? ] | [ カンニング ペーパー >> ] | ||
| [ < parser variable ] | [ 上へ : Technical glossary ] | [ smob > ] | ||
prob
PRoperty OBjects, or probs for short, are instances of
the Prob class, a simple base class for objects which have
mutable and immutable property alists and the methods to manipulate
them. The Music and Stream_event classes derive from
Prob. Instances of the Prob class are also created
to hold the formatted content of system grobs and titling blocks
during page layout.
| [ << Notation manual tables ] | [トップ][目次][インデックス][ ? ] | [ カンニング ペーパー >> ] | ||
| [ < prob ] | [ 上へ : Technical glossary ] | [ stencil > ] | ||
smob
Smobs, or ScheMe OBjects, are part of the mechanism used by Guile to export C and C++ objects to Scheme code. In LilyPond, smobs are created from C++ objects through macros. There are two types of smob objects: simple smobs, intended for simple immutable objects like numbers, and complex smobs, used for objects with identities. If you have access to the LilyPond sources, more information can be found in ‘lily/includes/smob.hh’.
| [ << Notation manual tables ] | [トップ][目次][インデックス][ ? ] | [ カンニング ペーパー >> ] | ||
| [ < smob ] | [ 上へ : Technical glossary ] | [ All context properties > ] | ||
stencil
An instance of the stencil class holds the information required to print a typographical object. It is a simple smob containing a confining box, which defines the vertical and horizontal extents of the object, and a Scheme expression which will print the object when evaluated. Stencils may be combined to form more complex stencils defined by a tree of Scheme expressions formed from the Scheme expressions of the component stencils.
The stencil property, which connects a grob to its stencil,
is defined in the grob-interface interface.
参照
Internals Reference: grob-interface.
| [ << Notation manual tables ] | [トップ][目次][インデックス][ ? ] | [ カンニング ペーパー >> ] | ||
| [ < stencil ] | [ 上へ : Notation manual tables ] | [ Layout properties > ] | ||
A.17 All context properties
-
accidentalGrouping(symbol) If set to
'voice, accidentals on the same note in different octaves may be horizontally staggered if in different voices.-
additionalBassStrings(list) The additional tablature bass-strings, which will not get a seprate line in TabStaff. It is a list of the pitches of each string (starting with the lowest numbered one).
-
additionalPitchPrefix(string) Text with which to prefix additional pitches within a chord name.
-
aDueText(markup) Text to print at a unisono passage.
-
alignAboveContext(string) Where to insert newly created context in vertical alignment.
-
alignBassFigureAccidentals(boolean) If true, then the accidentals are aligned in bass figure context.
-
alignBelowContext(string) Where to insert newly created context in vertical alignment.
-
alternativeNumberingStyle(symbol) The style of an alternative’s bar numbers. Can be
numbersfor going back to the same number ornumbers-with-lettersfor going back to the same number with letter suffixes. No setting will not go back in measure-number time.-
alternativeRestores(symbol list) Timing variables that are restored to their value at the start of the first alternative in subsequent alternatives.
-
associatedVoice(string) Name of the context (see
associatedVoiceTypefor its type, usuallyVoice) that has the melody for thisLyricsline.-
associatedVoiceType(symbol) Type of the context that has the melody for this
Lyricsline.-
autoAccidentals(list) List of different ways to typeset an accidental.
For determining when to print an accidental, several different rules are tried. The rule that gives the highest number of accidentals is used.
Each entry in the list is either a symbol or a procedure.
- symbol
The symbol is the name of the context in which the following rules are to be applied. For example, if context is Score then all staves share accidentals, and if context is Staff then all voices in the same staff share accidentals, but staves do not.
- procedure
The procedure represents an accidental rule to be applied to the previously specified context.
The procedure takes the following arguments:
-
context The current context to which the rule should be applied.
-
pitch The pitch of the note to be evaluated.
-
barnum The current bar number.
-
measurepos The current measure position.
The procedure returns a pair of booleans. The first states whether an extra natural should be added. The second states whether an accidental should be printed.
(#t . #f)does not make sense.-
-
autoBeamCheck(procedure) A procedure taking three arguments, context, dir [start/stop (-1 or 1)], and test [shortest note in the beam]. A non-
#freturn value starts or stops the auto beam.-
autoBeaming(boolean) If set to true then beams are generated automatically.
-
autoCautionaries(list) List similar to
autoAccidentals, but it controls cautionary accidentals rather than normal ones. Both lists are tried, and the one giving the most accidentals wins. In case of draw, a normal accidental is typeset.-
automaticBars(boolean) If set to false then bar lines will not be printed automatically; they must be explicitly created with a
\barcommand. Unlike the\cadenzaOnkeyword, measures are still counted. Bar line generation will resume according to that count if this property is unset.-
barAlways(boolean) If set to true a bar line is drawn after each note.
-
barCheckSynchronize(boolean) If true then reset
measurePositionwhen finding a bar check.-
barNumberFormatter(procedure) A procedure that takes a bar number, measure position, and alternative number and returns a markup of the bar number to print.
-
barNumberVisibility(procedure) A procedure that takes a bar number and a measure position and returns whether the corresponding bar number should be printed. Note that the actual print-out of bar numbers is controlled with the
break-visibilityproperty.The following procedures are predefined:
-
all-bar-numbers-visible Enable bar numbers for all bars, including the first one and broken bars (which get bar numbers in parentheses).
-
first-bar-number-invisible Enable bar numbers for all bars (including broken bars) except the first one. If the first bar is broken, it doesn’t get a bar number either.
-
first-bar-number-invisible-save-broken-bars Enable bar numbers for all bars (including broken bars) except the first one. A broken first bar gets a bar number.
-
first-bar-number-invisible-and-no-parenthesized-bar-numbers Enable bar numbers for all bars except the first bar and broken bars. This is the default.
-
(every-nth-bar-number-visible n) Assuming n is value 2, for example, this enables bar numbers for bars 2, 4, 6, etc.
-
(modulo-bar-number-visible n m) If bar numbers 1, 4, 7, etc., should be enabled, n (the modulo) must be set to 3 and m (the division remainder) to 1.
-
-
baseMoment(moment) Smallest unit of time that will stand on its own as a subdivided section.
-
bassFigureFormatFunction(procedure) A procedure that is called to produce the formatting for a
BassFiguregrob. It takes a list ofBassFigureEvents, a context, and the grob to format.-
beamExceptions(list) An alist of exceptions to autobeam rules that normally end on beats.
-
beamHalfMeasure(boolean) Whether to allow a beam to begin halfway through the measure in triple time, which could look like 6/8.
-
beatStructure(list) List of
baseMoments that are combined to make beats.-
chordChanges(boolean) Only show changes in chords scheme?
-
chordNameExceptions(list) An alist of chord exceptions. Contains
(chord . markup)entries.-
chordNameExceptionsFull(list) An alist of full chord exceptions. Contains
(chord . markup)entries.-
chordNameExceptionsPartial(list) An alist of partial chord exceptions. Contains
(chord . (prefix-markup suffix-markup))entries.-
chordNameFunction(procedure) The function that converts lists of pitches to chord names.
-
chordNameLowercaseMinor(boolean) Downcase roots of minor chords?
-
chordNameSeparator(markup) The markup object used to separate parts of a chord name.
-
chordNoteNamer(procedure) A function that converts from a pitch object to a text markup. Used for single pitches.
-
chordPrefixSpacer(number) The space added between the root symbol and the prefix of a chord name.
-
chordRootNamer(procedure) A function that converts from a pitch object to a text markup. Used for chords.
-
clefGlyph(string) Name of the symbol within the music font.
-
clefPosition(number) Where should the center of the clef symbol go, measured in half staff spaces from the center of the staff.
-
clefTransposition(integer) Add this much extra transposition. Values of 7 and -7 are common.
-
clefTranspositionFormatter(procedure) A procedure that takes the Transposition number as a string and the style as a symbol and returns a markup.
-
clefTranspositionStyle(symbol) Determines the way the ClefModifier grob is displayed. Possible values are ‘default’, ‘parenthesized’ and ‘bracketed’.
-
completionBusy(boolean) Whether a completion-note head is playing.
-
completionFactor(an exact rational or procedure) When
Completion_heads_engraverandCompletion_rest_engraverneed to split a note or rest with a scaled duration, such asc2*3, this specifies the scale factor to use for the newly-split notes and rests created by the engraver.If
#f, the completion engraver uses the scale-factor of each duration being split.If set to a callback procedure, that procedure is called with the context of the completion engraver, and the duration to be split.
-
completionUnit(moment) Sub-bar unit of completion.
-
connectArpeggios(boolean) If set, connect arpeggios across piano staff.
-
countPercentRepeats(boolean) If set, produce counters for percent repeats.
-
createKeyOnClefChange(boolean) Print a key signature whenever the clef is changed.
-
createSpacing(boolean) Create
StaffSpacingobjects? Should be set for staves.-
crescendoSpanner(symbol) The type of spanner to be used for crescendi. Available values are ‘hairpin’ and ‘text’. If unset, a hairpin crescendo is used.
-
crescendoText(markup) The text to print at start of non-hairpin crescendo, i.e., ‘cresc.’.
-
cueClefGlyph(string) Name of the symbol within the music font.
-
cueClefPosition(number) Where should the center of the clef symbol go, measured in half staff spaces from the center of the staff.
-
cueClefTransposition(integer) Add this much extra transposition. Values of 7 and -7 are common.
-
cueClefTranspositionFormatter(procedure) A procedure that takes the Transposition number as a string and the style as a symbol and returns a markup.
-
cueClefTranspositionStyle(symbol) Determines the way the ClefModifier grob is displayed. Possible values are ‘default’, ‘parenthesized’ and ‘bracketed’.
-
currentBarNumber(integer) Contains the current barnumber. This property is incremented at every bar line.
-
decrescendoSpanner(symbol) The type of spanner to be used for decrescendi. Available values are ‘hairpin’ and ‘text’. If unset, a hairpin decrescendo is used.
-
decrescendoText(markup) The text to print at start of non-hairpin decrescendo, i.e., ‘dim.’.
-
defaultBarType(string) Set the default type of bar line. See
whichBarfor information on available bar types.This variable is read by Timing_translator at Score level.
-
defaultStrings(list) A list of strings to use in calculating frets for tablatures and fretboards if no strings are provided in the notes for the current moment.
-
doubleRepeatSegnoType(string) Set the default bar line for the combinations double repeat with segno. Default is ‘:|.S.|:’.
-
doubleRepeatType(string) Set the default bar line for double repeats.
-
doubleSlurs(boolean) If set, two slurs are created for every slurred note, one above and one below the chord.
-
drumPitchTable(hash table) A table mapping percussion instruments (symbols) to pitches.
-
drumStyleTable(hash table) A hash table which maps drums to layout settings. Predefined values: ‘drums-style’, ‘agostini-drums-style’, ‘timbales-style’, ‘congas-style’, ‘bongos-style’, and ‘percussion-style’.
The layout style is a hash table, containing the drum-pitches (e.g., the symbol ‘hihat’) as keys, and a list
(notehead-style script vertical-position)as values.-
endRepeatSegnoType(string) Set the default bar line for the combinations ending of repeat with segno. Default is ‘:|.S’.
-
endRepeatType(string) Set the default bar line for the ending of repeats.
-
explicitClefVisibility(vector) ‘break-visibility’ function for clef changes.
-
explicitCueClefVisibility(vector) ‘break-visibility’ function for cue clef changes.
-
explicitKeySignatureVisibility(vector) ‘break-visibility’ function for explicit key changes. ‘\override’ of the
break-visibilityproperty will set the visibility for normal (i.e., at the start of the line) key signatures.-
extendersOverRests(boolean) Whether to continue extenders as they cross a rest.
-
extraNatural(boolean) Whether to typeset an extra natural sign before accidentals that reduce the effect of a previous alteration.
-
figuredBassAlterationDirection(direction) Where to put alterations relative to the main figure.
-
figuredBassCenterContinuations(boolean) Whether to vertically center pairs of extender lines. This does not work with three or more lines.
-
figuredBassFormatter(procedure) A routine generating a markup for a bass figure.
-
figuredBassPlusDirection(direction) Where to put plus signs relative to the main figure.
-
fingeringOrientations(list) A list of symbols, containing ‘left’, ‘right’, ‘up’ and/or ‘down’. This list determines where fingerings are put relative to the chord being fingered.
-
firstClef(boolean) If true, create a new clef when starting a staff.
-
followVoice(boolean) If set, note heads are tracked across staff switches by a thin line.
-
fontSize(number) The relative size of all grobs in a context.
-
forbidBreak(boolean) If set to
#t, prevent a line break at this point.-
forceClef(boolean) Show clef symbol, even if it has not changed. Only active for the first clef after the property is set, not for the full staff.
-
fretLabels(list) A list of strings or Scheme-formatted markups containing, in the correct order, the labels to be used for lettered frets in tablature.
-
glissandoMap(list) A map in the form of ’((source1 . target1) (source2 . target2) (sourcen . targetn)) showing the glissandi to be drawn for note columns. The value ’() will default to ’((0 . 0) (1 . 1) (n . n)), where n is the minimal number of note-heads in the two note columns between which the glissandi occur.
-
gridInterval(moment) Interval for which to generate
GridPoints.-
handleNegativeFrets(symbol) How the automatic fret calculator should handle calculated negative frets. Values include
'ignore, to leave them out of the diagram completely,'include, to include them as calculated, and'recalculate, to ignore the specified string and find a string where they will fit with a positive fret number.-
harmonicAccidentals(boolean) If set, harmonic notes in chords get accidentals.
-
harmonicDots(boolean) If set, harmonic notes in dotted chords get dots.
-
highStringOne(boolean) Whether the first string is the string with highest pitch on the instrument. This used by the automatic string selector for tablature notation.
-
ignoreBarChecks(boolean) Ignore bar checks.
-
ignoreFiguredBassRest(boolean) Don’t swallow rest events.
-
ignoreMelismata(boolean) Ignore melismata for this Lyrics line.
-
implicitBassFigures(list) A list of bass figures that are not printed as numbers, but only as extender lines.
-
includeGraceNotes(boolean) Do not ignore grace notes for Lyrics.
-
initialTimeSignatureVisibility(vector) break visibility for the initial time signature.
-
instrumentCueName(markup) The name to print if another instrument is to be taken.
-
instrumentEqualizer(procedure) A function taking a string (instrument name), and returning a
(min . max)pair of numbers for the loudness range of the instrument.-
instrumentName(markup) The name to print left of a staff. The
instrumentNameproperty labels the staff in the first system, and theshortInstrumentNameproperty labels following lines.-
instrumentTransposition(pitch) Define the transposition of the instrument. Its value is the pitch that sounds when the instrument plays written middle C. This is used to transpose the MIDI output, and
\quotes.-
internalBarNumber(integer) Contains the current barnumber. This property is used for internal timekeeping, among others by the
Accidental_engraver.-
keepAliveInterfaces(list) A list of symbols, signifying grob interfaces that are worth keeping a staff with
remove-emptyset around for.-
keyAlterationOrder(list) An alist that defines in what order alterations should be printed. The format is
(step . alter), where step is a number from 0 to 6 and alter from -2 (sharp) to 2 (flat).-
keyAlterations(list) The current key signature. This is an alist containing
(step . alter)or((octave . step) . alter), where step is a number in the range 0 to 6 and alter a fraction, denoting alteration. For alterations, use symbols, e.g.keyAlterations = #`((6 . ,FLAT)).-
lyricMelismaAlignment(number) Alignment to use for a melisma syllable.
-
magnifyStaffValue(positive number) The most recent value set with
\magnifyStaff.-
majorSevenSymbol(markup) How should the major 7th be formatted in a chord name?
-
markFormatter(procedure) A procedure taking as arguments the context and the rehearsal mark. It should return the formatted mark as a markup object.
-
maximumFretStretch(number) Don’t allocate frets further than this from specified frets.
-
measureLength(moment) Length of one measure in the current time signature.
-
measurePosition(moment) How much of the current measure have we had. This can be set manually to create incomplete measures.
-
melismaBusyProperties(list) A list of properties (symbols) to determine whether a melisma is playing. Setting this property will influence how lyrics are aligned to notes. For example, if set to
'(melismaBusy beamMelismaBusy), only manual melismata and manual beams are considered. Possible values includemelismaBusy,slurMelismaBusy,tieMelismaBusy, andbeamMelismaBusy.-
metronomeMarkFormatter(procedure) How to produce a metronome markup. Called with two arguments: a
TempoChangeEventand context.-
middleCClefPosition(number) The position of the middle C, as determined only by the clef. This can be calculated by looking at
clefPositionandclefGlyph.-
middleCCuePosition(number) The position of the middle C, as determined only by the clef of the cue notes. This can be calculated by looking at
cueClefPositionandcueClefGlyph.-
middleCOffset(number) The offset of middle C from the position given by
middleCClefPositionThis is used for ottava brackets.-
middleCPosition(number) The place of the middle C, measured in half staff-spaces. Usually determined by looking at
middleCClefPositionandmiddleCOffset.-
midiBalance(number) Stereo balance for the MIDI channel associated with the current context. Ranges from -1 to 1, where the values -1 (
#LEFT), 0 (#CENTER) and 1 (#RIGHT) correspond to leftmost emphasis, center balance, and rightmost emphasis, respectively.-
midiChannelMapping(symbol) How to map MIDI channels: per
staff(default),instrumentorvoice.-
midiChorusLevel(number) Chorus effect level for the MIDI channel associated with the current context. Ranges from 0 to 1 (0=off, 1=full effect).
-
midiExpression(number) Expression control for the MIDI channel associated with the current context. Ranges from 0 to 1 (0=off, 1=full effect).
-
midiInstrument(string) Name of the MIDI instrument to use.
-
midiMaximumVolume(number) Analogous to
midiMinimumVolume.-
midiMergeUnisons(boolean) If true, output only one MIDI note-on event when notes with the same pitch, in the same MIDI-file track, overlap.
-
midiMinimumVolume(number) Set the minimum loudness for MIDI. Ranges from 0 to 1.
-
midiPanPosition(number) Pan position for the MIDI channel associated with the current context. Ranges from -1 to 1, where the values -1 (
#LEFT), 0 (#CENTER) and 1 (#RIGHT) correspond to hard left, center, and hard right, respectively.-
midiReverbLevel(number) Reverb effect level for the MIDI channel associated with the current context. Ranges from 0 to 1 (0=off, 1=full effect).
-
minimumFret(number) The tablature auto string-selecting mechanism selects the highest string with a fret at least
minimumFret.-
minimumPageTurnLength(moment) Minimum length of a rest for a page turn to be allowed.
-
minimumRepeatLengthForPageTurn(moment) Minimum length of a repeated section for a page turn to be allowed within that section.
-
minorChordModifier(markup) Markup displayed following the root for a minor chord
-
noChordSymbol(markup) Markup to be displayed for rests in a ChordNames context.
-
noteToFretFunction(procedure) Convert list of notes and list of defined strings to full list of strings and fret numbers. Parameters: The context, a list of note events, a list of tabstring events, and the fretboard grob if a fretboard is desired.
-
nullAccidentals(boolean) The
Accidental_engravergenerates no accidentals for notes in contexts were this is set. In addition to supressing the printed accidental, this option removes any effect the note would have had on accidentals in other voices.-
ottavation(markup) If set, the text for an ottava spanner. Changing this creates a new text spanner.
-
output(music output) The output produced by a score-level translator during music interpretation.
-
partCombineForced(symbol) Override for the partcombine decision. Can be
apart,chords,unisono,solo1, orsolo2.-
partCombineTextsOnNote(boolean) Print part-combine texts only on the next note rather than immediately on rests or skips.
-
pedalSostenutoStrings(list) See
pedalSustainStrings.-
pedalSostenutoStyle(symbol) See
pedalSustainStyle.-
pedalSustainStrings(list) A list of strings to print for sustain-pedal. Format is
(up updown down), where each of the three is the string to print when this is done with the pedal.-
pedalSustainStyle(symbol) A symbol that indicates how to print sustain pedals:
text,bracketormixed(both).-
pedalUnaCordaStrings(list) See
pedalSustainStrings.-
pedalUnaCordaStyle(symbol) See
pedalSustainStyle.-
predefinedDiagramTable(hash table) The hash table of predefined fret diagrams to use in FretBoards.
-
printKeyCancellation(boolean) Print restoration alterations before a key signature change.
-
printOctaveNames(boolean) Print octave marks for the
NoteNamescontext.-
printPartCombineTexts(boolean) Set ‘Solo’ and ‘A due’ texts in the part combiner?
-
proportionalNotationDuration(moment) Global override for shortest-playing duration. This is used for switching on proportional notation.
-
rehearsalMark(integer) The last rehearsal mark printed.
-
repeatCommands(list) This property is a list of commands of the form
(list 'volta x), where x is a string or#f.'end-repeatis also accepted as a command.-
repeatCountVisibility(procedure) A procedure taking as arguments an integer and context, returning whether the corresponding percent repeat number should be printed when
countPercentRepeatsis set.-
restCompletionBusy(boolean) Signal whether a completion-rest is active.
-
restNumberThreshold(number) If a multimeasure rest has more measures than this, a number is printed.
-
restrainOpenStrings(boolean) Exclude open strings from the automatic fret calculator.
-
searchForVoice(boolean) Signal whether a search should be made of all contexts in the context hierarchy for a voice to provide rhythms for the lyrics.
-
segnoType(string) Set the default bar line for a requested segno. Default is ‘S’.
-
shapeNoteStyles(vector) Vector of symbols, listing style for each note head relative to the tonic (qv.) of the scale.
-
shortInstrumentName(markup) See
instrumentName.-
shortVocalName(markup) Name of a vocal line, short version.
-
skipBars(boolean) If set to true, then skip the empty bars that are produced by multimeasure notes and rests. These bars will not appear on the printed output. If not set (the default), multimeasure notes and rests expand into their full length, printing the appropriate number of empty bars so that synchronization with other voices is preserved.
{ r1 r1*3 R1*3 \set Score.skipBars= ##t r1*3 R1*3 }-
skipTypesetting(boolean) If true, no typesetting is done, speeding up the interpretation phase. Useful for debugging large scores.
-
slashChordSeparator(markup) The markup object used to separate a chord name from its root note in case of inversions or slash chords.
-
soloIIText(markup) The text for the start of a solo for voice ‘two’ when part-combining.
-
soloText(markup) The text for the start of a solo when part-combining.
-
squashedPosition(integer) Vertical position of squashing for Pitch_squash_engraver.
-
staffLineLayoutFunction(procedure) Layout of staff lines,
traditional, orsemitone.-
stanza(markup) Stanza ‘number’ to print before the start of a verse. Use in
Lyricscontext.-
startRepeatSegnoType(string) Set the default bar line for the combinations beginning of repeat with segno. Default is ‘S.|:’.
-
startRepeatType(string) Set the default bar line for the beginning of repeats.
-
stemLeftBeamCount(integer) Specify the number of beams to draw on the left side of the next note. Overrides automatic beaming. The value is only used once, and then it is erased.
-
stemRightBeamCount(integer) See
stemLeftBeamCount.-
strictBeatBeaming(boolean) Should partial beams reflect the beat structure even if it causes flags to hang out?
-
stringNumberOrientations(list) See
fingeringOrientations.-
stringOneTopmost(boolean) Whether the first string is printed on the top line of the tablature.
-
stringTunings(list) The tablature strings tuning. It is a list of the pitches of each string (starting with the lowest numbered one).
-
strokeFingerOrientations(list) See
fingeringOrientations.-
subdivideBeams(boolean) If set, multiple beams will be subdivided at
baseMomentpositions by only drawing one beam over the beat.-
suggestAccidentals(boolean) If set, accidentals are typeset as cautionary suggestions over the note.
-
supportNonIntegerFret(boolean) If set in
ScoretheTabStaffwill print micro-tones as ‘2½’-
suspendRestMerging(boolean) When using the Merge_rest_engraver do not merge rests when this is set to true.
-
systemStartDelimiter(symbol) Which grob to make for the start of the system/staff? Set to
SystemStartBrace,SystemStartBracketorSystemStartBar.-
systemStartDelimiterHierarchy(pair) A nested list, indicating the nesting of a start delimiters.
-
tablatureFormat(procedure) A function formatting a tablature note head. Called with three arguments: context, string number and, fret number. It returns the text as a markup.
-
tabStaffLineLayoutFunction(procedure) A function determining the staff position of a tablature note head. Called with two arguments: the context and the string.
-
tempoHideNote(boolean) Hide the note = count in tempo marks.
-
tempoWholesPerMinute(moment) The tempo in whole notes per minute.
-
tieWaitForNote(boolean) If true, tied notes do not have to follow each other directly. This can be used for writing out arpeggios.
-
timeSignatureFraction(fraction, as pair) A pair of numbers, signifying the time signature. For example,
'(4 . 4)is a 4/4 time signature.-
timeSignatureSettings(list) A nested alist of settings for time signatures. Contains elements for various time signatures. The element for each time signature contains entries for
baseMoment,beatStructure, andbeamExceptions.-
timing(boolean) Keep administration of measure length, position, bar number, etc.? Switch off for cadenzas.
-
tonic(pitch) The tonic of the current scale.
-
topLevelAlignment(boolean) If true, the Vertical_align_engraver will create a VerticalAlignment; otherwise, it will create a StaffGrouper
-
tupletFullLength(boolean) If set, the tuplet is printed up to the start of the next note.
-
tupletFullLengthNote(boolean) If set, end at the next note, otherwise end on the matter (time signatures, etc.) before the note.
-
tupletSpannerDuration(moment) Normally, a tuplet bracket is as wide as the
\timesexpression that gave rise to it. By setting this property, you can make brackets last shorter.{ \set tupletSpannerDuration = #(ly:make-moment 1 4) \times 2/3 { c8 c c c c c } }-
useBassFigureExtenders(boolean) Whether to use extender lines for repeated bass figures.
-
vocalName(markup) Name of a vocal line.
-
voltaSpannerDuration(moment) This specifies the maximum duration to use for the brackets printed for
\alternative. This can be used to shrink the length of brackets in the situation where one alternative is very large.-
whichBar(string) This property is read to determine what type of bar line to create.
Example:
\set Staff.whichBar = ".|:"
This will create a start-repeat bar in this staff only. Valid values are described in ‘scm/bar-line.scm’.
| [ << Notation manual tables ] | [トップ][目次][インデックス][ ? ] | [ カンニング ペーパー >> ] | ||
| [ < All context properties ] | [ 上へ : Notation manual tables ] | [ Available music functions > ] | ||
A.18 Layout properties
-
add-stem-support(boolean) If set, the
Stemobject is included in this script’s support.-
after-line-breaking(boolean) Dummy property, used to trigger callback for
after-line-breaking.-
align-dir(direction) Which side to align?
-1: left side,0: around center of width,1: right side.-
allow-loose-spacing(boolean) If set, column can be detached from main spacing.
-
allow-span-bar(boolean) If false, no inter-staff bar line will be created below this bar line.
-
alteration(number) Alteration numbers for accidental.
-
alteration-alist(list) List of
(pitch . accidental)pairs for key signature.-
annotation(string) Annotate a grob for debug purposes.
-
annotation-balloon(boolean) Print the balloon around an annotation.
-
annotation-line(boolean) Print the line from an annotation to the grob that it annotates.
-
arpeggio-direction(direction) If set, put an arrow on the arpeggio squiggly line.
-
arrow-length(number) Arrow length.
-
arrow-width(number) Arrow width.
-
auto-knee-gap(dimension, in staff space) If a gap is found between note heads where a horizontal beam fits that is larger than this number, make a kneed beam.
-
automatically-numbered(boolean) Should a footnote be automatically numbered?
-
average-spacing-wishes(boolean) If set, the spacing wishes are averaged over staves.
-
avoid-note-head(boolean) If set, the stem of a chord does not pass through all note heads, but starts at the last note head.
-
avoid-scripts(boolean) If set, a tuplet bracket avoids the scripts associated with the note heads it encompasses.
-
avoid-slur(symbol) Method of handling slur collisions. Choices are
inside,outside,around, andignore.insideadjusts the slur if needed to keep the grob inside the slur.outsidemoves the grob vertically to the outside of the slur.aroundmoves the grob vertically to the outside of the slur only if there is a collision.ignoredoes not move either. In grobs whose notational significance depends on vertical position (such as accidentals, clefs, etc.),outsideandaroundbehave likeignore.-
axes(list) List of axis numbers. In the case of alignment grobs, this should contain only one number.
-
bar-extent(pair of numbers) The Y-extent of the actual bar line. This may differ from
Y-extentbecause it does not include the dots in a repeat bar line.-
base-shortest-duration(moment) Spacing is based on the shortest notes in a piece. Normally, pieces are spaced as if notes at least as short as this are present.
-
baseline-skip(dimension, in staff space) Distance between base lines of multiple lines of text.
-
beam-thickness(dimension, in staff space) Beam thickness, measured in
staff-spaceunits.-
beam-width(dimension, in staff space) Width of the tremolo sign.
-
beamed-stem-shorten(list) How much to shorten beamed stems, when their direction is forced. It is a list, since the value is different depending on the number of flags and beams.
-
beaming(pair) Pair of number lists. Each number list specifies which beams to make.
0is the central beam,1is the next beam toward the note, etc. This information is used to determine how to connect the beaming patterns from stem to stem inside a beam.-
beamlet-default-length(pair) A pair of numbers. The first number specifies the default length of a beamlet that sticks out of the left hand side of this stem; the second number specifies the default length of the beamlet to the right. The actual length of a beamlet is determined by taking either the default length or the length specified by
beamlet-max-length-proportion, whichever is smaller.-
beamlet-max-length-proportion(pair) The maximum length of a beamlet, as a proportion of the distance between two adjacent stems.
-
before-line-breaking(boolean) Dummy property, used to trigger a callback function.
-
between-cols(pair) Where to attach a loose column to.
-
bound-details(list) An alist of properties for determining attachments of spanners to edges.
-
bound-padding(number) The amount of padding to insert around spanner bounds.
-
bracket-flare(pair of numbers) A pair of numbers specifying how much edges of brackets should slant outward. Value
0.0means straight edges.-
bracket-visibility(boolean or symbol) This controls the visibility of the tuplet bracket. Setting it to false prevents printing of the bracket. Setting the property to
if-no-beammakes it print only if there is no beam associated with this tuplet bracket.-
break-align-anchor(number) Grobs aligned to this breakable item will have their X-offsets shifted by this number. In bar lines, for example, this is used to position grobs relative to the (visual) center of the bar line.
-
break-align-anchor-alignment(number) Read by
ly:break-aligned-interface::calc-extent-aligned-anchorfor aligning an anchor to a grob’s extent.-
break-align-orders(vector) This is a vector of 3 lists:
#(end-of-line unbroken start-of-line). Each list contains break-align symbols that specify an order of breakable items (see break-alignment-interface).For example, this places time signatures before clefs:
\override Score.BreakAlignment.break-align-orders = #(make-vector 3 '(left-edge cue-end-clef ambitus breathing-sign time-signature clef cue-clef staff-bar key-cancellation key-signature custos))-
break-align-symbol(symbol) This key is used for aligning, ordering, and spacing breakable items. See break-alignment-interface.
-
break-align-symbols(list) A list of break-align symbols that determines which breakable items to align this to. If the grob selected by the first symbol in the list is invisible due to
break-visibility, we will align to the next grob (and so on). Choices are listed in break-alignment-interface.-
break-overshoot(pair of numbers) How much does a broken spanner stick out of its bounds?
-
break-visibility(vector) A vector of 3 booleans,
#(end-of-line unbroken begin-of-line).#tmeans visible,#fmeans killed.-
breakable(boolean) Allow breaks here.
-
broken-bound-padding(number) The amount of padding to insert when a spanner is broken at a line break.
-
chord-dots-limit(integer) Limits the column of dots on each chord to the height of the chord plus
chord-dots-limitstaff-positions.-
circled-tip(boolean) Put a circle at start/end of hairpins (al/del niente).
-
clef-alignments(list) An alist of parent-alignments that should be used for clef modifiers with various clefs
-
clip-edges(boolean) Allow outward pointing beamlets at the edges of beams?
-
collapse-height(dimension, in staff space) Minimum height of system start delimiter. If equal or smaller, the bracket/brace/line is removed.
-
collision-interfaces(list) A list of interfaces for which automatic beam-collision resolution is run.
-
collision-voice-only(boolean) Does automatic beam collsion apply only to the voice in which the beam was created?
-
color(color) The color of this grob.
-
common-shortest-duration(moment) The most common shortest note length. This is used in spacing. Enlarging this sets the score tighter.
-
concaveness(number) A beam is concave if its inner stems are closer to the beam than the two outside stems. This number is a measure of the closeness of the inner stems. It is used for damping the slope of the beam.
-
connect-to-neighbor(pair) Pair of booleans, indicating whether this grob looks as a continued break.
-
control-points(list of number pairs) List of offsets (number pairs) that form control points for the tie, slur, or bracket shape. For Béziers, this should list the control points of a third-order Bézier curve.
-
count-from(integer) The first measure in a measure count receives this number. The following measures are numbered in increments from this initial value.
-
damping(number) Amount of beam slope damping.
-
dash-definition(pair) List of
dash-elementsdefining the dash structure. Eachdash-elementhas a starting t value, an ending t-value, adash-fraction, and adash-period.-
dash-fraction(number) Size of the dashes, relative to
dash-period. Should be between0.1and1.0(continuous line). If set to0.0, a dotted line is produced-
dash-period(number) The length of one dash together with whitespace. If negative, no line is drawn at all.
-
default-direction(direction) Direction determined by note head positions.
-
default-staff-staff-spacing(list) The settings to use for
staff-staff-spacingwhen it is unset, for ungrouped staves and for grouped staves that do not have the relevantStaffGrouperproperty set (staff-staff-spacingorstaffgroup-staff-spacing).-
details(list) Alist of parameters for detailed grob behavior. More information on the allowed parameters for a grob can be found by looking at the top of the Internals Reference page for each interface having a
detailsproperty.-
digit-names(vector) Names for string finger digits.
-
direction(direction) If
side-axisis0(orX), then this property determines whether the object is placedLEFT,CENTERorRIGHTwith respect to the other object. Otherwise, it determines whether the object is placedUP,CENTERorDOWN. Numerical values may also be used:UP=1,DOWN=-1,LEFT=-1,RIGHT=1,CENTER=0.-
dot-count(integer) The number of dots.
-
dot-negative-kern(number) The space to remove between a dot and a slash in percent repeat glyphs. Larger values bring the two elements closer together.
-
dot-placement-list(list) List consisting of
(description string-number fret-number finger-number)entries used to define fret diagrams.-
double-stem-separation(number) The distance between the two stems of a half note in tablature when using
\tabFullNotation, not counting the width of the stems themselves, expressed as a multiple of the default height of a staff-space in the traditional five-line staff.-
duration-log(integer) The 2-log of the note head duration, i.e.,
0= whole note,1= half note, etc.-
eccentricity(number) How asymmetrical to make a slur. Positive means move the center to the right.
-
edge-height(pair) A pair of numbers specifying the heights of the vertical edges:
(left-height . right-height).-
edge-text(pair) A pair specifying the texts to be set at the edges:
(left-text . right-text).-
expand-limit(integer) Maximum number of measures expanded in church rests.
-
extra-dy(number) Slope glissandi this much extra.
-
extra-offset(pair of numbers) A pair representing an offset. This offset is added just before outputting the symbol, so the typesetting engine is completely oblivious to it. The values are measured in
staff-spaceunits of the staff’sStaffSymbol.-
extra-spacing-height(pair of numbers) In the horizontal spacing problem, we increase the height of each item by this amount (by adding the ‘car’ to the bottom of the item and adding the ‘cdr’ to the top of the item). In order to make a grob infinitely high (to prevent the horizontal spacing problem from placing any other grobs above or below this grob), set this to
(-inf.0 . +inf.0).-
extra-spacing-width(pair of numbers) In the horizontal spacing problem, we pad each item by this amount (by adding the ‘car’ on the left side of the item and adding the ‘cdr’ on the right side of the item). In order to make a grob take up no horizontal space at all, set this to
(+inf.0 . -inf.0).-
flag-count(number) The number of tremolo beams.
-
flag-style(symbol) The style of the flag to be used with
MetronomeMark. Available are'modern-straight-flag,'old-straight-flag,flat-flag,mensuraland'default-
flat-positions(list) Flats in key signatures are placed within the specified ranges of staff-positions. The general form is a list of pairs, with one pair for each type of clef, in order of the staff-position at which each clef places C:
(alto treble tenor soprano baritone mezzosoprano bass). If the list contains a single element it applies for all clefs. A single number in place of a pair sets accidentals within the octave ending at that staff-position.-
font-encoding(symbol) The font encoding is the broadest category for selecting a font. Currently, only lilypond’s system fonts (Emmentaler) are using this property. Available values are
fetaMusic(Emmentaler),fetaBraces,fetaText(Emmentaler).-
font-family(symbol) The font family is the broadest category for selecting text fonts. Options include:
sans,roman.-
font-features(list) Opentype features.
-
font-name(string) Specifies a file name (without extension) of the font to load. This setting overrides selection using
font-family,font-seriesandfont-shape.-
font-series(symbol) Select the series of a font. Choices include
medium,bold,bold-narrow, etc.-
font-shape(symbol) Select the shape of a font. Choices include
upright,italic,caps.-
font-size(number) The font size, compared to the ‘normal’ size.
0is style-sheet’s normal size,-1is smaller,+1is bigger. Each step of 1 is approximately 12% larger; 6 steps are exactly a factor 2 larger. If the context propertyfontSizeis set, its value is added to this before the glyph is printed. Fractional values are allowed.-
footnote(boolean) Should this be a footnote or in-note?
-
footnote-music(music) Music creating a footnote.
-
footnote-text(markup) A footnote for the grob.
-
force-hshift(number) This specifies a manual shift for notes in collisions. The unit is the note head width of the first voice note. This is used by note-collision-interface.
-
forced-spacing(number) Spacing forced between grobs, used in various ligature engravers.
-
fraction(fraction, as pair) Numerator and denominator of a time signature object.
-
french-beaming(boolean) Use French beaming style for this stem. The stem stops at the innermost beams.
-
fret-diagram-details(list) An alist of detailed grob properties for fret diagrams. Each alist entry consists of a
(property . value)pair. The properties which can be included infret-diagram-detailsinclude the following:-
barre-type– Type of barre indication used. Choices includecurved,straight, andnone. Defaultcurved. -
capo-thickness– Thickness of capo indicator, in multiples of fret-space. Default value 0.5. -
dot-color– Color of dots. Options includeblackandwhite. Defaultblack. -
dot-label-font-mag– Magnification for font used to label fret dots. Default value 1. -
dot-position– Location of dot in fret space. Default 0.6 for dots without labels, 0.95-dot-radiusfor dots with labels. -
dot-radius– Radius of dots, in terms of fret spaces. Default value 0.425 for labeled dots, 0.25 for unlabeled dots. -
finger-code– Code for the type of fingering indication used. Options includenone,in-dot, andbelow-string. Defaultnonefor markup fret diagrams,below-stringforFretBoardsfret diagrams. -
fret-count– The number of frets. Default 4. -
fret-distance– Multiplier to adjust the distance between frets. Default 1.0. -
fret-label-custom-format– The format string to be used label the lowest fret number, whennumber-typeequals tocustom. Default "~a". -
fret-label-font-mag– The magnification of the font used to label the lowest fret number. Default 0.5. -
fret-label-vertical-offset– The offset of the fret label from the center of the fret in direction parallel to strings. Default 0. -
fret-label-horizontal-offset– The offset of the fret label from the center of the fret in direction orthogonal to strings. Default 0. -
paren-padding– The padding for the parenthesis. Default 0.05. -
label-dir– Side to which the fret label is attached.-1,LEFT, orDOWNfor left or down;1,RIGHT, orUPfor right or up. DefaultRIGHT. -
mute-string– Character string to be used to indicate muted string. Default"x". -
number-type– Type of numbers to use in fret label. Choices includeroman-lower,roman-upper,arabicandcustom. In the later case, the format string is supplied by thefret-label-custom-formatproperty. Defaultroman-lower. -
open-string– Character string to be used to indicate open string. Default"o". -
orientation– Orientation of fret-diagram. Options includenormal,landscape, andopposing-landscape. Defaultnormal. -
string-count– The number of strings. Default 6. -
string-distance– Multiplier to adjust the distance between strings. Default 1.0. -
string-label-font-mag– The magnification of the font used to label fingerings at the string, rather than in the dot. Default value 0.6 fornormalorientation, 0.5 forlandscapeandopposing-landscape. -
string-thickness-factor– Factor for changing thickness of each string in the fret diagram. Thickness of string k is given bythickness* (1+string-thickness-factor) ^ (k-1). Default 0. -
top-fret-thickness– The thickness of the top fret line, as a multiple of the standard thickness. Default value 3. -
xo-font-magnification– Magnification used for mute and open string indicators. Default value 0.5. -
xo-padding– Padding for open and mute indicators from top fret. Default value 0.25.
-
-
full-length-padding(number) How much padding to use at the right side of a full-length tuplet bracket.
-
full-length-to-extent(boolean) Run to the extent of the column for a full-length tuplet bracket.
-
full-measure-extra-space(number) Extra space that is allocated at the beginning of a measure with only one note. This property is read from the NonMusicalPaperColumn that begins the measure.
-
full-size-change(boolean) Don’t make a change clef smaller.
-
gap(dimension, in staff space) Size of a gap in a variable symbol.
-
gap-count(integer) Number of gapped beams for tremolo.
-
glissando-skip(boolean) Should this
NoteHeadbe skipped by glissandi?-
glyph(string) A string determining what ‘style’ of glyph is typeset. Valid choices depend on the function that is reading this property.
In combination with (span) bar lines, it is a string resembling the bar line appearance in ASCII form.
-
glyph-name(string) The glyph name within the font.
In the context of (span) bar lines, glyph-name represents a processed form of
glyph, where decisions about line breaking etc. are already taken.-
glyph-name-alist(list) An alist of key-string pairs.
-
graphical(boolean) Display in graphical (vs. text) form.
-
grow-direction(direction) Crescendo or decrescendo?
-
hair-thickness(number) Thickness of the thin line in a bar line, expressed as a multiple of the default staff-line thickness (i.e. the visual output is not influenced by changes to
Staff.StaffSymbol.thickness).-
harp-pedal-details(list) An alist of detailed grob properties for harp pedal diagrams. Each alist entry consists of a
(property . value)pair. The properties which can be included in harp-pedal-details include the following:-
box-offset– Vertical shift of the center of flat/sharp pedal boxes above/below the horizontal line. Default value 0.8. -
box-width– Width of each pedal box. Default value 0.4. -
box-height– Height of each pedal box. Default value 1.0. -
space-before-divider– Space between boxes before the first divider (so that the diagram can be made symmetric). Default value 0.8. -
space-after-divider– Space between boxes after the first divider. Default value 0.8. -
circle-thickness– Thickness (in unit of the line-thickness) of the ellipse around circled pedals. Default value 0.5. -
circle-x-padding– Padding in X direction of the ellipse around circled pedals. Default value 0.15. -
circle-y-padding– Padding in Y direction of the ellipse around circled pedals. Default value 0.2.
-
-
head-direction(direction) Are the note heads left or right in a semitie?
-
height(dimension, in staff space) Height of an object in
staff-spaceunits.-
height-limit(dimension, in staff space) Maximum slur height: The longer the slur, the closer it is to this height.
-
hide-tied-accidental-after-break(boolean) If set, an accidental that appears on a tied note after a line break will not be displayed.
-
horizon-padding(number) The amount to pad the axis along which a
Skylineis built for theside-position-interface.-
horizontal-shift(integer) An integer that identifies ranking of
NoteColumns for horizontal shifting. This is used by note-collision-interface.-
horizontal-skylines(pair of skylines) Two skylines, one to the left and one to the right of this grob.
-
id(string) An id string for the grob.
-
ignore-ambitus(boolean) If set, don’t consider this notehead for ambitus calculation.
-
ignore-collision(boolean) If set, don’t do note collision resolution on this
NoteColumn.-
implicit(boolean) Is this an implicit bass figure?
-
inspect-index(integer) If debugging is set, set beam and slur configuration to this index, and print the respective scores.
-
inspect-quants(pair of numbers) If debugging is set, set beam and slur quants to this position, and print the respective scores.
-
keep-inside-line(boolean) If set, this column cannot have objects sticking into the margin.
-
kern(dimension, in staff space) The space between individual elements in any compound bar line, expressed as a multiple of the default staff-line thickness (i.e. the visual output is not influenced by changes to
Staff.StaffSymbol.thickness).-
knee(boolean) Is this beam kneed?
-
knee-spacing-correction(number) Factor for the optical correction amount for kneed beams. Set between
0for no correction and1for full correction.-
knee-to-beam(boolean) Determines whether a tuplet number will be positioned next to a kneed beam.
-
labels(list) List of labels (symbols) placed on a column.
-
layer(integer) An integer which determines the order of printing objects. Objects with the lowest value of layer are drawn first, then objects with progressively higher values are drawn, so objects with higher values overwrite objects with lower values. By default most objects are assigned a layer value of 1.
-
ledger-extra(dimension, in staff space) Extra distance from staff line to draw ledger lines for.
-
ledger-line-thickness(pair of numbers) The thickness of ledger lines. It is the sum of 2 numbers: The first is the factor for line thickness, and the second for staff space. Both contributions are added.
-
ledger-positions(list) Vertical positions of ledger lines. When set on a
StaffSymbolgrob it defines a repeating pattern of ledger lines and any parenthesized groups will always be shown together.-
ledger-positions-function(any type) A quoted Scheme procedure that takes a
StaffSymbolgrob and the vertical position of a note head as arguments and returns a list of ledger line positions.-
left-bound-info(list) An alist of properties for determining attachments of spanners to edges.
-
left-padding(dimension, in staff space) The amount of space that is put left to an object (e.g., a lyric extender).
-
length(dimension, in staff space) User override for the stem length of unbeamed stems.
-
length-fraction(number) Multiplier for lengths. Used for determining ledger lines and stem lengths.
-
line-break-penalty(number) Penalty for a line break at this column. This affects the choices of the line breaker; it avoids a line break at a column with a positive penalty and prefers a line break at a column with a negative penalty.
-
line-break-permission(symbol) Instructs the line breaker on whether to put a line break at this column. Can be
forceorallow.-
line-break-system-details(list) An alist of properties to use if this column is the start of a system.
-
line-count(integer) The number of staff lines.
-
line-positions(list) Vertical positions of staff lines.
-
line-thickness(number) For slurs and ties, this is the diameter of the virtual “pen” that draws the two arcs of the curve’s outline, which intersect at the endpoints. This property is expressed as a multiple of the current staff-line thickness (i.e. the visual output is influenced by changes to
Staff.StaffSymbol.thickness).-
long-text(markup) Text markup. See Formatting text.
-
max-beam-connect(integer) Maximum number of beams to connect to beams from this stem. Further beams are typeset as beamlets.
-
max-symbol-separation(number) The maximum distance between symbols making up a church rest.
-
maximum-gap(number) Maximum value allowed for
gapproperty.-
measure-count(integer) The number of measures for a multi-measure rest.
-
measure-length(moment) Length of a measure. Used in some spacing situations.
-
merge-differently-dotted(boolean) Merge note heads in collisions, even if they have a different number of dots. This is normal notation for some types of polyphonic music.
merge-differently-dottedonly applies to opposing stem directions (i.e., voice 1 & 2).-
merge-differently-headed(boolean) Merge note heads in collisions, even if they have different note heads. The smaller of the two heads is rendered invisible. This is used in polyphonic guitar notation. The value of this setting is used by note-collision-interface.
merge-differently-headedonly applies to opposing stem directions (i.e., voice 1 & 2).-
minimum-distance(dimension, in staff space) Minimum distance between rest and notes or beam.
-
minimum-length(dimension, in staff space) Try to make a spanner at least this long, normally in the horizontal direction. This requires an appropriate callback for the
springs-and-rodsproperty. If added to aTie, this sets the minimum distance between noteheads.-
minimum-length-after-break(dimension, in staff space) If set, try to make a broken spanner starting a line this long. This requires an appropriate callback for the
springs-and-rodsproperty. If added to aTie, this sets the minimum distance to the notehead.-
minimum-length-fraction(number) Minimum length of ledger line as fraction of note head size.
-
minimum-space(dimension, in staff space) Minimum distance that the victim should move (after padding).
-
minimum-X-extent(pair of numbers) Minimum size of an object in X dimension, measured in
staff-spaceunits.-
minimum-Y-extent(pair of numbers) Minimum size of an object in Y dimension, measured in
staff-spaceunits.-
neutral-direction(direction) Which direction to take in the center of the staff.
-
neutral-position(number) Position (in half staff spaces) where to flip the direction of custos stem.
-
next(graphical (layout) object) Object that is next relation (e.g., the lyric syllable following an extender).
-
no-alignment(boolean) If set, don’t place this grob in a
VerticalAlignment; rather, place it using its ownY-offsetcallback.-
no-ledgers(boolean) If set, don’t draw ledger lines on this object.
-
no-stem-extend(boolean) If set, notes with ledger lines do not get stems extending to the middle staff line.
-
non-break-align-symbols(list) A list of symbols that determine which NON-break-aligned interfaces to align this to.
-
non-default(boolean) Set for manually specified clefs and keys.
-
non-musical(boolean) True if the grob belongs to a
NonMusicalPaperColumn.-
nonstaff-nonstaff-spacing(list) The spacing alist controlling the distance between the current non-staff line and the next non-staff line in the direction of
staff-affinity, if both are on the same side of the related staff, andstaff-affinityis eitherUPorDOWN. Seestaff-staff-spacingfor a description of the alist structure.-
nonstaff-relatedstaff-spacing(list) The spacing alist controlling the distance between the current non-staff line and the nearest staff in the direction of
staff-affinity, if there are no non-staff lines between the two, andstaff-affinityis eitherUPorDOWN. Ifstaff-affinityisCENTER, thennonstaff-relatedstaff-spacingis used for the nearest staves on both sides, even if other non-staff lines appear between the current one and either of the staves. Seestaff-staff-spacingfor a description of the alist structure.-
nonstaff-unrelatedstaff-spacing(list) The spacing alist controlling the distance between the current non-staff line and the nearest staff in the opposite direction from
staff-affinity, if there are no other non-staff lines between the two, andstaff-affinityis eitherUPorDOWN. Seestaff-staff-spacingfor a description of the alist structure.-
normalized-endpoints(pair) Represents left and right placement over the total spanner, where the width of the spanner is normalized between 0 and 1.
-
note-collision-threshold(dimension, in staff space) Simultaneous notes that are this close or closer in units of
staff-spacewill be identified as vertically colliding. Used byStemgrobs for notes in the same voice, andNoteCollisiongrobs for notes in different voices. Default value 1.-
note-names(vector) Vector of strings containing names for easy-notation note heads.
-
number-type(symbol) Numbering style. Choices include
roman-lower,roman-upperandarabic.-
output-attributes(list) An alist of attributes for the grob, to be included in output files. When the SVG typesetting backend is used, the attributes are assigned to a group (<g>) containing all of the stencils that comprise a given grob. For example,
'((id . 123) (class . foo) (data-whatever . “bar”))will produce<g id=“123” class=“foo” data-whatever=“bar”> … </g>. In the Postscript backend, where there is no way to group items, the setting of the output-attributes property will have no effect.-
outside-staff-horizontal-padding(number) By default, an outside-staff-object can be placed so that is it very close to another grob horizontally. If this property is set, the outside-staff-object is raised so that it is not so close to its neighbor.
-
outside-staff-padding(number) The padding to place between grobs when spacing according to
outside-staff-priority. Two grobs with differentoutside-staff-paddingvalues have the larger value of padding between them.-
outside-staff-placement-directive(symbol) One of four directives telling how outside staff objects should be placed.
-
left-to-right-greedy– Place each successive grob from left to right. -
left-to-right-polite– Place a grob from left to right only if it does not potentially overlap with another grob that has been placed on a pass through a grob array. If there is overlap, do another pass to determine placement. -
right-to-left-greedy– Same asleft-to-right-greedy, but from right to left. -
right-to-left-polite– Same asleft-to-right-polite, but from right to left.
-
-
outside-staff-priority(number) If set, the grob is positioned outside the staff in such a way as to avoid all collisions. In case of a potential collision, the grob with the smaller
outside-staff-priorityis closer to the staff.-
packed-spacing(boolean) If set, the notes are spaced as tightly as possible.
-
padding(dimension, in staff space) Add this much extra space between objects that are next to each other.
-
padding-pairs(list) An alist mapping
(name . name)to distances.-
page-break-penalty(number) Penalty for page break at this column. This affects the choices of the page breaker; it avoids a page break at a column with a positive penalty and prefers a page break at a column with a negative penalty.
-
page-break-permission(symbol) Instructs the page breaker on whether to put a page break at this column. Can be
forceorallow.-
page-turn-penalty(number) Penalty for a page turn at this column. This affects the choices of the page breaker; it avoids a page turn at a column with a positive penalty and prefers a page turn at a column with a negative penalty.
-
page-turn-permission(symbol) Instructs the page breaker on whether to put a page turn at this column. Can be
forceorallow.-
parent-alignment-X(number) Specify on which point of the parent the object is aligned. The value
-1means aligned on parent’s left edge,0on center, and1right edge, in X direction. Other numerical values may also be specified - the unit is half the parent’s width. If unset, the value fromself-alignment-Xproperty will be used.-
parent-alignment-Y(number) Like
parent-alignment-Xbut for the Y axis.-
parenthesis-friends(list) A list of Grob types, as symbols. When parentheses enclose a Grob that has ’parenthesis-friends, the parentheses widen to include any child Grobs with type among ’parenthesis-friends.
-
parenthesized(boolean) Parenthesize this grob.
-
positions(pair of numbers) Pair of staff coordinates
(left . right), where both left and right are instaff-spaceunits of the current staff. For slurs, this value selects which slur candidate to use; if extreme positions are requested, the closest one is taken.-
prefer-dotted-right(boolean) For note collisions, prefer to shift dotted up-note to the right, rather than shifting just the dot.
-
protrusion(number) In an arpeggio bracket, the length of the horizontal edges.
-
ratio(number) Parameter for slur shape. The higher this number, the quicker the slur attains its
height-limit.-
remove-empty(boolean) If set, remove group if it contains no interesting items.
-
remove-first(boolean) Remove the first staff of an orchestral score?
-
remove-layer(index or symbol) When set as a positive integer, the
Keep_alive_together_engraverremoves allVerticalAxisGroupgrobs with aremove-layerlarger than the smallest retainedremove-layer. Set to#fto make a layer independent of theKeep_alive_together_engraver. Set to'(), the layer does not participate in the layering decisions. The property can also be set as a symbol for common behaviors:#'anyto keep the layer alive with any other layer in the group;#'aboveor#'belowto keep the layer alive with the context immediately before or after it, respectively.-
replacement-alist(list) Alist of strings. The key is a string of the pattern to be replaced. The value is a string of what should be displayed. Useful for ligatures.
-
restore-first(boolean) Print a natural before the accidental.
-
rhythmic-location(rhythmic location) Where (bar number, measure position) in the score.
-
right-bound-info(list) An alist of properties for determining attachments of spanners to edges.
-
right-padding(dimension, in staff space) Space to insert on the right side of an object (e.g., between note and its accidentals).
-
rotation(list) Number of degrees to rotate this object, and what point to rotate around. For example,
'(45 0 0)rotates by 45 degrees around the center of this object.-
round-up-exceptions(list) A list of pairs where car is the numerator and cdr the denominator of a moment. Each pair in this list means that the multi-measure rests of the corresponding length will be rounded up to the longer rest. See round-up-to-longer-rest.
-
round-up-to-longer-rest(boolean) Displays the longer multi-measure rest when the length of a measure is between two values of
usable-duration-logs. For example, displays a breve instead of a whole in a 3/2 measure.-
rounded(boolean) Decide whether lines should be drawn rounded or not.
-
same-direction-correction(number) Optical correction amount for stems that are placed in tight configurations. This amount is used for stems with the same direction to compensate for note head to stem distance.
-
script-priority(number) A key for determining the order of scripts in a stack, by being added to the position of the script in the user input, the sum being the overall priority. Smaller means closer to the head.
-
segno-kern(number) The space between the two thin lines of the segno bar line symbol, expressed as a multiple of the default staff-line thickness (i.e. the visual output is not influenced by changes to
Staff.StaffSymbol.thickness).-
self-alignment-X(number) Specify alignment of an object. The value
-1means left aligned,0centered, and1right-aligned in X direction. Other numerical values may also be specified - the unit is half the object width.-
self-alignment-Y(number) Like
self-alignment-Xbut for the Y axis.-
shape(symbol) This setting determines what shape a grob has. Valid choices depend on the
stencilcallback reading this property.-
sharp-positions(list) Sharps in key signatures are placed within the specified ranges of staff-positions. The general form is a list of pairs, with one pair for each type of clef, in order of the staff-position at which each clef places C:
(alto treble tenor soprano baritone mezzosoprano bass). If the list contains a single element it applies for all clefs. A single number in place of a pair sets accidentals within the octave ending at that staff-position.-
shorten-pair(pair of numbers) The lengths to shorten on both sides a hairpin or text-spanner such as a pedal bracket. Positive values shorten the hairpin or text-spanner, while negative values lengthen it.
-
shortest-duration-space(number) Start with this multiple of
spacing-incrementspace for the shortest duration. See also spacing-spanner-interface.-
shortest-playing-duration(moment) The duration of the shortest note playing here.
-
shortest-starter-duration(moment) The duration of the shortest note that starts here.
-
side-axis(number) If the value is
X(or equivalently0), the object is placed horizontally next to the other object. If the value isYor1, it is placed vertically.-
side-relative-direction(direction) Multiply direction of
direction-sourcewith this to get the direction of this object.-
simple-Y(boolean) Should the Y placement of a spanner disregard changes in system heights?
-
size(number) The ratio of the size of the object to its default size.
-
skip-quanting(boolean) Should beam quanting be skipped?
-
skyline-horizontal-padding(number) For determining the vertical distance between two staves, it is possible to have a configuration which would result in a tight interleaving of grobs from the top staff and the bottom staff. The larger this parameter is, the farther apart the staves are placed in such a configuration.
-
skyline-vertical-padding(number) The amount by which the left and right skylines of a column are padded vertically, beyond the
Y-extents andextra-spacing-heights of the constituent grobs in the column. Increase this to prevent interleaving of grobs from adjacent columns.-
slash-negative-kern(number) The space to remove between slashes in percent repeat glyphs. Larger values bring the two elements closer together.
-
slope(number) The slope of this object.
-
slur-padding(number) Extra distance between slur and script.
-
snap-radius(number) The maximum distance between two objects that will cause them to snap to alignment along an axis.
-
space-alist(list) An alist that specifies distances from this grob to other breakable items, using the format:
'((break-align-symbol . (spacing-style . space)) (break-align-symbol . (spacing-style . space)) ...)
Standard choices for
break-align-symbolare listed in break-alignment-interface. Additionally, three special break-align symbols available tospace-alistare:-
first-note used when the grob is just left of the first note on a line
-
next-note used when the grob is just left of any other note; if not set, the value of
first-notegets used-
right-edge used when the grob is the last item on the line (only compatible with the
extra-spacespacing style)
Choices for
spacing-styleare:-
extra-space Put this much space between the two grobs. The space is stretchable when paired with
first-noteornext-note; otherwise it is fixed.-
minimum-space Put at least this much space between the left sides of both grobs, without allowing them to collide. The space is stretchable when paired with
first-noteornext-note; otherwise it is fixed. Not compatible withright-edge.-
fixed-space Only compatible with
first-noteandnext-note. Put this much fixed space between the grob and the note.-
minimum-fixed-space Only compatible with
first-noteandnext-note. Put at least this much fixed space between the left side of the grob and the left side of the note, without allowing them to collide.-
semi-fixed-space Only compatible with
first-noteandnext-note. Put this much space between the grob and the note, such that half of the space is fixed and half is stretchable.
Rules for this spacing are much more complicated than this. See [Wanske] page 126–134, [Ross] page 143–147.
-
-
space-to-barline(boolean) If set, the distance between a note and the following non-musical column will be measured to the bar line instead of to the beginning of the non-musical column. If there is a clef change followed by a bar line, for example, this means that we will try to space the non-musical column as though the clef is not there.
-
spacing-increment(dimension, in staff space) The unit of length for note-spacing. Typically, the width of a note head. See also spacing-spanner-interface.
-
spacing-pair(pair) A pair of alignment symbols which set an object’s spacing relative to its left and right
BreakAlignments.For example, a
MultiMeasureRestwill ignore prefatory items at its bounds (i.e., clefs, key signatures and time signatures) using the following override:\override MultiMeasureRest #'spacing-pair = #'(staff-bar . staff-bar)
-
spanner-id(index or symbol) An identifier to distinguish concurrent spanners.
-
springs-and-rods(boolean) Dummy variable for triggering spacing routines.
-
stacking-dir(direction) Stack objects in which direction?
-
staff-affinity(direction) The direction of the staff to use for spacing the current non-staff line. Choices are
UP,DOWN, andCENTER. IfCENTER, the non-staff line will be placed equidistant between the two nearest staves on either side, unless collisions or other spacing constraints prevent this. Settingstaff-affinityfor a staff causes it to be treated as a non-staff line. Settingstaff-affinityto#fcauses a non-staff line to be treated as a staff.-
staff-padding(dimension, in staff space) Maintain this much space between reference points and the staff. Its effect is to align objects of differing sizes (like the dynamics p and f) on their baselines.
-
staff-position(number) Vertical position, measured in half staff spaces, counted from the middle line.
-
staff-space(dimension, in staff space) Amount of space between staff lines, expressed in global
staff-space.-
staff-staff-spacing(list) When applied to a staff-group’s
StaffGroupergrob, this spacing alist controls the distance between consecutive staves within the staff-group. When applied to a staff’sVerticalAxisGroupgrob, it controls the distance between the staff and the nearest staff below it in the same system, replacing any settings inherited from theStaffGroupergrob of the containing staff-group, if there is one. This property remains in effect even when non-staff lines appear between staves. The alist can contain the following keys:-
basic-distance– the vertical distance, measured in staff-spaces, between the reference points of the two items when no collisions would result, and no stretching or compressing is in effect. -
minimum-distance– the smallest allowable vertical distance, measured in staff-spaces, between the reference points of the two items, when compressing is in effect. -
padding– the minimum required amount of unobstructed vertical whitespace between the bounding boxes (or skylines) of the two items, measured in staff-spaces. -
stretchability– a unitless measure of the dimension’s relative propensity to stretch. If zero, the distance will not stretch (unless collisions would result).
-
-
staffgroup-staff-spacing(list) The spacing alist controlling the distance between the last staff of the current staff-group and the staff just below it in the same system, even if one or more non-staff lines exist between the two staves. If the
staff-staff-spacingproperty of the staff’sVerticalAxisGroupgrob is set, that is used instead. Seestaff-staff-spacingfor a description of the alist structure.-
stem-attachment(pair of numbers) An
(x . y)pair where the stem attaches to the notehead.-
stem-begin-position(number) User override for the begin position of a stem.
-
stem-spacing-correction(number) Optical correction amount for stems that are placed in tight configurations. For opposite directions, this amount is the correction for two normal sized stems that overlap completely.
-
stemlet-length(number) How long should be a stem over a rest?
-
stencil(stencil) The symbol to print.
-
stencils(list) Multiple stencils, used as intermediate value.
-
strict-grace-spacing(boolean) If set, main notes are spaced normally, then grace notes are put left of the musical columns for the main notes.
-
strict-note-spacing(boolean) If set, unbroken columns with non-musical material (clefs, bar lines, etc.) are not spaced separately, but put before musical columns.
-
stroke-style(string) Set to
"grace"to turn stroke through flag on.-
style(symbol) This setting determines in what style a grob is typeset. Valid choices depend on the
stencilcallback reading this property.-
text(markup) Text markup. See Formatting text.
-
text-direction(direction) This controls the ordering of the words. The default
RIGHTis for roman text. Arabic or Hebrew should useLEFT.-
thick-thickness(number) Thickness of the thick line in a bar line, expressed as a multiple of the default staff-line thickness (i.e. the visual output is not influenced by changes to
Staff.StaffSymbol.thickness).-
thickness(number) For grobs made up of lines, this is the thickness of the line. For slurs and ties, this is the distance between the two arcs of the curve’s outline at its thickest point, not counting the diameter of the virtual “pen” that draws the arcs. This property is expressed as a multiple of the current staff-line thickness (i.e. the visual output is influenced by changes to
Staff.StaffSymbol.thickness).-
tie-configuration(list) List of
(position . dir)pairs, indicating the desired tie configuration, where position is the offset from the center of the staff in staff space and dir indicates the direction of the tie (1=>up,-1=>down,0=>center). A non-pair entry in the list causes the corresponding tie to be formatted automatically.-
to-barline(boolean) If true, the spanner will stop at the bar line just before it would otherwise stop.
-
toward-stem-shift(number) Amount by which scripts are shifted toward the stem if their direction coincides with the stem direction.
0.0means centered on the note head (the default position of most scripts);1.0means centered on the stem. Interpolated values are possible.-
toward-stem-shift-in-column(number) Amount by which a script is shifted toward the stem if its direction coincides with the stem direction and it is associated with a
ScriptColumnobject.0.0means centered on the note head (the default position of most scripts);1.0means centered on the stem. Interpolated values are possible.-
transparent(boolean) This makes the grob invisible.
-
uniform-stretching(boolean) If set, items stretch proportionally to their natural separation based on durations. This looks better in complex polyphonic patterns.
-
usable-duration-logs(list) List of
duration-logs that can be used in typesetting the grob.-
use-skylines(boolean) Should skylines be used for side positioning?
-
used(boolean) If set, this spacing column is kept in the spacing problem.
-
vertical-skylines(pair of skylines) Two skylines, one above and one below this grob.
-
voiced-position(number) The staff-position of a voiced
Rest, negative if the rest hasdirectionDOWN.-
when(moment) Global time step associated with this column.
-
whiteout(boolean-or-number) If a number or true, the grob is printed over a white background to white-out underlying material, if the grob is visible. A number indicates how far the white background extends beyond the bounding box of the grob as a multiple of the staff-line thickness. The
LyricHyphengrob uses a special implementation of whiteout: A positive number indicates how far the white background extends beyond the bounding box in multiples ofline-thickness. The shape of the background is determined bywhiteout-style. Usually#fby default.-
whiteout-style(symbol) Determines the shape of the
whiteoutbackground. Available are'outline,'rounded-box, and the default'box. There is one exception: Use'specialforLyricHyphen.-
width(dimension, in staff space) The width of a grob measured in staff space.
-
word-space(dimension, in staff space) Space to insert between words in texts.
-
X-align-on-main-noteheads(boolean) If true, this grob will ignore suspended noteheads when aligning itself on NoteColumn.
-
X-extent(pair of numbers) Extent (size) in the X direction, measured in staff-space units, relative to object’s reference point.
-
X-offset(number) The horizontal amount that this object is moved relative to its X-parent.
-
X-positions(pair of numbers) Pair of X staff coordinates of a spanner in the form
(left . right), where both left and right are instaff-spaceunits of the current staff.-
Y-extent(pair of numbers) Extent (size) in the Y direction, measured in staff-space units, relative to object’s reference point.
-
Y-offset(number) The vertical amount that this object is moved relative to its Y-parent.
-
zigzag-length(dimension, in staff space) The length of the lines of a zigzag, relative to
zigzag-width. A value of1gives 60-degree zigzags.-
zigzag-width(dimension, in staff space) The width of one zigzag squiggle. This number is adjusted slightly so that the glissando line can be constructed from a whole number of squiggles.
| [ << Notation manual tables ] | [トップ][目次][インデックス][ ? ] | [ カンニング ペーパー >> ] | ||
| [ < Layout properties ] | [ 上へ : Notation manual tables ] | [ Context modification identifiers > ] | ||
A.19 Available music functions
-
absolute[music] - music (music) -
Make music absolute. This does not actually change the music itself but rather hides it from surrounding
\relativeand\fixedcommands. -
acciaccatura[music] - music (music) -
Create an acciaccatura from the following music expression
-
accidentalStyle[music] - style (symbol list) -
Set accidental style to symbol list style in the form ‘piano-cautionary’. If style has a form like ‘Staff.piano-cautionary’, the settings are applied to that context. Otherwise, the context defaults to ‘Staff’, except for piano styles, which use ‘GrandStaff’ as a context.
-
addChordShape[void] - key-symbol (symbol) tuning (pair) shape-definition (string or pair) -
Add chord shape shape-definition to the chord-shape-table hash with the key
(cons key-symbol tuning). -
addInstrumentDefinition[void] - name (string) lst (list) -
Create instrument name with properties list.
-
addQuote[void] - name (string) music (music) -
Define music as a quotable music expression named name
-
afterGrace[music] - fraction [fraction, as pair] main (music) grace (music) -
Create grace note(s) after a main music expression.
The musical position of the grace expression is after a given fraction of the main note’s duration has passed. If fraction is not specified as first argument, it is taken from
afterGraceFractionwhich has a default value of3/4. -
allowPageTurn[music] -
Allow a page turn. May be used at toplevel (ie between scores or markups), or inside a score.
-
allowVoltaHook[void] - bar (string) -
(undocumented; fixme)
-
alterBroken[music] - property (key list or symbol) arg (list) item (key list or music) -
Override property for pieces of broken spanner item with values arg. item may either be music in the form of a starting spanner event, or a symbol list in the form ‘Context.Grob’ or just ‘Grob’. Iff item is in the form of a spanner event, property may also have the form ‘Grob.property’ for specifying a directed tweak.
-
appendToTag[music] - tag (symbol) more (music) music (music) -
Append more to the
elementsof all music expressions in music that are tagged with tag. -
applyContext[music] - proc (procedure) -
Modify context properties with Scheme procedure proc.
-
applyMusic[music] - func (procedure) music (music) -
Apply procedure func to music.
-
applyOutput[music] - target (symbol list or symbol) proc (procedure) -
Apply function
procto every layout object matched by target which takes the formContextorContext.Grob. -
appoggiatura[music] - music (music) -
Create an appoggiatura from music
-
assertBeamQuant[music] - l (pair) r (pair) -
Testing function: check whether the beam quants l and r are correct
-
assertBeamSlope[music] - comp (procedure) -
Testing function: check whether the slope of the beam is the same as
comp -
autochange[music] - pitch [pitch] clef-1 [context modification] clef-2 [context modification] music (music) -
Make voices that switch between staves automatically. As an option the pitch where to switch staves may be specified. The clefs for the staves are optional as well. Setting clefs works only for implicitly instantiated staves.
-
balloonGrobText[music] - grob-name (symbol) offset (pair of numbers) text (markup) -
Attach text to grob-name at offset offset (use like
\once) -
balloonText[post event] - offset (pair of numbers) text (markup) -
Attach text at offset (use like
\tweak) -
bar[music] - type (string) -
Insert a bar line of type type
-
barNumberCheck[music] - n (integer) -
Print a warning if the current bar number is not n.
-
beamExceptions(any type) - music (music) -
Extract a value suitable for setting
Timing.beamExceptionsfrom the given pattern with explicit beams in music. A bar check|has to be used between bars of patterns in order to reset the timing. -
bendAfter[post event] - delta (real number) -
Create a fall or doit of pitch interval delta.
-
bookOutputName[void] - newfilename (string) -
Direct output for the current book block to newfilename.
-
bookOutputSuffix[void] - newsuffix (string) -
Set the output filename suffix for the current book block to newsuffix.
-
breathe[music] -
Insert a breath mark.
-
chordRepeats[music] - event-types [list] music (music) -
Walk through music putting the notes of the previous chord into repeat chords, as well as an optional list of event-types such as
#'(string-number-event). -
clef[music] - type (string) -
Set the current clef to type.
-
compoundMeter[music] - args (pair) -
Create compound time signatures. The argument is a Scheme list of lists. Each list describes one fraction, with the last entry being the denominator, while the first entries describe the summands in the enumerator. If the time signature consists of just one fraction, the list can be given directly, i.e. not as a list containing a single list. For example, a time signature of (3+1)/8 + 2/4 would be created as
\compoundMeter #'((3 1 8) (2 4)), and a time signature of (3+2)/8 as\compoundMeter #'((3 2 8))or shorter\compoundMeter #'(3 2 8). -
compressMMRests[music] - music (music) -
Remove the empty bars created by multi-measure rests, leaving just the first bar containing the MM rest itself.
-
crossStaff[music] - notes (music) -
Create cross-staff stems
-
cueClef[music] - type (string) -
Set the current cue clef to type.
-
cueClefUnset[music] -
Unset the current cue clef.
-
cueDuring[music] - what (string) dir (direction) main-music (music) -
Insert contents of quote what corresponding to main-music, in a CueVoice oriented by dir.
-
cueDuringWithClef[music] - what (string) dir (direction) clef (string) main-music (music) -
Insert contents of quote what corresponding to main-music, in a CueVoice oriented by dir.
-
deadNote[music] - note (music) -
Print note with a cross-shaped note head.
-
defineBarLine[void] - bar (string) glyph-list (list) -
Define bar line settings for bar line bar. The list glyph-list must have three entries which define the appearance at the end of line, at the beginning of the next line, and the span bar, respectively.
-
displayLilyMusic[music] - port [output port] music (music) -
Display the LilyPond input representation of music to port, defaulting to the console.
-
displayMusic[music] - port [output port] music (music) -
Display the internal representation of music to port, default to the console.
-
displayScheme(any type) - port [output port] expr (any type) -
Display the internal representation of expr to port, default to the console.
-
endSpanners[music] - music (music) -
Terminate the next spanner prematurely after exactly one note without the need of a specific end spanner.
-
eventChords[music] - music (music) -
Compatibility function wrapping
EventChordaround isolated rhythmic events occuring since version 2.15.28, after expanding repeat chords ‘q’. -
featherDurations[music] - factor (moment) argument (music) -
Adjust durations of music in argument by rational factor.
-
finger[post event] - finger (number or markup) -
Apply finger as a fingering indication.
-
fixed[music] - pitch (pitch) music (music) -
Use the octave of pitch as the default octave for music.
-
footnote[music] - mark [markup] offset (pair of numbers) footnote (markup) item (symbol list or music) -
Make the markup footnote a footnote on item. The footnote is marked with a markup mark moved by offset with respect to the marked music.
If mark is not given or specified as \default, it is replaced by an automatically generated sequence number. If item is a symbol list of form ‘Grob’ or ‘Context.Grob’, then grobs of that type will be marked at the current time step in the given context (default
Bottom).If item is music, the music will get a footnote attached to a grob immediately attached to the event, like \tweak does. For attaching a footnote to an indirectly caused grob, write
\single\footnote, use item to specify the grob, and follow it with the music to annotate.Like with
\tweak, if you use a footnote on a following post-event, the\footnotecommand itself needs to be attached to the preceding note or rest as a post-event with-. -
grace[music] - music (music) -
Insert music as grace notes.
-
grobdescriptions(any type) - descriptions (list) -
Create a context modification from descriptions, a list in the format of
all-grob-descriptions. -
harmonicByFret[music] - fret (number) music (music) -
Convert music into mixed harmonics; the resulting notes resemble harmonics played on a fretted instrument by touching the strings at fret.
-
harmonicByRatio[music] - ratio (number) music (music) -
Convert music into mixed harmonics; the resulting notes resemble harmonics played on a fretted instrument by touching the strings at the point given through ratio.
-
harmonicNote[music] - note (music) -
Print note with a diamond-shaped note head.
-
harmonicsOn[music] -
Set the default note head style to a diamond-shaped style.
-
hide[music] - item (symbol list or music) -
Set item’s ‘transparent’ property to
#t, making it invisible while still retaining its dimensions.If item is a symbol list of form
GrobNameorContext.GrobName, the result is an override for the grob name specified by it. If item is a music expression, the result is the same music expression with an appropriate tweak applied to it. -
incipit[music] - incipit-music (music) -
Output incipit-music before the main staff as an indication of its appearance in the original music.
-
inherit-acceptability[void] - to (symbol) from (symbol) -
When used in an output definition, will modify all context definitions such that context to is accepted as a child by all contexts that also accept from.
-
inStaffSegno[music] -
Put the segno variant ’varsegno’ at this position into the staff, compatible with the repeat command.
-
instrumentSwitch[music] - name (string) -
Switch instrument to name, which must be predefined with
\addInstrumentDefinition. -
inversion[music] - around (pitch) to (pitch) music (music) -
Invert music about around and transpose from around to to.
-
keepWithTag[music] - tags (symbol list or symbol) music (music) -
Include only elements of music that are tagged with one of the tags in tags. tags may be either a single symbol or a list of symbols.
Each tag may be declared as a member of at most one tag group (defined with
\tagGroup). If none of a music element’s tags share a tag group with one of the specified tags, the element is retained. -
key[music] - tonic [pitch] pitch-alist [list] -
Set key to tonic and scale pitch-alist. If both are null, just generate
KeyChangeEvent. -
killCues[music] - music (music) -
Remove cue notes from music.
-
label[music] - label (symbol) -
Create label as a bookmarking label.
-
language[void] - language (string) -
Set note names for language language.
-
languageRestore[void] -
Restore a previously-saved pitchnames alist.
-
languageSaveAndChange[void] - language (string) -
Store the previous pitchnames alist, and set a new one.
-
magnifyMusic[music] - mag (positive number) music (music) -
Magnify the notation of music without changing the staff-size, using mag as a size factor. Stems, beams, slurs, ties, and horizontal spacing are adjusted automatically.
-
magnifyStaff[music] - mag (positive number) -
Change the size of the staff, adjusting notation size and horizontal spacing automatically, using mag as a size factor.
-
makeClusters[music] - arg (music) -
Display chords in arg as clusters.
-
makeDefaultStringTuning[void] - symbol (symbol) pitches (list) -
This defines a string tuning symbol via a list of pitches. The symbol also gets registered in
defaultStringTuningsfor documentation purposes. -
mark[music] - label [number or markup] -
Make the music for the \mark command.
-
markupMap[music] - path (symbol list or symbol) markupfun (markup-function) music (music) -
This applies the given markup function markupfun to all markup music properties matching path in music.
For example,
\new Voice { g'2 c'' } \addlyrics { \markupMap LyricEvent.text \markup \with-color #red \etc { Oh yes! } } -
modalInversion[music] - around (pitch) to (pitch) scale (music) music (music) -
Invert music about around using scale and transpose from around to to.
-
modalTranspose[music] - from (pitch) to (pitch) scale (music) music (music) -
Transpose music from pitch from to pitch to using scale.
-
musicMap[music] - proc (procedure) mus (music) -
Apply proc to mus and all of the music it contains.
-
noPageBreak[music] -
Forbid a page break. May be used at toplevel (i.e., between scores or markups), or inside a score.
-
noPageTurn[music] -
Forbid a page turn. May be used at toplevel (i.e., between scores or markups), or inside a score.
-
octaveCheck[music] - pitch (pitch) -
Octave check.
-
offset[music] - property (symbol list or symbol) offsets (any type) item (key list or music) -
Offset the default value of property of item by offsets. If item is a string, the result is
\overridefor the specified grob type. If item is a music expression, the result is the same music expression with an appropriate tweak applied. -
omit[music] - item (symbol list or music) -
Set item’s ‘stencil’ property to
#f, effectively omitting it without taking up space.If item is a symbol list of form
GrobNameorContext.GrobName, the result is an override for the grob name specified by it. If item is a music expression, the result is the same music expression with an appropriate tweak applied to it. -
once[music] - music (music) -
Set
onceto#ton all layout instruction events in music. This will complain about music with an actual duration. As a special exception, if music contains ‘tweaks’ it will be silently ignored in order to allow for\once \propertyTweakto work as both one-time override and proper tweak. -
ottava[music] - octave (integer) -
Set the octavation.
-
overrideProperty[music] - grob-property-path (list of indexes or symbols) value (any type) -
Set the grob property specified by grob-property-path to value. grob-property-path is a symbol list of the form
Context.GrobName.propertyorGrobName.property, possibly with subproperties given as well.As opposed to
\overridewhich overrides the context-dependent defaults with which a grob is created, this command usesOutput_property_engraverat the grob acknowledge stage. This may be necessary for overriding values set after the initial grob creation. -
overrideTimeSignatureSettings[music] - time-signature (fraction, as pair) base-moment (fraction, as pair) beat-structure (list) beam-exceptions (list) -
Override
timeSignatureSettingsfor time signatures of time-signature to have settings of base-moment, beat-structure, and beam-exceptions. -
pageBreak[music] -
Force a page break. May be used at toplevel (i.e., between scores or markups), or inside a score.
-
pageTurn[music] -
Force a page turn between two scores or top-level markups.
-
palmMute[music] - note (music) -
Print note with a triangle-shaped note head.
-
palmMuteOn[music] -
Set the default note head style to a triangle-shaped style.
-
parallelMusic[void] - voice-ids (list) music (music) -
Define parallel music sequences, separated by ’|’ (bar check signs), and assign them to the identifiers provided in voice-ids.
voice-ids: a list of music identifiers (symbols containing only letters)
music: a music sequence, containing BarChecks as limiting expressions.
Example:
\parallelMusic #'(A B C) { c c | d d | e e | d d | e e | f f | } <==> A = { c c | d d } B = { d d | e e } C = { e e | f f }The last bar checks in a sequence are not copied to the result in order to facilitate ending the last entry at non-bar boundaries.
-
parenthesize[music] - arg (music) -
Tag arg to be parenthesized.
-
partcombine[music] - chord-range [pair of numbers] part1 (music) part2 (music) -
Take the music in part1 and part2 and return a music expression containing simultaneous voices, where part1 and part2 are combined into one voice where appropriate. Optional chord-range sets the distance in steps between notes that may be combined into a chord or unison.
-
partcombineDown[music] - chord-range [pair of numbers] part1 (music) part2 (music) -
Take the music in part1 and part2 and typeset so that they share a staff with stems directed downward.
-
partcombineForce[music] - type [symbol] -
Override the part-combiner.
-
partcombineUp[music] - chord-range [pair of numbers] part1 (music) part2 (music) -
Take the music in part1 and part2 and typeset so that they share a staff with stems directed upward.
-
partial[music] - dur (duration) -
Make a partial measure.
-
phrasingSlurDashPattern[music] - dash-fraction (number) dash-period (number) -
Set up a custom style of dash pattern for dash-fraction ratio of line to space repeated at dash-period interval for phrasing slurs.
-
pitchedTrill[music] - main-note (music) secondary-note (music) -
Print a trill with main-note as the main note of the trill and print secondary-note as a stemless note head in parentheses.
-
pointAndClickOff[void] -
Suppress generating extra code in final-format (e.g. pdf) files to point back to the lilypond source statement.
-
pointAndClickOn[void] -
Enable generation of code in final-format (e.g. pdf) files to reference the originating lilypond source statement; this is helpful when developing a score but generates bigger final-format files.
-
pointAndClickTypes[void] - types (symbol list or symbol) -
Set a type or list of types (such as
#'note-event) for which point-and-click info is generated. -
propertyOverride[music] - grob-property-path (list of indexes or symbols) value (any type) -
Set the grob property specified by grob-property-path to value. grob-property-path is a symbol list of the form
Context.GrobName.propertyorGrobName.property, possibly with subproperties given as well. This music function is mostly intended for use from Scheme as a substitute for the built-in\overridecommand. -
propertyRevert[music] - grob-property-path (list of indexes or symbols) -
Revert the grob property specified by grob-property-path to its previous value. grob-property-path is a symbol list of the form
Context.GrobName.propertyorGrobName.property, possibly with subproperties given as well. This music function is mostly intended for use from Scheme as a substitute for the built-in\revertcommand. -
propertySet[music] - property-path (symbol list or symbol) value (any type) -
Set the context property specified by property-path to value. This music function is mostly intended for use from Scheme as a substitute for the built-in
\setcommand. -
propertyTweak[music] - prop (key list or symbol) value (any type) item (key list or music) -
Add a tweak to the following item, usually music. This generally behaves like
\tweakbut will turn into an\overridewhen item is a symbol list.In that case, item specifies the grob path to override. This is mainly useful when using
\propertyTweakas as a component for building other functions like\omit. It is not the default behavior for\tweaksince many input strings in\lyricmodecan serve equally as music or as symbols which causes surprising behavior when tweaking lyrics using the less specific semantics of\propertyTweak.prop can contain additional elements in which case a nested property (inside of an alist) is tweaked.
-
propertyUnset[music] - property-path (symbol list or symbol) -
Unset the context property specified by property-path. This music function is mostly intended for use from Scheme as a substitute for the built-in
\unsetcommand. -
pushToTag[music] - tag (symbol) more (music) music (music) -
Add more to the front of
elementsof all music expressions in music that are tagged with tag. -
quoteDuring[music] - what (string) main-music (music) -
Indicate a section of music to be quoted. what indicates the name of the quoted voice, as specified in an
\addQuotecommand. main-music is used to indicate the length of music to be quoted; usually contains spacers or multi-measure rests. -
reduceChords[music] - music (music) -
Reduce chords contained in music to single notes, intended mainly for reusing music in RhythmicStaff. Does not reduce parallel music.
-
relative[music] - pitch [pitch] music (music) -
Make music relative to pitch. If pitch is omitted, the first note in music is given in absolute pitch.
-
removeWithTag[music] - tags (symbol list or symbol) music (music) -
Remove elements of music that are tagged with one of the tags in tags. tags may be either a single symbol or a list of symbols.
-
resetRelativeOctave[music] - pitch (pitch) -
Set the octave inside a \relative section.
-
retrograde[music] - music (music) -
Return music in reverse order.
-
revertTimeSignatureSettings[music] - time-signature (pair) -
Revert
timeSignatureSettingsfor time signatures of time-signature. -
rightHandFinger[post event] - finger (number or markup) -
Apply finger as a fingering indication.
-
scaleDurations[music] - fraction (fraction, as pair) music (music) -
Multiply the duration of events in music by fraction.
-
settingsFrom(any type) - ctx [symbol] music (music) -
Take the layout instruction events from music, optionally restricted to those applying to context type ctx, and return a context modification duplicating their effect.
-
shape[music] - offsets (list) item (key list or music) -
Offset control-points of item by offsets. The argument is a list of number pairs or list of such lists. Each element of a pair represents an offset to one of the coordinates of a control-point. If item is a string, the result is
\once\overridefor the specified grob type. If item is a music expression, the result is the same music expression with an appropriate tweak applied. -
shiftDurations[music] - dur (integer) dots (integer) arg (music) -
Change the duration of arg by adding dur to the
durlogof arg and dots to thedotsof arg. -
single[music] - overrides (music) music (music) -
Convert overrides to tweaks and apply them to music. This does not convert
\revert,\setor\unset. -
skip[music] - dur (duration) -
Skip forward by dur.
-
slashedGrace[music] - music (music) -
Create slashed graces (slashes through stems, but no slur) from the following music expression
-
slurDashPattern[music] - dash-fraction (number) dash-period (number) -
Set up a custom style of dash pattern for dash-fraction ratio of line to space repeated at dash-period interval for slurs.
-
spacingTweaks[music] - parameters (list) -
Set the system stretch, by reading the ’system-stretch property of the ‘parameters’ assoc list.
-
storePredefinedDiagram[void] - fretboard-table (hash table) chord (music) tuning (pair) diagram-definition (string or pair) -
Add predefined fret diagram defined by diagram-definition for the chord pitches chord and the stringTuning tuning.
-
stringTuning(any type) - chord (music) -
Convert chord to a string tuning. chord must be in absolute pitches and should have the highest string number (generally the lowest pitch) first.
-
styledNoteHeads[music] - style (symbol) heads (symbol list or symbol) music (music) -
Set heads in music to style.
-
tabChordRepeats[music] - event-types [list] music (music) -
Walk through music putting the notes, fingerings and string numbers of the previous chord into repeat chords, as well as an optional list of event-types such as
#'(articulation-event). -
tabChordRepetition[void] -
Include the string and fingering information in a chord repetition. This function is deprecated; try using
\tabChordRepeatsinstead. -
tag[music] - tags (symbol list or symbol) music (music) -
Tag the following music with tags and return the result, by adding the single symbol or symbol list tags to the
tagsproperty of music. -
tagGroup[void] - tags (symbol list) -
Define a tag group comprising the symbols in the symbol list tags. Tag groups must not overlap.
-
temporary[music] - music (music) -
Make any
\overridein music replace an existing grob property value only temporarily, restoring the old value when a corresponding\revertis executed. This is achieved by clearing the ‘pop-first’ property normally set on\overrides.An
\override/\revertsequence created by using\temporaryand\undoon the same music containing overrides will cancel out perfectly or cause a warning.Non-property-related music is ignored, warnings are generated for any property-changing music that isn’t an
\override. -
tieDashPattern[music] - dash-fraction (number) dash-period (number) -
Set up a custom style of dash pattern for dash-fraction ratio of line to space repeated at dash-period interval for ties.
-
time[music] - beat-structure [number list] fraction (fraction, as pair) -
Set fraction as time signature, with optional number list beat-structure before it.
-
times[music] - fraction (fraction, as pair) music (music) -
Scale music in time by fraction.
-
tocItem[music] - text (markup) -
Add a line to the table of content, using the
tocItemMarkuppaper variable markup -
transpose[music] - from (pitch) to (pitch) music (music) -
Transpose music from pitch from to pitch to.
-
transposedCueDuring[music] - what (string) dir (direction) pitch (pitch) main-music (music) -
Insert notes from the part what into a voice called
cue, using the transposition defined by pitch. This happens simultaneously with main-music, which is usually a rest. The argument dir determines whether the cue notes should be notated as a first or second voice. -
transposition[music] - pitch (pitch) -
Set instrument transposition
-
tuplet[music] - ratio (fraction, as pair) tuplet-span [duration] music (music) -
Scale the given music to tuplets. ratio is a fraction that specifies how many notes are played in place of the nominal value: it will be ‘3/2’ for triplets, namely three notes being played in place of two. If the optional duration tuplet-span is specified, it is used instead of
tupletSpannerDurationfor grouping the tuplets. For example,\tuplet 3/2 4 { c8 c c c c c }will result in two groups of three tuplets, each group lasting for a quarter note.
-
tupletSpan[music] - tuplet-span [duration] -
Set
tupletSpannerDuration, the length into which\tupletwithout an explicit ‘tuplet-span’ argument of its own will group its tuplets, to the duration tuplet-span. To revert to the default of not subdividing the contents of a\tupletcommand without explicit ‘tuplet-span’, use\tupletSpan \default
-
tweak[music] - prop (key list or symbol) value (any type) music (music) -
Add a tweak to the following music. Layout objects created by music get their property prop set to value. If prop has the form ‘Grob.property’, like with
\tweak Accidental.color #red cis'
an indirectly created grob (‘Accidental’ is caused by ‘NoteHead’) can be tweaked; otherwise only directly created grobs are affected.
prop can contain additional elements in which case a nested property (inside of an alist) is tweaked.
-
undo[music] - music (music) -
Convert
\overrideand\setin music to\revertand\unset, respectively. Any reverts and unsets already in music cause a warning. Non-property-related music is ignored. -
unfoldRepeats[music] - types [symbol list or symbol] music (music) -
Force
\repeat volta,\repeat tremoloor\repeat percentcommands in music to be interpreted as\repeat unfold, if specified in the optional symbol-list types. The default for types is an empty list, which will force any of those commands in music to be interpreted as\repeat unfold. Possible entries arevolta,tremoloorpercent. Multiple entries are possible. -
voices[music] - ids (list of indexes or symbols) music (music) -
Take the given key list of numbers (indicating the use of ‘\voiceOne’…) or symbols (indicating voice names, typically converted from strings by argument list processing) and assign the following
\\-separated music to contexts according to that list. Named rather than numbered contexts can be used for continuing one voice (for the sake of spanners and lyrics), usually requiring a\voiceOne-style override at the beginning of the passage and a\oneVoiceoverride at its end.The default
<< … \\ … \\ … >>
construct would correspond to
\voices 1,2,3 << … \\ … \\ … >>
-
void[void] - arg (any type) -
Accept a scheme argument, return a void expression. Use this if you want to have a scheme expression evaluated because of its side-effects, but its value ignored.
-
withMusicProperty[music] - sym (symbol) val (any type) music (music) -
Set sym to val in music.
-
xNote[music] - note (music) -
Print note with a cross-shaped note head.
-
\=[post event] - id (index or symbol) event (post event) -
This sets the
spanner-idproperty of the following event to the given id (non-negative integer or symbol). This can be used to tell LilyPond how to connect overlapping or parallel slurs or phrasing slurs within a singleVoice.\fixed c' { c\=1( d\=2( e\=1) f\=2) }![[image of music]](a5/lily-4a81126a.png)
| [ << Notation manual tables ] | [トップ][目次][インデックス][ ? ] | [ カンニング ペーパー >> ] | ||
| [ < Available music functions ] | [ 上へ : Notation manual tables ] | [ Predefined type predicates > ] | ||
A.20 Context modification identifiers
The following commands are defined for use as context modifications
within a \layout or \with block.
-
RemoveAllEmptyStaves -
Remove staves which are considered to be empty according to the list of interfaces set by
keepAliveInterfaces, including those in the first system.- Sets grob property
remove-emptyinVerticalAxisGroupto#t. - Sets grob property
remove-firstinVerticalAxisGroupto#t.
- Sets grob property
-
RemoveEmptyStaves -
Remove staves which are considered to be empty according to the list of interfaces set by
keepAliveInterfaces.- Sets grob property
remove-emptyinVerticalAxisGroupto#t.
- Sets grob property
| [ << Notation manual tables ] | [トップ][目次][インデックス][ ? ] | [ カンニング ペーパー >> ] | ||
| [ < Context modification identifiers ] | [ 上へ : Notation manual tables ] | [ R5RS primary predicates > ] | ||
A.21 Predefined type predicates
| R5RS primary predicates | ||
| R5RS secondary predicates | ||
| Guile predicates | ||
| LilyPond scheme predicates | ||
| LilyPond exported predicates |
| [ << Notation manual tables ] | [トップ][目次][インデックス][ ? ] | [ カンニング ペーパー >> ] | ||
| [ < Predefined type predicates ] | [ 上へ : Predefined type predicates ] | [ R5RS secondary predicates > ] | ||
R5RS primary predicates
| Type predicate | Description |
|---|---|
boolean? | boolean |
char? | character |
number? | number |
pair? | pair |
port? | port |
procedure? | procedure |
string? | string |
symbol? | symbol |
vector? | vector |
| [ << Notation manual tables ] | [トップ][目次][インデックス][ ? ] | [ カンニング ペーパー >> ] | ||
| [ < R5RS primary predicates ] | [ 上へ : Predefined type predicates ] | [ Guile predicates > ] | ||
R5RS secondary predicates
| Type predicate | Description |
|---|---|
char-alphabetic? | alphabetic character |
char-lower-case? | lower-case character |
char-numeric? | numeric character |
char-upper-case? | upper-case character |
char-whitespace? | whitespace character |
complex? | complex number |
eof-object? | end-of-file object |
even? | even number |
exact? | exact number |
inexact? | inexact number |
input-port? | input port |
integer? | integer |
list? | list (use cheap-list?
for faster processing) |
negative? | negative number |
null? | null |
odd? | odd number |
output-port? | output port |
positive? | positive number |
rational? | rational number |
real? | real number |
zero? | zero |
| [ << Notation manual tables ] | [トップ][目次][インデックス][ ? ] | [ カンニング ペーパー >> ] | ||
| [ < R5RS secondary predicates ] | [ 上へ : Predefined type predicates ] | [ LilyPond scheme predicates > ] | ||
Guile predicates
| Type predicate | Description |
|---|---|
hash-table? | hash table |
| [ << Notation manual tables ] | [トップ][目次][インデックス][ ? ] | [ カンニング ペーパー >> ] | ||
| [ < Guile predicates ] | [ 上へ : Predefined type predicates ] | [ LilyPond exported predicates > ] | ||
LilyPond scheme predicates
| Type predicate | Description |
|---|---|
boolean-or-symbol? | boolean or symbol |
cheap-list? | list (use this instead of
list? for faster processing) |
color? | color |
fraction? | fraction, as pair |
grob-list? | list of grobs |
index? | non-negative integer |
key? | index or symbol |
key-list? | list of indexes or symbols |
key-list-or-music? | key list or music |
key-list-or-symbol? | key list or symbol |
markup? | markup |
markup-command-list? | markup command list |
markup-list? | markup list |
moment-pair? | pair of moment objects |
number-list? | number list |
number-or-grob? | number or grob |
number-or-markup? | number or markup |
number-or-pair? | number or pair |
number-or-string? | number or string |
number-pair? | pair of numbers |
number-pair-list? | list of number pairs |
rational-or-procedure? | an exact rational or procedure |
rhythmic-location? | rhythmic location |
scheme? | any type |
string-or-music? | string or music |
string-or-pair? | string or pair |
string-or-symbol? | string or symbol |
symbol-list? | symbol list |
symbol-list-or-music? | symbol list or music |
symbol-list-or-symbol? | symbol list or symbol |
void? | void |
| [ << Notation manual tables ] | [トップ][目次][インデックス][ ? ] | [ カンニング ペーパー >> ] | ||
| [ < LilyPond scheme predicates ] | [ 上へ : Predefined type predicates ] | [ Scheme functions > ] | ||
LilyPond exported predicates
| Type predicate | Description |
|---|---|
ly:book? | book |
ly:box? | box |
ly:context? | context |
ly:context-def? | context definition |
ly:context-mod? | context modification |
ly:dimension? | dimension, in staff space |
ly:dir? | direction |
ly:dispatcher? | dispatcher |
ly:duration? | duration |
ly:event? | post event |
ly:font-metric? | font metric |
ly:grob? | graphical (layout) object |
ly:grob-array? | array of grobs |
ly:grob-properties? | grob properties |
ly:input-location? | input location |
ly:item? | item |
ly:iterator? | iterator |
ly:lily-lexer? | lily-lexer |
ly:lily-parser? | lily-parser |
ly:listener? | listener |
ly:moment? | moment |
ly:music? | music |
ly:music-function? | music function |
ly:music-list? | list of music objects |
ly:music-output? | music output |
ly:otf-font? | OpenType font |
ly:output-def? | output definition |
ly:page-marker? | page marker |
ly:pango-font? | pango font |
ly:paper-book? | paper book |
ly:paper-system? | paper-system Prob |
ly:pitch? | pitch |
ly:prob? | property object |
ly:score? | score |
ly:skyline? | skyline |
ly:skyline-pair? | pair of skylines |
ly:source-file? | source file |
ly:spanner? | spanner |
ly:spring? | spring |
ly:stencil? | stencil |
ly:stream-event? | stream event |
ly:translator? | translator |
ly:translator-group? | translator group |
ly:undead? | undead container |
ly:unpure-pure-container? | unpure/pure container |
| [ << Notation manual tables ] | [トップ][目次][インデックス][ ? ] | [ カンニング ペーパー >> ] | ||
| [ < LilyPond exported predicates ] | [ 上へ : Notation manual tables ] | [ カンニング ペーパー > ] | ||
A.22 Scheme functions
- Function: ly:add-context-mod contextmods modification
Adds the given context modification to the list contextmods of context modifications.
- Function: ly:add-interface iface desc props
Add a new grob interface. iface is the interface name, desc is the interface description, and props is the list of user-settable properties for the interface.
- Function: ly:add-listener callback disp cl
Add the single-argument procedure callback as listener to the dispatcher disp. Whenever disp hears an event of class cl, it calls callback with it.
- Function: ly:add-option sym val description
Add a program option sym. val is the default value and description is a string description.
- Function: ly:angle x y
Calculates angle in degrees of given vector. With one argument, x is a number pair indicating the vector. With two arguments, x and y specify the respective coordinates.
- Function: ly:assoc-get key alist default-value strict-checking
Return value if key in alist, else default-value (or
#fif not specified). If strict-checking is set to#tand key is not in alist, a programming_error is output.
- Function: ly:axis-group-interface::add-element grob grob-element
Set grob the parent of grob-element on all axes of grob.
- Function: ly:basic-progress str rest
A Scheme callable function to issue a basic progress message str. The message is formatted with
formatand rest.
- Function: ly:book-process book-smob default-paper default-layout output
Print book. output is passed to the backend unchanged. For example, it may be a string (for file based outputs) or a socket (for network based output).
- Function: ly:book-process-to-systems book-smob default-paper default-layout output
Print book. output is passed to the backend unchanged. For example, it may be a string (for file based outputs) or a socket (for network based output).
- Function: ly:bracket a iv t p
Make a bracket in direction a. The extent of the bracket is given by iv. The wings protrude by an amount of p, which may be negative. The thickness is given by t.
- Function: ly:chain-assoc-get key achain default-value strict-checking
Return value for key from a list of alists achain. If no entry is found, return default-value or
#fif default-value is not specified. With strict-checking set to#t, a programming_error is output in such cases.
- Function: ly:check-expected-warnings
Check whether all expected warnings have really been triggered.
- Function: ly:context-def-lookup def sym val
Return the value of sym in context definition def (e.g.,
\Voice). If no value is found, return val or'()if val is undefined. sym can be any of ‘default-child’, ‘consists’, ‘description’, ‘aliases’, ‘accepts’, ‘property-ops’, ‘context-name’, ‘group-type’.
- Function: ly:context-def-modify def mod
Return the result of applying the context-mod mod to the context definition def. Does not change def.
- Function: ly:context-events-below context
Return a
stream-distributorthat distributes all events from context and all its subcontexts.
- Function: ly:context-find context name
Find a parent of context that has name or alias name. Return
#fif not found.
- Function: ly:context-grob-definition context name
Return the definition of name (a symbol) within context as an alist.
- Function: ly:context-id context
Return the ID string of context, i.e., for
\context Voice = "one" …return the stringone.
- Function: ly:context-matched-pop-property context grob cell
This undoes a particular
\override,\once \overrideor\once \revertwhen given the specific alist pair to undo.
- Function: ly:context-name context
Return the name of context, i.e., for
\context Voice = "one" …return the symbolVoice.
- Function: ly:context-property context sym def
Return the value for property sym in context. If def is given, and property value is
'(), return def.
- Function: ly:context-property-where-defined context name
Return the context above context where name is defined.
- Function: ly:context-pushpop-property context grob eltprop val
Do
\temporary \overrideor\revertoperation in context. The grob definition grob is extended with eltprop (if val is specified) or reverted (if unspecified).
- Function: ly:context-set-property! context name val
Set value of property name in context context to val.
- Function: ly:debug str rest
A Scheme callable function to issue a debug message str. The message is formatted with
formatand rest.
- Function: ly:dimension? d
Return d as a number. Used to distinguish length variables from normal numbers.
- Function: ly:dir? s
Is s a direction? Valid directions are
-1,0, or1, where-1represents left or down,1represents right or up, and0represents a neutral direction.
- Function: ly:directed direction magnitude
Calculates an
(x . y)pair with optional magnitude (defaulting to1.0) and direction specified either as an angle in degrees or a coordinate pair giving the direction. If magnitude is a pair, the respective coordinates are scaled independently, useful for ellipse drawings.
- Function: ly:encode-string-for-pdf str
Encode the given string to either Latin1 (which is a subset of the PDFDocEncoding) or if that’s not possible to full UTF-16BE with Byte-Order-Mark (BOM).
- Function: ly:engraver-announce-end-grob engraver grob cause
Announce the end of a grob (i.e., the end of a spanner) originating from given engraver instance, with grob being a grob. cause should either be another grob or a music event.
- Function: ly:engraver-make-grob engraver grob-name cause
Create a grob originating from given engraver instance, with given grob-name, a symbol. cause should either be another grob or a music event.
- Function: ly:error str rest
A Scheme callable function to issue the error str. The error is formatted with
formatand rest.
- Function: ly:event-property sev sym val
Get the property sym of stream event sev. If sym is undefined, return val or
'()if val is not specified.
- Function: ly:expect-warning str rest
A Scheme callable function to register a warning to be expected and subsequently suppressed. If the warning is not encountered, a warning about the missing warning will be shown. The message should be translated with
(_ ...)and changing parameters given after the format string.
- Function: ly:font-design-size font
Given the font metric font, return the design size, relative to the current output-scale.
- Function: ly:font-get-glyph font name
Return a stencil from font for the glyph named name. If the glyph is not available, return an empty stencil.
Note that this command can only be used to access glyphs from fonts loaded with
ly:system-font-load; currently, this means either the Emmentaler or Emmentaler-Brace fonts, corresponding to the font encodingsfetaMusicandfetaBraces, respectively.
- Function: ly:font-glyph-name-to-charcode font name
Return the character code for glyph name in font.
Note that this command can only be used to access glyphs from fonts loaded with
ly:system-font-load; currently, this means either the Emmentaler or Emmentaler-Brace fonts, corresponding to the font encodingsfetaMusicandfetaBraces, respectively.
- Function: ly:font-glyph-name-to-index font name
Return the index for name in font.
Note that this command can only be used to access glyphs from fonts loaded with
ly:system-font-load; currently, this means either the Emmentaler or Emmentaler-Brace fonts, corresponding to the font encodingsfetaMusicandfetaBraces, respectively.
- Function: ly:font-index-to-charcode font index
Return the character code for index in font.
Note that this command can only be used to access glyphs from fonts loaded with
ly:system-font-load; currently, this means either the Emmentaler or Emmentaler-Brace fonts, corresponding to the font encodingsfetaMusicandfetaBraces, respectively.
- Function: ly:font-magnification font
Given the font metric font, return the magnification, relative to the current output-scale.
- Function: ly:font-sub-fonts font
Given the font metric font of an OpenType font, return the names of the subfonts within font.
- Function: ly:format str rest
LilyPond specific format, supporting
~aand~[0-9]f. Basic support for~sis also provided.
- Function: ly:format-output context
Given a global context in its final state, process it and return the
Music_outputobject in its final state.
- Function: ly:generic-bound-extent grob common
Determine the extent of grob relative to common along the X axis, finding its extent as a bound when it a has
bound-alignment-interfacesproperty list set and otherwise the full extent.
- Function: ly:get-all-function-documentation
Get a hash table with all LilyPond Scheme extension functions.
- Function: ly:get-cff-offset font-file-name idx
Get the offset of ’CFF’ table for font_file_name, returning it as an integer. The optional idx argument is useful for OpenType/CFF collections (OTC) only; it specifies the font index within the OTC. The default value of idx is 0.
- Function: ly:get-context-mods contextmod
Returns the list of context modifications stored in contextmod.
- Function: ly:get-font-format font-file-name idx
Get the font format for font_file_name, returning it as a symbol. The optional idx argument is useful for TrueType Collections (TTC) and OpenType/CFF collections (OTC) only; it specifies the font index within the TTC/OTC. The default value of idx is 0.
- Function: ly:get-spacing-spec from-scm to-scm
Return the spacing spec going between the two given grobs, from_scm and to_scm.
- Function: ly:grob-alist-chain grob global
Get an alist chain for grob grob, with global as the global default. If unspecified,
font-defaultsfrom the layout block is taken.
- Function: ly:grob-chain-callback grob proc sym
Find the callback that is stored as property sym of grob grob and chain proc to the head of this, meaning that it is called using grob and the previous callback’s result.
- Function: ly:grob-common-refpoint grob other axis
Find the common refpoint of grob and other for axis.
- Function: ly:grob-common-refpoint-of-array grob others axis
Find the common refpoint of grob and others (a grob-array) for axis.
- Function: ly:grob-extent grob refp axis
Get the extent in axis direction of grob relative to the grob refp.
- Function: ly:grob-get-vertical-axis-group-index grob
Get the index of the vertical axis group the grob grob belongs to; return
-1if none is found.
- Function: ly:grob-object grob sym
Return the value of a pointer in grob grob of property sym. It returns
'()(end-of-list) if sym is undefined in grob.
- Function: ly:grob-parent grob axis
Get the parent of grob. axis is 0 for the X-axis, 1 for the Y-axis.
- Function: ly:grob-property grob sym val
Return the value for property sym of grob. If no value is found, return val or
'()if val is not specified.
- Function: ly:grob-property-data grob sym
Return the value for property sym of grob, but do not process callbacks.
- Function: ly:grob-pure-height grob refp beg end val
Return the pure height of grob given refpoint refp. If no value is found, return val or
'()if val is not specified.
- Function: ly:grob-pure-property grob sym beg end val
Return the pure value for property sym of grob. If no value is found, return val or
'()if val is not specified.
- Function: ly:grob-relative-coordinate grob refp axis
Get the coordinate in axis direction of grob relative to the grob refp.
- Function: ly:grob-robust-relative-extent grob refp axis
Get the extent in axis direction of grob relative to the grob refp, or
(0,0)if empty.
- Function: ly:grob-set-nested-property! grob symlist val
Set nested property symlist in grob grob to value val.
- Function: ly:grob-set-parent! grob axis parent-grob
Set parent-grob the parent of grob grob in axis axis.
- Function: ly:grob-spanned-rank-interval grob
Returns a pair with the
rankof the furthest left column and therankof the furthest right column spanned bygrob.
- Function: ly:gulp-file name size
Read size characters from the file name, and return its contents in a string. If size is undefined, the entire file is read. The file is looked up using the search path.
- Function: ly:has-glyph-names? font-file-name idx
Does the font for font_file_name have glyph names? The optional idx argument is useful for TrueType Collections (TTC) and OpenType/CFF collections (OTC) only; it specifies the font index within the TTC/OTC. The default value of idx is 0.
- Function: ly:input-both-locations sip
Return input location in sip as
(file-name first-line first-column last-line last-column).
- Function: ly:input-file-line-char-column sip
Return input location in sip as
(file-name line char column).
- Function: ly:input-message sip msg rest
Print msg as a GNU compliant error message, pointing to the location in sip. msg is interpreted similar to
format’s argument, using rest.
- Function: ly:input-warning sip msg rest
Print msg as a GNU compliant warning message, pointing to the location in sip. msg is interpreted similar to
format’s argument, using rest.
- Function: ly:interpret-music-expression mus ctx
Interpret the music expression mus in the global context ctx. The context is returned in its final state.
- Function: ly:interpret-stencil-expression expr func arg1 offset
Parse expr, feed bits to func with first arg arg1 having offset offset.
- Function: ly:item-break-dir it
The break status direction of item it.
-1means end of line,0unbroken, and1beginning of line.
- Function: ly:item-get-column it
Return the
PaperColumnorNonMusicalPaperColumnassociated with thisItem.
- Function: ly:length x y
Calculates magnitude of given vector. With one argument, x is a number pair indicating the vector. With two arguments, x and y specify the respective coordinates.
- Function: ly:lexer-keywords lexer
Return a list of
(KEY . CODE)pairs, signifying the LilyPond reserved words list.
- Function: ly:line-interface::line grob startx starty endx endy
Make a line using layout information from grob grob.
- Function: ly:make-book paper header scores
Make a
\bookof paper and header (which may be#fas well) containing\scores.
- Function: ly:make-context-mod mod-list
Creates a context modification, optionally initialized via the list of modifications mod-list.
- Function: ly:make-duration length dotcount num den
length is the negative logarithm (base 2) of the duration: 1 is a half note, 2 is a quarter note, 3 is an eighth note, etc. The number of dots after the note is given by the optional argument dotcount.
The duration factor is optionally given by integers num and den, alternatively by a single rational number.
A duration is a musical duration, i.e., a length of time described by a power of two (whole, half, quarter, etc.) and a number of augmentation dots.
- Function: ly:make-global-context output-def
Set up a global interpretation context, using the output block output-def. The context is returned.
- Function: ly:make-global-translator global
Create a translator group and connect it to the global context global. The translator group is returned.
- Function: ly:make-grob-properties alist
This packages the given property list alist in a grob property container stored in a context property with the name of a grob.
- Function: ly:make-moment m g gn gd
Create the moment with rational main timing m, and optional grace timing g.
A moment is a point in musical time. It consists of a pair of rationals (m, g), where m is the timing for the main notes, and g the timing for grace notes. In absence of grace notes, g is zero.
For compatibility reasons, it is possible to write two numbers specifying numerator and denominator instead of the rationals. These forms cannot be mixed, and the two-argument form is disambiguated by the sign of the second argument: if it is positive, it can only be a denominator and not a grace timing.
- Function: ly:make-music props
Make a C++
Musicobject and initialize it with props.This function is for internal use and is only called by
make-music, which is the preferred interface for creating music objects.
- Function: ly:make-music-function signature func
Make a function to process music, to be used for the parser. func is the function, and signature describes its arguments. signature’s cdr is a list containing either
ly:music?predicates or other type predicates. Its car is the syntax function to call.
- Function: ly:make-page-permission-marker symbol permission
Return page marker with page breaking and turning permissions.
- Function: ly:make-pango-description-string chain size
Make a
PangoFontDescriptionstring for the property alist chain at size size.
- Function: ly:make-paper-outputter port format
Create an outputter that evaluates within
output-format, writing to port.
- Function: ly:make-pitch octave note alter
octave is specified by an integer, zero for the octave containing middle C. note is a number indexing the global default scale, with 0 corresponding to pitch C and 6 usually corresponding to pitch B. Optional alter is a rational number of 200-cent whole tones for alteration.
- Function: ly:make-scale steps
Create a scale. The argument is a vector of rational numbers, each of which represents the number of 200 cent tones of a pitch above the tonic.
- Function: ly:make-spring ideal min-dist
Make a spring. ideal is the ideal distance of the spring, and min-dist is the minimum distance.
- Function: ly:make-stencil expr xext yext
Stencils are device independent output expressions. They carry two pieces of information:
- A specification of how to print this object. This specification is processed by the output backends, for example ‘scm/output-ps.scm’.
-
The vertical and horizontal extents of the object, given as pairs. If an extent is unspecified (or if you use
empty-intervalas its value), it is taken to be empty.
- Function: ly:make-stream-event cl proplist
Create a stream event of class cl with the given mutable property list.
- Function: ly:make-undead object
This packages object in a manner that keeps it from triggering "Parsed object should be dead" messages.
- Function: ly:make-unpure-pure-container unpure pure
Make an unpure-pure container. unpure should be an unpure expression, and pure should be a pure expression. If pure is omitted, the value of unpure will be used twice, except that a callback is given two extra arguments that are ignored for the sake of pure calculations.
- Function: ly:message str rest
A Scheme callable function to issue the message str. The message is formatted with
formatand rest.
- Function: ly:minimal-breaking pb
Break (pages and lines) the
Paper_bookobject pb without looking for optimal spacing: stack as many lines on a page before moving to the next one.
- Function: ly:modules-lookup modules sym def
Look up sym in the list modules, returning the first occurence. If not found, return def or
#fif def isn’t specified.
- Function: ly:music-deep-copy m origin
Copy m and all sub expressions of m. m may be an arbitrary type; cons cells and music are copied recursively. If origin is given, it is used as the origin for one level of music by calling
ly:set-origin!on the copy.
- Function: ly:music-length mus
Get the length of music expression mus and return it as a
Momentobject.
- Function: ly:music-mutable-properties mus
Return an alist containing the mutable properties of mus. The immutable properties are not available, since they are constant and initialized by the
make-musicfunction.
- Function: ly:music-property mus sym val
Return the value for property sym of music expression mus. If no value is found, return val or
'()if val is not specified.
- Function: ly:note-column-accidentals note-column
Return the
AccidentalPlacementgrob from note-column if any, orSCM_EOLotherwise.
- Function: ly:note-column-dot-column note-column
Return the
DotColumngrob from note-column if any, orSCM_EOLotherwise.
- Function: ly:note-head::stem-attachment font-metric glyph-name
Get attachment in font-metric for attaching a stem to notehead glyph-name.
- Function: ly:one-line-auto-height-breaking pb
Put each score on a single line, and put each line on its own page. Modify the paper-width setting so that every page is wider than the widest line. Modify the paper-height setting to fit the height of the tallest line.
- Function: ly:one-line-breaking pb
Put each score on a single line, and put each line on its own page. Modify the paper-width setting so that every page is wider than the widest line.
- Function: ly:one-page-breaking pb
Put each score on a single page. The paper-height settings are modified so each score fits on one page, and the height of the page matches the height of the full score.
- Function: ly:optimal-breaking pb
Optimally break (pages and lines) the
Paper_bookobject pb to minimize badness in bother vertical and horizontal spacing.
- Function: ly:option-usage port
Print
ly:set-optionusage. Optional port argumentfor the destination defaults to current output port.
- Function: ly:otf->cff otf-file-name idx
Convert the contents of an OTF file to a CFF file, returning it as a string. The optional idx argument is useful for OpenType/CFF collections (OTC) only; it specifies the font index within the OTC. The default value of idx is 0.
- Function: ly:otf-font-glyph-info font glyph
Given the font metric font of an OpenType font, return the information about named glyph glyph (a string).
- Function: ly:otf-font-table-data font tag
Extract a table tag from font. Return empty string for non-existent tag.
- Function: ly:output-def-lookup def sym val
Return the value of sym in output definition def (e.g.,
\paper). If no value is found, return val or'()if val is undefined.
- Function: ly:output-find-context-def output-def context-name
Return an alist of all context defs (matching context-nameif given) in output-def.
- Function: ly:page-turn-breaking pb
Optimally break (pages and lines) the
Paper_bookobject pb such that page turns only happen in specified places, returning its pages.
- Function: ly:pango-font-physical-fonts f
Return alist of
(ps-name file-name font-index)lists for Pango font f.
- Function: ly:paper-book-paper pb
Return the paper output definition (
\paper) inPaper_bookobject pb.
- Function: ly:paper-column::break-align-width col align-syms
Determine the extent along the X-axis of a grob used for break-alignment organized by column col. The grob is specified by align-syms, which contains either a single
break-align-symbolor a list of such symbols.
- Function: ly:paper-column::print
Optional stencil for
PaperColumnorNonMusicalPaperColumn. Draws therank numberof each column, its moment in time, a blue arrow showing the ideal distance, and a red arrow showing the minimum distance between columns.
- Function: ly:paper-fonts def
Return a list containing the fonts from output definition def (e.g.,
\paper).
- Function: ly:paper-get-font def chain
Find a font metric in output definition def satisfying the font-qualifiers in alist chain chain, and return it. (An alist chain is a list of alists, containing grob properties.)
- Function: ly:paper-get-number def sym
Return the value of variable sym in output definition def as a double.
- Function: ly:paper-score-paper-systems paper-score
Return vector of
paper_systemobjects from paper-score.
- Function: ly:paper-system-minimum-distance sys1 sys2
Measure the minimum distance between these two paper-systems, using their stored skylines if possible and falling back to their extents otherwise.
- Function: ly:parse-string-expression parser-smob ly-code filename line
Parse the string ly-code with parser-smob. Return the contained music expression. filename and line are optional source indicators.
- Function: ly:parsed-undead-list!
Return the list of objects that have been found live that should have been dead, and clear that list.
- Function: ly:parser-clone closures location
Return a clone of current parser. An association list of port positions to closures can be specified in closures in order to have
$and#interpreted in their original lexical environment. If location is a valid location, it becomes the source of all music expressions inside.
- Function: ly:parser-error msg input
Display an error message and make current parser fail. Without a current parser, trigger an ordinary error.
- Function: ly:parser-has-error? parser
Does parser (defaulting to current parser) have an error flag?
- Function: ly:parser-include-string ly-code
Include the string ly-code into the input stream for current parser. Can only be used in immediate Scheme expressions (
$instead of#).
- Function: ly:parser-lookup symbol
Look up symbol in current parser’s module. Return
'()if not defined.
- Function: ly:parser-output-name parser
Return the base name of the output file. If
parseris left off, use currently active parser.
- Function: ly:parser-parse-string parser-smob ly-code
Parse the string ly-code with parser-smob. Upon failure, throw
ly-file-failedkey.
- Function: ly:parser-set-note-names names
Replace current note names in parser. names is an alist of symbols. This only has effect if the current mode is notes.
- Function: ly:performance-write performance filename name
Write performance to filename storing name as the name of the performance in the file metadata.
- Function: ly:pitch-diff pitch root
Return pitch delta such that root transposed by delta equals pitch.
- Function: ly:pitch-transpose p delta
Transpose p by the amount delta, where delta is relative to middle C.
- Function: ly:pointer-group-interface::add-grob grob sym grob-element
Add grob-element to grob’s sym grob array.
- Function: ly:position-on-line? sg spos
Return whether spos is on a line of the staff associated with the grob sg (even on an extender line).
- Function: ly:prob-property prob sym val
Return the value for property sym of Prob object prob. If no value is found, return val or
'()if val is not specified.
- Function: ly:programming-error str rest
A Scheme callable function to issue the internal warning str. The message is formatted with
formatand rest.
- Function: ly:progress str rest
A Scheme callable function to print progress str. The message is formatted with
formatand rest.
- Function: ly:property-lookup-stats sym
Return hash table with a property access corresponding to sym. Choices are
prob,grob, andcontext.
- Function: ly:pure-call data grob start end rest
Convert property data (unpure-pure container or procedure) to value in a pure context defined by grob, start, end, and possibly rest arguments.
- Function: ly:register-translator creator name description
Register a translator creator (usually a descriptive alist or a function/closure returning one when given a context argument) with the given symbol name and the given description alist.
- Function: ly:relative-group-extent elements common axis
Determine the extent of elements relative to common in the axis direction.
- Function: ly:round-filled-box xext yext blot
Make a
Stencilobject that prints a black box of dimensions xext, yext and roundness blot.
- Function: ly:round-filled-polygon points blot extroversion
Make a
Stencilobject that prints a black polygon with corners at the points defined by points (list of coordinate pairs) and roundness blot. Optionalextroversion shifts the outline outward, with thedefault of-1.0keeping the outer boundary ofthe outline just inside of the polygon.
- Function: ly:run-translator mus output-def
Process mus according to output-def. An interpretation context is set up, and mus is interpreted with it. The context is returned in its final state.
Optionally, this routine takes an object-key to to uniquely identify the score block containing it.
- Function: ly:score-embedded-format score layout
Run score through layout (an output definition) scaled to correct output-scale already, returning a list of layout-lines.
- Function: ly:separation-item::print
Optional stencil for
PaperColumnorNonMusicalPaperColumn. Draws thehorizontal-skylinesof eachPaperColumn, showing the shapes used to determine the minimum distances betweenPaperColumnsat the note-spacing step, before staves have been spaced (vertically) on the page.
- Function: ly:set-default-scale scale
Set the global default scale. This determines the tuning of pitches with no accidentals or key signatures. The first pitch is C. Alterations are calculated relative to this scale. The number of pitches in this scale determines the number of scale steps that make up an octave. Usually the 7-note major scale.
- Function: ly:set-grob-modification-callback cb
Specify a procedure that will be called every time LilyPond modifies a grob property. The callback will receive as arguments the grob that is being modified, the name of the C++ file in which the modification was requested, the line number in the C++ file in which the modification was requested, the name of the function in which the modification was requested, the property to be changed, and the new value for the property.
- Function: ly:set-middle-C! context
Set the
middleCPositionvariable in context based on the variablesmiddleCClefPositionandmiddleCOffset.
- Function: ly:set-origin! m origin
This sets the origin given in origin to m. m will typically be a music expression or a list of music. List structures are searched recursively, but recursion stops at the changed music expressions themselves. origin is generally of type
ly:input-location?, defaulting to(*location*). Other valid values fororiginare a music expression which is then used as the source of location information, or#for'()in which case no action is performed. The return value is m itself.
- Function: ly:set-property-cache-callback cb
Specify a procedure that will be called whenever lilypond calculates a callback function and caches the result. The callback will receive as arguments the grob whose property it is, the name of the property, the name of the callback that calculated the property, and the new (cached) value of the property.
- Function: ly:solve-spring-rod-problem springs rods length ragged
Solve a spring and rod problem for count objects, that are connected by count-1 springs, and an arbitrary number of rods. count is implicitly given by springs and rods. The springs argument has the format
(ideal, inverse_hook)and rods is of the form(idx1, idx2, distance).length is a number, ragged a boolean.
The function returns a list containing the force (positive for stretching, negative for compressing and
#ffor non-satisfied constraints) followed by spring-count+1 positions of the objects.
- Function: ly:source-files parser-smob
A list of LilyPond files being processed;a PARSER may optionally be specified.
- Function: ly:spanner-bound spanner dir
Get one of the bounds of spanner. dir is
-1for left, and1for right.
- Function: ly:spanner-set-bound! spanner dir item
Set grob item as bound in direction dir for spanner.
- Function: ly:spawn command rest
Simple interface to g_spawn_sync str. The error is formatted with
formatand rest.
- Function: ly:spring-set-inverse-compress-strength! spring strength
Set the inverse compress strength of spring.
- Function: ly:spring-set-inverse-stretch-strength! spring strength
Set the inverse stretch strength of spring.
- Function: ly:staff-symbol-line-thickness grob
Returns the current staff-line thickness in the staff associated with grob, expressed as a multiple of the current staff-space height.
- Function: ly:staff-symbol-staff-space grob
Returns the current staff-space height in the staff associated with grob, expressed as a multiple of the default height of a staff-space in the traditional five-line staff.
- Function: ly:start-environment
Return the environment (a list of strings) that was in effect at program start.
- Function: ly:stencil-aligned-to stil axis dir
Align stil using its own extents. dir is a number.
-1and1are left and right, respectively. Other values are interpolated (so0means the center).
- Function: ly:stencil-combine-at-edge first axis direction second padding
Construct a stencil by putting second next to first. axis can be 0 (x-axis) or 1 (y-axis). direction can be -1 (left or down) or 1 (right or up). The stencils are juxtaposed with padding as extra space. first and second may also be
'()or#f.
- Function: ly:stencil-empty? stil axis
Return whether stil is empty. If an optional axis is supplied, the emptiness check is restricted to that axis.
- Function: ly:stencil-extent stil axis
Return a pair of numbers signifying the extent of stil in axis direction (
0or1for x and y axis, respectively).
- Function: ly:stencil-outline stil outline
Return a stencil with the stencil expression (inking) of stencil stil but with outline and dimensions from stencil outline.
- Function: ly:stencil-rotate stil angle x y
Return a stencil stil rotated angle degrees around the relative offset (x, y). E.g., an offset of (-1, 1) will rotate the stencil around the left upper corner.
- Function: ly:stencil-rotate-absolute stil angle x y
Return a stencil stil rotated angle degrees around point (x, y), given in absolute coordinates.
- Function: ly:stencil-scale stil x y
Scale stencil stil using the horizontal and vertical scaling factors x and y. Negative values will flip or mirror stil without changing its origin; this may result in collisions unless it is repositioned.
- Function: ly:stencil-stack first axis direction second padding mindist
Construct a stencil by stacking second next to first. axis can be 0 (x-axis) or 1 (y-axis). direction can be -1 (left or down) or 1 (right or up). The stencils are juxtaposed with padding as extra space. first and second may also be
'()or#f. As opposed toly:stencil-combine-at-edge, metrics are suited for successively accumulating lines of stencils. Also, second stencil is drawn last.If mindist is specified, reference points are placed apart at least by this distance. If either of the stencils is spacing, padding and mindist do not apply.
- Function: ly:stencil-translate stil offset
Return a stil, but translated by offset (a pair of numbers).
- Function: ly:stencil-translate-axis stil amount axis
Return a copy of stil but translated by amount in axis direction.
- Function: ly:string-percent-encode str
Encode all characters in string str with hexadecimal percent escape sequences, with the following exceptions: characters
-,.,/, and_; and characters in ranges0-9,A-Z, anda-z.
- Function: ly:system-font-load name
Load the OpenType system font ‘name.otf’. Fonts loaded with this command must contain three additional SFNT font tables called
LILC,LILF, andLILY, needed for typesetting musical elements. Currently, only the Emmentaler and the Emmentaler-Brace fonts fulfill these requirements.Note that only
ly:font-get-glyphand derived code (like\lookup) can access glyphs from the system fonts; text strings are handled exclusively via the Pango interface.
- Function: ly:text-interface::interpret-markup
Convert a text markup into a stencil. Takes three arguments, layout, props, and markup.
layout is a
\layoutblock; it may be obtained from a grob withly:grob-layout. props is an alist chain, i.e. a list of alists. This is typically obtained with(ly:grob-alist-chain grob (ly:output-def-lookup layout 'text-font-defaults)). markup is the markup text to be processed.
- Function: ly:translate-cpp-warning-scheme str
Translates a string in C++ printf format and modifies it to use it for scheme formatting.
- Function: ly:translator-description creator
Return an alist of properties of translator definition creator.
- Function: ly:translator-name creator
Return the type name of the translator definition creator. The name is a symbol.
- Function: ly:ttf->pfa ttf-file-name idx
Convert the contents of a TrueType font file to PostScript Type 42 font, returning it as a string. The optional idx argument is useful for TrueType collections (TTC) only; it specifies the font index within the TTC. The default value of idx is 0.
- Function: ly:ttf-ps-name ttf-file-name idx
Extract the PostScript name from a TrueType font. The optional idx argument is useful for TrueType collections (TTC) only; it specifies the font index within the TTC. The default value of idx is 0.
- Function: ly:type1->pfa type1-file-name
Convert the contents of a Type 1 font in PFB format to PFA format. If the file is already in PFA format, pass through it.
- Function: ly:unpure-call data grob rest
Convert property data (unpure-pure container or procedure) to value in an unpure context defined by grob and possibly rest arguments.
- Function: ly:warning str rest
A Scheme callable function to issue the warning str. The message is formatted with
formatand rest.
- Function: ly:warning-located location str rest
A Scheme callable function to issue the warning str at the specified location in an input file. The message is formatted with
formatand rest.
| [ << Notation manual tables ] | [トップ][目次][インデックス][ ? ] | [ GNU Free Documentation License >> ] | ||
| [ < Scheme functions ] | [ 上へ : Top ] | [ GNU Free Documentation License > ] | ||
B. カンニング ペーパー
| 構文 | 説明 | 例 |
1 2 8 16 | 演奏時間 |
|
c4. c4.. | 増音の付点 |
|
c d e f g a b | 音階 |
|
fis bes | 変音 |
|
\clef treble \clef bass | 音部記号 |
|
\time 3/4 \time 4/4 | 拍子記号 |
|
r4 r8 | 休符 |
|
d ~ d | タイ |
|
\key es \major | 調号 |
|
note' | 1 オクターブ上げる |
|
note, | 1 オクターブ下げる |
|
c( d e) | スラー |
|
c\( c( d) e\) | プレージング スラー |
|
a8[ b] | 連桁 |
|
<< \new Staff ... >> | 複数の譜 |
|
c-> c-. | アーティキュレーション |
|
c2\mf c\sfz | 強弱記号 |
|
a\< a a\! | クレッシェンド |
|
a\> a a\! | デクレッシェンド |
|
< > | 和音 |
|
\partial 8 | 上拍 |
|
\tuplet 3/2 {f g a} | 3 連符 |
|
\grace | 装飾小音符 |
|
\lyricmode { twinkle } | 歌詞を入力する | twinkle |
\new Lyrics | 歌詞を譜刻する |
|
twin -- kle | 歌詞のハイフン |
|
\chordmode { c:dim f:maj7 } | コード |
|
\context ChordNames | コード ネームを譜刻する |
|
<<{e f} \\ {c d}>> | 多声 |
|
s4 s8 s16 | 空白休符 |
![[image of music]](a7/lily-f3afef3a.png)
![[image of music]](7d/lily-49b544ae.png)
![[image of music]](3a/lily-d0f02014.png)
![[image of music]](53/lily-49574969.png)
![[image of music]](8c/lily-d9290c41.png)
![[image of music]](e4/lily-54920ce6.png)
![[image of music]](6d/lily-13250dec.png)
![[image of music]](76/lily-ba034041.png)
![[image of music]](08/lily-3f659613.png)
![[image of music]](5d/lily-106ac42b.png)
![[image of music]](1f/lily-db5edf8a.png)
![[image of music]](79/lily-2eb948de.png)
![[image of music]](f1/lily-46c2cb52.png)
![[image of music]](ae/lily-7a71e3a4.png)
![[image of music]](f6/lily-dee1d7b1.png)
![[image of music]](7f/lily-f6eef2e9.png)
![[image of music]](1d/lily-c9c722a6.png)
![[image of music]](ed/lily-460def26.png)
![[image of music]](3c/lily-ebc0a4d8.png)
![[image of music]](6a/lily-93bc84c9.png)
![[image of music]](6b/lily-70f697ef.png)
![[image of music]](a2/lily-19ae1780.png)
![[image of music]](ff/lily-e70fb1df.png)
![[image of music]](b7/lily-79e78e46.png)
![[image of music]](e7/lily-ba95a97e.png)
![[image of music]](1a/lily-71af9815.png)
![[image of music]](9b/lily-2f2a65ec.png)
![[image of music]](61/lily-b71662b4.png)
| [ << カンニング ペーパー ] | [トップ][目次][インデックス][ ? ] | [ LilyPond コマンド インデックス >> ] | ||
| [ < カンニング ペーパー ] | [ 上へ : Top ] | [ LilyPond コマンド インデックス > ] | ||
C. GNU Free Documentation License
Version 1.3, 3 November 2008
Copyright © 2000, 2001, 2002, 2007, 2008 Free Software Foundation, Inc. http://fsf.org/ Everyone is permitted to copy and distribute verbatim copies of this license document, but changing it is not allowed. |
-
PREAMBLE
The purpose of this License is to make a manual, textbook, or other functional and useful document free in the sense of freedom: to assure everyone the effective freedom to copy and redistribute it, with or without modifying it, either commercially or noncommercially. Secondarily, this License preserves for the author and publisher a way to get credit for their work, while not being considered responsible for modifications made by others.
This License is a kind of “copyleft”, which means that derivative works of the document must themselves be free in the same sense. It complements the GNU General Public License, which is a copyleft license designed for free software.
We have designed this License in order to use it for manuals for free software, because free software needs free documentation: a free program should come with manuals providing the same freedoms that the software does. But this License is not limited to software manuals; it can be used for any textual work, regardless of subject matter or whether it is published as a printed book. We recommend this License principally for works whose purpose is instruction or reference.
-
APPLICABILITY AND DEFINITIONS
This License applies to any manual or other work, in any medium, that contains a notice placed by the copyright holder saying it can be distributed under the terms of this License. Such a notice grants a world-wide, royalty-free license, unlimited in duration, to use that work under the conditions stated herein. The “Document”, below, refers to any such manual or work. Any member of the public is a licensee, and is addressed as “you”. You accept the license if you copy, modify or distribute the work in a way requiring permission under copyright law.
A “Modified Version” of the Document means any work containing the Document or a portion of it, either copied verbatim, or with modifications and/or translated into another language.
A “Secondary Section” is a named appendix or a front-matter section of the Document that deals exclusively with the relationship of the publishers or authors of the Document to the Document’s overall subject (or to related matters) and contains nothing that could fall directly within that overall subject. (Thus, if the Document is in part a textbook of mathematics, a Secondary Section may not explain any mathematics.) The relationship could be a matter of historical connection with the subject or with related matters, or of legal, commercial, philosophical, ethical or political position regarding them.
The “Invariant Sections” are certain Secondary Sections whose titles are designated, as being those of Invariant Sections, in the notice that says that the Document is released under this License. If a section does not fit the above definition of Secondary then it is not allowed to be designated as Invariant. The Document may contain zero Invariant Sections. If the Document does not identify any Invariant Sections then there are none.
The “Cover Texts” are certain short passages of text that are listed, as Front-Cover Texts or Back-Cover Texts, in the notice that says that the Document is released under this License. A Front-Cover Text may be at most 5 words, and a Back-Cover Text may be at most 25 words.
A “Transparent” copy of the Document means a machine-readable copy, represented in a format whose specification is available to the general public, that is suitable for revising the document straightforwardly with generic text editors or (for images composed of pixels) generic paint programs or (for drawings) some widely available drawing editor, and that is suitable for input to text formatters or for automatic translation to a variety of formats suitable for input to text formatters. A copy made in an otherwise Transparent file format whose markup, or absence of markup, has been arranged to thwart or discourage subsequent modification by readers is not Transparent. An image format is not Transparent if used for any substantial amount of text. A copy that is not “Transparent” is called “Opaque”.
Examples of suitable formats for Transparent copies include plain ASCII without markup, Texinfo input format, LaTeX input format, SGML or XML using a publicly available DTD, and standard-conforming simple HTML, PostScript or PDF designed for human modification. Examples of transparent image formats include PNG, XCF and JPG. Opaque formats include proprietary formats that can be read and edited only by proprietary word processors, SGML or XML for which the DTD and/or processing tools are not generally available, and the machine-generated HTML, PostScript or PDF produced by some word processors for output purposes only.
The “Title Page” means, for a printed book, the title page itself, plus such following pages as are needed to hold, legibly, the material this License requires to appear in the title page. For works in formats which do not have any title page as such, “Title Page” means the text near the most prominent appearance of the work’s title, preceding the beginning of the body of the text.
The “publisher” means any person or entity that distributes copies of the Document to the public.
A section “Entitled XYZ” means a named subunit of the Document whose title either is precisely XYZ or contains XYZ in parentheses following text that translates XYZ in another language. (Here XYZ stands for a specific section name mentioned below, such as “Acknowledgements”, “Dedications”, “Endorsements”, or “History”.) To “Preserve the Title” of such a section when you modify the Document means that it remains a section “Entitled XYZ” according to this definition.
The Document may include Warranty Disclaimers next to the notice which states that this License applies to the Document. These Warranty Disclaimers are considered to be included by reference in this License, but only as regards disclaiming warranties: any other implication that these Warranty Disclaimers may have is void and has no effect on the meaning of this License.
-
VERBATIM COPYING
You may copy and distribute the Document in any medium, either commercially or noncommercially, provided that this License, the copyright notices, and the license notice saying this License applies to the Document are reproduced in all copies, and that you add no other conditions whatsoever to those of this License. You may not use technical measures to obstruct or control the reading or further copying of the copies you make or distribute. However, you may accept compensation in exchange for copies. If you distribute a large enough number of copies you must also follow the conditions in section 3.
You may also lend copies, under the same conditions stated above, and you may publicly display copies.
-
COPYING IN QUANTITY
If you publish printed copies (or copies in media that commonly have printed covers) of the Document, numbering more than 100, and the Document’s license notice requires Cover Texts, you must enclose the copies in covers that carry, clearly and legibly, all these Cover Texts: Front-Cover Texts on the front cover, and Back-Cover Texts on the back cover. Both covers must also clearly and legibly identify you as the publisher of these copies. The front cover must present the full title with all words of the title equally prominent and visible. You may add other material on the covers in addition. Copying with changes limited to the covers, as long as they preserve the title of the Document and satisfy these conditions, can be treated as verbatim copying in other respects.
If the required texts for either cover are too voluminous to fit legibly, you should put the first ones listed (as many as fit reasonably) on the actual cover, and continue the rest onto adjacent pages.
If you publish or distribute Opaque copies of the Document numbering more than 100, you must either include a machine-readable Transparent copy along with each Opaque copy, or state in or with each Opaque copy a computer-network location from which the general network-using public has access to download using public-standard network protocols a complete Transparent copy of the Document, free of added material. If you use the latter option, you must take reasonably prudent steps, when you begin distribution of Opaque copies in quantity, to ensure that this Transparent copy will remain thus accessible at the stated location until at least one year after the last time you distribute an Opaque copy (directly or through your agents or retailers) of that edition to the public.
It is requested, but not required, that you contact the authors of the Document well before redistributing any large number of copies, to give them a chance to provide you with an updated version of the Document.
-
MODIFICATIONS
You may copy and distribute a Modified Version of the Document under the conditions of sections 2 and 3 above, provided that you release the Modified Version under precisely this License, with the Modified Version filling the role of the Document, thus licensing distribution and modification of the Modified Version to whoever possesses a copy of it. In addition, you must do these things in the Modified Version:
- Use in the Title Page (and on the covers, if any) a title distinct from that of the Document, and from those of previous versions (which should, if there were any, be listed in the History section of the Document). You may use the same title as a previous version if the original publisher of that version gives permission.
- List on the Title Page, as authors, one or more persons or entities responsible for authorship of the modifications in the Modified Version, together with at least five of the principal authors of the Document (all of its principal authors, if it has fewer than five), unless they release you from this requirement.
- State on the Title page the name of the publisher of the Modified Version, as the publisher.
- Preserve all the copyright notices of the Document.
- Add an appropriate copyright notice for your modifications adjacent to the other copyright notices.
- Include, immediately after the copyright notices, a license notice giving the public permission to use the Modified Version under the terms of this License, in the form shown in the Addendum below.
- Preserve in that license notice the full lists of Invariant Sections and required Cover Texts given in the Document’s license notice.
- Include an unaltered copy of this License.
- Preserve the section Entitled “History”, Preserve its Title, and add to it an item stating at least the title, year, new authors, and publisher of the Modified Version as given on the Title Page. If there is no section Entitled “History” in the Document, create one stating the title, year, authors, and publisher of the Document as given on its Title Page, then add an item describing the Modified Version as stated in the previous sentence.
- Preserve the network location, if any, given in the Document for public access to a Transparent copy of the Document, and likewise the network locations given in the Document for previous versions it was based on. These may be placed in the “History” section. You may omit a network location for a work that was published at least four years before the Document itself, or if the original publisher of the version it refers to gives permission.
- For any section Entitled “Acknowledgements” or “Dedications”, Preserve the Title of the section, and preserve in the section all the substance and tone of each of the contributor acknowledgements and/or dedications given therein.
- Preserve all the Invariant Sections of the Document, unaltered in their text and in their titles. Section numbers or the equivalent are not considered part of the section titles.
- Delete any section Entitled “Endorsements”. Such a section may not be included in the Modified Version.
- Do not retitle any existing section to be Entitled “Endorsements” or to conflict in title with any Invariant Section.
- Preserve any Warranty Disclaimers.
If the Modified Version includes new front-matter sections or appendices that qualify as Secondary Sections and contain no material copied from the Document, you may at your option designate some or all of these sections as invariant. To do this, add their titles to the list of Invariant Sections in the Modified Version’s license notice. These titles must be distinct from any other section titles.
You may add a section Entitled “Endorsements”, provided it contains nothing but endorsements of your Modified Version by various parties—for example, statements of peer review or that the text has been approved by an organization as the authoritative definition of a standard.
You may add a passage of up to five words as a Front-Cover Text, and a passage of up to 25 words as a Back-Cover Text, to the end of the list of Cover Texts in the Modified Version. Only one passage of Front-Cover Text and one of Back-Cover Text may be added by (or through arrangements made by) any one entity. If the Document already includes a cover text for the same cover, previously added by you or by arrangement made by the same entity you are acting on behalf of, you may not add another; but you may replace the old one, on explicit permission from the previous publisher that added the old one.
The author(s) and publisher(s) of the Document do not by this License give permission to use their names for publicity for or to assert or imply endorsement of any Modified Version.
-
COMBINING DOCUMENTS
You may combine the Document with other documents released under this License, under the terms defined in section 4 above for modified versions, provided that you include in the combination all of the Invariant Sections of all of the original documents, unmodified, and list them all as Invariant Sections of your combined work in its license notice, and that you preserve all their Warranty Disclaimers.
The combined work need only contain one copy of this License, and multiple identical Invariant Sections may be replaced with a single copy. If there are multiple Invariant Sections with the same name but different contents, make the title of each such section unique by adding at the end of it, in parentheses, the name of the original author or publisher of that section if known, or else a unique number. Make the same adjustment to the section titles in the list of Invariant Sections in the license notice of the combined work.
In the combination, you must combine any sections Entitled “History” in the various original documents, forming one section Entitled “History”; likewise combine any sections Entitled “Acknowledgements”, and any sections Entitled “Dedications”. You must delete all sections Entitled “Endorsements.”
-
COLLECTIONS OF DOCUMENTS
You may make a collection consisting of the Document and other documents released under this License, and replace the individual copies of this License in the various documents with a single copy that is included in the collection, provided that you follow the rules of this License for verbatim copying of each of the documents in all other respects.
You may extract a single document from such a collection, and distribute it individually under this License, provided you insert a copy of this License into the extracted document, and follow this License in all other respects regarding verbatim copying of that document.
-
AGGREGATION WITH INDEPENDENT WORKS
A compilation of the Document or its derivatives with other separate and independent documents or works, in or on a volume of a storage or distribution medium, is called an “aggregate” if the copyright resulting from the compilation is not used to limit the legal rights of the compilation’s users beyond what the individual works permit. When the Document is included in an aggregate, this License does not apply to the other works in the aggregate which are not themselves derivative works of the Document.
If the Cover Text requirement of section 3 is applicable to these copies of the Document, then if the Document is less than one half of the entire aggregate, the Document’s Cover Texts may be placed on covers that bracket the Document within the aggregate, or the electronic equivalent of covers if the Document is in electronic form. Otherwise they must appear on printed covers that bracket the whole aggregate.
-
TRANSLATION
Translation is considered a kind of modification, so you may distribute translations of the Document under the terms of section 4. Replacing Invariant Sections with translations requires special permission from their copyright holders, but you may include translations of some or all Invariant Sections in addition to the original versions of these Invariant Sections. You may include a translation of this License, and all the license notices in the Document, and any Warranty Disclaimers, provided that you also include the original English version of this License and the original versions of those notices and disclaimers. In case of a disagreement between the translation and the original version of this License or a notice or disclaimer, the original version will prevail.
If a section in the Document is Entitled “Acknowledgements”, “Dedications”, or “History”, the requirement (section 4) to Preserve its Title (section 1) will typically require changing the actual title.
-
TERMINATION
You may not copy, modify, sublicense, or distribute the Document except as expressly provided under this License. Any attempt otherwise to copy, modify, sublicense, or distribute it is void, and will automatically terminate your rights under this License.
However, if you cease all violation of this License, then your license from a particular copyright holder is reinstated (a) provisionally, unless and until the copyright holder explicitly and finally terminates your license, and (b) permanently, if the copyright holder fails to notify you of the violation by some reasonable means prior to 60 days after the cessation.
Moreover, your license from a particular copyright holder is reinstated permanently if the copyright holder notifies you of the violation by some reasonable means, this is the first time you have received notice of violation of this License (for any work) from that copyright holder, and you cure the violation prior to 30 days after your receipt of the notice.
Termination of your rights under this section does not terminate the licenses of parties who have received copies or rights from you under this License. If your rights have been terminated and not permanently reinstated, receipt of a copy of some or all of the same material does not give you any rights to use it.
-
FUTURE REVISIONS OF THIS LICENSE
The Free Software Foundation may publish new, revised versions of the GNU Free Documentation License from time to time. Such new versions will be similar in spirit to the present version, but may differ in detail to address new problems or concerns. See http://www.gnu.org/copyleft/.
Each version of the License is given a distinguishing version number. If the Document specifies that a particular numbered version of this License “or any later version” applies to it, you have the option of following the terms and conditions either of that specified version or of any later version that has been published (not as a draft) by the Free Software Foundation. If the Document does not specify a version number of this License, you may choose any version ever published (not as a draft) by the Free Software Foundation. If the Document specifies that a proxy can decide which future versions of this License can be used, that proxy’s public statement of acceptance of a version permanently authorizes you to choose that version for the Document.
-
RELICENSING
“Massive Multiauthor Collaboration Site” (or “MMC Site”) means any World Wide Web server that publishes copyrightable works and also provides prominent facilities for anybody to edit those works. A public wiki that anybody can edit is an example of such a server. A “Massive Multiauthor Collaboration” (or “MMC”) contained in the site means any set of copyrightable works thus published on the MMC site.
“CC-BY-SA” means the Creative Commons Attribution-Share Alike 3.0 license published by Creative Commons Corporation, a not-for-profit corporation with a principal place of business in San Francisco, California, as well as future copyleft versions of that license published by that same organization.
“Incorporate” means to publish or republish a Document, in whole or in part, as part of another Document.
An MMC is “eligible for relicensing” if it is licensed under this License, and if all works that were first published under this License somewhere other than this MMC, and subsequently incorporated in whole or in part into the MMC, (1) had no cover texts or invariant sections, and (2) were thus incorporated prior to November 1, 2008.
The operator of an MMC Site may republish an MMC contained in the site under CC-BY-SA on the same site at any time before August 1, 2009, provided the MMC is eligible for relicensing.
ADDENDUM: How to use this License for your documents
To use this License in a document you have written, include a copy of the License in the document and put the following copyright and license notices just after the title page:
Copyright (C) year your name. Permission is granted to copy, distribute and/or modify this document under the terms of the GNU Free Documentation License, Version 1.3 or any later version published by the Free Software Foundation; with no Invariant Sections, no Front-Cover Texts, and no Back-Cover Texts. A copy of the license is included in the section entitled ``GNU Free Documentation License''. |
If you have Invariant Sections, Front-Cover Texts and Back-Cover Texts, replace the “with…Texts.” line with this:
with the Invariant Sections being list their titles, with
the Front-Cover Texts being list, and with the Back-Cover Texts
being list.
|
If you have Invariant Sections without Cover Texts, or some other combination of the three, merge those two alternatives to suit the situation.
If your document contains nontrivial examples of program code, we recommend releasing these examples in parallel under your choice of free software license, such as the GNU General Public License, to permit their use in free software.
| [ << GNU Free Documentation License ] | [トップ][目次][インデックス][ ? ] | [ LilyPond インデックス >> ] | ||
| [ < GNU Free Documentation License ] | [ 上へ : Top ] | [ LilyPond インデックス > ] | ||
D. LilyPond コマンド インデックス
このインデックスは、すべての LilyPond コマンドとキーワードをリストアップしていて、それらの使い方について説明しているマニュアルのセクションへのリンクがあります。各リンクは 2 つのパートに分かれています。最初のパートは、マニュアルの中でコマンドあるいはキーワードが出現する場所へのリンクです。2 番目のパートは、マニュアルの中でコマンドあるいはキーワードが出現するセクションの先頭へのリンクです。
| 行き先: | !
"
'
,
-
.
/
:
<
=
>
?
[
\
]
^
_
|
~
A B C D E F G H I K L M N O P Q R S T U V W X |
|---|
| 行き先: | !
"
'
,
-
.
/
:
<
=
>
?
[
\
]
^
_
|
~
A B C D E F G H I K L M N O P Q R S T U V W X |
|---|
| [ << LilyPond コマンド インデックス ] | [トップ][目次][インデックス][ ? ] | [ >> ] | ||
| [ < LilyPond コマンド インデックス ] | [ 上へ : Top ] | [ > ] | ||
E. LilyPond インデックス
すべての LilyPond コマンドとキーワードに加えて、このインデックスは、それらに関連する音楽用語や単語をリストアップしていて、そのトピックスについて説明しているマニュアルのセクションへのリンクがあります。各リンクは 2 つのパートに分かれています。最初のパートは、マニュアルの中でトピックスが出現する場所へのリンクです。2 番目のパートは、マニュアルの中でトピックスが出現するセクションの先頭へのリンクです。
| 行き先: | !
"
'
,
-
.
/
1
8
:
<
=
>
?
[
\
]
^
_
|
~
そ
ア
オ
コ
ネ
ボ
マ
余
出
実
私
臨
表
調
譜
連
A B C D E F G H I J K L M N O P Q R S T U V W X |
|---|
| 行き先: | !
"
'
,
-
.
/
1
8
:
<
=
>
?
[
\
]
^
_
|
~
そ
ア
オ
コ
ネ
ボ
マ
余
出
実
私
臨
表
調
譜
連
A B C D E F G H I J K L M N O P Q R S T U V W X |
|---|
| [トップ][目次][インデックス][ ? ] |
脚注
[1] Scheme tutorial の中に、Scheme 形式で数、リスト、文字列、それに記号を入力するための簡単な手引きがあります。
| [トップ][目次][インデックス][ ? ] |
目次
- 1. 音楽記譜法
- 2. 専門的な記譜法
- 2.1 声楽
- 2.2 キーボードと他の複数譜の楽器
- 2.3 フレットの無い弦楽器
- 2.4 フレットのある弦楽器
- 2.5 打楽器
- 2.6 管楽器
- 2.7 和音記譜法
- 2.8 現代音楽
- 2.9 Ancient notation
- 2.10 世界の音楽
- 3. 入出力全般
- 4. スペースの問題
- 5. デフォルトを変更する
- A. Notation manual tables
- A.1 Chord name chart
- A.2 Common chord modifiers
- A.3 Predefined string tunings
- A.4 Predefined fretboard diagrams
- A.5 Predefined paper sizes
- A.6 MIDI instruments
- A.7 List of colors
- A.8 The Emmentaler font
- Clef glyphs
- Time Signature glyphs
- Number glyphs
- Accidental glyphs
- Default Notehead glyphs
- Special Notehead glyphs
- Shape-note Notehead glyphs
- Rest glyphs
- Flag glyphs
- Dot glyphs
- Dynamic glyphs
- Script glyphs
- Arrowhead glyphs
- Bracket-tip glyphs
- Pedal glyphs
- Accordion glyphs
- Tie glyphs
- Vaticana glyphs
- Medicaea glyphs
- Hufnagel glyphs
- Mensural glyphs
- Neomensural glyphs
- Petrucci glyphs
- Solesmes glyphs
- Kievan Notation glyphs
- A.9 Note head styles
- A.10 Clef styles
- A.11 Text markup commands
- A.12 Text markup list commands
- A.13 List of special characters
- A.14 List of articulations
- A.15 Percussion notes
- A.16 Technical glossary
- A.17 All context properties
- A.18 Layout properties
- A.19 Available music functions
- A.20 Context modification identifiers
- A.21 Predefined type predicates
- A.22 Scheme functions
- B. カンニング ペーパー
- C. GNU Free Documentation License
- D. LilyPond コマンド インデックス
- E. LilyPond インデックス
| [トップ][目次][インデックス][ ? ] |
このドキュメントについて
This document was generated by Karlin High on 10 月 3, 2017 using texi2html 1.82.
ナビゲーション パネルの中にあるボタンには以下のような意味があります:
| ボタン | 名前 | 行き先 | 1.2.3 からの行き先 |
|---|---|---|---|
| [] | |||
| [ << ] | 大きく戻る | この章あるいは前の章の先頭 | 1 |
| [] | |||
| [トップ] | トップ | ドキュメントの表紙 (先頭) | |
| [目次] | 目次 | 目次 | |
| [インデックス] | インデックス | インデックス | |
| [ ? ] | 情報 | 情報 (ヘルプ) | |
| [] | |||
| [ >> ] | 大きく進む | 次の章 | 2 |
| [] | |||
| [] | |||
| [ < ] | 戻る | 前のセクション | 1.2.2 |
| [] | |||
| [ 上へ ] | 上 | 上のセクション | 1.2 |
| [] | |||
| [ > ] | 進む | 次のセクション | 1.2.4 |
この表で、 行き先 は、現在の位置が以下のような構造を持つドキュメントの サブサブセクション 1-2-3 であると仮定しています:
- 1. セクション 1
- 1.1 サブセクション 1-1
- ...
- 1.2 サブセクション 1-2
- 1.2.1 サブサブセクション 1-2-1
- 1.2.2 サブサブセクション 1-2-2
- 1.2.3 サブサブセクション 1-2-3 <== 現在の位置
- 1.2.4 サブサブセクション 1-2-4
- 1.3 サブセクション 1-3
- ...
- 1.4 サブセクション 1-4
- 1.1 サブセクション 1-1
他の言語: English, català, deutsch, español, français, italiano
About automatic language selection.